Introduction
This document describes how to configure the Unified Computing System (UCS)-M2-HWRAID so an operating system (OS) can use the disks for storage or as bootable disks.
Prerequisites
Requirements
Cisco recommends that you have knowledge of these topics:
- UCS M5 Server
- UCSM 3.2.2b or higher
- Compatible OS in UEFI Mode (minimums follow)
Components Used
The information in this document is based on these software and hardware versions:
- UCS-M2-HWRAID
- 2x m.2 Drives of the same model and capacity
The information in this document was created from the devices in a specific lab environment. All of the devices used in this document started with a cleared (default) configuration. If your network is live, ensure that you understand the potential impact of any command.
Background Information
The UCS-M2-HWRAID holds two m.2 gumsticks; one on each side of the carrier. The UCS-M2-HWRAID and UCS-MSTOR-M2 look similar but in this configuration example hardware RAID requires a UCS-M2-HWRAID controller.
Configure
Check Current Status
1. Check that the necessary parts show in the server's inventory.
In UCSM, navigate to Equipment > Chassis x > Servers > Server x.
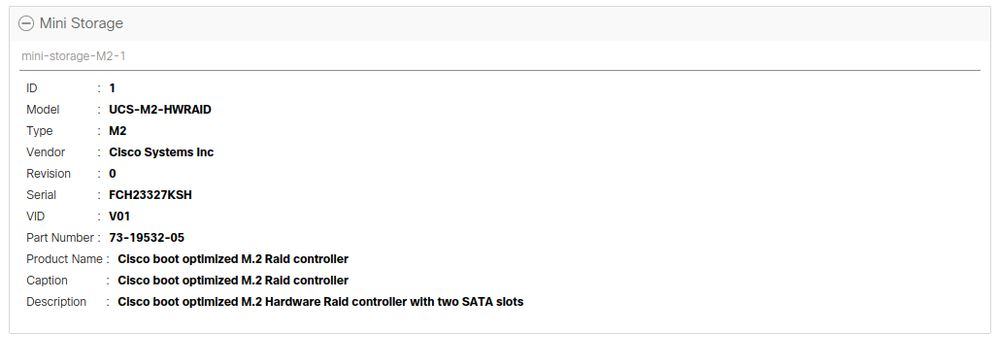
Select the Inventory tab at the top, Motherboard. Select Mini Storage. Ensure that your Model shows as UCS-M2-HWRAID as shown in this image.
2. Check that there are two m.2 drives installed and detected.
Navigate to Inventory > Storage > Disks.
From the drop-down, select Storage Controller Sata 1.
Check what two m.2 disks (253 & 254) are presented, and are in an operable state. On M6 the two m.2 disks will be 245 and 246. The drive state can differ.

3. Check for any orphaned LUNs.
Navigate to Inventory> Storage> LUNs.
Check if there is a drop-down arrow for Storage Controller SATA 1. If not, there is not an orphaned LUN.
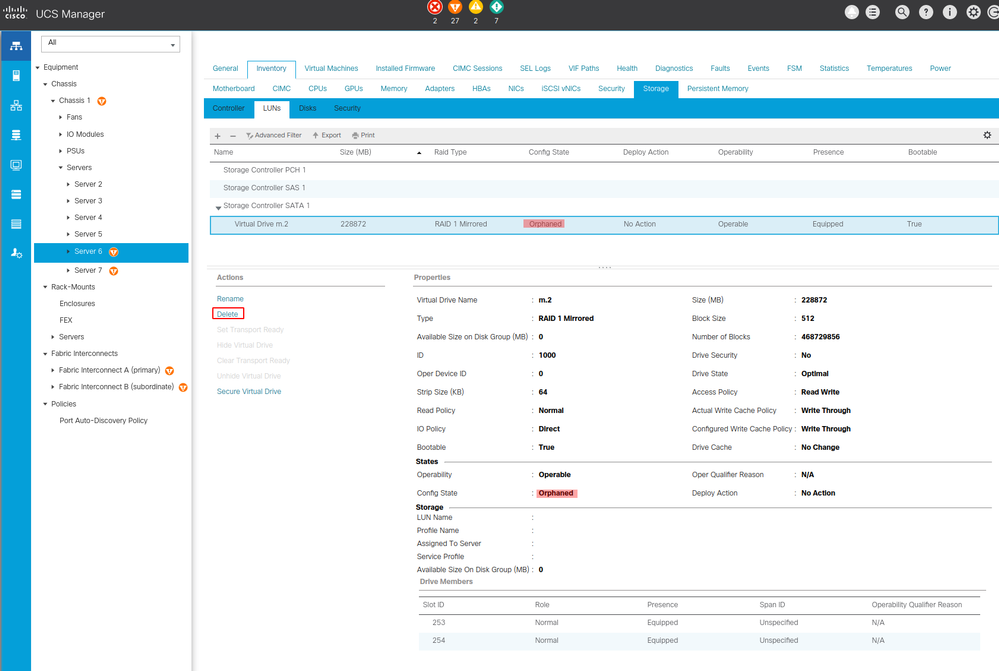
If you see an orphaned LUN, skip to the Troubleshooting section at the bottom before you begin the configuration.
Setup Storage Configuration
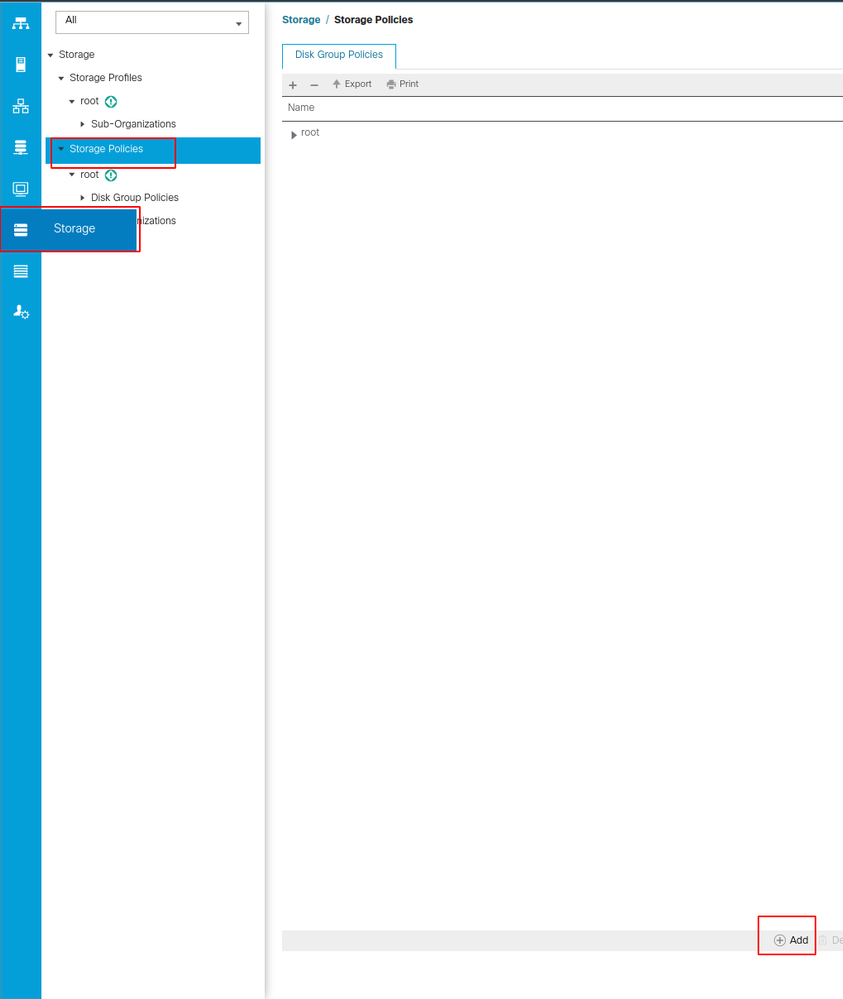
1. First, you need to make a storage policy. Navigate Storage > Storage Policies > Add as shown in the image.
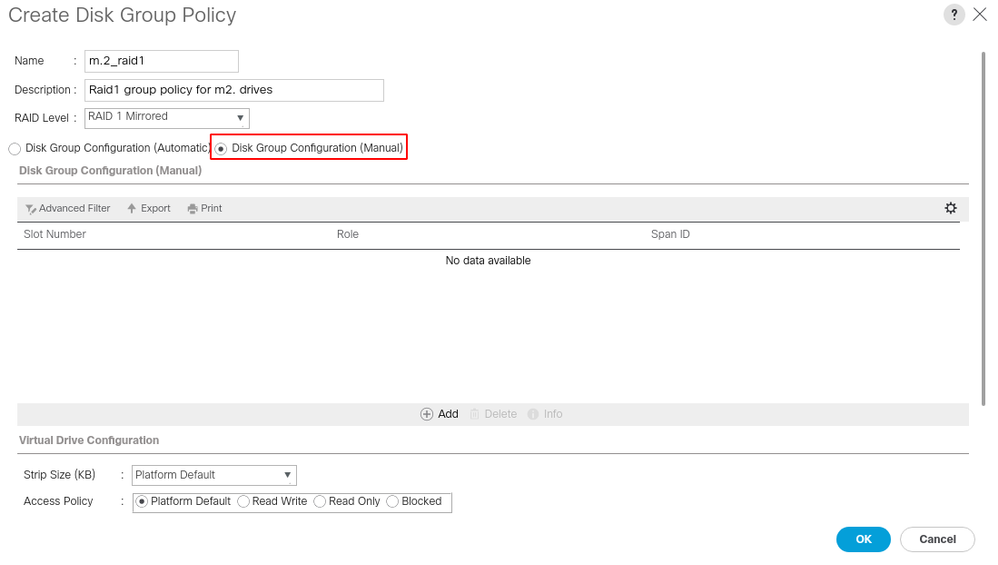
In the Create Disk Group Policy window:
- Enter a name
- Description (optional)
- RAID Level
- RAID1 Mirrored is used in this guide and is the safest option.
- Select the Disk Group Configuration Manual Radio Button.
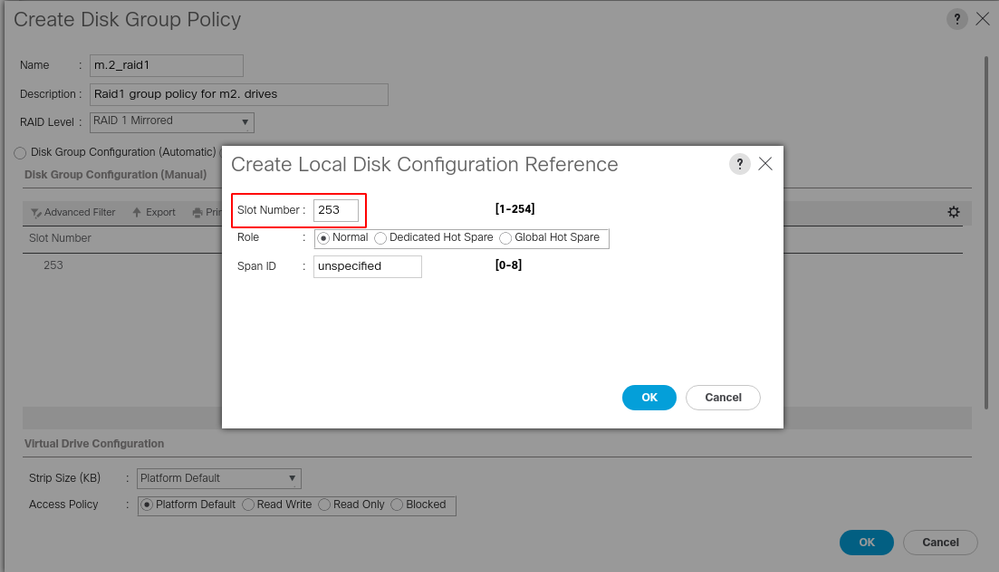
Click the Add Button in the Disk Group Configuration (Manual) box.
This opens a new window Create Local Disk Configuration Reference.
- Slot Number can be set to 253 (the ID of the first m.2. This value can be checked in the prerequisites)
- The role must be Normal
- Leave the Span ID as unspecified
Click OK as shown in this image.
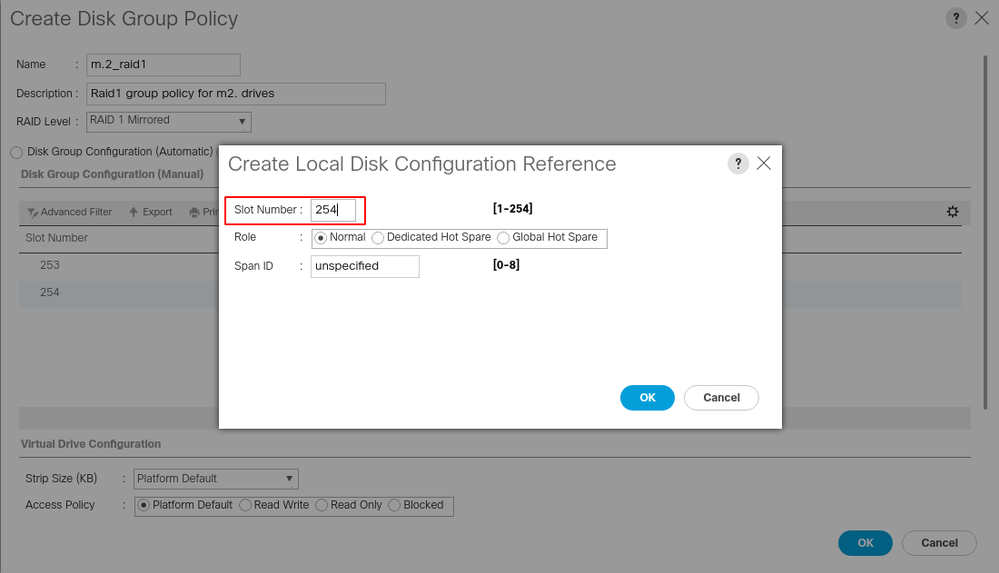
Repeat the last step for the other disk, but use slot number 254 as shown in this image.
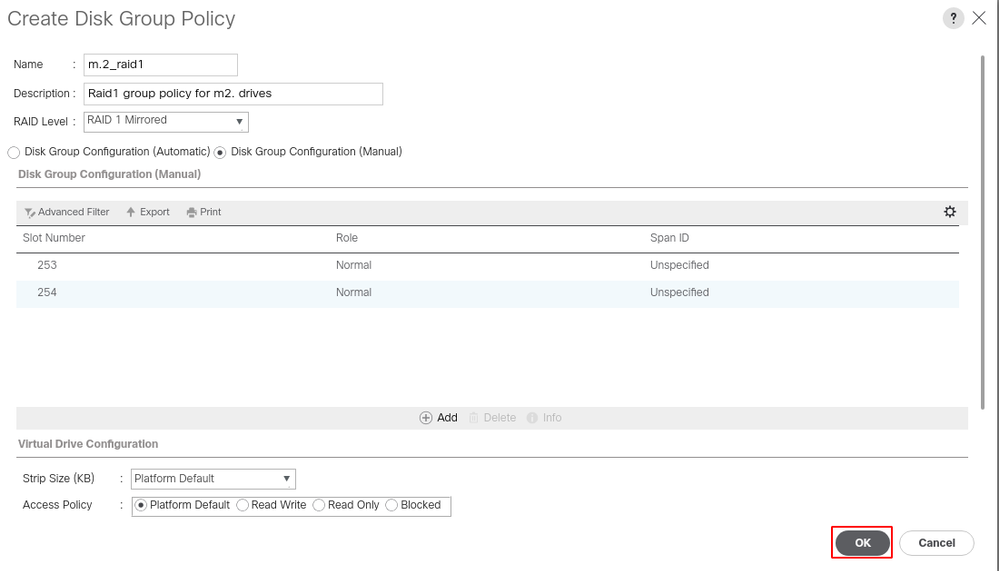
Now your Disk Policy must look like this:
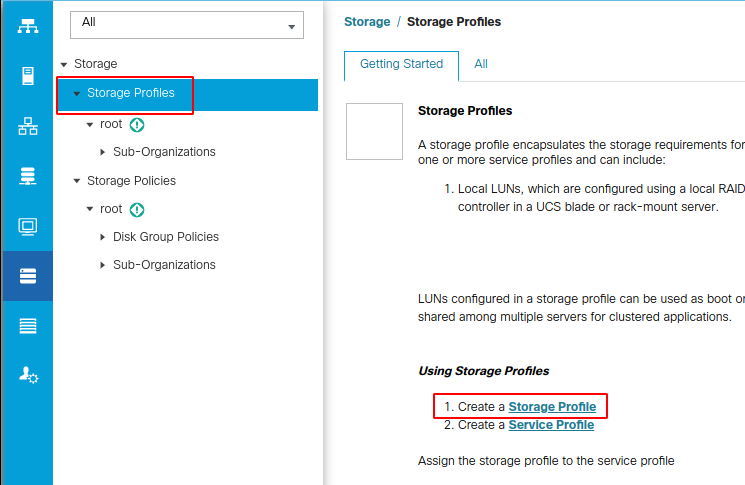
2. Make a Storage Profile.
Navigate to Storage > Storage Profiles > Create a Storage Profile as shown in this image.
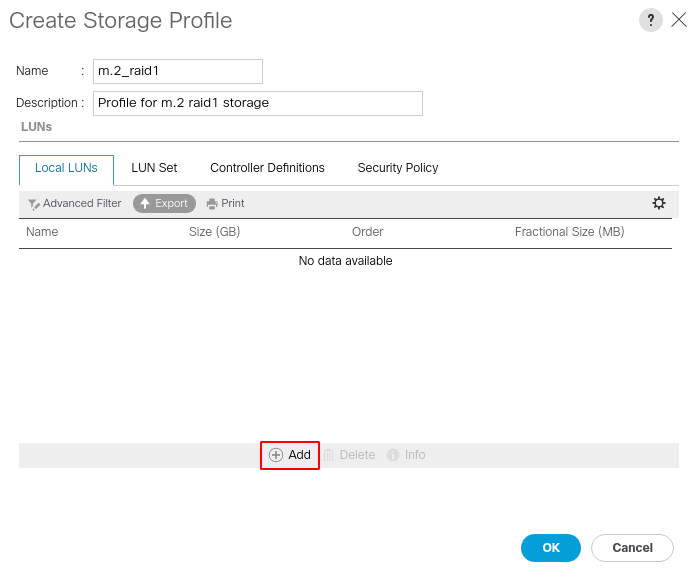
A Create Storage Profile window opens that asks for:
- Name: Enter a logical name
- Description (optional)
- Click the Add button as shown in this image.
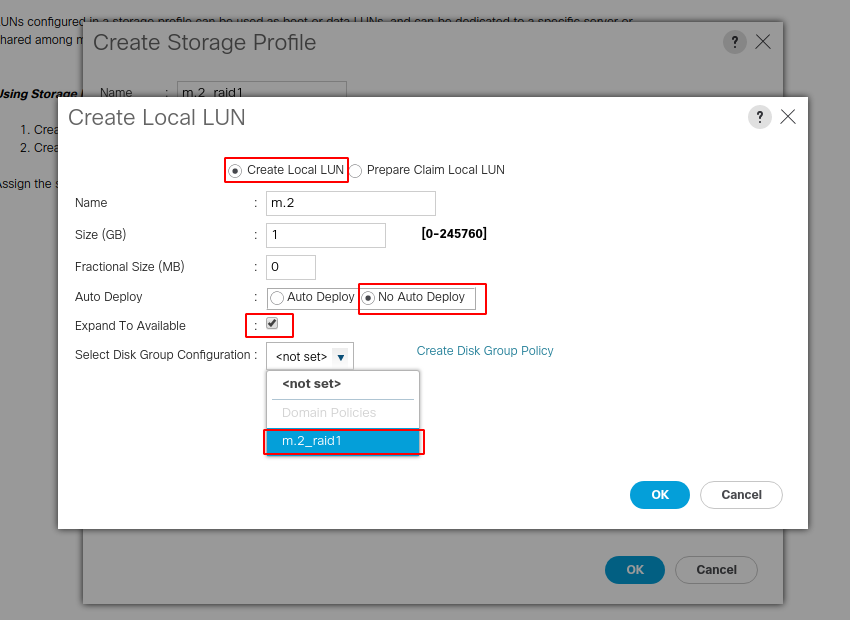
In the Create Local LUN window:
- Select the Create Local LUN radio button
- Give the LUN a name (I used m.2)
- Set the Size to 1
- Set the Fractional Size 0
- Select if you would like to have the LUN auto-deploy (if you select no you have to manually enable the LUN on each service profile)
- Tick the Expand to Available box
- Select the previously made disk group configuration
- Click OK as shown in this image
Your Storage Profile must now look like this:
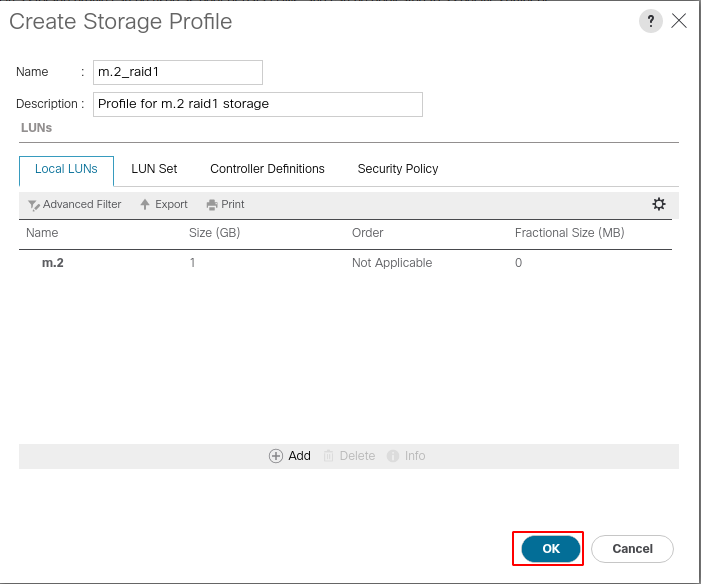
Click OK and you get a message that says the storage profile was successfully created. Push OK on that message to clear it.
3. Apply the Storage Profile
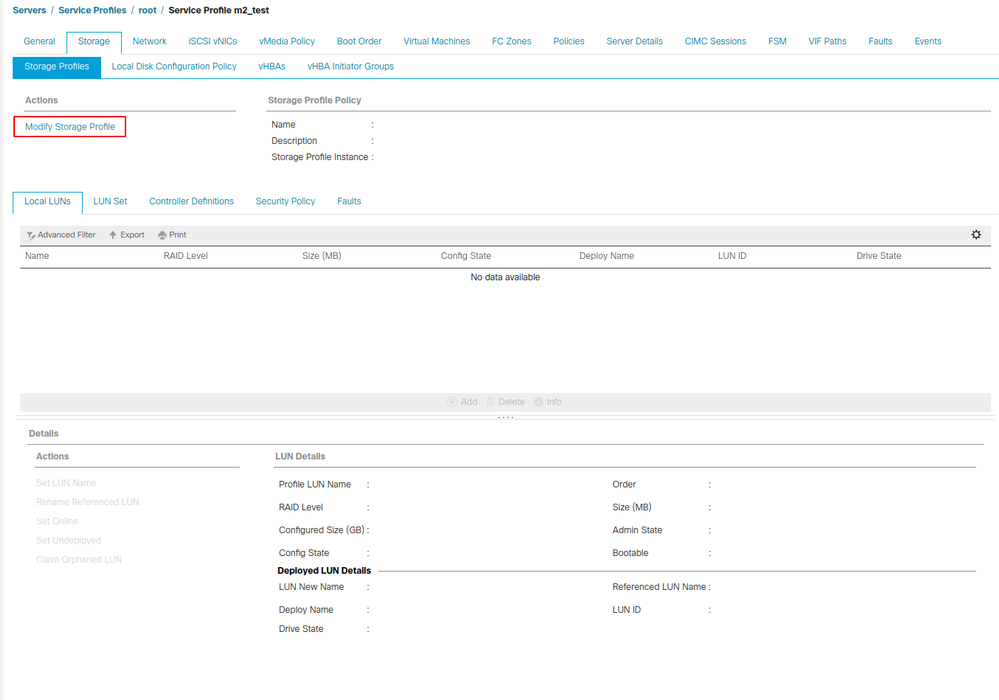
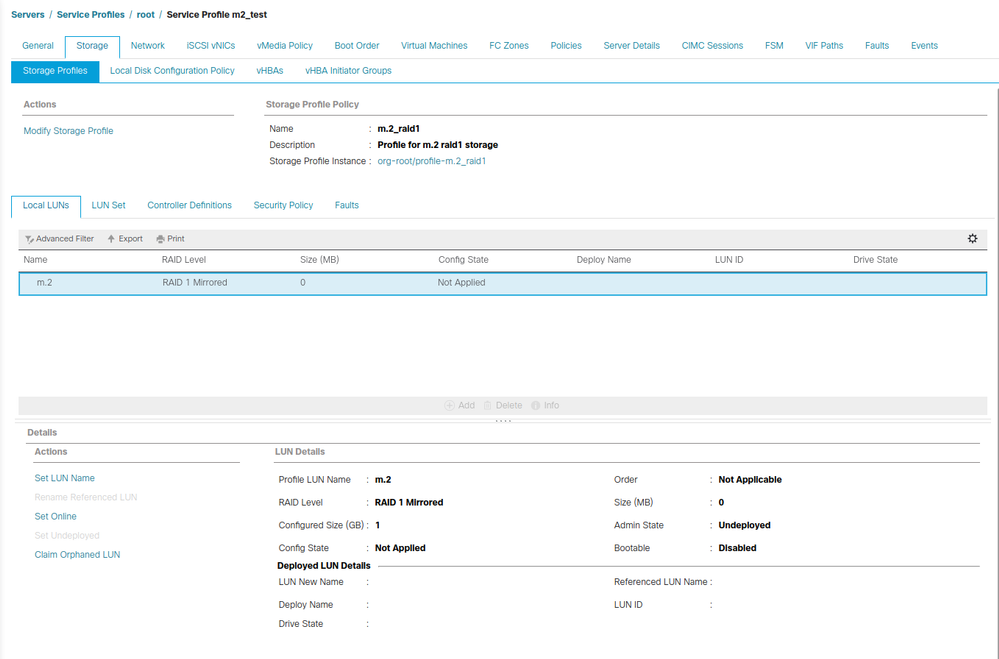
Navigate to Servers > Service Profiles and select your service profile. Click the Storage tab at the top of the service profile as shown in this image.
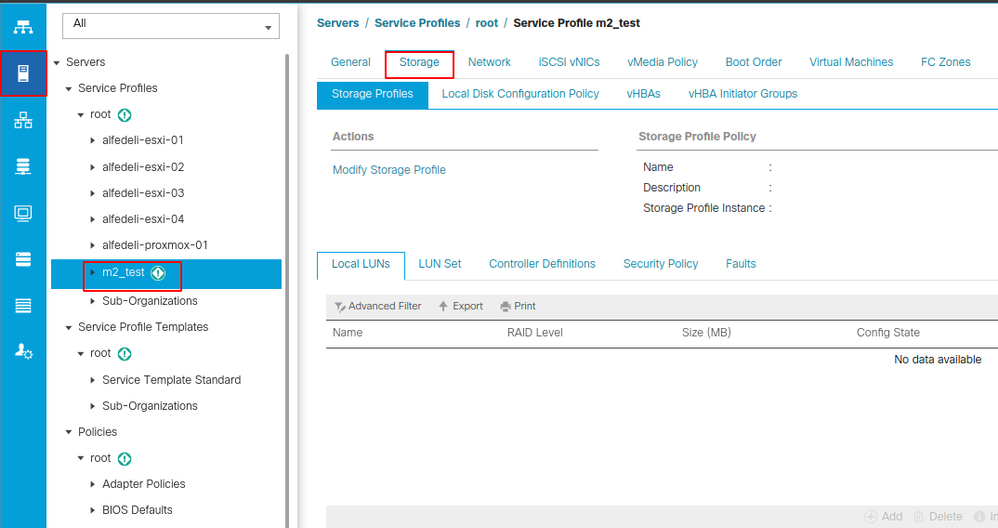
Select the Modify Storage Profile link as shown in this image.
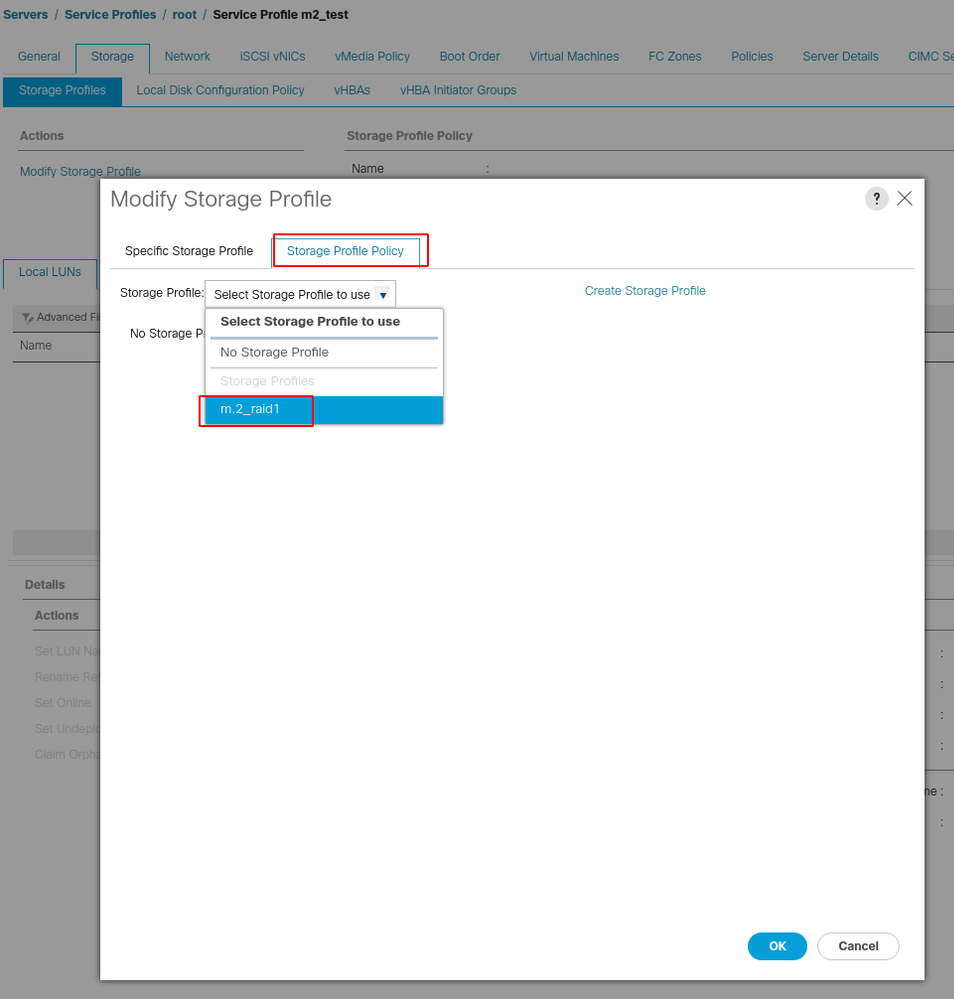
In the Modify Storage Profile Window:
- Select the Storage Profile Policy tab
- In the Storage Profile dropdown, select the previously created profile as shown in this image
Your window must now look like this:
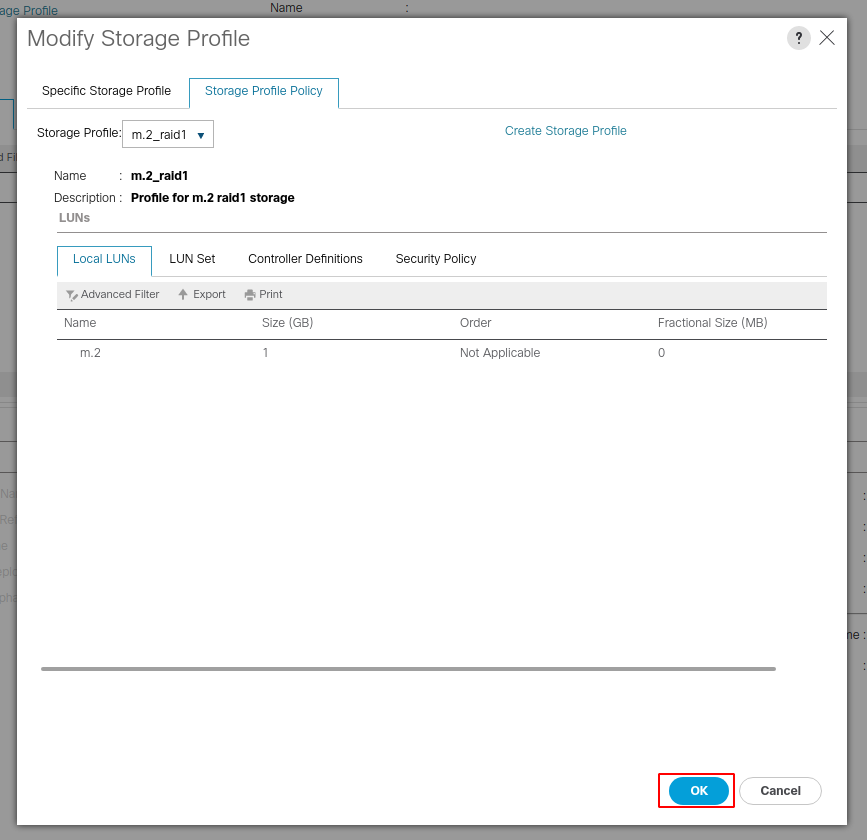
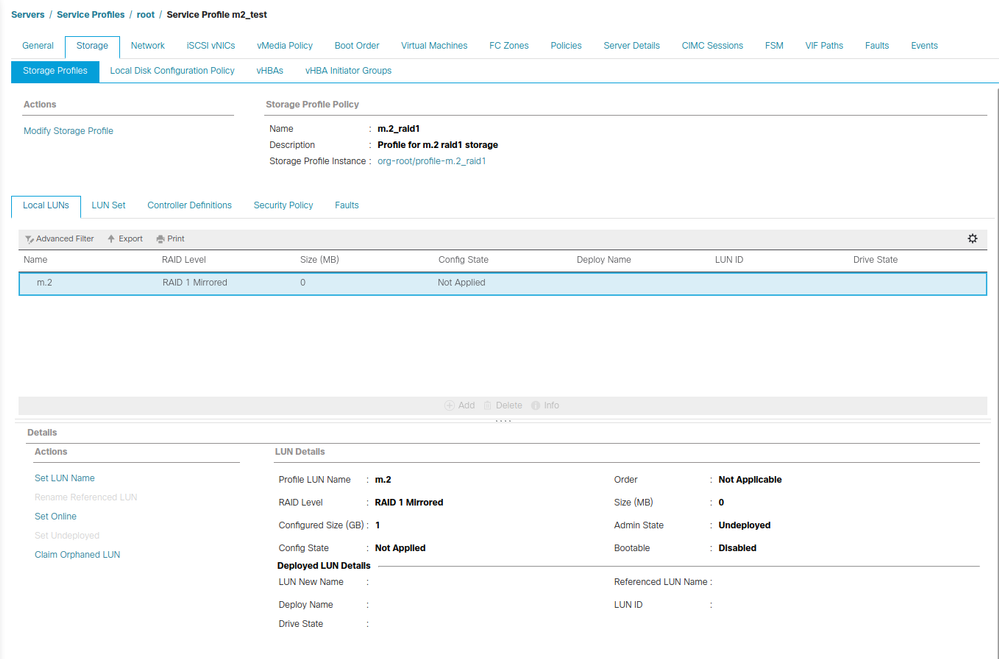
Select OK on the window, and success window.
If auto-deploy is enabled or disabled, ensure the Local LUN is set to online. In order to set the LUN online, click the Set Online button as shown in this image.
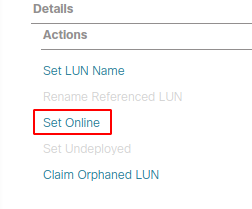
The LUN can take a minute to initialize and come online.
Once the LUN is online, it shows an Applied Config state and the Optimal Drive state.
4. Verify The LUN.
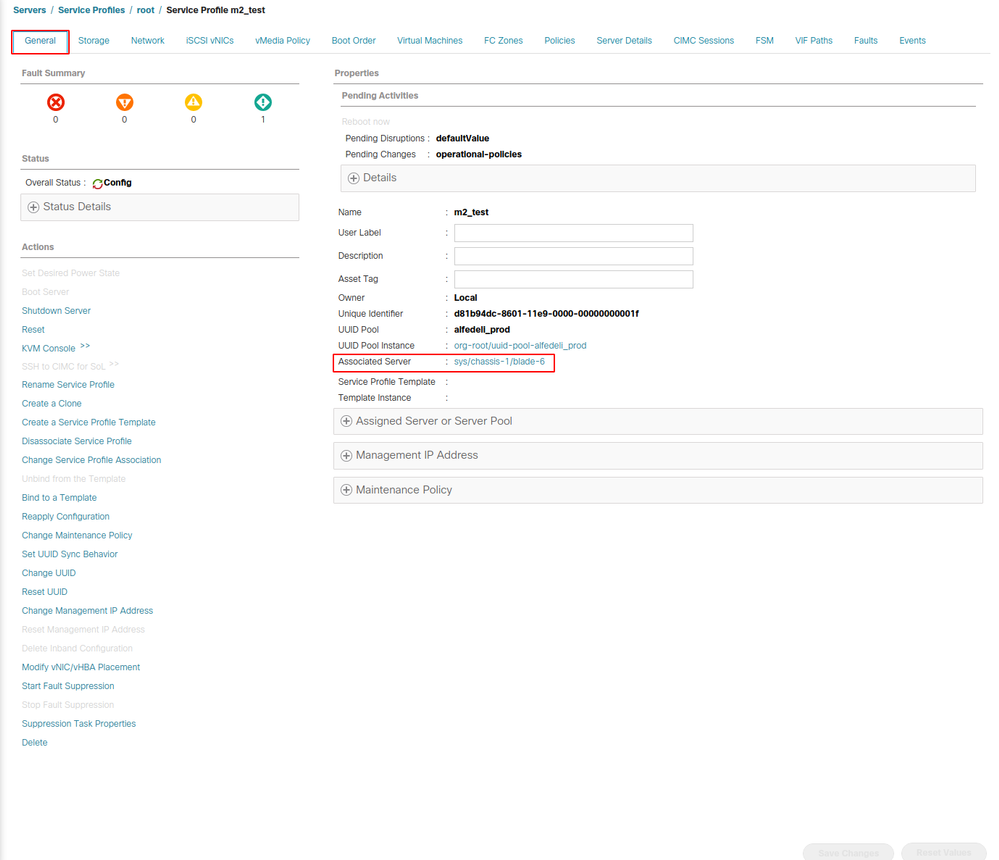
Under the General tab of the service profile, click the link for the Associated Server as shown in this image.
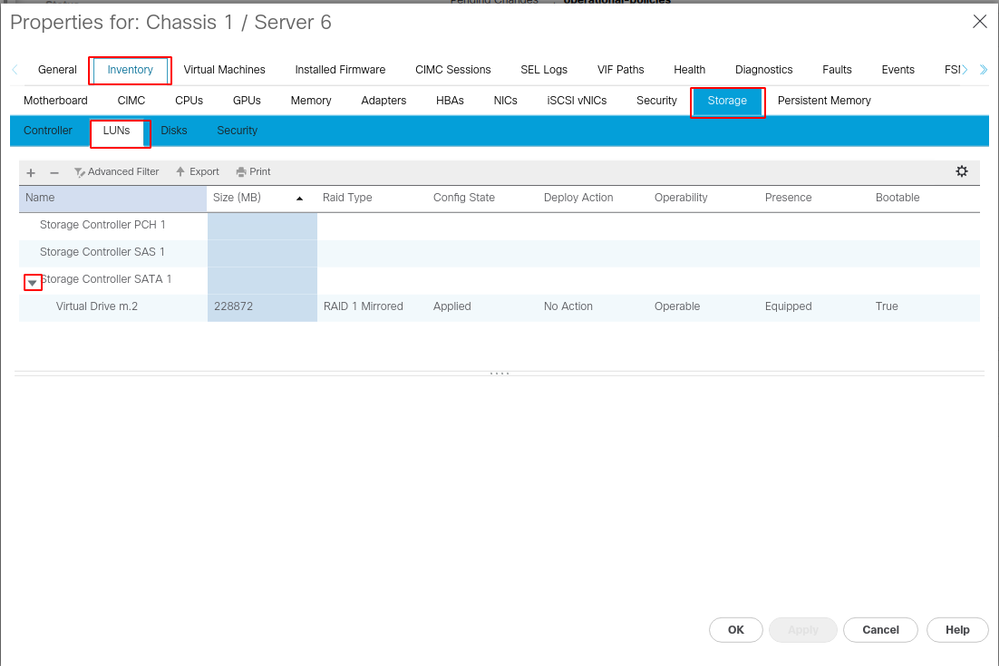
Navigate to Inventory> Storage> LUNs.
Select the drop-down arrow to the left of Storage Controller SATA 1. You must see Virtual Drive [your drive profile name]
The drive must have auto-configured its size, and be in an Operable, Equipped, and Bootable state as shown in this image.
5. Set the Boot Order to boot off the m.2 arrays.
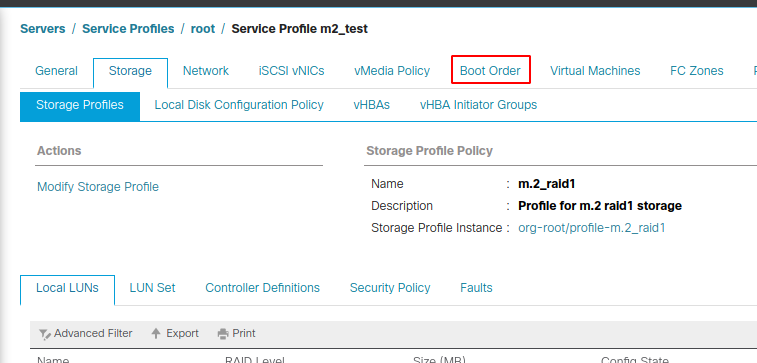
In the service profile, select the Boot Order tab as shown in this image.
Set your boot policy to use Uefi. After your install media (if any), select the Add Local Disk option. Here is an example that the Boot Policy might not match exactly:
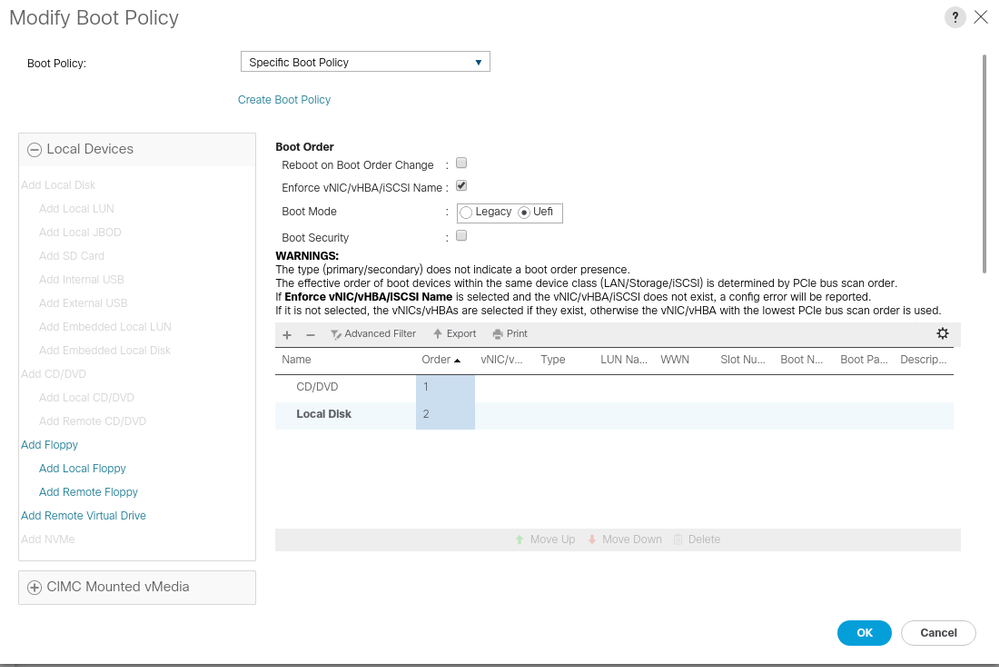
You can need to reboot the host for the configs to apply. This changes the Bootable field from Disabled to Enabled in the Storage Profile.
Verify
Check Inventory > Storage > LUN > Config State is Applied
Troubleshoot
This section provides information you can use in order to troubleshoot your configuration.
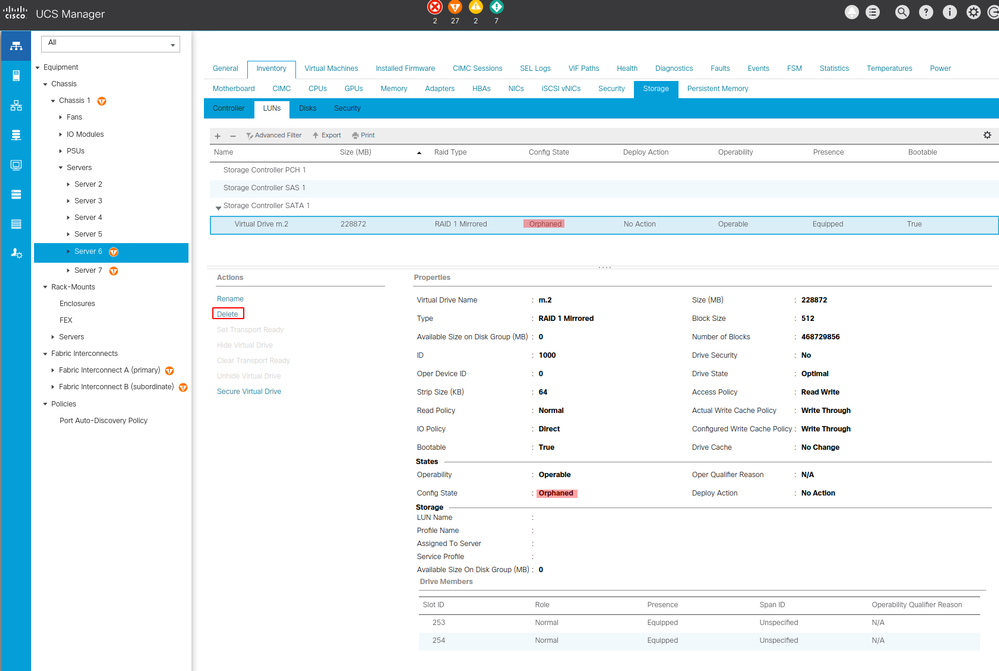
When an orphaned LUN is found, select the LUN and Delete it. This removes any and all data that exists on the array as shown in this image.


 Feedback