Introduction
This document describes how to run the Cisco Unified Computing System (UCS) diagnostics tool in command-line mode without using the Kernel Virtual Machine (KVM).
It leverages the Serial Over Lan (SOL) feature to connect with the diagnostics tool.
Contributed by Ravi Kumar and Saurabh Kalra, Cisco TAC Engineer.
Prerequisites
Requirements
Cisco recommends that you have knowledge of these topics:
- Compatible diagnostics tool: Diagnostics tool image can be downloaded from the Cisco Software Download website for the specific server model.
- Secure Shell (SSH) should be enabled on the Cisco Integrated Management Controller (CIMC) and allowed in the network.
Components Used
The information in this document is based on these software and hardware versions:
- UCS C240-M4
- Server Firmware: 4.0(2f)
- UCS C Series Diagnostics tool version 6.0(2a)
The information in this document was created from the devices in a specific lab environment. All of the devices used in this document started with a cleared (default) configuration. If your network is live, ensure that you understand the potential impact of any command.
Configure
Step 1. Enable Sol
Serial over LAN (SoL) is a mechanism that enables the input and output of the serial port of a managed system to be redirected via an SSH session over IP.
- Log in to CIMC and navigate to Compute > Remote Management > Serial over LAN.
- Enable Serial over LAN.
GUI:

CLI:
Server# scope sol
Server /sol # set enabled yes
Server /sol *# set baud-rate 115200
Server /sol *# commit
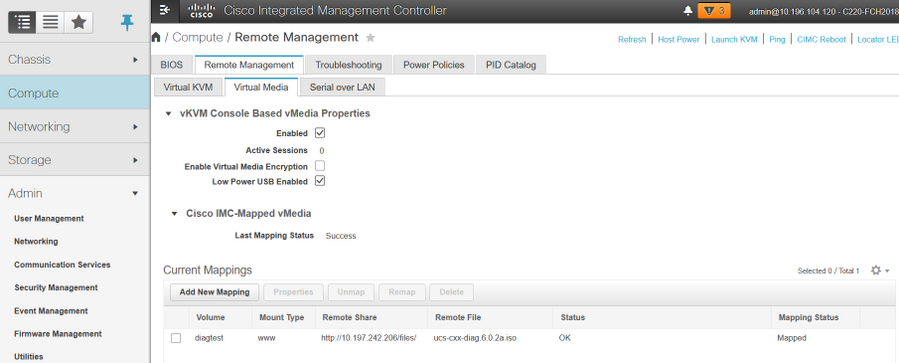
Step 2. Map Diagnostics ISO as CIMC Mapped vMedia Volume.
- Navigate to Compute > Remote Management > Virtual Media.
- Under Cisco-IMC mapped vMedia, Add a new mapping.
- In the Add New Mapping pop-up window, fill in the details of the to create the mapping.
Note: HTTP mount type is used, there are other options like SMB and NFS.
GUI:


Ensure that the mapping status shows OK and Mapping status is Mapped. This means that CIMC has mapped the ISO and can boot the server using this ISO.
Step 3. Configure Boot Order and make Cisco CIMC-Mapped vDVD as Boot Device.
- Navigate to Compute > Bios > Configure Boot Order
- Scroll down to the bottom, click on Configure Boot order.
- A window pop-up on the screen, navigate to the Advanced tab.
- Under Add Boot Device select Add Virtual Media.
- Another window pop-up to fill in the information for Add virtual Media.
- Enter the desired Name and in Sub Type drop-down menu, select CIMC MAPPED DVD.
- Keep the order to 1st Priority and save changes.
CIMC GUI:


Alternatively: if don’t want to change the boot order, Configure One Time Boot Order to CIMC Mapped DVD. This allows the diag-ISO to boot on the next reboot irrespective of the configured boot order.
Now, SoL is enabled, Diagnostics ISO is mapped as CIMC Mapped DVD and boot order is configured, ready to launch SSH session to the CIMC IP and do connect host to re-direct the output on SSH.
- Power cycle the server to boot the diag test tool; Since the diag tool is mounted on CIMC mapped vDVD and configured it as the first boot device (or one-time boot device), the Diag test should boot automatically
- SSH to CIMC IP.

3. Run connect host to connect to the server serial console via SSH (SOL).

4. Wait for output to be redirected to the SOL (SSH Session), please be advised it may not see any activity on the SSH screen while the server is doing bios post and diag tool is booting in the background. Once diag tool has booted, it presents the End-User License Agreement screen (EULA) and that’s when the output starts coming on the SOL (SSH session). It took 3-5 minutes in the lab for the diag tool to boot.

5. After EULA (either press a or hit enter when Accept is highlighted) is accepted, it gets the diag# command line. Commands available are shown in this image.

Note: Ensure that the SSH port used in the SOL configuration is allowed in the network.
Verify
UCS Rack Server Diagnostics v6.0.2a
Left and Right-click the scrollbar to scroll down and up respectively
Press? anytime to see a list of commands/sub-commands available
diag#?
 Cimc                         cimc tests
 clear                          clear commands
 comprehensive       comprehensive test suite
 cpu                            cpu tests
 gui                             enter GUI mode
 memory                    memory tests
 pci                              pci tests
 quick                         quick test suite
 reboot                       reboot the server
 saveusb                   save logs to USB drive
 server                       server information
 show                        show information
 smbios                    show smbios information

diag# show
  analysis                show test analysis
  cpu                         show /proc/cpuinfo
  ecc                         show ecc info
  ipmi                       show ipmi sensor info
  log                         show test log
  memory                show /proc/memory
  performance       show processor perf ctr monitor info
  sel                         show sel log
  spd                       show dimm spd info
  status                   show test status
  temperature        show system temperature info
  version                 blade diagnostics software version
In order to check the DIag tool version:
diag# show version
6.0.2a
