IPsec Between a VPN 3000 Concentrator and a VPN Client 4.x for Windows using RADIUS for User Authentication and Accounting Configuration Example
Available Languages
Contents
Introduction
This document describes how to establish an IPsec tunnel between a Cisco VPN 3000 Concentrator and a Cisco VPN Client 4.x for Microsoft Windows that uses RADIUS for user authentication and accounting. This document recommends the Cisco Secure Access Control Server (ACS) for Windows for the easier RADIUS configuration to authenticate users that connect to a VPN 3000 Concentrator. A group on a VPN 3000 Concentrator is a collection of users treated as a single entity. The configuration of groups, as opposed to individual users, can simplify system management and streamline configuration tasks.
Refer to PIX/ASA 7.x and Cisco VPN Client 4.x for Windows with Microsoft Windows 2003 IAS RADIUS Authentication Configuration Example in order to set up the remote access VPN connection between a Cisco VPN Client (4.x for Windows) and the PIX 500 Series Security Appliance 7.x that uses a Microsoft Windows 2003 Internet Authentication Service (IAS) RADIUS server.
Refer to Configuring IPsec Between a Cisco IOS Router and a Cisco VPN Client 4.x for Windows Using RADIUS for User Authentication in order to configure a connection between a router and the Cisco VPN Client 4.x that uses RADIUS for user authentication.
Prerequisites
Requirements
Cisco recommends that you have knowledge of these topics:
-
Cisco Secure ACS for Windows RADIUS is installed and operates properly with other devices.
-
The Cisco VPN 3000 Concentrator is configured and can be managed with the HTML interface.
Components Used
The information in this document is based on these software and hardware versions:
-
Cisco Secure ACS for Windows with version 4.0
-
Cisco VPN 3000 Series Concentrator with image file 4.7.2.B
-
Cisco VPN Client 4.x
The information in this document was created from the devices in a specific lab environment. All of the devices used in this document started with a cleared (default) configuration. If your network is live, make sure that you understand the potential impact of any command.
Conventions
Refer to the Cisco Technical Tips Conventions for more information on document conventions.
Configure
In this section, you are presented with the information to configure the features described in this document.
Note: Use the Command Lookup Tool (registered customers only) to obtain more information on the commands used in this section.
Network Diagram
This document uses this network setup:

Note: The IP addressing schemes used in this configuration are not legally routable on the Internet. They are RFC 1918 ![]() addresses which have been used in a lab environment.
addresses which have been used in a lab environment.
Use Groups on the VPN 3000 Concentrator
Groups can be defined for both Cisco Secure ACS for Windows and the VPN 3000 Concentrator, but they use groups somewhat differently. Perform these tasks in order to simplify things:
-
Configure a single group on the VPN 3000 Concentrator for when you establish the initial tunnel. This is often called the Tunnel Group and it is used to establish an encrypted Internet Key Exchange (IKE) session to the VPN 3000 Concentrator using a pre-shared key (the group password). This is the same group name and password that should be configured on all Cisco VPN Clients that want to connect to the VPN Concentrator.
-
Configure groups on the Cisco Secure ACS for Windows server that use standard RADIUS Attributes and Vendor Specific Attributes (VSAs) for policy management. The VSAs that should be used with the VPN 3000 Concentrator are the RADIUS (VPN 3000) attributes.
-
Configure users on the Cisco Secure ACS for Windows RADIUS server and assign them to one of the groups configured on the same server. The users inherit attributes defined for their group and Cisco Secure ACS for Windows sends those attributes to VPN Concentrator when the user is authenticated.
How the VPN 3000 Concentrator Uses Group and User Attributes
After the VPN 3000 Concentrator authenticates the Tunnel Group with the VPN Concentrator and the user with RADIUS, it must organize the attributes it has received. The VPN Concentrator uses the attributes in this order of preference, whether the authentication is done in the VPN Concentrator or with RADIUS:
-
User attributes—These attributes always take precedence over any others.
-
Tunnel Group attributes—Any attributes not returned when the user was authenticated are filled in by the Tunnel Group attributes.
-
Base Group attributes—Any attributes missing from the user or Tunnel Group attributes are filled in by the VPN Concentrator Base Group attributes.
VPN 3000 Series Concentrator Configuration
Complete the procedure in this section in order to configure a Cisco VPN 3000 Concentrator for the parameters required to the IPsec connection as well as the AAA client for the VPN user to authenticate with the RADIUS server.
In this lab setting, the VPN Concentrator is first accessed through the console port and a minimal configuration is added as this output shows:
Login: admin

!--- The password must be "admin".

Password:*****

                Welcome to
               Cisco Systems
       VPN 3000 Concentrator Series
          Command Line Interface
Copyright (C) 1998-2005 Cisco Systems, Inc.

1) Configuration
2) Administration
3) Monitoring
4) Save changes to Config file
5) Help Information
6) Exit

Main -> 1

1) Interface Configuration
2) System Management
3) User Management
4) Policy Management
5) Tunneling and Security
6) Back

Config -> 1

This table shows current IP addresses.

  Intf         Status       IP Address/Subnet Mask          MAC Address
-------------------------------------------------------------------------------
Ether1-Pri|       DOWN   |       10.1.1.1/255.255.255.0  | 00.03.A0.89.BF.D0
Ether2-Pub|Not Configured|        0.0.0.0/0.0.0.0        |
Ether3-Ext|Not Configured|        0.0.0.0/0.0.0.0        |
-------------------------------------------------------------------------------
DNS Server(s): DNS Server Not Configured
DNS Domain Name:
Default Gateway: Default Gateway Not Configured

1) Configure Ethernet #1 (Private)
2) Configure Ethernet #2 (Public)
3) Configure Ethernet #3 (External)
4) Configure Power Supplies
5) Back

Interfaces -> 1

1) Interface Setting (Disable, DHCP or Static IP)
2) Set Public Interface
3) Select IP Filter
4) Select Ethernet Speed
5) Select Duplex
6) Set MTU
7) Set Port Routing Config
8) Set Bandwidth Management
9) Set Public Interface IPSec Fragmentation Policy
10) Set Interface WebVPN Parameters
11) Back

Ethernet Interface 1 -> 1

1) Disable
2) Enable using DHCP Client
3) Enable using Static IP Addressing

Ethernet Interface 1 -> [ ] 3

This table shows current IP addresses.

  Intf         Status       IP Address/Subnet Mask          MAC Address
-------------------------------------------------------------------------------
Ether1-Pri|       DOWN   |       10.1.1.1/255.255.255.0  | 00.03.A0.89.BF.D0
Ether2-Pub|Not Configured|        0.0.0.0/0.0.0.0        |
Ether3-Ext|Not Configured|        0.0.0.0/0.0.0.0        |
-------------------------------------------------------------------------------
DNS Server(s): DNS Server Not Configured
DNS Domain Name:
Default Gateway: Default Gateway Not Configured

> Enter IP Address

Ethernet Interface 1 -> [ 10.1.1.1 ] 172.16.124.1


20 02/14/2007 09:50:18.830 SEV=3 IP/2 RPT=3
IP Interface 1 status changed to Link Down.

21 02/14/2007 09:50:18.830 SEV=3 IP/1 RPT=3
IP Interface 1 status changed to Link Up.

22 02/14/2007 09:50:18.950 SEV=3 IP/1 RPT=4
IP Interface 1 status changed to Link Up.
> Enter Subnet Mask

23 02/14/2007 09:50:19.460 SEV=3 IP/2 RPT=4
IP Interface 1 status changed to Link Down.

Ethernet Interface 1 -> [ 255.255.255.0 ]

1) Interface Setting (Disable, DHCP or Static IP)
2) Set Public Interface
3) Select IP Filter
4) Select Ethernet Speed
5) Select Duplex
6) Set MTU
7) Set Port Routing Config
8) Set Bandwidth Management
9) Set Public Interface IPSec Fragmentation Policy
10) Set Interface WebVPN Parameters
11) Back

Ethernet Interface 1 -> 11

This table shows current IP addresses.

  Intf         Status       IP Address/Subnet Mask          MAC Address
-------------------------------------------------------------------------------
Ether1-Pri|       Up     |   172.16.124.1/255.255.255.0  | 00.03.A0.89.BF.D0
Ether2-Pub|Not Configured|        0.0.0.0/0.0.0.0        |
Ether3-Ext|Not Configured|        0.0.0.0/0.0.0.0        |
-------------------------------------------------------------------------------
DNS Server(s): DNS Server Not Configured
DNS Domain Name:
Default Gateway: Default Gateway Not Configured

1) Configure Ethernet #1 (Private)
2) Configure Ethernet #2 (Public)
3) Configure Ethernet #3 (External)
4) Configure Power Supplies
5) Back

Interfaces ->
The VPN Concentrator appears in Quick Configuration, and these items are configured.
-
Time/Date
-
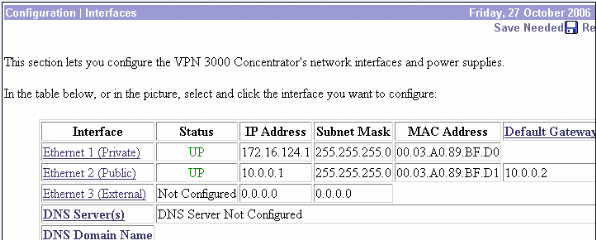
Interfaces/Masks in Configuration > Interfaces (public=10.0.0.1/24, private=172.16.124.1/24)
-
Default Gateway in Configuration > System > IP routing > Default_Gateway (10.0.0.2)
At this point, the VPN Concentrator is accessible through HTML from the inside network.
Note: If the VPN Concentrator is managed from outside, you also perform these steps:
-
Choose Configuration > 1-Interfaces > 2-Public > 4-Select IP Filter > 1. Private (Default).
-
Choose Administration > 7-Access Rights > 2-Access Control List > 1-Add Manager Workstation in order to add the IP address of the external manager.
These steps are only required if you manage the VPN Concentrator from outside.
Once you have completed these two steps, the rest of the configuration can be done through the GUI by using a web browser and connecting to the IP of the interface you just configured. In this example and at this point, the VPN Concentrator is accessible through HTML from the inside network:
-
Choose Configuration > Interfaces in order to recheck the interfaces after you bring up the GUI.
-
Complete these steps in order to add the Cisco Secure ACS for Windows RADIUS server to the VPN 3000 Concentrator configuration.
-
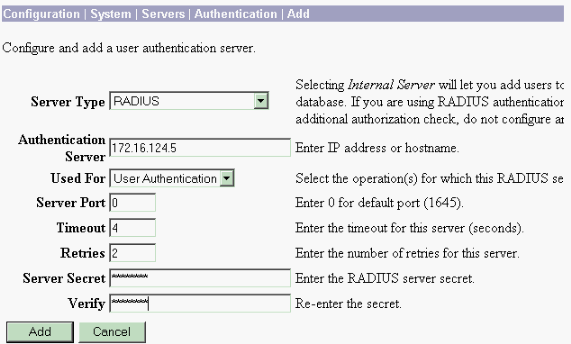
Choose Configuration > System > Servers > Authentication, and click Add from the left menu.
-
Choose the server type RADIUS and add these parameters for your Cisco Secure ACS for Windows RADIUS server. Leave all other parameters in their default state.
-
Authentication Server—Enter the IP address of your Cisco Secure ACS for Windows RADIUS server.
-
Server Secret—Enter the RADIUS server secret. This must be the same secret you use when you configure the VPN 3000 Concentrator in the Cisco Secure ACS for Windows configuration.
-
Verify—Re-enter the password for verification.
This adds the authentication server in the global configuration of the VPN 3000 Concentrator. This server is used by all groups except for when an authentication server has been specifically defined. If an authentication server is not configured for a group, it reverts to the global authentication server.
-
-
-
Complete these steps in order to configure the Tunnel Group on the VPN 3000 Concentrator.
-
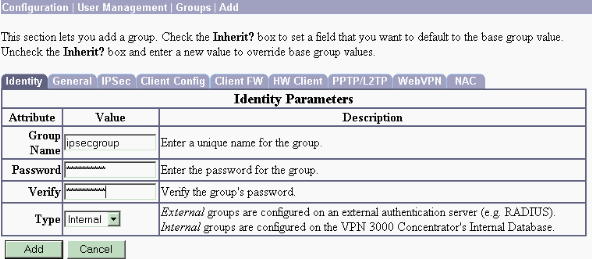
Choose Configuration > User Management > Groups from the left menu and click Add.
-
Change or add these parameters in the Configuration tabs. Do not click Apply until you change all of these parameters:
Note: These parameters are the minimum needed for remote access VPN connections. These parameters also assume the default settings in the Base Group on the VPN 3000 Concentrator have not been changed.
Identity
-
Group Name—Type a group name. For example, IPsecUsers.
-
Password—Enter a password for the group. This is the pre-shared key for the IKE session.
-
Verify—Re-enter the password for verification.
-
Type—Leave this as the default: Internal.
IPsec
-
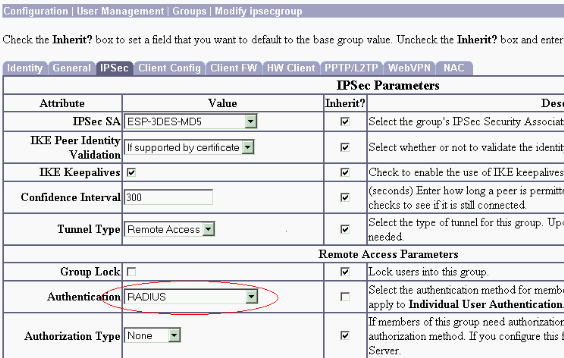
Tunnel Type—Choose Remote-Access.
-
Authentication—RADIUS. This tells the VPN Concentrator what method to use to authenticate users.
-
Mode Config—Check Mode Config.
-
-
Click Apply.
-
-
Complete these steps in order to configure multiple authentication servers on the VPN 3000 Concentrator.
-
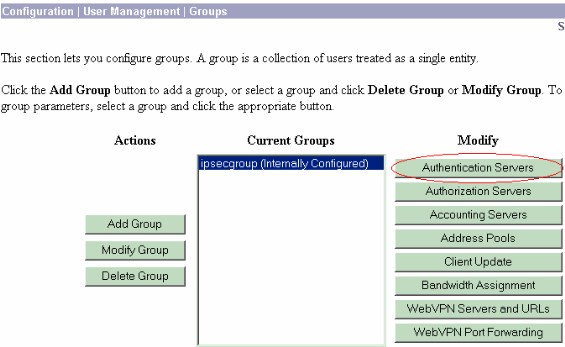
Once the group is defined, highlight that group, and click Authentication Servers under the Modify column. Individual authentication servers can be defined for each group even if these servers do not exist in the global servers.
-
Choose the server type RADIUS, and add these parameters for your Cisco Secure ACS for Windows RADIUS server. Leave all other parameters in their default state.
-
Authentication Server—Enter the IP address of your Cisco Secure ACS for Windows RADIUS server.
-
Server Secret—Enter the RADIUS server secret. This must be the same secret you use when you configure the VPN 3000 Concentrator in the Cisco Secure ACS for Windows configuration.
-
Verify—Re-enter the password for verification.
-
-
-
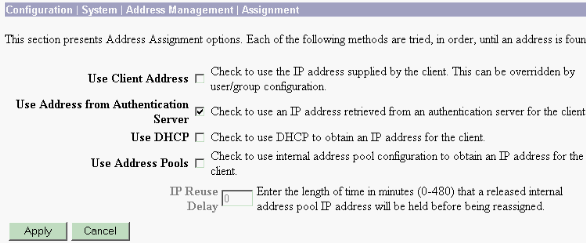
Choose Configuration > System > Address Management > Assignment and check Use Address from Authentication Server in order to assign the IP address to the VPN Clients from the IP pool created in the RADIUS server once the client gets authenticated.
RADIUS Server Configuration
This section of the document describes the procedure required to configure the Cisco Secure ACS as a RADIUS server for VPN Client user authentication forwarded by the Cisco VPN 3000 Series Concentrator - AAA client.
Double-click the ACS Admin icon in order to start the admin session on the PC that runs the Cisco Secure ACS for Windows RADIUS server. Log in with the proper username and password, if required.
-
Complete these steps in order to add the VPN 3000 Concentrator to the Cisco Secure ACS for Windows server configuration.
-
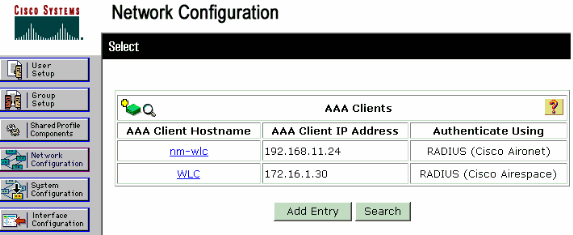
Choose Network Configuration and click Add Entry in order to add an AAA client to the RADIUS server.
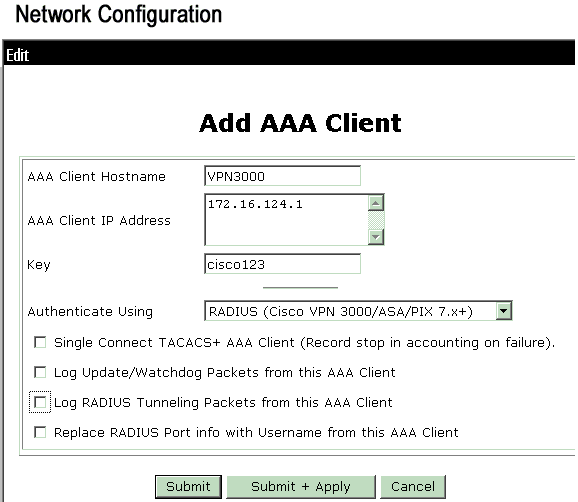
Add these parameters for your VPN 3000 Concentrator:
-
AAA Client Hostname—Enter the hostname of your VPN 3000 Concentrator (for DNS resolution).
-
AAA Client IP Address—Enter the IP address of your VPN 3000 Concentrator.
-
Key—Enter the RADIUS server secret. This must be the same secret you configured when you added the Authentication Server on the VPN Concentrator.
-
Authenticate Using—Choose RADIUS (Cisco VPN 3000/ASA/PIX 7.x+). This allows the VPN 3000 VSAs to display in the Group configuration window.
-
-
Click Submit.
-
Choose Interface Configuration, click RADIUS (Cisco VPN 3000/ASA/PIX 7.x+), and check Group [26] Vendor-Specific.
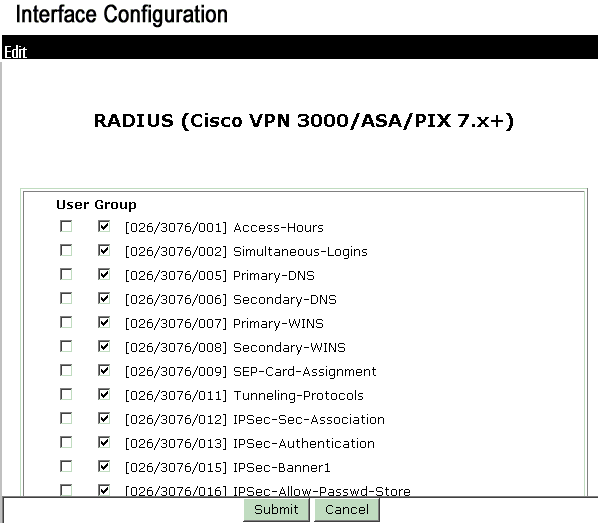
Note: 'RADIUS attribute 26' refers to all vendor specific attributes. For example, choose Interface Configuration > RADIUS (Cisco VPN 3000) and see that all of the available attributes start with 026. This shows that all of these vendor specific attributes fall under the IETF RADIUS 26 standard. These attributes do not show up in User or Group setup by default. In order to show up in the Group setup, create an AAA client (in this case VPN 3000 Concentrator) that authenticates with RADIUS in the network configuration. Then check the attributes that need to appear in User Setup, Group Setup, or both from the Interface configuration.
Refer to RADIUS Attributes for more information on the available attributes and their usage.
-
Click Submit.
-
-
Complete these steps in order to add groups to the Cisco Secure ACS for Windows configuration.
-
Choose Group Setup, then select one of the template groups, for example, Group 1, and click Rename Group.
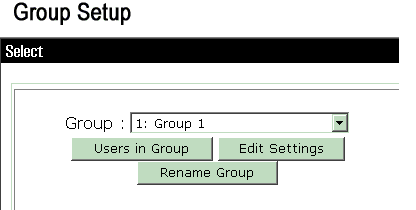
Change the name to something appropriate for your organization., for example, ipsecgroup. Since users are added to these groups, make the group name reflect the actual purpose of that group. If all users are put into the same group, you can call it VPN Users Group.
-
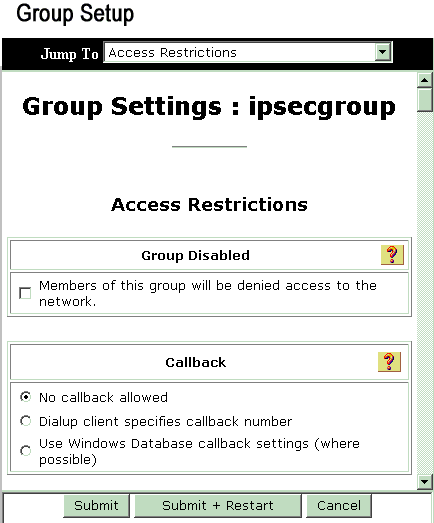
Click Edit Settings in order to edit the parameters in your newly renamed group.
-
Click Cisco VPN 3000 RADIUS and configure these recommended attributes. This allows users assigned to this group to inherit the Cisco VPN 3000 RADIUS attributes, which allows you to centralize policies for all users in Cisco Secure ACS for Windows.
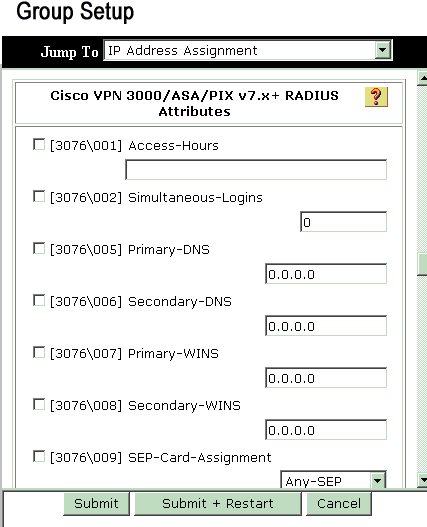
Note: Technically, VPN 3000 RADIUS attributes are not required to be configured as long as the Tunnel Group is set up in step 3 of the VPN 3000 Series Concentrator Configuration and the Base Group in the VPN Concentrator does not change from the original default settings.
Recommended VPN 3000 Attributes:
-
Primary-DNS—Enter the IP address of your Primary DNS server.
-
Secondary-DNS—Enter the IP address of your Secondary DNS server.
-
Primary-WINS—Enter the IP address of your Primary WINS server.
-
Secondary-WINS—Enter the IP address of your Secondary WINS server.
-
Tunneling-Protocols—Choose IPsec. This allows only IPsec client connections. PPTP or L2TP are not allowed.
-
IPsec-Sec-Association—Enter ESP-3DES-MD5. This ensures all your IPsec clients connect with the highest encryption available.
-
IPsec-Allow-Password-Store—Choose Disallow so users are not allowed to save their password in the VPN Client.
-
IPsec-Banner—Enter a welcome message banner to be presented to the user upon connection. For example, "Welcome to MyCompany employee VPN access!"
-
IPsec-Default Domain—Enter the domain name of your company. For example, "mycompany.com".
This set of attributes is not necessary. But if you are unsure if the Base Group attributes of the VPN 3000 Concentrator have changed, then Cisco recommends that you configure these attributes:
-
Simultaneous-Logins—Enter the number of times you allow a user to simultaneously log in with the same username. The recommendation is 1 or 2.
-
SEP-Card-Assignment—Choose Any-SEP.
-
IPsec-Mode-Config—Choose ON.
-
IPsec over UDP—Choose OFF, unless you want users in this group to connect using IPsec over the UDP protocol. If you select ON, the VPN Client still has the ability to locally disable IPsec over UDP and connect normally.
-
IPsec over UDP Port—Select a UDP port number in the range of 4001 through 49151. This is used only if IPsec over UDP is ON.
The next set of attributes requires that you set something up on the VPN Concentrator first before you can use them. This is only recommended for advanced users.
-
Access-Hours—This requires you to set up a range of Access Hours on the VPN 3000 Concentrator under Configuration > Policy Management. Instead, use Access Hours available in Cisco Secure ACS for Windows to manage this attribute.
-
IPsec-Split-Tunnel-List—This requires you to set up a Network List on the VPN Concentrator under Configuration > Policy Management > Traffic Management. This is a list of networks sent down to the client that tell the client to encrypt data to only those networks in the list.
-
-
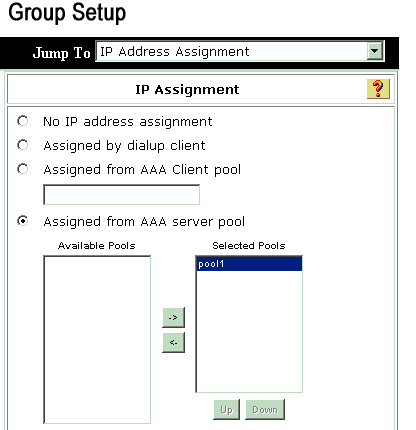
Choose IP assignment in Group setup and check Assigned from AAA server Pool in order to assign the IP addresses to VPN Client users once they are get authenticated.
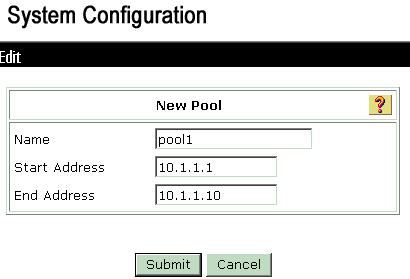
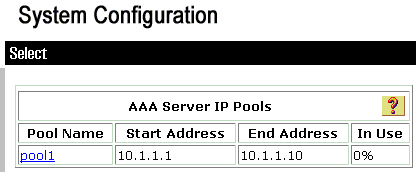
Choose System configuration > IP pools in order to create a IP pool for VPN Client users and click Submit .
-
Choose Submit > Restart in order to save the configuration and activate the new group.
-
Repeat these steps in order to add more groups.
-
-
Configure Users on Cisco Secure ACS for Windows.
-
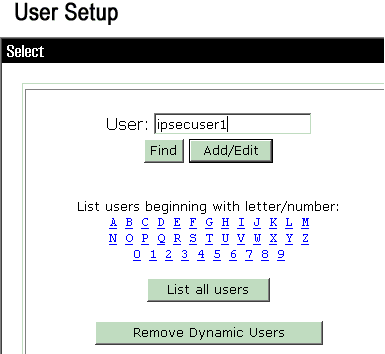
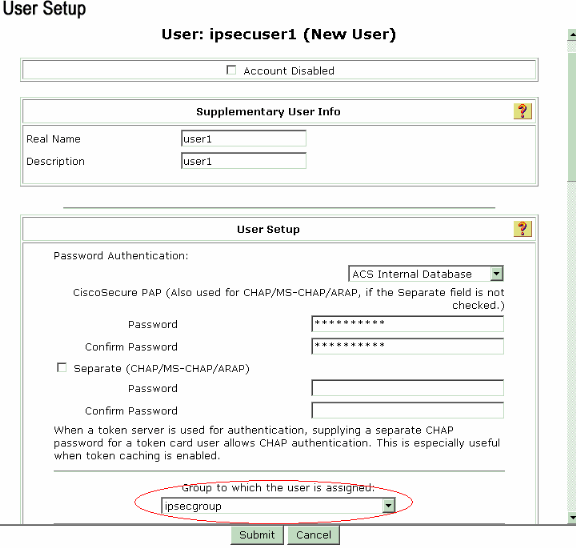
Choose User Setup, enter a username, and click Add/Edit.
-
Configure these parameters under the user setup section:
-
Password Authentication—Choose ACS Internal Database.
-
Cisco Secure PAP - Password—Enter a password for the user.
-
Cisco Secure PAP - Confirm Password—Re-enter the password for the new user.
-
Group to which the user is assigned—Select the name of the group you created in the previous step.
-
-
Click Submit in order to save and activate the user settings.
-
Repeat these steps in order to add additional users.
-
Assign a Static IP address to the VPN Client User
Complete these steps:
-
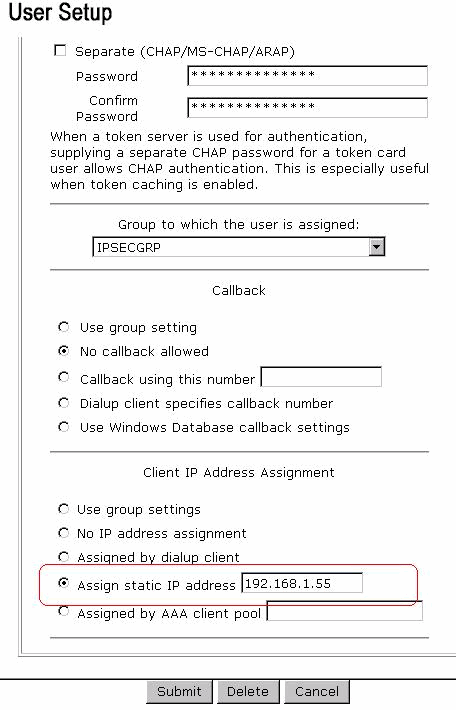
Create a new VPN group IPSECGRP.
-
Create a user who wants to receive the static IP and choose IPSECGRP. Choose Assign static IP address with the static IP address that is assigned under the Client IP Address Assignment.
VPN Client configuration
This section describes the VPN Client side configuration.
-
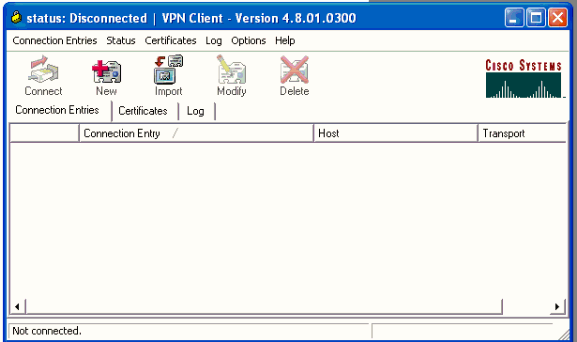
Choose Start > Programs > Cisco Systems VPN Client > VPN Client.
-
Click New in order to launch the Create New VPN Connection Entry window.
-
When prompted, assign a name to your entry. You can also enter a description if you wish. Specify the VPN 3000 Concentrator public interface IP address in the Host column and choose Group Authentication . Then provide the group name and password. Click Save in order to complete the new VPN connection entry.
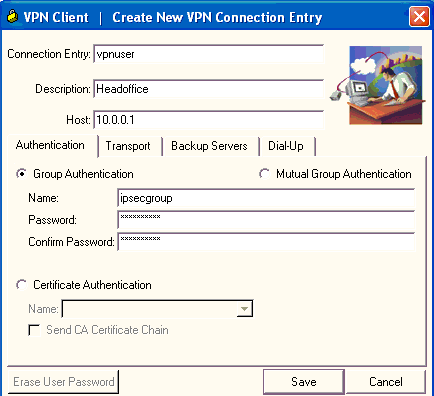
Note: Be sure that the VPN Client is configured to use the same group name and password configured in the Cisco VPN 3000 Series Concentrator.
Add Accounting
After authentication works, you can add accounting.
-
On the VPN 3000, choose Configuration > System > Servers > Accounting Servers, and add the Cisco Secure ACS for Windows server.
-
You can add individual accounting servers to each group when you choose Configuration > User Management > Groups, highlight a group and click Modify Acct. Servers. Then enter the IP address of the accounting server with the server secret.
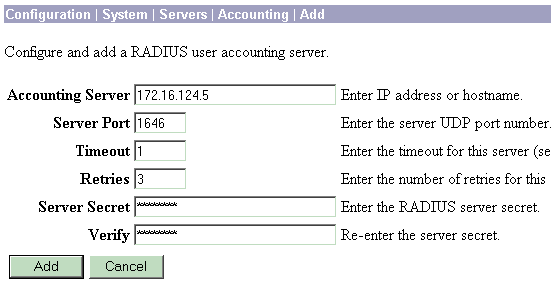
In Cisco Secure ACS for Windows, the accounting records appear as this output shows:

Verify
Use this section in order to confirm that your configuration works properly.
The Output Interpreter Tool (registered customers only) (OIT) supports certain show commands. Use the OIT to view an analysis of show command output.
Verify the VPN Concentrator
On the VPN 3000 Concentrator side, choose Administration > Administer Sessions in order to verify the remote VPN tunnel establishment.

Verify the VPN Client
Complete these steps in order to verify the VPN Client.
-
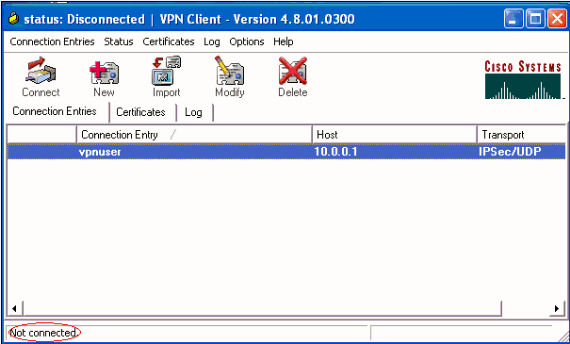
Click Connect in order to initiate a VPN connection.
-
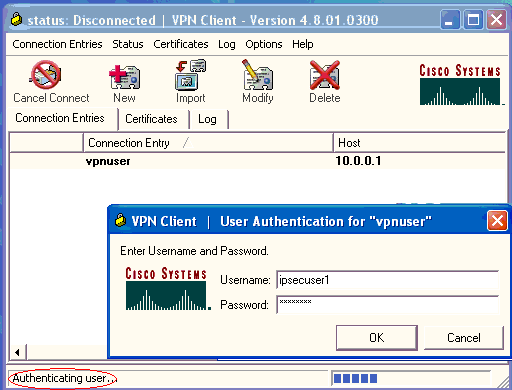
This window appears for user authentication. Enter a valid Username and Password in order to establish the VPN connection.
-
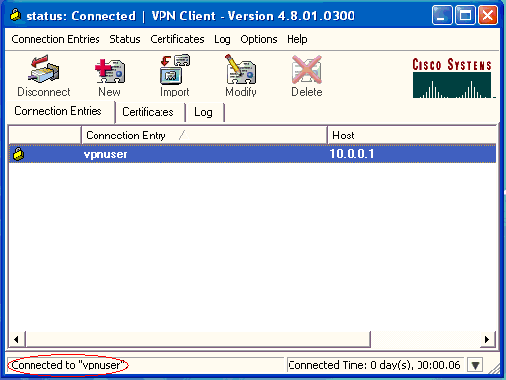
The VPN Client gets connected with the VPN 3000 Concentrator at the central site.
-
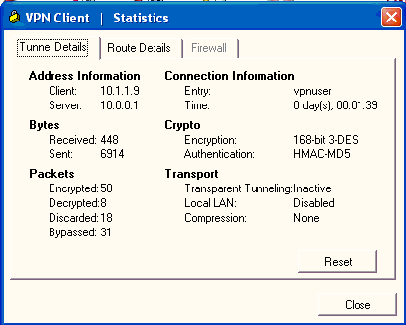
Choose Status > Statistics in order to check the tunnel statistics of the VPN Client.
Troubleshoot
Complete these steps in order to troubleshoot your configuration.
-
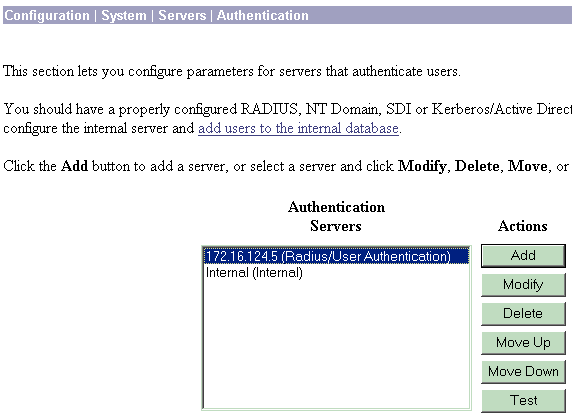
Choose Configuration > System > Servers > Authentication and complete these steps in order to test the connectivity between the RADIUS server and the VPN 3000 Concentrator.
-
Select your server, and then click Test.
-
Enter the RADIUS username and password and click OK.
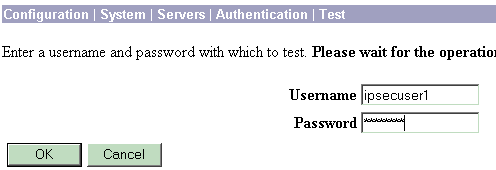
A successful authentication appears.

-
-
If it fails, there is either a configuration problem or an IP connectivity issue. Check the Failed Attempts Log on the ACS server for messages related to the failure.
-
If no messages appear in this log then there is probably an IP connectivity issue. The RADIUS request does not reach the RADIUS server. Verify the filters applied to the appropriate VPN 3000 Concentrator interface allows RADIUS (1645) packets in and out.
-
If the test authentication is successful, but logins to the VPN 3000 Concentrator continue to fail, check the Filterable Event Log via the console port.
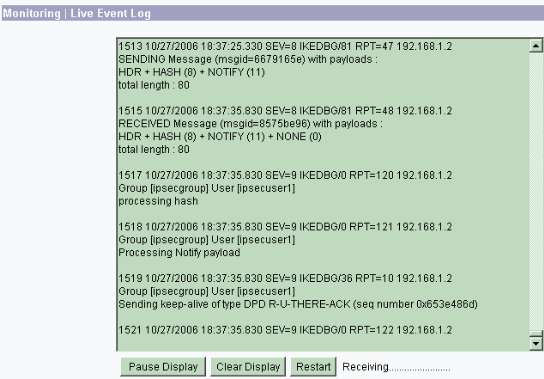
If connections do not work, you can add AUTH, IKE, and IPsec event classes to the VPN Concentrator when you select Configuration > System > Events > Classes > Modify (Severity to Log=1-9, Severity to Console=1-3). AUTHDBG, AUTHDECODE, IKEDBG, IKEDECODE, IPSECDBG, and IPSECDECODE are also available, but can provide too much information. If detailed information is needed on the attributes that are passed down from the RADIUS server, AUTHDECODE, IKEDECODE, and IPSECDECODE provide this at the Severity to Log=1-13 level.
-
-
Retrieve the event log from Monitoring > Event Log.
Troubleshoot VPN Client 4.8 for Windows
Complete these steps in order to troubleshoot VPN Client 4.8 for Windows.
-
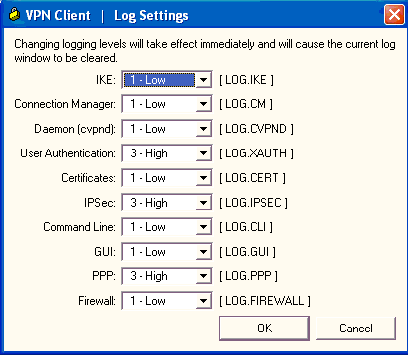
Choose Log > Log settings in order to enable the log levels in the VPN Client.
-
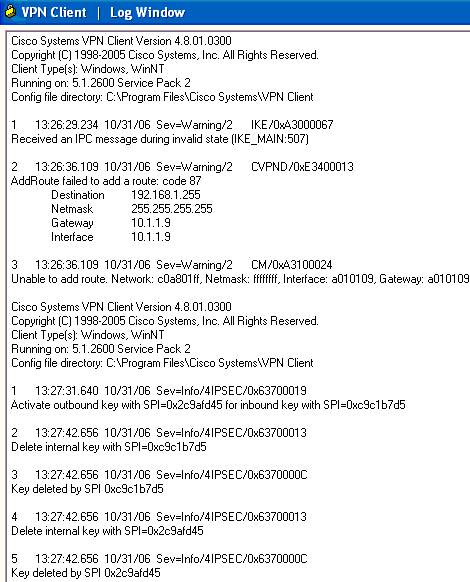
Choose Log > Log Window in order to view the log entries in the VPN Client.
Related Information
Revision History
| Revision | Publish Date | Comments |
|---|---|---|
1.0 |
23-Mar-2007 |
Initial Release |
Contact Cisco
- Open a Support Case

- (Requires a Cisco Service Contract)


 Feedback