Configuring the Cisco VPN 3000 Concentrator with Microsoft RADIUS
Available Languages
Contents
Introduction
Microsoft Internet Authentication Server (IAS) and Microsoft Commercial Internet System (MCIS 2.0) are currently available. The Microsoft RADIUS server is convenient because it uses the Active Directory on the Primary Domain Controller for its user database. You no longer need to maintain a separate database. It also supports 40-bit and 128-bit encryption for Point-to-Point Tunneling Protocol (PPTP) VPN connections. Refer to the Microsoft Checklist: Configuring IAS for dial-up and VPN access ![]() documentation for more information.
documentation for more information.
Prerequisites
Requirements
There are no specific requirements for this document.
Components Used
This document is not restricted to specific software and hardware versions.
Conventions
Refer to the Cisco Technical Tips Conventions for more information on document conventions.
Install and Configure the RADIUS Server on Windows 2000 and Windows 2003
Install the RADIUS Server
If you do not have the RADIUS server (IAS) already installed, perform these steps in order to install. If you already have the RADIUS server installed, continue to the configuration steps.
-
Insert the Windows Server compact disc and start the setup program.
-
Click Install Add-On Components, and then click Add/Remove Windows Components.
-
In Components, click Networking Services (but do not select or clear the check box), and then click Details.
-
Check Internet Authentication Service and click OK.
-
Click Next.
Configure the Microsoft Windows 2000 Server with IAS
Complete these steps in order to configure the RADIUS server (IAS) and to start the service in order to make it available to authenticate users on the VPN Concentrator.
-
Choose Start > Programs > Administrative Tools > Internet Authentication Service.
-
Right-click Internet Authentication Service, and click Properties from the submenu that appears.
-
Go to the RADIUS tab in order to examine the settings for ports.
If your RADIUS authentication and RADIUS accounting User Datagram Protocol (UDP) ports differ from the default values provided (1812 and 1645 for authentication, 1813 and 1646 for accounting) in Authentication and Accounting, type your port settings. Click OK when you are finished.
Note: Do not change the default ports. Separate the ports by using commas to use multiple port settings for authentication or accounting requests.
-
Right-click Clients and choose New Client in order to add the VPN Concentrator as an authentication, authorization, and accounting (AAA) client to the RADIUS server (IAS).
Note: If redundancy is configured between two Cisco VPN 3000 Concentrators, the backup Cisco VPN 3000 Concentrator must also be added to the RADIUS server as a RADIUS client.
-
Enter a friendly name and select as Protocol Radius.
-
Define the VPN Concentrator with an IP address or DNS name on the next window.
-
Choose Cisco from the Client-Vendor scrollbar.
-
Enter a shared secret.
Note: You must remember the exact secret that you use. You need this information in order to configure the VPN Concentrator.
-
Click Finish.
-
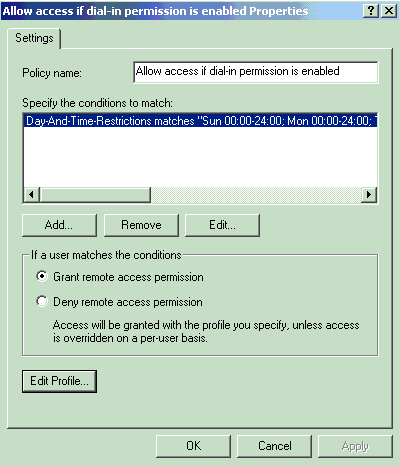
Double-click Remote Access Policies and double-click the policy that appears in the right side of the window.
Note: After you install IAS, a remote access policy should already exist.
In Windows 2000, authorization is granted based on the dial-in properties of a user account and remote access policies. Remote access policies are a set of conditions and connection settings that give network administrators more flexibility in authorizing connection attempts. The Windows 2000 Routing and Remote Access service and the Windows 2000 IAS both use remote access policies to determine whether to accept or reject connection attempts. In both cases, the remote access policies are stored locally. Refer to the Windows 2000 IAS documentation for more information about how connection attempts are processed.
-
Choose Grant remote access permission and click Edit Profile in order to configure dial-in properties.
-
Select the protocol to use for authentication on the Authentication tab. Check Microsoft Encrypted Authentication version 2 and uncheck all other authentication protocols.
Note: Settings in this Dial-In Profile must match the settings in the VPN 3000 Concentrator configuration and Dial-In client. In this example MS-CHAPv2 authentication without PPTP encryption is used.
-
On the Encryption tab check No Encryption only.
-
Click OK in order to close the Dial-In profile, then click OK in order to close the remote access policy window.
-
Right-click Internet Authentication Service and click Start Service in the console tree.
Note: You can also use this function to stop the service.
-
Complete these steps in order to modify the users to allow the connection.
-
Choose Console > Add/Remove Snap-in.
-
Click Add and choose Local Users and Groups snap-in.
-
Click Add.
-
Make sure to select Local Computer
-
Click Finish and OK.
-
-
Expand Local User and Groups and click the Users folder in the left pane. In the right pane, double-click the user (VPN User) you want to allow access.
-
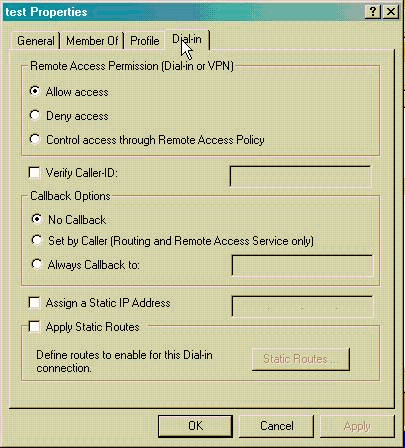
Go to the Dial-in tab and choose Allow Access under Remote Access Permission (Dial-in or VPN).
-
Click Apply and OK in order to complete the action. You can close the Console Management window and save the session, if desired.
The users that you modified are now able to access the VPN Concentrator with the VPN Client. Keep in mind that the IAS server only authenticates the user information. The VPN Concentrator still does the group authentication.
Configure the Microsoft Windows 2003 Server with IAS
Complete these steps in order to configure the Microsoft Windows 2003 server with IAS.
Note: These steps assume that IAS is already installed on the local machine. If not, add this through Control Panel > Add/Remove Programs.
-
Choose Administrative Tools > Internet Authentication Service and right-click on RADIUS Client in order to add a new RADIUS client. After you type the client information, click OK.
-
Enter a friendly name.
-
Define the VPN Concentrator with an IP address or DNS name on the next window.
-
Choose Cisco from the Client-Vendor scrollbar.
-
Enter a shared secret.
Note: You must remember the exact secret that you use. You need this information in order to configure the VPN Concentrator.
-
Click OK to complete.
-
Go to Remote Access Policies, right-click on Connections to Other Access Servers, and choose Properties.
-
Choose Grant remote access permission and click Edit Profile in order to configure Dial-In properties.
-
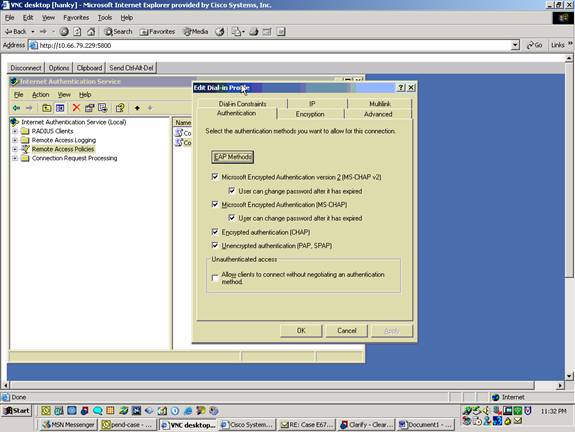
Select the protocol to use for authentication on the Authentication tab. Check Microsoft Encrypted Authentication version 2 and uncheck all other authentication protocols.
Note: Settings in this Dial-In Profile must match the settings in the VPN 3000 Concentrator configuration and Dial-In client. In this example MS-CHAPv2 authentication without PPTP encryption is used.
-
On the Encryption tab check No Encryption only.
-
Click OK when you are finished.
-
Right-click Internet Authentication Service and click Start Service in the console tree.
Note: You can also use this function in order to stop the service.
-
Choose Administrative Tools > Computer Management > System Tools > Local Users and Groups, right-click on Users and choose New Users in order to add a user into the local computer account.
-
Add user with Cisco password "vpnpassword" and check this profile information.
-
On the General tab, ensure that the option for Password Never Expired is selected instead of the option for User Must Change Password.
-
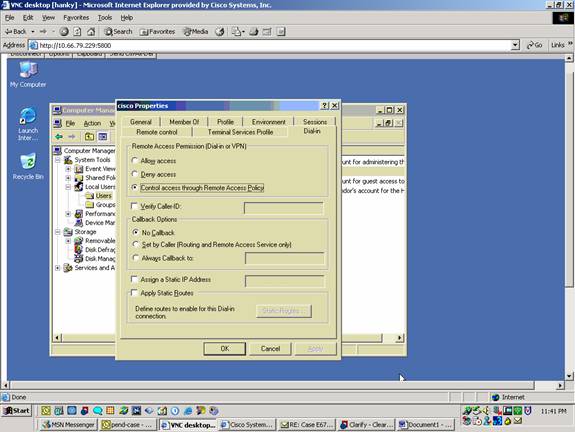
On the Dial-in tab, choose the option for Allow access (or leave default setting of Control access through Remote Access Policy).
Click OK when you are finished.
-
Configure the Cisco VPN 3000 Concentrator for RADIUS Authentication
Complete these steps in order to configure the Cisco VPN 3000 Concentrator for RADIUS authentication.
-
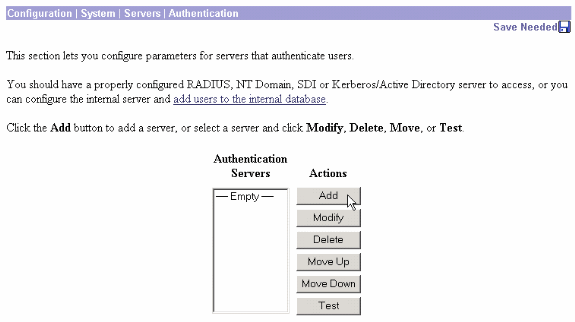
Connect to the VPN Concentrator with your Web Browser, and choose Configuration > System > Servers > Authentication from the left frame menu.
-
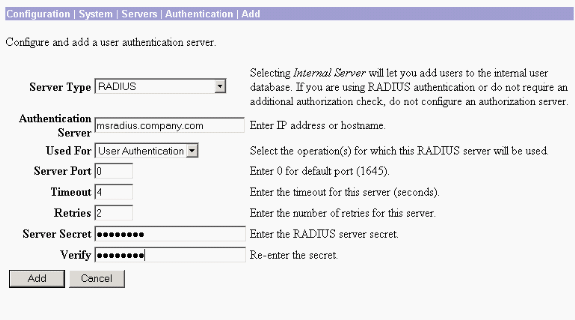
Click Add and configure these settings.
-
Server Type = RADIUS
-
Authentication Server = IP Address or Hostname of your RADIUS server (IAS)
-
Server Port = 0 (0=default=1645)
-
Server Secret = same as in step 8 in the section on Configure the RADIUS Server
-
-
Click Add in order to add the changes to the running configuration.
-
Click Add, choose Internal Server for Server Type, and click Apply.
You need this later in order to configure an IPsec Group (You need only Server Type = Internal Server).

-
Configure the VPN Concentrator for PPTP users or for VPN Client users.
-
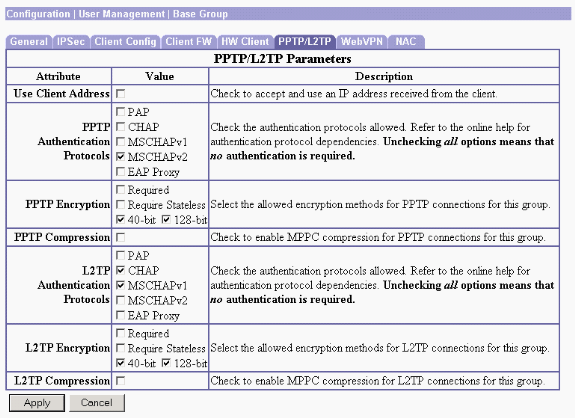
Choose Configuration > User Management > Base Group, and click the PPTP/L2TP tab.
-
Choose MSCHAPv2 and uncheck other authentication protocols in the PPTP Authentication Protocols section.
-
Click Apply at the bottom of the page in order to add the changes to the running configuration.
Now when PPTP users connect, they are authenticated by the RADIUS server (IAS).
PPTP
Complete these steps in order to configure for PPTP users.
-
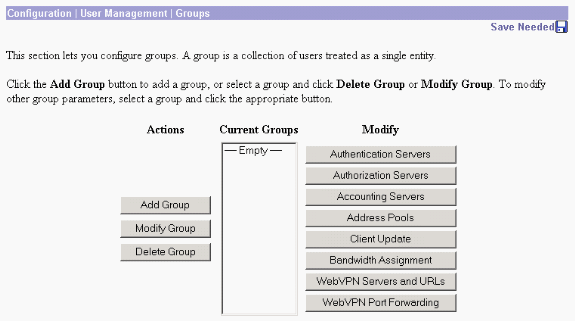
Choose Configuration > User Management > Groups and click Add in order to add a new group.
-
Type a group name (for example, IPsecUsers) and a password.
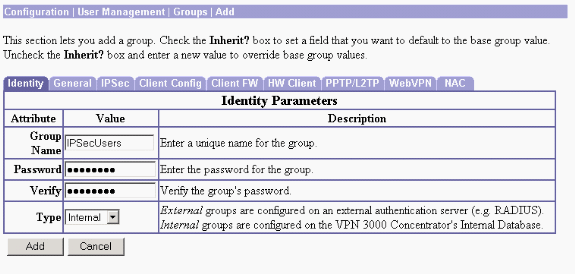
This password is used as the pre-shared key for the tunnel negotiation.
-
Go to the IPSec tab and set Authentication to RADIUS.
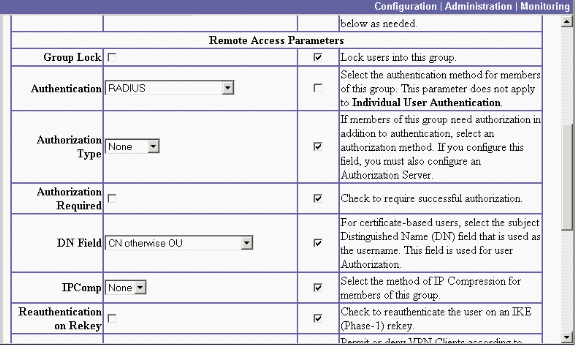
This allows IPsec clients to be authenticated via the RADIUS Authentication server.
-
Click Add at the bottom of the page in order to add the changes to the running configuration.
Now when IPsec clients connect and use the group you configured, they are authenticated by the RADIUS server.
VPN Client
Complete these steps in order to configure for VPN Client users.
-
Verify
There is currently no verification procedure available for this configuration.
Troubleshoot
WebVPN Authentication Fails
These sections provide information you can use to troubleshoot your configuration.
-
Problem: The WebVPN users are not able to authenticate against the RADIUS server but can authenticate successfully with the local database of the VPN Concentrator. They receive errors such as "Login failed" and this message.

Cause: These kinds of problems often happen when any database other than the internal database of the Concentrator is used. WebVPN users hit the Base Group when they first connect to the Concentrator and must use the default authentication method. Often this method is set to the internal database of the Concentrator and is not a configured RADIUS or other server.
Solution: When a WebVPN user authenticates, the Concentrator checks the list of servers defined at Configuration > System > Servers > Authentication and uses the top one. Make sure to move the server that you want WebVPN users to authenticate with to the top of this list. For example, if RADIUS should be the authentication method, you need to move the RADIUS server to the top of the list to push the authentication to it.
Note: Just because WebVPN users initially hit the Base Group does not mean that they are confined to the Base Group. Additional WebVPN groups can be configured on the Concentrator, and users can be assigned to them by the RADIUS server with the population of attribute 25 with OU=groupname . Refer to Locking Users into a VPN 3000 Concentrator Group Using a RADIUS Server for a more detailed explanation.
User Authentication Fails Against the Active Directory
In the Active Directory server, on the Account tab of the User Properties of the failing user, you can see this check box:
[x] Do not require pre-authentication
If this check box is unchecked, check it, and try to authenticate again with this user.
Related Information
Revision History
| Revision | Publish Date | Comments |
|---|---|---|
1.0 |
25-Feb-2002 |
Initial Release |
Contact Cisco
- Open a Support Case

- (Requires a Cisco Service Contract)


 Feedback