Configuring the Cisco VPN 3000 Concentrator and the Network Associates PGP Client
Available Languages
Contents
Introduction
This document describes how to configure both the Cisco VPN 3000 Concentrator and the Network Associates Pretty Good Privacy (PGP) Client running version 6.5.1 to accept connections from each other.
Prerequisites
Requirements
There are no specific requirements for this document.
Components Used
The information in this document is based on these software and hardware versions:
-
Cisco VPN 3000 Concentrator Version 4.7
-
Networks Associates PGP Client version 6.5.1
The information in this document was created from the devices in a specific lab environment. All of the devices used in this document started with a cleared (default) configuration. If your network is live, make sure that you understand the potential impact of any command.
Conventions
For more information on document conventions, refer to the Cisco Technical Tips Conventions.
Configure the Network Associates PGP Client to Connect to the Cisco VPN 3000 Concentrator
Use this procedure to configure the Network Associates PGP Client to connect to the VPN 3000 Concentrator.
-
Launch PGPNet > Hosts.
-
Click Add and then click Next.
-
Choose the Gateway option, and click Next.

-
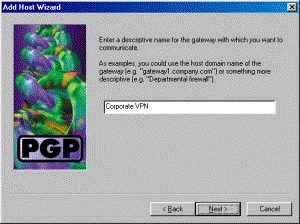
Enter a descriptive name for the connection and click Next.

-
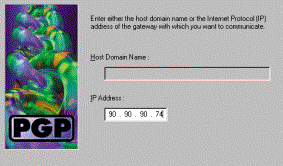
Enter the host domain name or the IP address of the public interface of the VPN 3000 Concentrator and click Next.

-
Choose Use public-key cryptographic security only and click Next.

-
Select Yes, and click Next. When you add a new host or subnet, it allows you to reach private networks after your connection is secured.

-
Select Subnet and click Next.

-
Choose Allow insecure communications and click Next.
The VPN 3000 Concentrator handles the security of the connection, not the PGP client software.

-
Enter a descriptive name to uniquely identify the networks to which you connect and click Next.

-
Enter the network number and the subnet mask for the network behind the VPN 3000 Concentrator and click Next.

-
If there are more internal networks, choose Yes. Otherwise, choose No and click Next.

Configure the Cisco VPN 3000 Concentrator to Accept Connections from Network Associates PGP Client
Use this procedure to configure the Cisco VPN 3000 Concentrator to accept connections from a Network Associates PGP Client:
-
Select Configuration > Tunneling and Security > IPSec > IKE Proposals.
-
Activate the IKE-3DES-SHA-DSA proposal by selecting it in the Inactive Proposals column. Next, click the Activate button and then click the Save Needed button.
-
Select Configuration > Policy Management > Traffic Management > SAs.
-
Click Add.
-
Leave all except these fields at their default settings:
-
SA Name: Create a unique name to identify this.
-
Digital Certificate: Choose the installed server identify certificate.
-
IKE Proposal: Select IKE-3DES-SHA-DSA.
-
-
Click Add.
-
Select Configuration > User Management > Groups, click Add Group, and configure these fields:
Note: If all your users are PGP Clients, you can use the Base Group (Configuration > User Management > Base Group) instead of creating new groups. If so, skip the steps for the Identity tab and complete steps 1 and 2 for the IPSec tab only.
Under the Identity tab, enter this information:
-
Group Name: Enter a unique name. (This group name must be equal to the OU field in the PGP Client's digital certificate.)
-
Password: Enter the password for the group.
Under the IPSec tab, enter this information:
-
Authentication: Set this to None.
-
Mode Configuration: Uncheck this.
-
-
Click Add.
-
Save as needed throughout.
Related Information
Revision History
| Revision | Publish Date | Comments |
|---|---|---|
1.0 |
28-Nov-2001 |
Initial Release |
Contact Cisco
- Open a Support Case

- (Requires a Cisco Service Contract)


 Feedback