Configure Thin-Client SSL VPN (WebVPN) Cisco IOS with SDM
Available Languages
Contents
Introduction
Thin-Client SSL VPN technology can be used to allow secure access for applications that use static ports. Examples are Telnet (23), SSH (22), POP3 (110), IMAP4 (143), and SMTP (25). The Thin-Client can be user-driven, policy-driven, or both. Access can be configured on a user-by-user basis, or group policies can be created that include one or more users. SSL VPN technology can be configured in three main modes: Clientless SSL VPN (WebVPN), Thin-Client SSL VPN (Port Forwarding), and SSL VPN Client (SVC-Full Tunnel Mode).
1. Clientless SSL VPN (WebVPN):
A remote client needs only an SSL-enabled web browser to access http- or https-enabled web servers on the corporate LAN. Access is also available to browse for Windows files with the Common Internet File System (CIFS). A good example of http access is the Outlook Web Access (OWA) client.
Refer to Clientless SSL VPN (WebVPN) on Cisco IOS using SDM Configuration Example in order to learn more about the Clientless SSL VPN.
2. Thin-Client SSL VPN (Port Forwarding)
A remote client must download a small, Java-based applet for secure access of TCP applications that use static port numbers. UDP is not supported. Examples include access to POP3, SMTP, IMAP, SSH, and Telnet. The user needs local administrative privileges because changes are made to files on the local machine. This method of SSL VPN does not work with applications that use dynamic port assignments, for example, several FTP applications.
3. SSL VPN Client (SVC-Full Tunnel Mode):
The SSL VPN Client downloads a small client to the remote workstation and allows full, secure access to the resources on the internal corporate network. The SVC can be downloaded permanently to the remote station, or it can be removed after the secure session ends.
Refer to SSL VPN Client (SVC) on IOS using SDM Configuration Example in order to learn more about the SSL VPN Client.
This document demonstrates a simple configuration for the Thin-Client SSL VPN on a Cisco IOS® router. The Thin-Client SSL VPN runs on these Cisco IOS routers:
-
Cisco 870, 1811, 1841, 2801, 2811, 2821, and 2851 Series routers
-
Cisco 3725, 3745, 3825, 3845, 7200, and 7301 Series routers
Prerequisites
Requirements
Ensure that you meet these requirements before you attempt this configuration:
Requirements for the Cisco IOS router
-
Any of the listed routers loaded with SDM and an advanced image of IOS version 12.4(6)T or later
-
Management station loaded with SDM
Cisco ships new routers with a pre-installed copy of SDM. If your router does not have SDM installed, you can obtain the software at Software Download-Cisco Security Device Manager. You must possess a CCO account with a service contract. Refer to Configure Your Router with Security Device Manager for detailed instructions.
Requirements for Client computers
-
Remote clients should have local administrative privileges; it is not required, but it is highly suggested.
-
Remote clients must have Java Runtime Environment (JRE) Version 1.4 or higher.
-
Remote client browsers: Internet Explorer 6.0, Netscape 7.1, Mozilla 1.7, Safari 1.2.2, or Firefox 1.0
-
Cookies enabled and Popups allowed on remote clients
Components Used
The information in this document is based on these software and hardware versions:
-
Cisco Advanced Enterprise Software Image 12.4(9)T
-
Cisco 3825 Integrated Services Router
-
Cisco Router and Security Device Manager (SDM) Version 2.3.1
The information in this document was created from the devices in a specific lab environment. All the devices used in this document began with a cleared (default) configuration. If your network is live, make sure that you understand the potential impact of any command. The IP addresses used for this configuration come from the RFC 1918 address space. They are not legal on the Internet.
Conventions
Refer to the Cisco Technical Tips Conventions for more information on document conventions.
Configure
Task
This section contains the information needed to configure the features described within this document.
Network Diagram
This document uses this network setup:
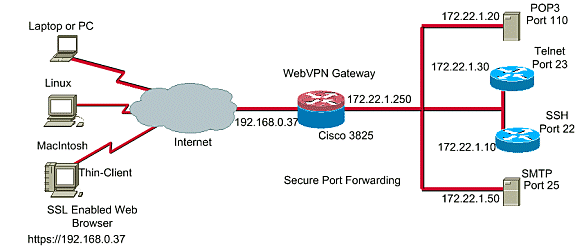
Configure the Thin-Client SSL VPN
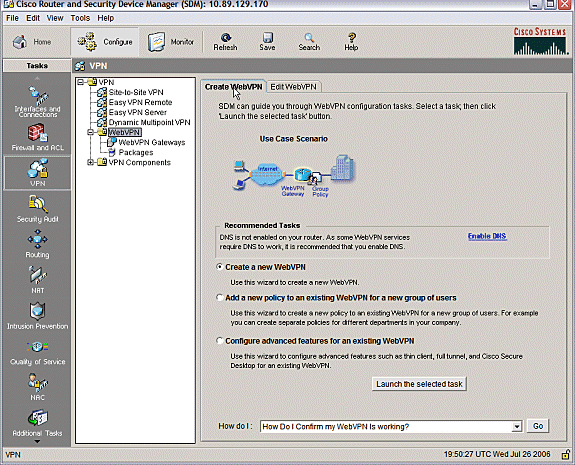
Use the Wizard provided in the Security Device Manager (SDM) interface to configure the Thin-Client SSL VPN on Cisco IOS, or configure it either at the Command Line Interface (CLI) or manually in the SDM application. This example uses the Wizard.
-
Choose the Configure tab.
-
From the navigation pane, choose VPN > WebVPN.
-
Click the Create WebVPN tab.
-
Click the radio button next to Create a new WebVPN.
-
Click the Launch the selected task button.
-
-
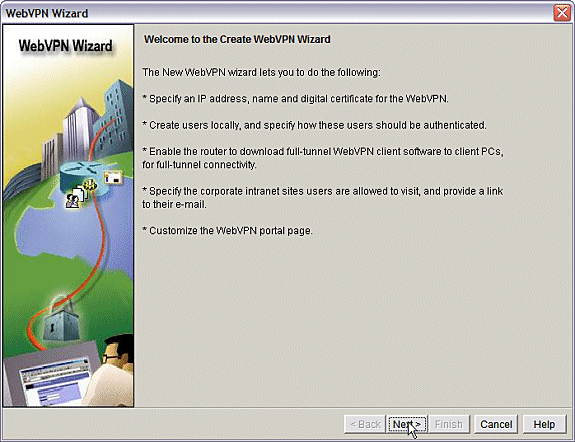
The WebVPN Wizard launches. Click Next.
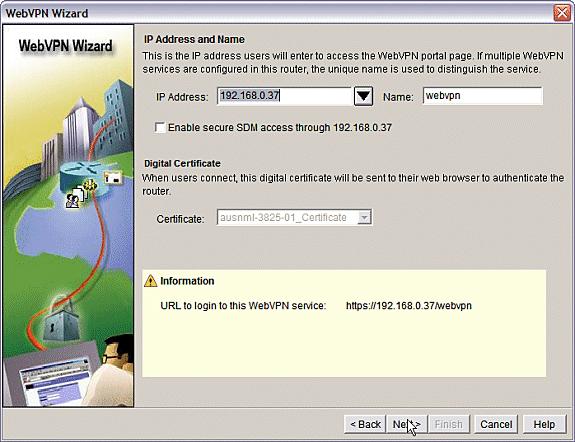
Enter the IP address and a unique name for this WebVPN gateway. Click Next.
-
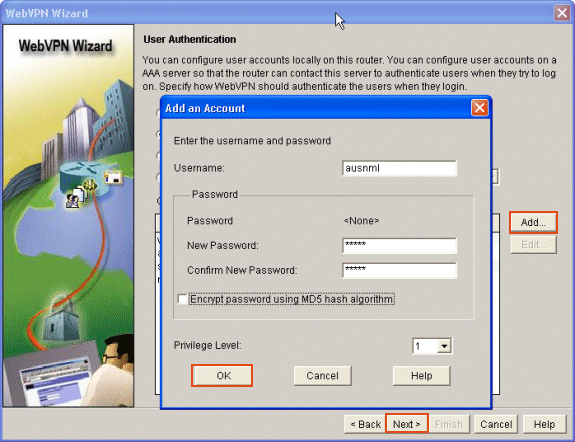
The User Authentication screen allows the opportunity to provide for the authentication of users. This configuration uses an account created locally on the router. You can also use an Authentication, Authorization, and Accounting (AAA) server.
-
To add a user, click Add.
-
Enter the user information on the Add an Account screen, and click OK.
-
Click Next on the User Authentication screen.
-
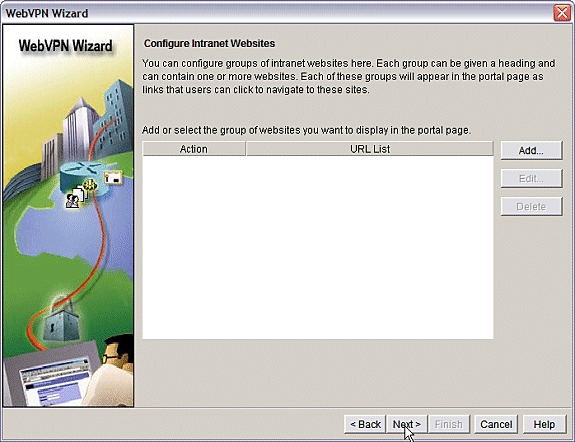
The WebVPN Wizard screen allows for the configuration of Intranet web sites, but this step is omitted because Port-Forwarding is used for this application access. If you want to allow access to web sites, use the Clientless or Full Client SSL VPN configurations, which are not within the scope of this document.
-
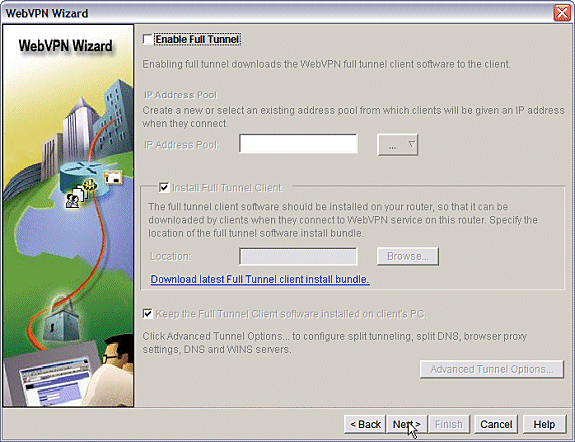
Click Next. The Wizard displays a screen that allows configuration of the Full Tunnel client. This does not apply to the Thin-Client SSL VPN (Port Forwarding).
-
Uncheck Enable Full Tunnel. Click Next.
-
-
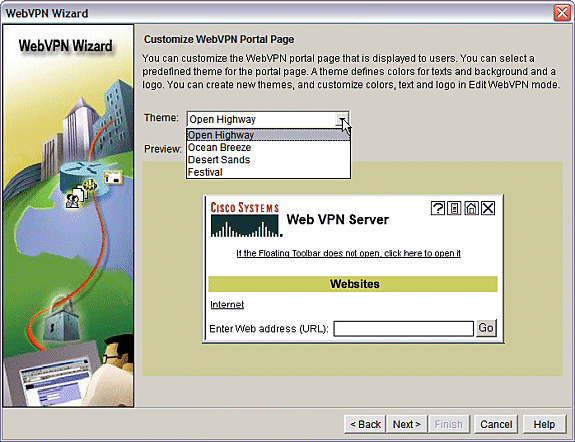
Customize the appearance of the WebVPN portal page or accept the default appearance.
-
Click Next.
-
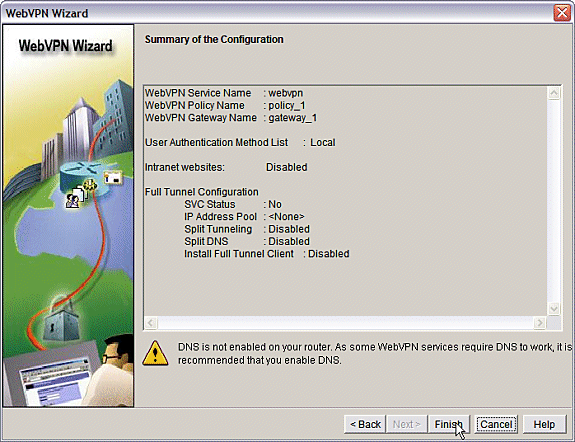
Preview the Summary of the Configuration and click Finish > Save.
-
-
You have created a WebVPN Gateway and a WebVPN Context with a linked Group Policy. Configure the Thin-Client ports, which are made available when clients connect to the WebVPN.
-
Choose Configure.
-
Choose VPN > WebVPN.
-
Choose Create WebVPN.
-
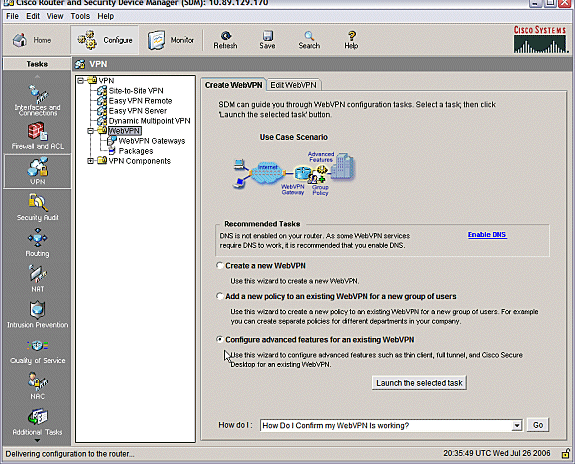
Choose the radio button Configure advanced features for an existing WebVPN and click Launch the selected task.
-
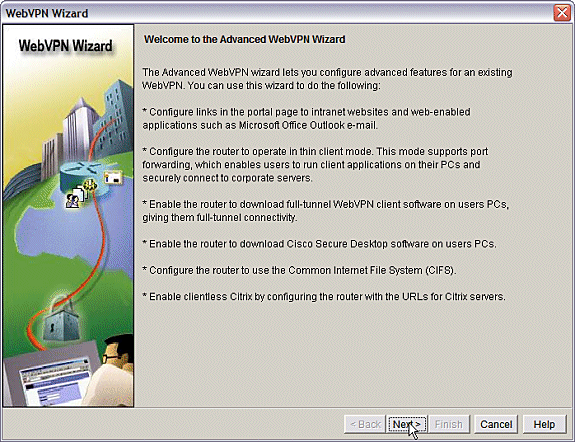
The Welcome screen offers highlights of the capabilities of the Wizard. Click Next.
-
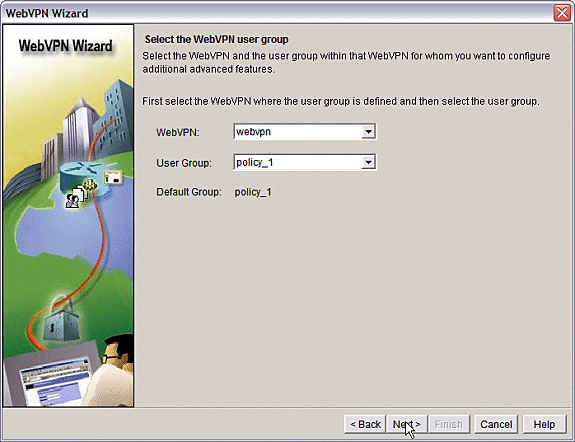
Choose the WebVPN context and user group from the drop-down menus. Click Next.
-
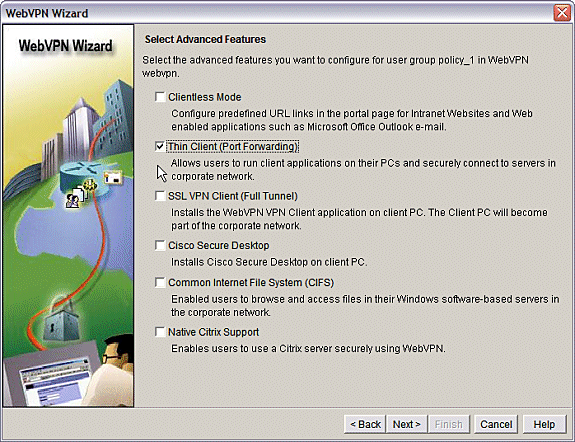
Choose Thin Client (Port Forwarding) and click Next.
-
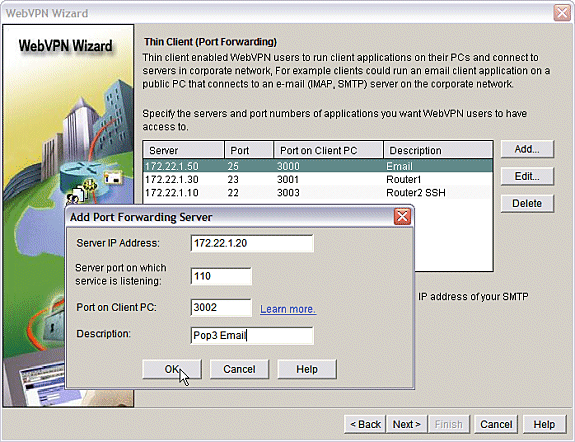
Enter the resources that you want to make available through Port Forwarding. The service port must be a static port, but you can accept the default port on the client PC assigned by the Wizard. Click Next.
-
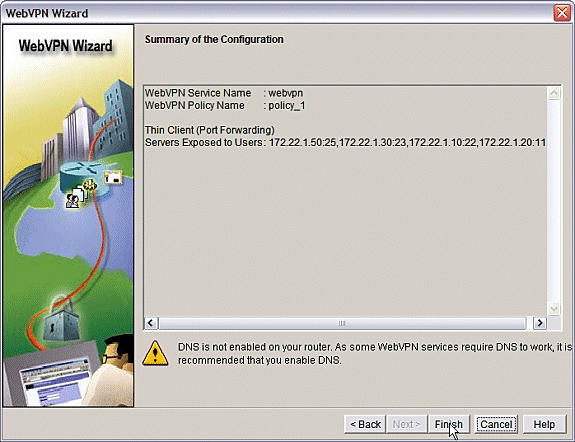
Preview your configuration summary and click Finish > OK > Save.
-
Configuration
Results of the SDM Configuration.
| ausnml-3825-01 |
|---|
Building configuration... Current configuration : 4343 bytes ! ! Last configuration change at 15:55:38 UTC Thu Jul 27 2006 by ausnml ! NVRAM config last updated at 21:30:03 UTC Wed Jul 26 2006 by ausnml ! version 12.4 service timestamps debug datetime msec service timestamps log datetime msec service password-encryption ! hostname ausnml-3825-01 ! boot-start-marker boot system flash c3825-adventerprisek9-mz.124-9.T.bin boot-end-marker ! no logging buffered enable secret 5 $1$KbIu$5o8qKYAVpWvyv9rYbrJLi/ ! aaa new-model ! aaa authentication login default local aaa authentication login sdm_vpn_xauth_ml_1 local aaa authentication login sdm_vpn_xauth_ml_2 local aaa authorization exec default local ! aaa session-id common ! resource policy ! ip cef ! ip domain name cisco.com ! voice-card 0 no dspfarm !--- Self-Signed Certificate Information crypto pki trustpoint ausnml-3825-01_Certificate enrollment selfsigned serial-number none ip-address none revocation-check crl rsakeypair ausnml-3825-01_Certificate_RSAKey 1024 ! crypto pki certificate chain ausnml-3825-01_Certificate certificate self-signed 02 30820240 308201A9 A0030201 02020102 300D0609 2A864886 F70D0101 04050030 !--------------------- !--- cut for brevity quit ! username ausnml privilege 15 password 7 15071F5A5D292421 username fallback privilege 15 password 7 08345818501A0A12 username austin privilege 15 secret 5 $1$3xFv$W0YUsKDx1adDc.cVQF2Ei0 username sales_user1 privilege 5 secret 5 $1$2/SX$ep4fsCpodeyKaRji2mJkX/ username admin0321 privilege 15 secret 5 $1$FxzG$cQUJeUpBWgZ.scSzOt8Ro1 ! interface GigabitEthernet0/0 ip address 192.168.0.37 255.255.255.0 duplex auto speed auto media-type rj45 ! interface GigabitEthernet0/1 ip address 172.22.1.151 255.255.255.0 duplex auto speed auto media-type rj45 ! ip route 0.0.0.0 0.0.0.0 172.22.1.1 ! ip http server ip http authentication local ip http secure-server ip http timeout-policy idle 600 life 86400 requests 100 ! control-plane ! line con 0 stopbits 1 line aux 0 stopbits 1 line vty 0 4 exec-timeout 40 0 privilege level 15 password 7 071A351A170A1600 transport input telnet ssh line vty 5 15 exec-timeout 40 0 password 7 001107505D580403 transport input telnet ssh ! scheduler allocate 20000 1000 !--- the WebVPN Gateway webvpn gateway gateway_1 ip address 192.168.0.37 port 443 http-redirect port 80 ssl trustpoint ausnml-3825-01_Certificate inservice !--- the WebVPN Context webvpn context webvpn title-color #CCCC66 secondary-color white text-color black ssl authenticate verify all !--- resources available to the thin-client port-forward "portforward_list_1" local-port 3002 remote-server "172.22.1.20" remote-port 110 description "Pop3 Email" local-port 3001 remote-server "172.22.1.30" remote-port 23 description "Router1" local-port 3000 remote-server "172.22.1.50" remote-port 25 description "Email" local-port 3003 remote-server "172.22.1.10" remote-port 22 description "Router2 SSH" !--- the group policy policy group policy_1 port-forward "portforward_list_1" default-group-policy policy_1 aaa authentication list sdm_vpn_xauth_ml_2 gateway gateway_1 domain webvpn max-users 2 inservice ! end |
Verify
Verify Your Configuration
Use this section to confirm that your configuration works properly.
-
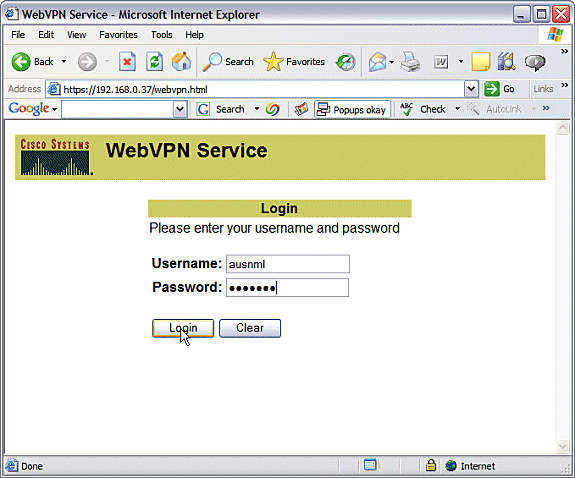
Use a client computer to access the WebVPN gateway at https://gateway_ip_address. Remember to include the WebVPN domain name if you create unique WebVPN contexts. For example, if you have created a domain called sales, enter https://gateway_ip_address/sales.
-
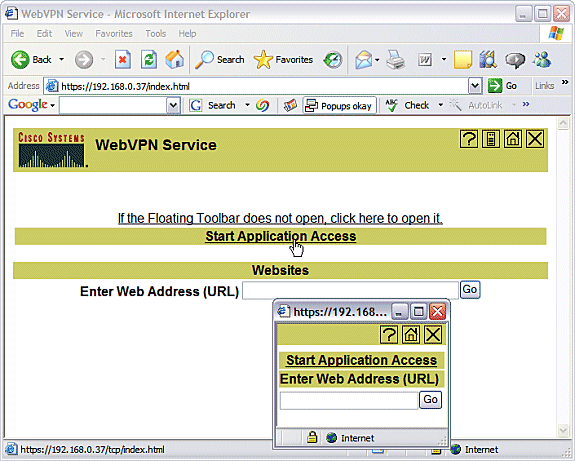
Login and accept the certificate offered by the WebVPN gateway. Click Start Application Access.
-
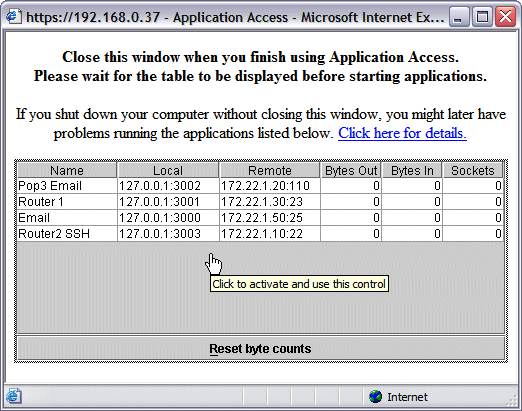
An Application Access screen displays. You can access an application with the local port number and your local loopback IP address. For example, to Telnet to Router 1, enter telnet 127.0.0.1 3001. The small Java applet sends this information to the WebVPN gateway, which then ties the two ends of the session together in a secure fashion. Successful connections can cause the Bytes Out and Bytes In columns to increase.
Commands
Several show commands are associated with WebVPN. You can execute these commands at the command-line interface (CLI) to show statistics and other information. To see the use of show commands in detail, refer to Verifying WebVPN Configuration.
The Output Interpreter Tool (registered customers only) (OIT) supports certain show commands. Use the OIT to view an analysis of show command output.
Troubleshoot
Use this section to troubleshoot your configuration.
Client computers must be loaded with SUN Java Version 1.4 or later. Obtain a copy of this software from Java Software Download
Commands Used to Troubleshoot
Note: Refer to Important Information on Debug Commands before the use of debug commands.
-
show webvpn ?—There are many show commands associated with WebVPN. These can be performed at the CLI to show statistics and other information. In order to see the use of show commands in detail, refer to Verifying WebVPN Configuration.
-
debug webvpn ?—The use of debug commands can adversely impact the router. In order to see the use of debug commands in more detail, refer to Using WebVPN Debug Commands.
Related Information
Revision History
| Revision | Publish Date | Comments |
|---|---|---|
1.0 |
15-Aug-2008 |
Initial Release |
Contact Cisco
- Open a Support Case

- (Requires a Cisco Service Contract)


 Feedback