Introduction
This document describes how to configure network tune settings for Secure Web Appliance (WSA) to improve the upload and download speed of file (s).
Prerequisites
Requirements
Cisco recommends that you have knowledge of these topics:
- WSA Installed
- Secure Shell (SSH) client
- Transmission Control Protocol (TCP) window scale
Components Used
This document is not restricted to specific software and hardware versions.
The information in this document was created from the devices in a specific lab environment. All of the devices used in this document started with a cleared (default) configuration. If your network is live, ensure that you understand the potential impact of any command.
Background Information
The WSA is designed to handle thousands of client and server connections in parallel.
The default size of the send and receive buffers are configured to deliver optimal performance, and the maximum number of short-lived connections.
Problem
Default size for send and receive buffers can introduce upload or download speed degradation. Especially for an environment where large file downloads or uploads contribute to large amount of the daily traffic.
Solution
The Network settings of the WSA control send and receive buffer size. Which improves the upload and download speed for large files.
Calculate WSA Maximum Send and Receive Buffer Size
This section explains how to calculate the right WSA network settings to be used in the configuration section.
The formula used to calculate the right network values:
MBUF_CLUSTER_COUNT = 98304*(X/Y)
MBUF_CLUSTER_COUNT: The maximum amount of memory buffer clusters can be used for this WSA.
X: The current Random Access Memory (RAM)
Y: Fixed value equals to 4 Giga Bytes (GB)
Note: Example: WSA S390 with 32G RAM fomula: MBUF_CLUSTER_COUNT = 98304*(32/4) =786,432
Verify WSA RAM Size
This section describes how to verify WSA RAM size through the command ipcheck.
- Access the WSA Command Line Interface (CLI) through admin credentials.
- Enter the command ipcheck.
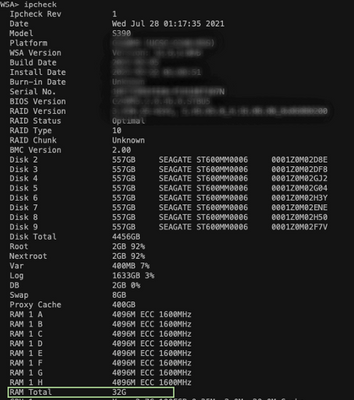
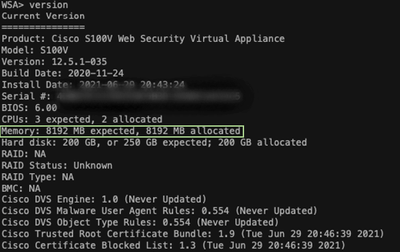
- Check the value of RAM Total in the output if WSA is physical appliance, or value of Memory if Virtual Appliance is used. as shown in these two images.
Figure 1. Physical WSA ipcheck output
 Figure 1: Physical WSA ipcheck output
Figure 2. Virtual WSA ipcheck output
 Figure 2: Virtual WSA ipcheck output
Configure WSA Network Settings
This section explains how to configure the network settings of the WSA and increase the send and receive buffers to get better upload and download speed.
Step 1. Configure send and receive buffer on network level.
- Access the WSA Command Line Interface (CLI) with admin credentials.
- Enter networktuning command to access buffers options, as shown in this snippit.
WSA> networktuning
Choose the operation you want to perform:
- SENDSPACE - TCP sendspace (8192-262144) default 32768
- RECVSPACE - TCP recvspace (8192-262144) default 65536
- SEND_AUTO - TCP send autotuning (ON=1/OFF=0) default OFF
- RECV_AUTO - TCP receive autotuning (ON=1/OFF=0) default OFF
- MBUF_CLUSTER_COUNT - number of mbuf clusters (98304,147100) Default 98304
- SENDBUF_MAX - Maximum send buf, size(131072 - 262144) default, 256K=262144
- RECVBUF_MAX - Maximum recv buf, size(131072 - 262144) default, 256K=262144
- CLEAN_FIB_1 - Remove all M1/M2 entries from Data routing table
[]>
Note: Check the MBUF_CLUSTER_COUNT formula explained in the previous section.
3. Use this table to enter the new values for each option.
|
Option
|
Value
|
Description
|
|
SENDSPACE
|
Increased up to 262144 (32 times the default value)
|
Send buffer size for TCP connections
|
|
RECVSPACE
|
Increased up to 262144 (32 times the default value)
|
Receive buffer size for TCP connections
|
|
SEND_AUTO
|
Set to 1
|
1. Allows the WSA to automatically update the send buffer on network level
0. Allows the WSA to automatically update the send buffer on proxy level
|
|
RECV_AUTO
|
Set to 1
|
1. Allows the WSA to automatically update the receive buffer on network level
0. Allows the WSA to automatically update the receive buffer on proxy level
|
|
MBUF_CLUSTER_COUNT
|
Use The formula
|
Number of Memory buffer clusters to be used for WSA
|
|
SENDBUF_MAX
|
No Changes, set to maximum by default
|
Maximum send buffer size
|
|
RECVBUF_MAX
|
No Changes, set to maximum by default
|
Maximum receive buffer size
|
|
CLEAN_FIB_1
|
none
|
FIB1 means the Data routing table. This option removes data routes entries for M1 and M2 interfaces
|
4. Use the Enter Key to go back to the main CLI prompt.
Note: Complete Step 2. on the same CLI session.
Step 2. Configure send and receive buffer on proxy level.
In order to enable network level receive and send buffers, the proxy level options must be disabled:
- Enter the command advancedproxyconfig.
- Enter the option miscellaneous.
- Use the Enter key to move to next option.
- Repeat previous step to reach the option "Would you like proxy to perform dynamic adjustment of TCP receive window size?" and set to NO.
- Use the Enter key to move to next option "Would you like proxy to perform dynamic adjustment of TCP send window size?" and set to NO.
- Use the Enter key until you are back to the main CLI prompt.
- Enter the command commit and save a backup of WSA configuration.
Note: Reboot is required for the settings to have impact.
Related Information


 Feedback