Introduction
This document describes how to configure SAML authentication for Remote Access VPN using Azure as IdP on FTD managed by FDM version 7.2 or below.
Prerequisites
Requirements
Cisco recommends that you have basic knowledge of these topics:
- Secure Socket Layer (SSL) Certificates
- OpenSSL
- Linux commands
- Remote Access Virtual Private Network (RAVPN)
- Secure Firewall Device Manager (FDM)
- Security Assertion Markup Language (SAML)
- Microsoft Azure
Components Used
The information in this document is based on these software versions:
- OpenSSL Version CiscoSSL 1.1.1j.7.2sp.230
- Secure Firewall Threat Defense (FTD) Version 7.2.0
- Secure Firewall Device Manager Version 7.2.0
- Internal Certificate Authority (CA)
The information in this document was created from the devices in a specific lab environment. All of the devices used in this document started with a cleared (default) configuration. If your network is live, ensure that you understand the potential impact of any command.
Background information
The use of SAML authentication for RAVPN connections and many other applications has become more popular lately due to its advantages. SAML is an open standard for exchanging authentication and authorization information between parties, specifically an Identity Provider (IdP) and Service Provider (SP).
There is a limitation in FTD managed by FDM versions 7.2.x or below where the only supported IdP for SAML authentication is Duo. In these versions, the certificates to be used for SAML authentication must have the extension Basic Constraints: CA:TRUE when uploading them to the FDM.
For this reason, certificates provided by other IdPs (that do not have the required extension) like Microsoft Azure for SAML authentication are natively not supported in these versions, causing the SAML authentication to fail.
Note: FDM versions 7.3.x and newer allow the Skip CA Check option to be enabled when uploading a new certificate. This resolves the limitation described in this document.
In case that you configure RAVPN with SAML authentication using the certificate provided by Azure and which does not have the Basic Constraints: CA:TRUE extension, when you run the show saml metadata <trustpoint name> command to retreive the metadata from the FTD Command Line Interface (CLI), the output is blank as displayed next:
firepower# show saml metadata <trustpoint name>
SP Metadata
-----------

IdP Metadata
-----------
Configure
The suggested plan to resolve this limitation is to upgrade the Secure Firewall to version 7.3 or higher however, if for any reason you need the Firewall to run version 7.2 or lower you can work around this limitation by creating a custom certificate that includes the Basic Constraints: CA:TRUE extension. Once the certificate is signed by a custom CA, you need to change the configuration in the Azure SAML configuration portal for it to use this custom certificate instead.
Step 1. Create a Certificate Signing Request (CSR) with "Basic Constraints: CA:TRUE" Extension
This section describes how to create a CSR using OpenSSL for it to include the Basic Constraints: CA:TRUE Extension.
1. Log in to an endpoint which has the OpenSSL library installed.
2. (Optional) Create a directory where you can locate the files needed for this certificate using the mkdir <folder name> command.
root@host1:/home/admin# mkdir certificate
3. If you created a new directory, change directory to it and generate a new private key running the openssl genrsa -out <key_name>.key 4096 command.
root@host1:/home/admin/certificate# openssl genrsa -out privatekey.key 4096
Note: 4096 bits represents the key length for this configuration example. You can specify a longer key if needed.
4. Create a configuration file using the touch <config_name>.conf command.
5. Edit the file with a text editor. In this example, Vim is used and the vim <config_name>.conf command is run. You can use any other text editor.
vim config.conf
6. Enter in the information to be included in the Certificate Signing Request (CSR). Ensure to add the basicConstraints = CA:true extension in the file as displayed next:
[ req ]
default_bits = 4096
default_md = sha256
prompt = no
encrypt_key = no
distinguished_name = req_distinguished_name
req_extensions = v3_req

[ req_distinguished_name ]
countryName = <Country Code>
stateOrProvinceName = <State or Province>
localityName = <Locality Name>
organizationName = <Organization Name>
organizationalUnitName = <Organizational Unit Name>
commonName = <Common Name>

[ v3_req ]
basicConstraints = CA:true
Note: basicConstraints = CA:true is the extension that the certificate needs to have in order for the FTD to successfully install the certificate.
7. Using the key and configuration file created in the previous steps, you can create the CSR with the openssl req -new <key_name>.key -config <conf_name>.conf -out <CSR_Name>.csr command:
openssl req -new -key privatekey.key -config config.conf -out CSR.csr
8. After this command, you can see your <CSR_name>.csr file listed in the folder, which is the CSR file that has to be sent to the CA Server to be signed.
-----BEGIN CERTIFICATE REQUEST-----
MIIErTCCApUCAQAwSTELMAkGA1UEBhMCTVgxFDASBgNVBAgMC01laXhjbyBDaXR5
MRQwEgYDVQQHDAtNZWl4Y28gQ2l0eTEOMAwGA1UECgwFQ2lzY28wggIiMA0GCSqG
SIb3DQEBAQUAA4ICDwAwggIKAoICAQDRWH+ij26HuF/Y6NvITCkD5VJa6KRssDJ8
[...]

Output Omitted

[...]
lRZ3ac3uV0y0kG6FamW3BhceYcDEQN+V0SInZZZQTw1Q5h23JsPkvJmRpKSilc7w
3rKfTXelewT1IJdCmgpp6qrwmEAPyrj/XnYyM/2nc3E3yJLxbGyT++yiVrr2RJeG
Wu6XM4o410LcRdaQZUhuFL/TPZSeLGJB2KU6XuqPMtGAvdmCgqdPSkwWc9mdnzKm
RA==
-----END CERTIFICATE REQUEST-----
Note: Due to Azure requisites, it's necessary to sign the CSR with a CA that has SHA-256 or SHA-1 configured, otherwise, the Azure IdP rejects the certificate when you upload it. More information can be found on the following link: Advanced certificate signing options in a SAML token
9. Send this CSR file with your CA to get the signed certificate.
Step 2. Create PKCS12 File
Once you have the identity certificate signed, you need to create the Public-Key Cryptography Standards (PKCS#12) file with the next 3 files:
- Signed identity certificate
- Private Key (defined in the previous steps)
- CA Certificate chain
You can copy the identity certificate and CA certificate chain to the same device where you created the private key and CSR file. Once you have the 3 files run the openssl pkcs12 -export -in <id_certificate>.cer -certfile <ca_cert_chain>.cer -inkey <private_key_name>.key -out <pkcs12_name>.pfx command to convert the certificate to PKCS#12.
openssl pkcs12 -export -in id.cer -certfile ca_chain.cer -inkey privatekey.key -out cert.pfx
After you run the command, you are asked to enter a password. This password is needed when you install the certificate.
If the command was successful, a new file named "<pkcs12_name>.pfx" is created in the current directory. This is your new PKCS#12 certificate.
Step 3. Upload the PKCS#12 Certificate to Azure and the FDM
Once you have the PKCS#12 file, you need to upload it to Azure and the FDM.
Upload the Certificate to Azure
1. Log in to your Azure portal, navigate to the Enterprise application you want to protect with SAML authentication and select Single Sign-On.
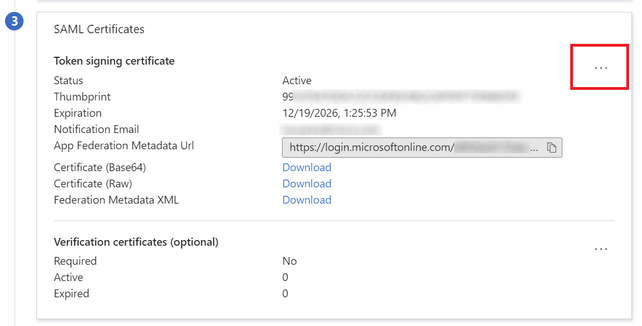
2. Scroll down to the SAML Certificates" section and select the More Options icon > Edit.
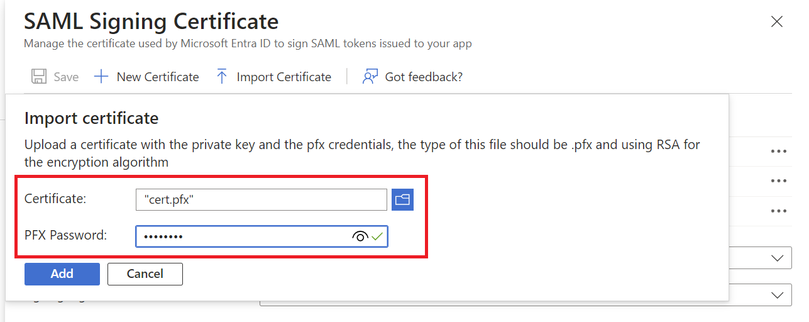
3. Now select the Import certificate option.

4. Find the PKCS12 file previously created and use the password you entered when you created the PKCS#12 file.
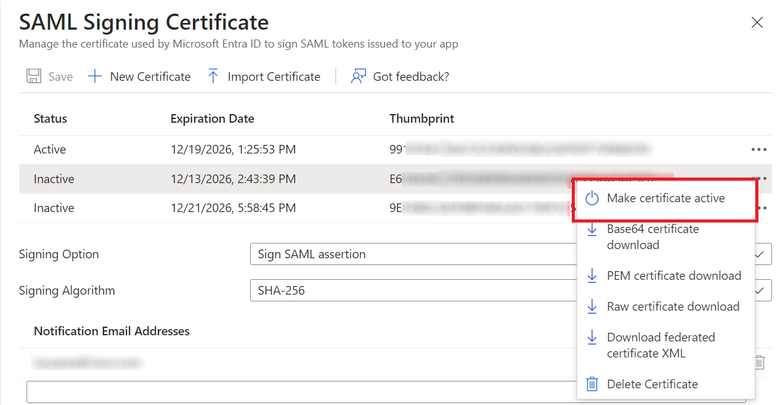
5. Finally, select the Make Certificate Active option.
Upload the Certificate to the FDM
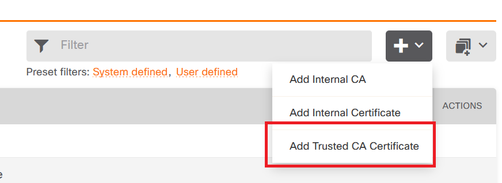
1. Navigate to Objects > Certificates > Click on Add Trusted CA certificate.
2. Enter in the trustpoint name you prefer and upload only the Identity certificate from the IdP (not the PKCS#12 file)
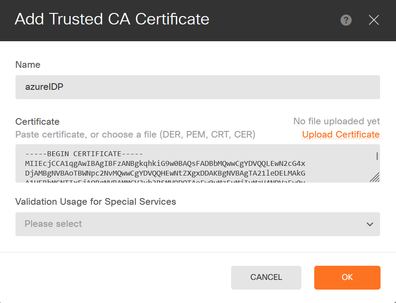
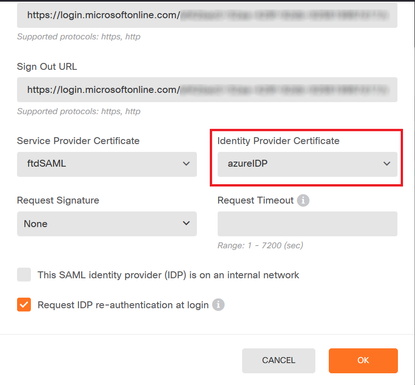
3. Set the new certificate in the SAML object and deploy the changes.
Verify
Run the show saml metadata <trustpoint name> command to ensure the metadata is available from the FTD CLI:
firepower# show saml metadata azure
SP Metadata
-----------
<?xml version="1.0" encoding="UTF-8" standalone="yes"?>
<EntityDescriptor entityID="https:[...omitted...]/saml/sp/metadata/azure"
xmlns="urn:oasis:names:tc:SAML:2.0:metadata">
<SPSSODescriptor AuthnRequestsSigned="false" WantAssertionsSigned="true"
protocolSupportEnumeration="urn:oasis:names:tc:SAML:2.0:protocol">
<KeyDescriptor use="signing">
<ds:KeyInfo xmlns:ds="http://www.w3.org/2000/09/xmldsig#">
<ds:X509Data>
<ds:X509Certificate>
MIIDbzCCAlegAwIBAgIBDDANBgkqhkiG9w0BAQwFADBbMQwwCgYDVQQLEwN2cG4x
...omitted...
HGaq+/IfNKKqkhgT6q4egqMHiA==
</ds:X509Certificate>
</ds:X509Data>
</ds:KeyInfo>
</KeyDescriptor>
<AssertionConsumerService index="0" isDefault="true" Binding="urn:oasis:names:tc:SAML:2.0:bindings:HTTP-
POST" Location="https://[...omitted...]/+CSCOE+/saml/sp/acs?tgname=azure" />
<SingleLogoutService Binding="urn:oasis:names:tc:SAML:2.0:bindings:HTTP-Redirect"
Location="https://[...omitted...]/+CSCOE+/saml/sp/logout"/><SingleLogoutService
Binding="urn:oasis:names:tc:SAML:2.0:bindings:HTTP-POST"
Location="https://[...omitted...]/+CSCOE+/saml/sp/logout"/></SPSSODescriptor>
</EntityDescriptor>

IdP Metadata
------------
<?xml version="1.0" encoding="UTF-8" standalone="yes"?>
<EntityDescriptor entityID="https://sts.windows.net/af42[...omitted...]d17/"
xmlns="urn:oasis:names:tc:SAML:2.0:metadata">
<IdPSSODescriptor protocolSupportEnumeration="urn:oasis:names:tc:SAML:2.0:protocol">
<KeyDescriptor use="signing">
<ds:KeyInfo xmlns:ds="http://www.w3.org/2000/09/xmldsig#">
<ds:X509Data>
<ds:X509Certificate>
MIIEcjCCA1qgAwIBAgIBFzANBgkqhkiG9w0BAQsFADBbMQwwCgYDVQQLEwN2cG4x
[...omitted...]
3Zmzsc5faZ8dMXO+1ofQVvMaPifcZZFoM7oB09RK2PaMwIAV+Mw=
</ds:X509Certificate>
</ds:X509Data>
</ds:KeyInfo>
</KeyDescriptor>
<SingleSignOnService Binding="urn:oasis:names:tc:SAML:2.0:bindings:HTTP-Redirect"
Location="https://login.microsoftonline.com/[...omitted...]/saml2" />
<SingleLogoutService Binding="urn:oasis:names:tc:SAML:2.0:bindings:HTTP-Redirect"
Location="https://login.microsoftonline.com/[...omitted...]/saml2" />
<SingleLogoutService Binding="urn:oasis:names:tc:SAML:2.0:bindings:HTTP-POST"
Location="https://login.microsoftonline.com/[...omitted...]/saml2" />
</IdPSSODescriptor> </EntityDescriptor>


 Feedback