Introduction
This document describes how to replace a faulty Secure Firewall Threat Defense module that is a part of a High Availability (HA) setup.
Prerequisites
Requirements
Cisco recommends that you have knowledge of these topics:
- Cisco Secure Firewall Management Center (FMC)
- Cisco Firepower eXtensible Operating System (FXOS)
- Cisco Secure Firewall Threat Defense (FTD)
Components Used
The information in this document is based on these software and hardware versions:
The information in this document was created from the devices in a specific lab environment. All of the devices used in this document started with a cleared (default) configuration. If your network is live, ensure that you understand the potential impact of any command.
Background Information
This procedure is supported on appliances:
- Cisco Secure Firewall 1000 series appliances
- Cisco Secure Firewall 2100 Series appliances
- Cisco Secure Firewall 3100 series appliances
- Cisco Secure Firewall 4100 series appliances
- Cisco Secure Firewall 4200 series appliances
- Cisco Secure Firewall 9300 appliance
- Cisco Secure Firewall Threat Defense for VMWare
Before you begin
This document requires that you have the new unit configured with the same FXOS and FTD versions.
Identify the Faulty Unit

In this scenario, the Secondary unit (FTD-02) is in a failed state.
Replace a Faulty Unit With Backup
You can use this procedure to replace either the Primary or Secondary unit. This guide assumes that you have a backup of the faulty unit you are going to replace.
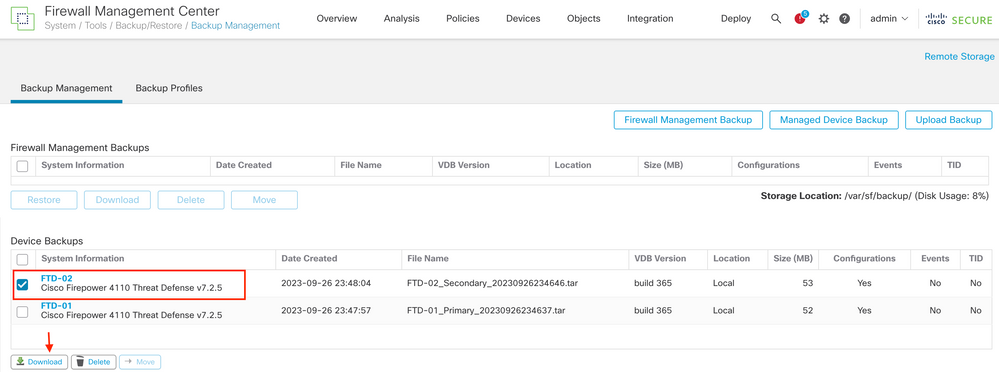
Step 1. Download the backup file from FMC. Navigate to System > Tools > Restore > Device Backups and select the correct backup. Click Download:
Step 2. Upload FTD backup to the /var/sf/backup/ directory of the new FTD:
2.1 From the test-pc (SCP client) upload the backup file to the FTD under the /var/tmp/ directory:
@test-pc ~ % scp FTD-02_Secondary_20230926234646.tar cisco@10.88.243.90:/var/tmp/
2.2 From FTD CLI expert mode, move the backup file from /var/tmp/ to /var/sf/backup/:
root@firepower:/var/tmp# mv FTD-02_Secondary_20230926234646.tar /var/sf/backup/
Step 3. Restore the FTD-02 backup, by applying the next command from clish mode:
>restore remote-manager-backup FTD-02_Secondary_20230926234646.tar

Device model from backup :: Cisco Firepower 4110 Threat Defense
This Device Model  :: Cisco Firepower 4110 Threat Defense
***********************************************
Backup Details
***********************************************
Model = Cisco Firepower 4110 Threat Defense
Software Version = 7.2.5
Serial = FLM22500791
Hostname = firepower
Device Name = FTD-02_Secondary
IP Address = 10.88.171.89
Role = SECONDARY
VDB Version = 365
SRU Version =
FXOS Version = 2.12(0.498)
Manager IP(s) = 10.88.243.90
Backup Date = 2023-09-26 23:46:46
Backup Filename = FTD-02_Secondary_20230926234646.tar
***********************************************

********************* Caution ****************************
Verify that you are restoring a valid backup file.
Make sure that FTD is installed with same software version and matches versions from backup manifest before proceeding.(Running 'show version' command on FTD, displays Model Name and version details).
Restore operation will overwrite all configurations on this device with configurations in backup.
If this restoration is being performed on an RMA device then ensure old device is removed from network or powered off completely prior to proceeding with backup restore.
**********************************************************
Are you sure you want to continue (Y/N)Y
Restoring device . . . . . . . . . . . . . . . . . . . . . . . . . . . . . . . . . . . . . . . . . . . . . . . . . . . . . . . . . . .Refreshing Events InfoDB...
Added table audit_log with table_id 1
Added table health_alarm_syslog with table_id 2
Added table dce_event with table_id 3
Added table application with table_id 4
Added table rna_scan_results_tableview with table_id 5
Added table rna_event with table_id 6
Added table ioc_state with table_id 7
Added table third_party_vulns with table_id 8
Added table user_ioc_state with table_id 9
Added table rna_client_app with table_id 10
Added table rna_attribute with table_id 11
Added table captured_file with table_id 12
Added table rna_ip_host with table_id 13
Added table flow_chunk with table_id 14
Added table rua_event with table_id 15
Added table wl_dce_event with table_id 16
Added table user_identities with table_id 17
Added table whitelist_violations with table_id 18
Added table remediation_status with table_id 19
Added table syslog_event with table_id 20
Added table rna_service with table_id 21
Added table rna_vuln with table_id 22
Added table SRU_import_log with table_id 23
Added table current_users with table_id 24

Broadcast message from root@firepower (Wed Sep 27 15:50:12 2023):

The system is going down for reboot NOW!

Note: When the restore is done, the device logs you out of the CLI, reboots, and automatically connects to the FMC. At this time, the device is going to appear out of date.
Step 4. Resume HA synchronization. From the FTD CLI, enter configure high-availability resume:
>configure high-availability resume
FTD High Availability configuration is now completed:

Replace a Faulty Unit Without Backup
If you do not have a backup of the failed device, you can proceed with this guide. You can either replace the Primary or Secondary unit, the process varies depending on whether the device is primary or secondary. All the steps described in this guide are to restore a Faulty Secondary unit. If you want to restore a Faulty Primary unit, in Step 5, configure high availability, using the existing secondary/active unit as the primary device and the replacement device as the secondary/standby device during registration.
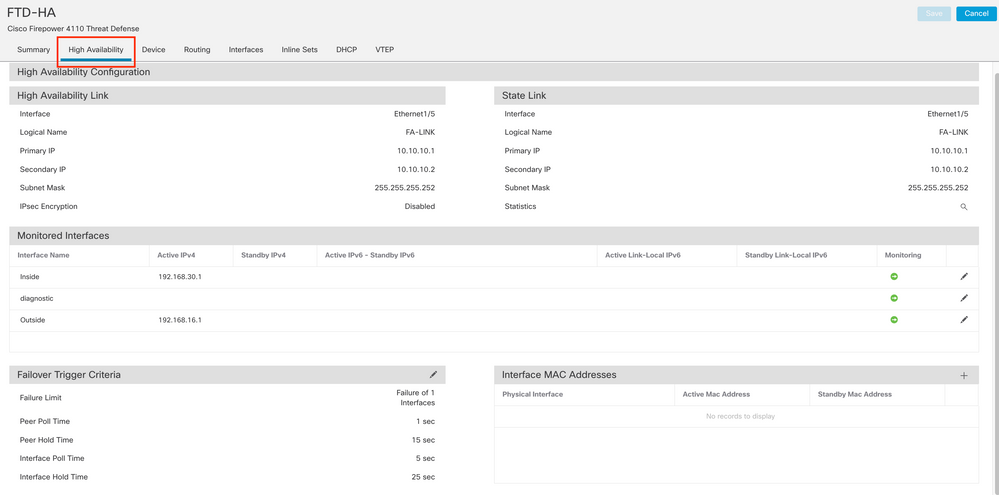
Step 1. Take a screenshot (backup) of the high-availability configuration by navigating to Device > Device Management. Edit the correct FTD HA pair (click on the pencil icon) and then click on the High Availability option:
Step 2. Break the HA.
2.1 Navigate to Devices > Device Management and then click on the three dots menu in the upper right corner. Then click on Break option:

2.2. Select Force break, if standby peer does not respond option:


Note: Because the unit is unresponsive, you need to force breaking the HA. When you break a high availability pair, the active device retains full deployed functionality. The standby device loses its failover and interface configurations and becomes a standalone device.
Step 3. Delete faulty FTD. Identify the FTD to replace, and then click on the three-dots menu. Click Delete:

Step 4. Add the new FTD.
4.1. Navigate to Devices > Device Management > Add and then click Device:

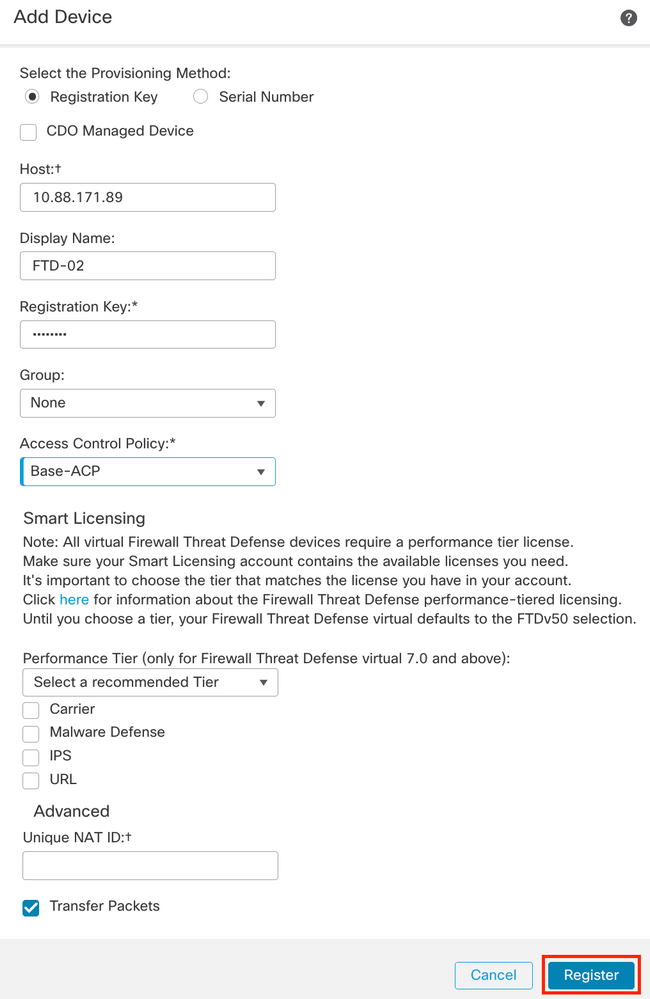
4.2. Select the Provisioning Method, in this case, Registration Key, configure Host, Display Name, Registration Key. Configure an Access Control Policy and click Register.
Step 5. Create the HA.
5.1 Navigate to Devices > Device Management > Add and click High Availability option.

5.2. Configure the Add High Availability Pair. Configure the Name, Device Type, select FTD-01 as the Primary Peer and FTD-02 as the Secondary Peer and then click Continue.
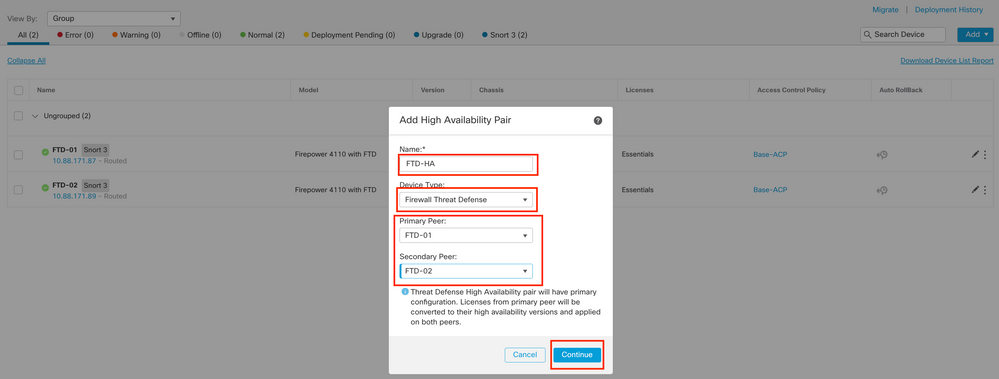

Note: Remember to select the Primary unit as the device that still has the configuration, in this case, FTD-01.
5.3. Confirm the HA creation and then click Yes.
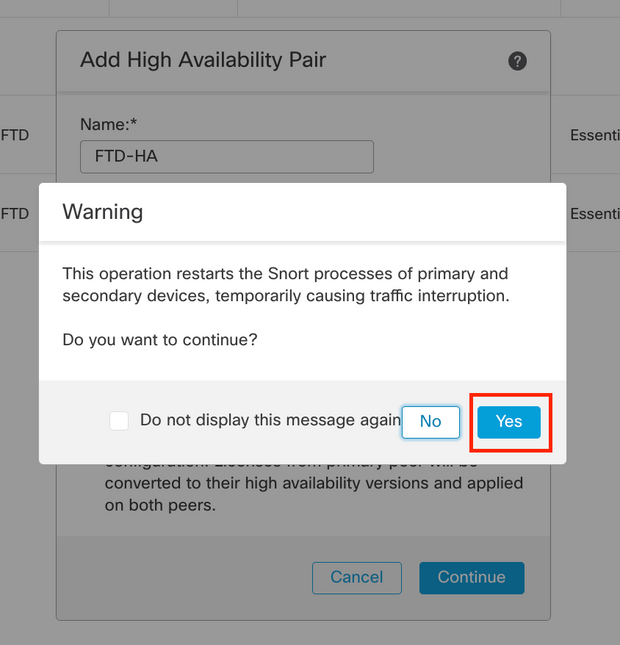

Note: Configuring High Availability restarts the snort engine of both units and this can cause traffic interruption.
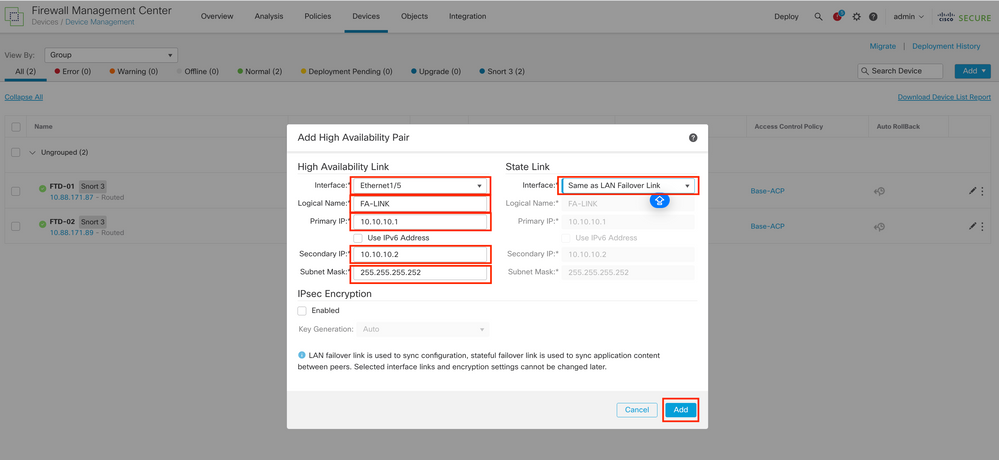
5.4. Configure the High-Availability parameters taken in step 2 and then click on the Add option:
6. FTD High Availability configuration is now completed:

Related Information


 Feedback