Configure Cert Matching for Secure Client Auth on FTD via FDM
Available Languages
Download Options
Bias-Free Language
The documentation set for this product strives to use bias-free language. For the purposes of this documentation set, bias-free is defined as language that does not imply discrimination based on age, disability, gender, racial identity, ethnic identity, sexual orientation, socioeconomic status, and intersectionality. Exceptions may be present in the documentation due to language that is hardcoded in the user interfaces of the product software, language used based on RFP documentation, or language that is used by a referenced third-party product. Learn more about how Cisco is using Inclusive Language.
Contents
Introduction
This document describes how to set up Cisco Secure Client with SSL on FTD via FDM using certificate matching for authentication.
Prerequisites
Requirements
Cisco recommends that you have knowledge of these topics:
- Cisco Firepower Device Manager (FDM) Virtual
- Firewall Threat Defense (FTD) Virtual
- VPN Authentication Flow
Components Used
- Cisco Firepower Device Manager Virtual 7.2.8
- Cisco Firewall Threat Defense Virtual 7.2.8
- Cisco Secure Client 5.1.4.74
- Profile Editor (Windows) 5.1.4.74
The information in this document was created from the devices in a specific lab environment. All of the devices used in this document started with a cleared (default) configuration. If your network is live, ensure that you understand the potential impact of any command.
Background Information
CertificateMatch is a feature that allows administrators to configure criteria that the client must use to select a client certificate for authentication with the VPN server. This configuration is specified in the client profile, which is an XML file that can be managed using the Profile Editor or manually edited. The CertificateMatch feature can be used to enhance the security of VPN connections by ensuring that only a certificate with specific attributes is used for the VPN connection.
This document describes how to authenticate the Cisco Secure Client using the common name from an SSL certificate.
These certificates contain a common name within them, which is used for authorization purposes.
- CA: ftd-ra-ca-common-name
- Engineer VPN Client Certificate: vpnEngineerClientCN
- Manager VPN Client Certificate: vpnManagerClientCN
- Server Certificate: 192.168.1.200
Network Diagram
This image shows the topology that is used for the example of this document.
 Network Diagram
Configurations
Configuration in FDM
Step 1. Configure FTD Interface
Navigate to Device > Interfaces > View All Interfaces, configure inside and outside interface for FTD in Interfaces tab.
For GigabitEthernet0/0,
- Name: outside
- IP Address: 192.168.1.200/24
 FTD Interface
Step 2. Confirm Cisco Secure Client License
Navigate to Device > Smart License > View Configuration, confirm the Cisco Secure Client license in RA VPN License item.
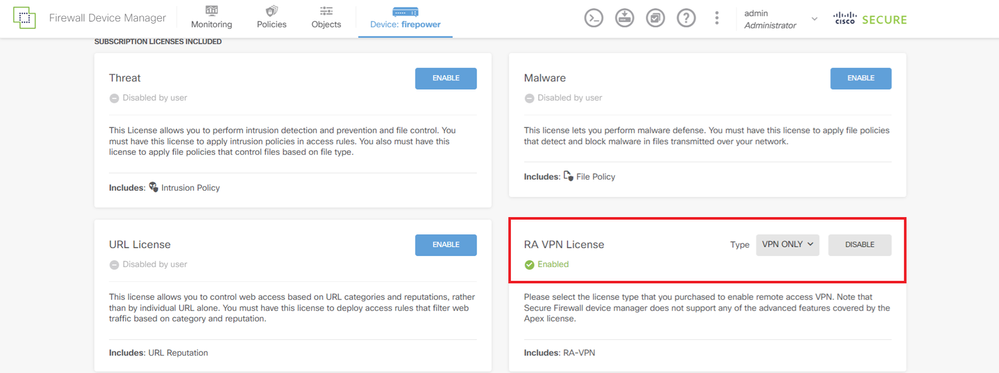 Secure Client License
Step 3. Add Address Pool
Navigate to Objects > Networks, click + button.
 Add Address Pool
Input necessary information to add a new IPv4 address pool. click OK button.
- Name: ftd-cert-match-pool
- Type: Range
- IP Range: 172.16.1.150-172.16.1.160
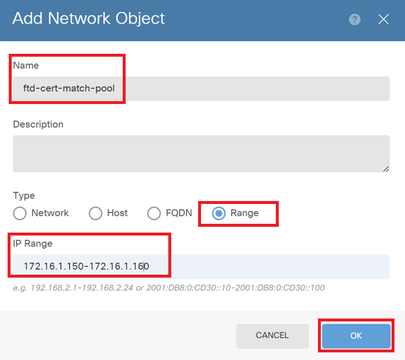 Detail of IPv4 Address Pool
Step 4. Create Secure Client Profile
Download and install the Secure Client Profile Editor from Cisco Software site. Navigate to Server List, click Add button. Input necessary information to add a Server List Entry and click OK button.
- Display Name: cert-match
- FQDN or IP Address: 192.168.1.200
- Primary Protocol: SSL
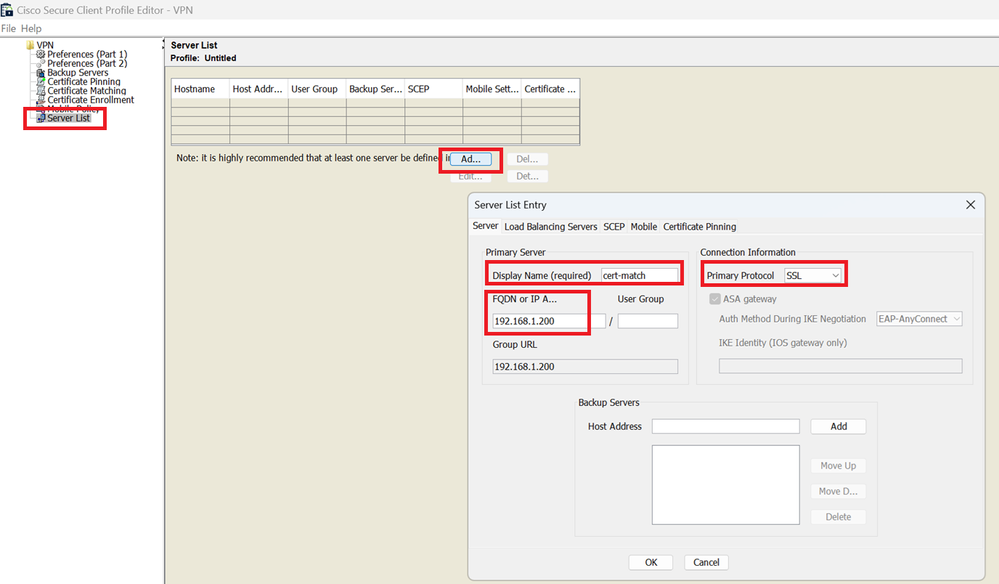 Server List Entry
Navigate to Certificate Matching, click Add button. Input necessary information to add a Distinguished Name Entry and click OK button.
- Name: CN
- Pattern: vpnEngineerClientCN
- Operator: Equal

Note: Check the MatchCase option in this document.
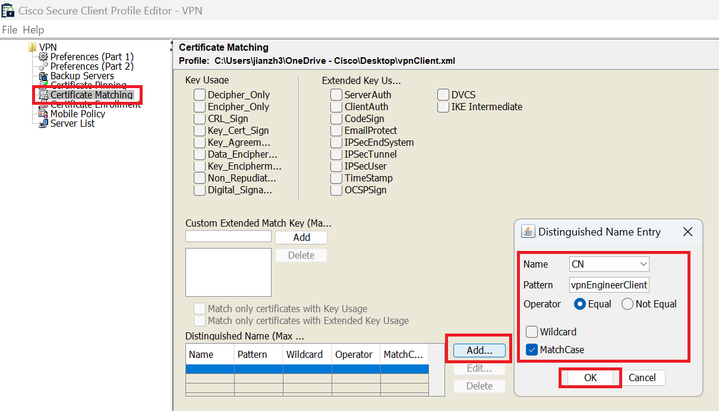 Distinguished Name Entry
Save the secure client profile to local computer and confirm the details of profile.
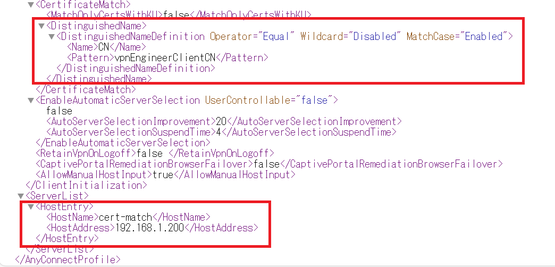 Secure Client Profile
Step 5. Upload Secure Client Profile to FDM
Navigate to Objects > Secure Client Profile, click CREATE SECURE CLIENT PROFILE button.
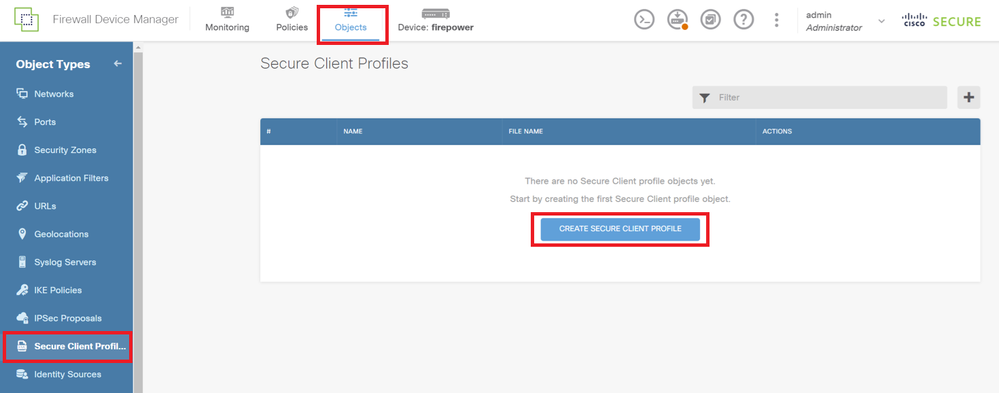 Create Secure Client Profile
Input necessary information to add a secure client profile and click OK button.
- Name: secureClientProfile
- Secure Client Profile: secureClientProfile.xml (upload from local computer)
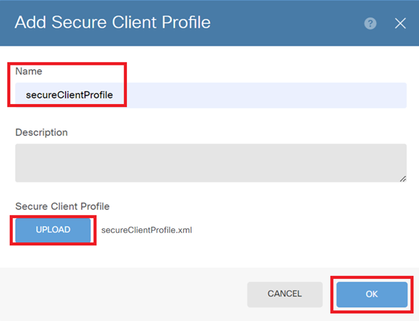 Add Secure Client Profile
Step 6. Add Group Policy
Navigate to Device > Remote Access VPN > View Configuration > Group Policies, click + button.
 Add Group Policy
Input necessary information to add a group policy and click OK button.
- Name: ftd-cert-match-grp
- Secure Client profiles: secureClientProfile
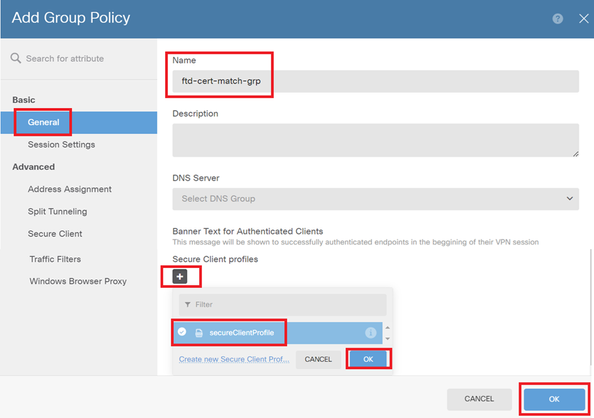 Details of Group Policy
Step 7. Add FTD Certificate
Navigate to Objects > Certificates, click Add Internal Certificate from + item.
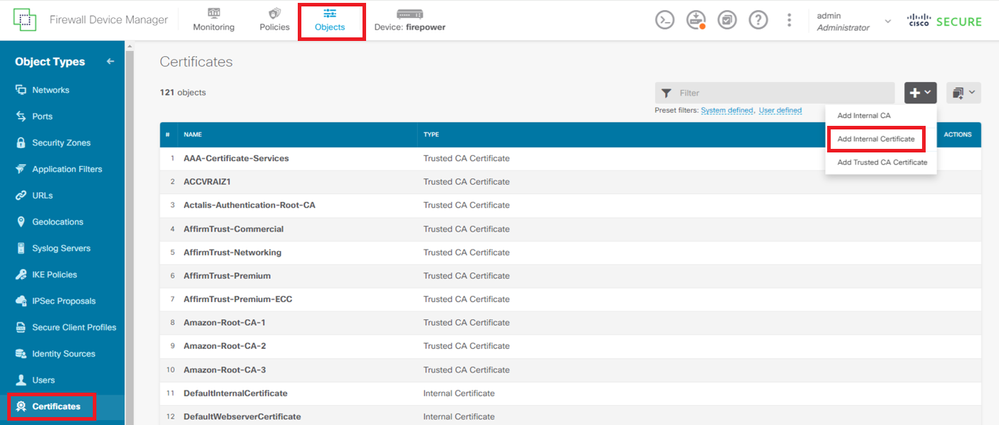 Add Internal Certificate
Click Upload Certificate and Key.
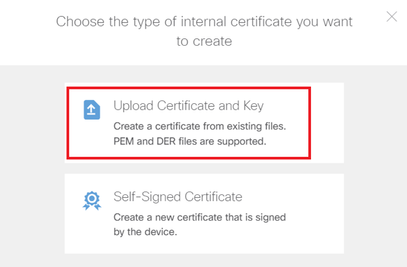 Upload Certificate and Key
Input necessary information for FTD certificate, import a certificate and a certificate key from local computer and then Click OK button.
- Name: ftd-vpn-cert
- Validation Usage for Special Services: SSL Server
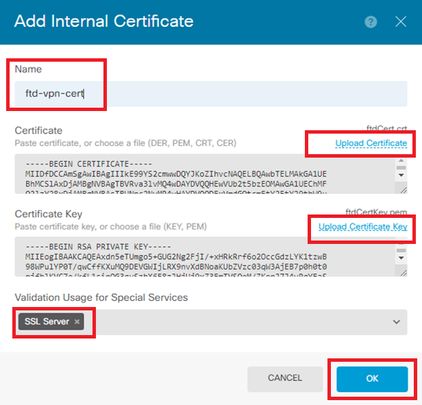 Details of Internal Certificate
Step 8. Add CA to FTD
Navigate to Objects > Certificates, click Add Trusted CA Certificate from + item.
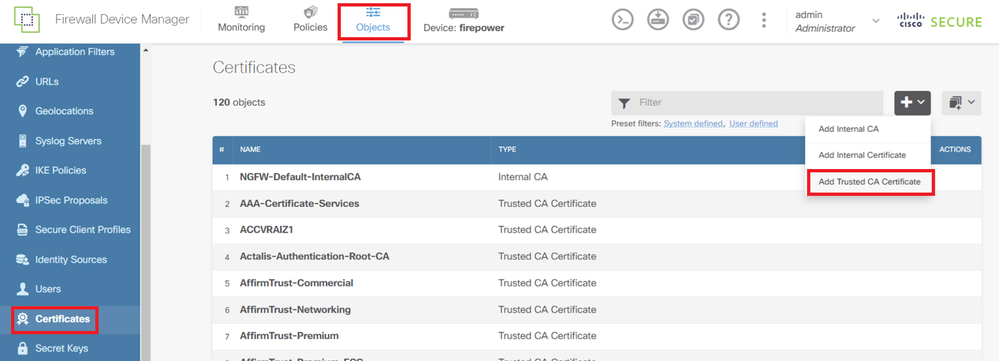 Add Trusted CA Certificate
Input necessary information for CA, import a certificate from local computer.
- Name: ftdvpn-ca-cert
- Validation Usage for Special Services: SSL Client
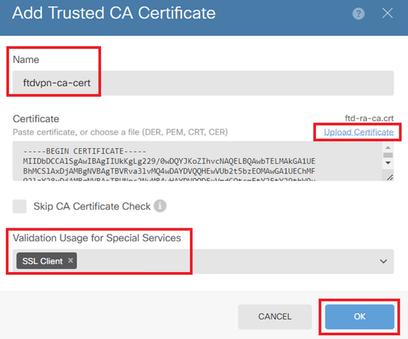 Details of Trusted CA Certificate
Step 9. Add Remote Access VPN Connection Profile
Navigate to Device > Remote Access VPN > View Configuration > Connection Profiles, click CREATE CONNECTION PROFILE button.
 Add Remote Access VPN Connection Profile
Input necessary information for connection profile and click Next button.
- Connection Profile Name: ftd-cert-match-vpn
- Authentication Type: Client Certificate Only
- Username From Certificate: Map specific field
- Primary Field: CN (Common Name)
- Secondary Field: OU (Organizational Unit)
- IPv4 Address Pools: ftd-cert-match-pool
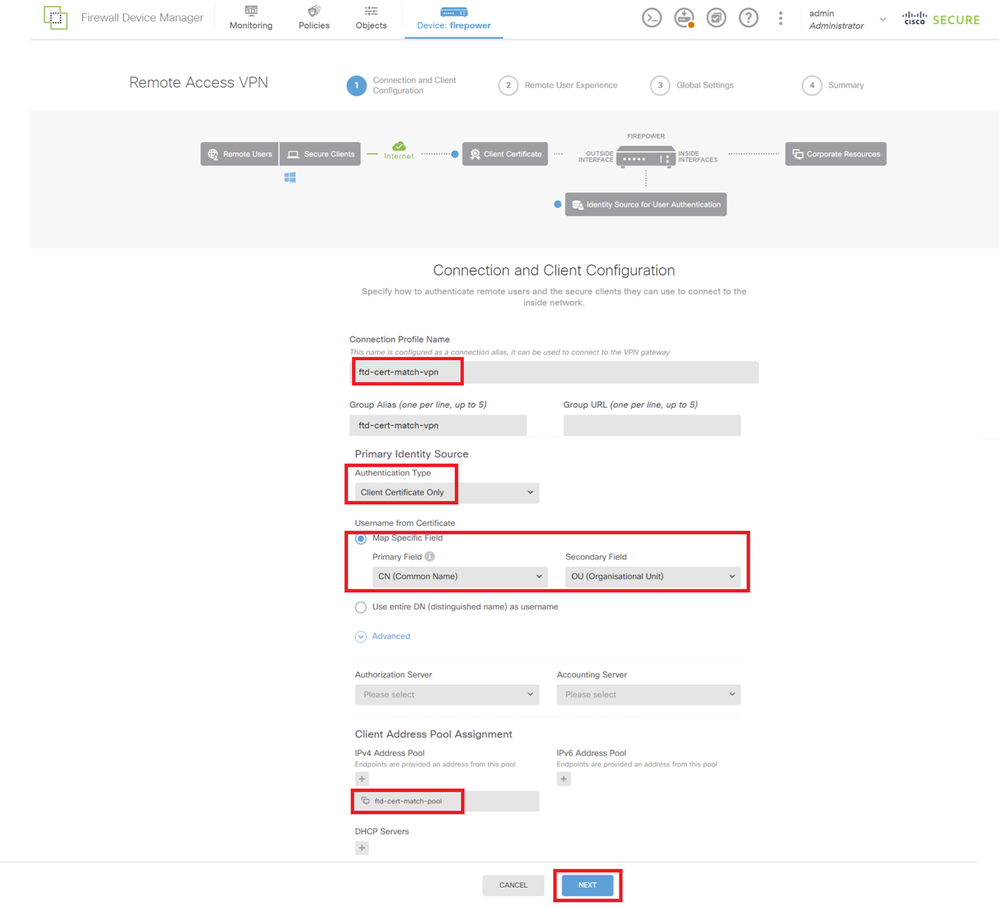 Details of VPN Connection Profile
Input necessary information for group policy and click Next button.
- View Group Policy: ftd-cert-match-grp
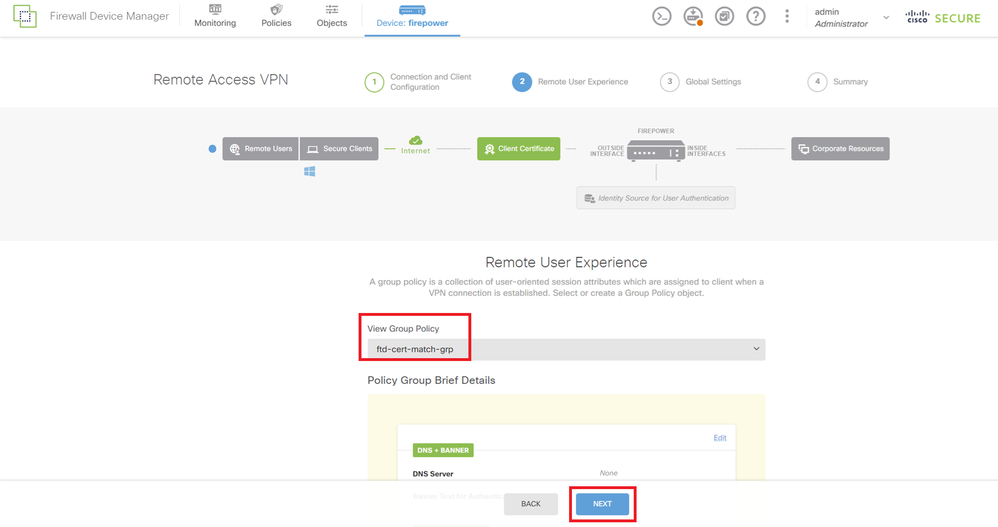 Select Group Policy
Select Certificate of Device Identity, Outside Interface, Secure Client Package for VPN connection.
- Certificate of Device Identity: ftd-vpn-cert
- Outside Interface: outside (GigabitEthernet0/0)
- Secure Client Package: cisco-secure-client-win-5.1.4.74-webdeploy-k9.pkg

Note: Disabled NAT Exempt feature in this document.
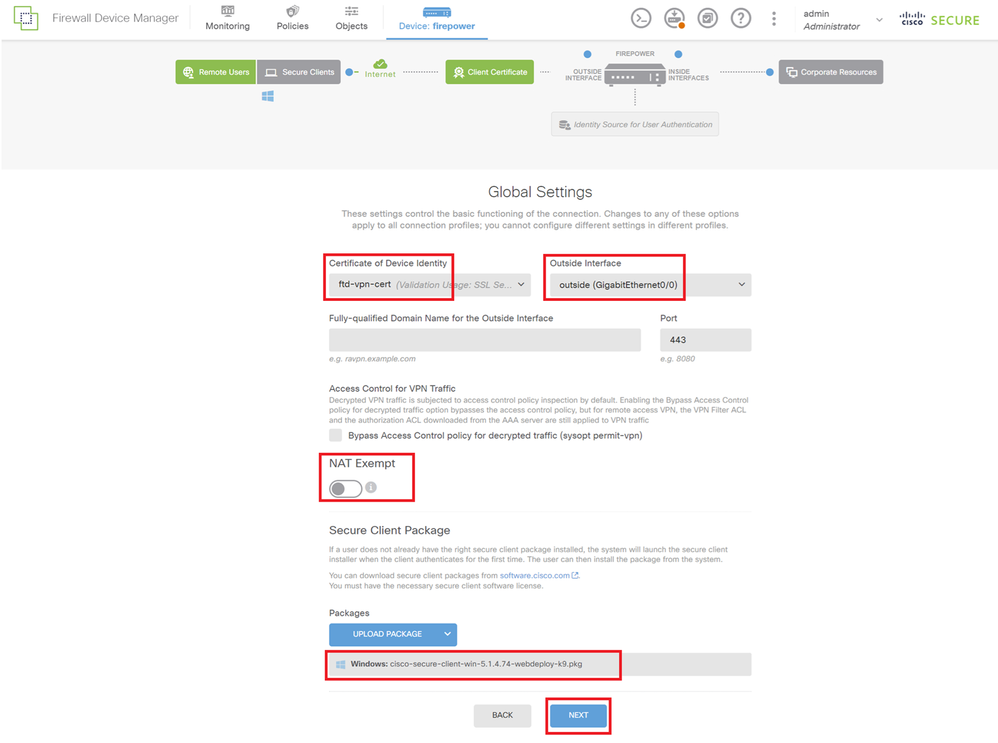 Details of Global Settings
Step 10. Confirm Summary for Connection Profile
Confirm the information entered for VPN connection and click FINISH button.
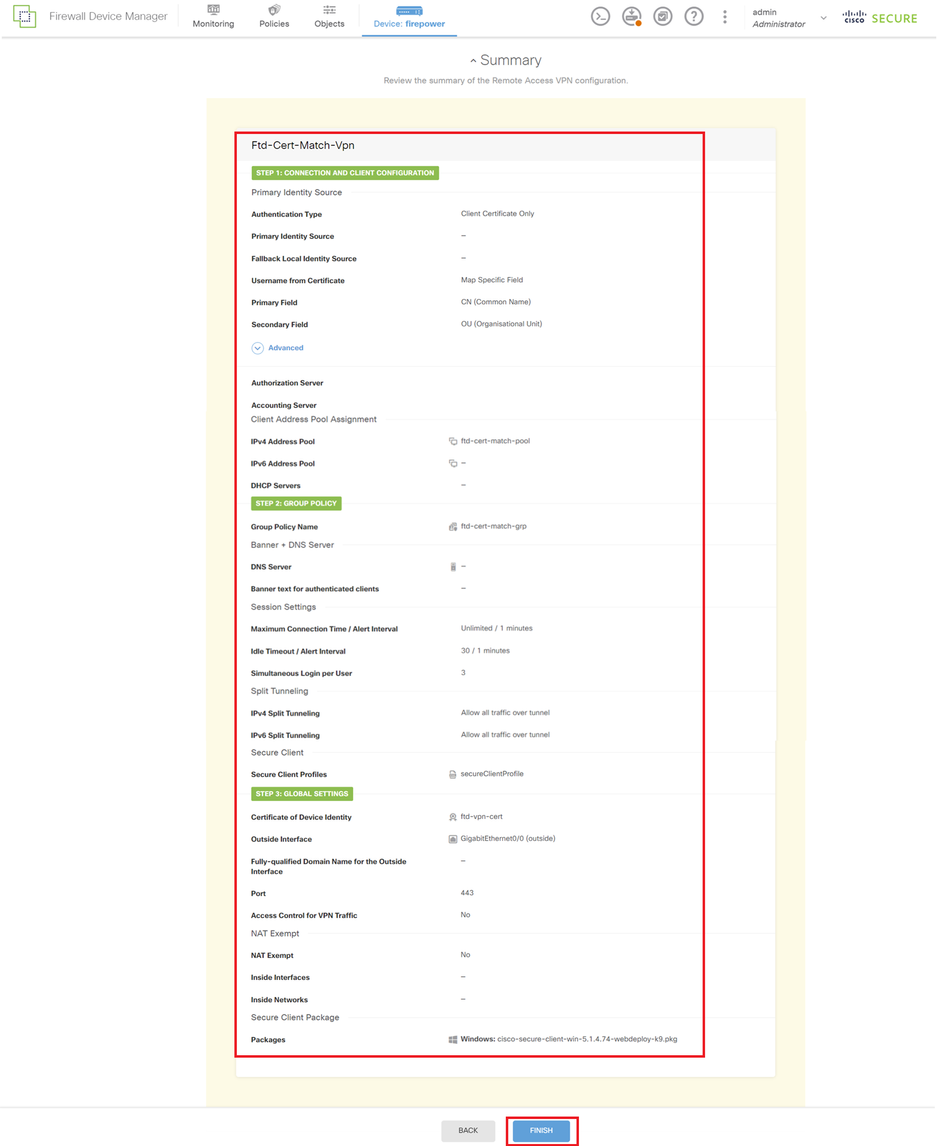 Confirm Summary for Connection Profile
Confirm in FTD CLI
Confirm the VPN connection settings in the FTD CLI after deployment from the FDM.
// Defines IP of interface
interface GigabitEthernet0/0
speed auto
nameif outside
cts manual
propagate sgt preserve-untag
policy static sgt disabled trusted
security-level 0
ip address 192.168.1.200 255.255.255.0

// Defines a pool of addresses
ip local pool ftd-cert-match-pool 172.16.1.150-172.16.1.160

// Defines Trustpoint for Server Certificate
crypto ca trustpoint ftd-vpn-cert
enrollment terminal
keypair ftd-vpn-cert
crl configure

// Server Certificate
crypto ca certificate chain ftdvpn-ca-cert
certificate ca 5242a02e0db6f7fd
3082036c 30820254 a0030201 02020852 42a02e0d b6f7fd30 0d06092a 864886f7
......
quit

// Defines Trustpoint for CA
crypto ca trustpoint ftdvpn-ca-cert
enrollment terminal
validation-usage ssl-client
crl configure

// CA
crypto ca certificate chain ftdvpn-ca-cert
certificate ca 5242a02e0db6f7fd
3082036c 30820254 a0030201 02020852 42a02e0d b6f7fd30 0d06092a 864886f7
......
quit

// Configures the FTD to allow Cisco Secure Client connections and the valid Cisco Secure Client images
webvpn
enable outside
http-headers
hsts-server
enable
max-age 31536000
include-sub-domains
no preload
hsts-client
enable
x-content-type-options
x-xss-protection
content-security-policy
anyconnect image disk0:/anyconnpkgs/cisco-secure-client-win-5.1.4.74-webdeploy-k9.pkg 2
anyconnect profiles secureClientProfile disk0:/anyconncprofs/secureClientProfile.xml
anyconnect enable
tunnel-group-list enable
cache
disable
error-recovery disable

// Configures the group-policy to allow SSL connections
group-policy ftd-cert-match-grp internal
group-policy ftd-cert-match-grp attributes
dhcp-network-scope none
vpn-simultaneous-logins 3
vpn-idle-timeout 30
vpn-idle-timeout alert-interval 1
vpn-session-timeout none
vpn-session-timeout alert-interval 1
vpn-filter none
vpn-tunnel-protocol ssl-client
split-tunnel-policy tunnelall
ipv6-split-tunnel-policy tunnelall
split-dns none
split-tunnel-all-dns disable
client-bypass-protocol disable
msie-proxy method no-modify
vlan none
address-pools none
ipv6-address-pools none
webvpn
anyconnect ssl dtls none
anyconnect mtu 1406
anyconnect ssl keepalive none
anyconnect ssl rekey time none
anyconnect ssl rekey method none
anyconnect dpd-interval client none
anyconnect dpd-interval gateway none
anyconnect ssl compression none
anyconnect dtls compression none
anyconnect modules none
anyconnect profiles value secureClientProfile type user
anyconnect ssl df-bit-ignore disable
always-on-vpn profile-setting

// Configures the tunnel-group to use the certificate authentication
tunnel-group ftd-cert-match-vpn type remote-access
tunnel-group ftd-cert-match-vpn general-attributes
address-pool ftd-cert-match-pool
default-group-policy ftd-cert-match-grp
tunnel-group ftd-cert-match-vpn webvpn-attributes
authentication certificate
group-alias ftd-cert-match-vpn enable
Confirm in VPN Client
Step 1. Copy Secure Client Profile to VPN Client
Copy secure client profile to engineer VPN client and manager VPN client.

Note: The directory of secure client profile in Windows computer : C:\ProgramData\Cisco\Cisco Secure Client\VPN\Profile
 Copy Secure Client Profile to VPN Client
Step 2. Confirm Client Certificate
In engineer VPN client, navigate to Certificates - Current User > Personal > Certificates, check the client certificate used for authentication.
 Confirm Certificate for Engineer VPN Client
Double click the client certificate, navigate to Details, check the detail of Subject.
- Subject: CN = vpnEngineerClientCN
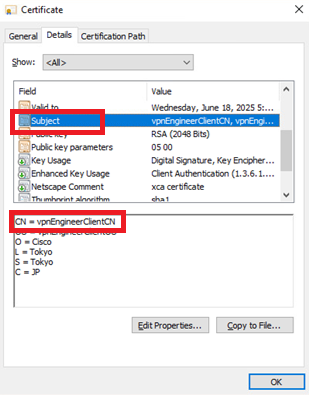 Details of Engineer Client Certificate
In manager VPN client, navigate to Certificates - Current User > Personal > Certificates, check the client certificate used for authentication.
 Confirm Certificate for Manager VPN Client
Double click the client certificate, navigate to Details, check the detail of Subject.
- Subject: CN = vpnManagerClientCN
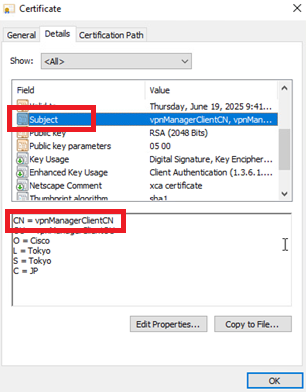 Details of Manager Client Certificate
Step 3. Confirm CA
In both engineer VPN client and manager VPN client, navigate to Certificates - Current User > Trusted Root Certification Authorities > Certificates, check the CA used for authentication.
- Issued By: ftd-ra-ca-common-name
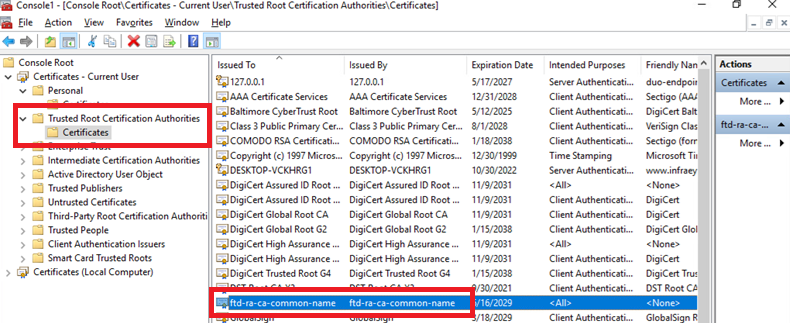 Confirm CA
Verify
Step 1. Initiate VPN Connection
In engineer VPN client, initiate the Cisco Secure Client connection. No need to input the username and password, the VPN connected successfully.
 VPN connection succeeded for Engineer VPN Client
In manager VPN client, initiate the Cisco Secure Client connection. the VPN connected failed due to certificate validation failure.
 VPN Connection Failed for Manager VPN Client
Step 2. Confirm VPN Sessions in FTD CLI
Run show vpn-sessiondb detail anyconnect command in FTD (Lina) CLI to confirm the VPN sessions of engineer.
firepower# show vpn-sessiondb detail anyconnect

Session Type: AnyConnect Detailed

Username : vpnEngineerClientCN Index : 32
Assigned IP : 172.16.1.150 Public IP : 192.168.1.11
Protocol : AnyConnect-Parent SSL-Tunnel
License : AnyConnect Premium
Encryption : AnyConnect-Parent: (1)none SSL-Tunnel: (1)AES-GCM-256
Hashing : AnyConnect-Parent: (1)none SSL-Tunnel: (1)SHA384
Bytes Tx : 14718 Bytes Rx : 12919
Pkts Tx : 2 Pkts Rx : 51
Pkts Tx Drop : 0 Pkts Rx Drop : 0
Group Policy : ftd-cert-match-grp Tunnel Group : ftd-cert-match-vpn
Login Time : 05:42:03 UTC Tue Jul 2 2024
Duration : 0h:00m:11s
Inactivity : 0h:00m:00s
VLAN Mapping : N/A VLAN : none
Audt Sess ID : 00000000000200006683932b
Security Grp : none Tunnel Zone : 0

AnyConnect-Parent Tunnels: 1
SSL-Tunnel Tunnels: 1

AnyConnect-Parent:
Tunnel ID : 32.1
Public IP : 192.168.1.11
Encryption : none Hashing : none
TCP Src Port : 50170 TCP Dst Port : 443
Auth Mode : Certificate
Idle Time Out: 30 Minutes Idle TO Left : 29 Minutes
Client OS : win
Client OS Ver: 10.0.17763
Client Type : AnyConnect
Client Ver : Cisco AnyConnect VPN Agent for Windows 5.1.4.74
Bytes Tx : 7359 Bytes Rx : 0
Pkts Tx : 1 Pkts Rx : 0
Pkts Tx Drop : 0 Pkts Rx Drop : 0

SSL-Tunnel:
Tunnel ID : 32.2
Assigned IP : 172.16.1.150 Public IP : 192.168.1.11
Encryption : AES-GCM-256 Hashing : SHA384
Ciphersuite : ECDHE-RSA-AES256-GCM-SHA384
Encapsulation: TLSv1.2 TCP Src Port : 50177
TCP Dst Port : 443 Auth Mode : Certificate
Idle Time Out: 30 Minutes Idle TO Left : 30 Minutes
Client OS : Windows
Client Type : SSL VPN Client
Client Ver : Cisco AnyConnect VPN Agent for Windows 5.1.4.74
Bytes Tx : 7359 Bytes Rx : 12919
Pkts Tx : 1 Pkts Rx : 51
Pkts Tx Drop : 0 Pkts Rx Drop : 0
Troubleshoot
You can expect to find information about VPN authentication in the debug syslog of Lina engine and in the DART file on Windows computer.
This is an example of debug logs in the Lina engine during VPN connection from engineer client.
Jul 02 2024 04:16:03: %FTD-7-717029: Identified client certificate within certificate chain. serial number: 7AF1C78ADCC8F941, subject name: CN=vpnEngineerClientCN,OU=vpnEngineerClientOU,O=Cisco,L=Tokyo,ST=Tokyo,C=JP.
Jul 02 2024 04:16:03: %FTD-6-717022: Certificate was successfully validated. serial number: 7AF1C78ADCC8F941, subject name: CN=vpnEngineerClientCN,OU=vpnEngineerClientOU,O=Cisco,L=Tokyo,ST=Tokyo,C=JP.
Jul 02 2024 04:16:04: %FTD-6-113009: AAA retrieved default group policy (ftd-cert-match-grp) for user = vpnEngineerClientCN
Jul 02 2024 04:16:09: %FTD-6-725002: Device completed SSL handshake with client outside:192.168.1.11/50158 to 192.168.1.200/443 for TLSv1.2 session
Related Information
Configure FDM On-Box Management Service for Firepower 2100
Configure Remote Access VPN on FTD Managed by FDM
Configure and Verify Syslog in Firepower Device Manager
Revision History
| Revision | Publish Date | Comments |
|---|---|---|
1.0 |
25-Jul-2024 |
Initial Release |
Contributed by Cisco Engineers
- Jian ZhangTechnical Consulting Engineer
Contact Cisco
- Open a Support Case

- (Requires a Cisco Service Contract)
 Feedback