Introduction
This document describes the process of dynamically assigning group policies using SAML authentication on the Cisco Secure Firewall.
Prerequisites
Requirements
Cisco recommends that you have knowledge of these topics:
- Basic Remote Access VPN, SSL, and Certificate Knowledge
- Basic SAML Knowledge
- Experience with Firepower Management Center
Components Used
The information in this document is based on these software and hardware versions:
- Cisco Secure Firewall v7.2.0
- Cisco Secure Firewall Management Center (FMC) v7.2.0
- Cisco Secure Client 5.0.04032
The information in this document was created from the devices in a specific lab environment. All of the devices used in this document started with a cleared (default) configuration. If your network is live, ensure that you understand the potential impact of any command.
Background Information
In this document, Okta is used as the Identity Provider (IdP). However, it is essential to note that any IdP that allows for the customization of attributes sent in the SAML Assertion can be used.
The SAML IdP can be configured in order to send assertions attributes in addition to the authentication assertion. The SAML Service Provider component in ASA/FTD interprets the SAML assertions received from IdP and makes policy selections based on them.
Configure
Network Diagram
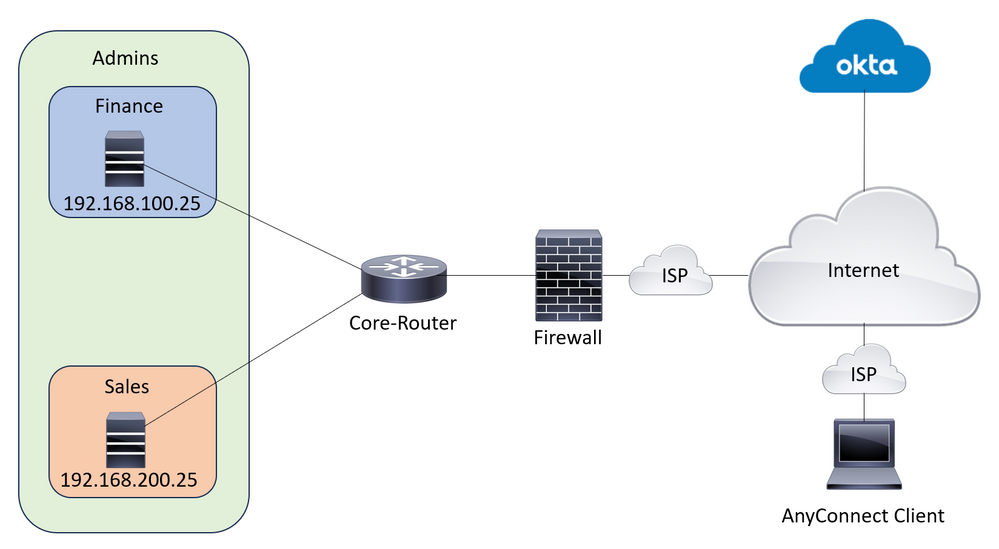 Lab Topology

Note: This setup only works when a user is part of one and only one group, it does not work when a user is a part of multiple groups.
Configurations
Okta - SAML Configuration Part #1
1. Navigate to Applications > Applications and click Browse App Catalog. Search forCisco in the catalog search bar and choose Cisco ASA VPN SAML, then click Add Integration.
 Okta Add Application
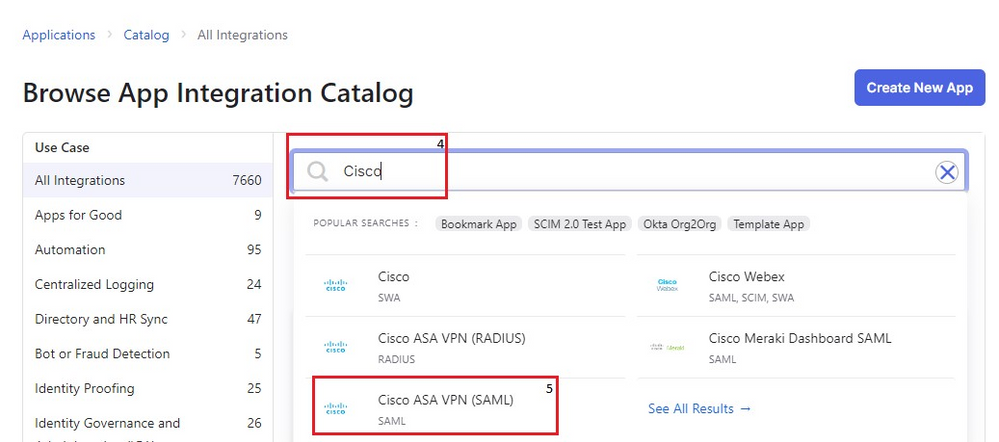 Okta ASA SAML App
 Okta Application Add Button
2. Fill in the Application Label in the General Settings section and click Done.
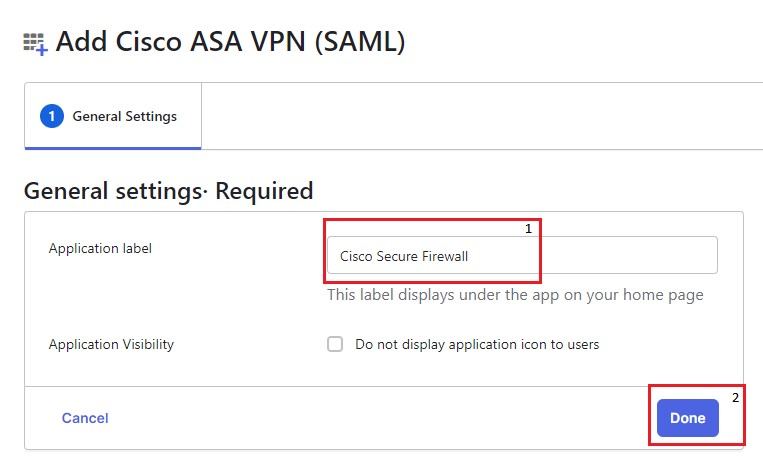 Okta general settings
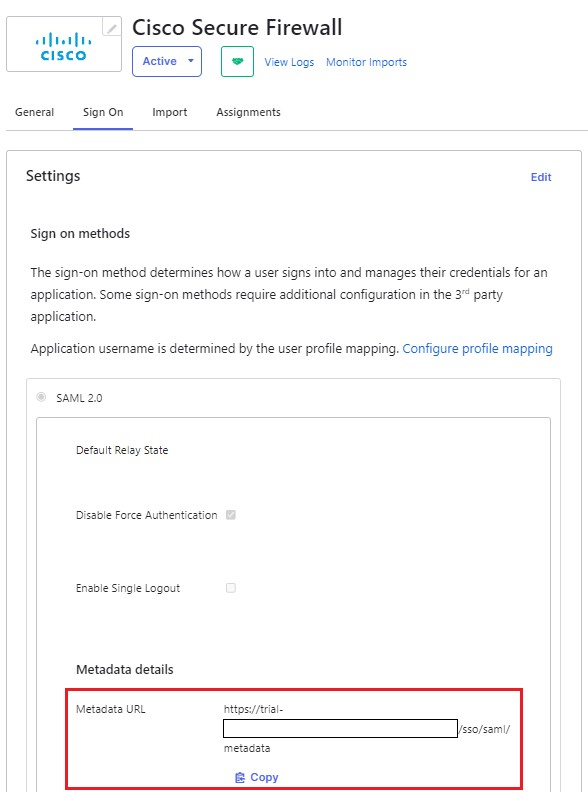
3. In the Sign On, find the Metadata URL, copy it, and open it in a new tab. The Metadata XML file looks like as shown in this image:
 Okta Sign on page
 Metadata XML
4. Download the SAML SIgning Certificate, from the same Sign On section. This is needed for configuring SSO in FMC.
5. Next, configure the SSO server on FMC. The assumption is made that the SSL certificate is configured and enrolled for FTD (here the trustpoint name is RAVPN-SSL).
FMC - SAML Configuration
1. In FMC, navigate to Devices > Certificates and click Add.
 FMC devices nav
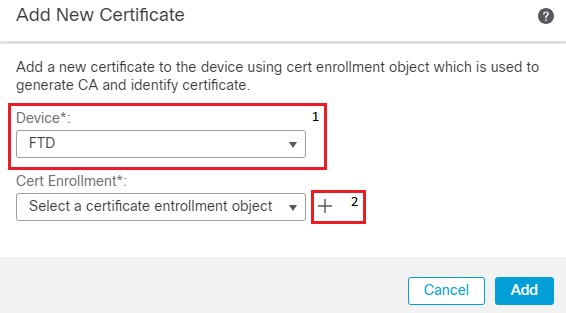
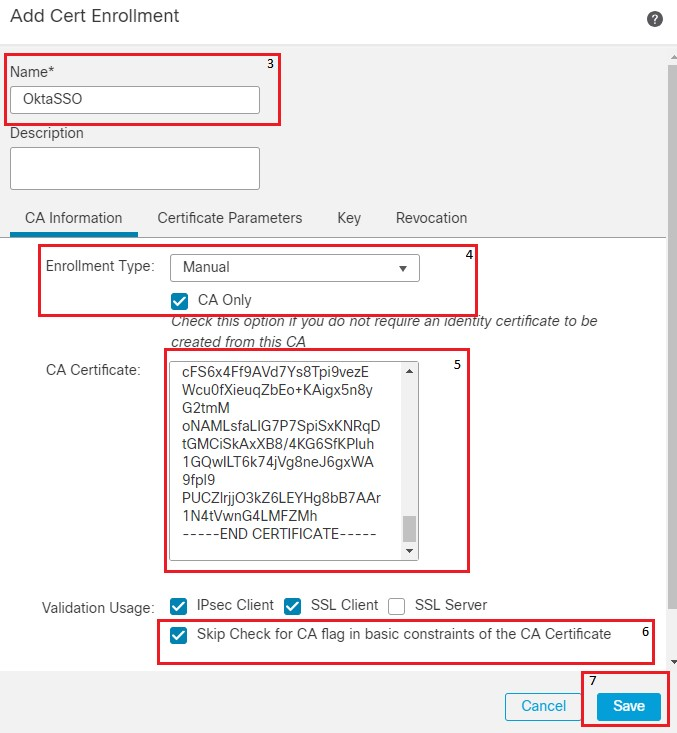
2. Choose the appropriate device and click + , next to Cert Enrollment. Give a name for the Cert Enrollment. Under CA Information, choose the Enrollment Type to be Manual. Check the CA Only checkbox and in the CA Certificate section paste the contents of the certificate you received earlier from the Okta SAML page. Once done, click Save.
 FMC cert enrollment
 fmc cert enrollment details

Note: Check the option Skip Check for CA flag in basic constraints of the CA certificate, since the certificate provided by the IdP is usually self-signed.
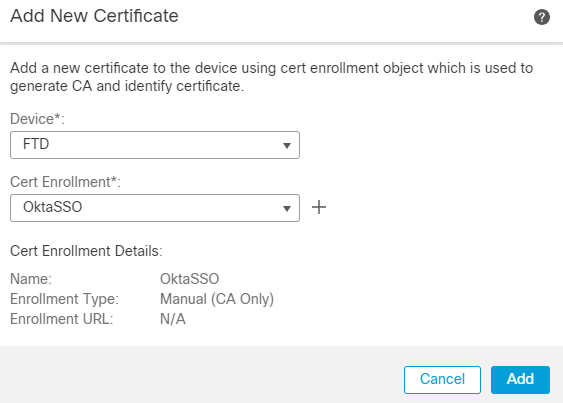
3. Click Add in order to enroll in the certificate.
 fmc add cert enrollment
4. Navigate to Objects > Object Management > AAA Server > Single Sign-on Server and click Add Single Sign-on Server. Fill in the necessary information, from the Metadata XML (Entity ID and SSO URL), the base URL is the common name (CN) that you have for the FTD SSL Certificate. The IdP Certificate is OktaSSO which was enrolled earlier, and the Service Provider Certificate is the SSL certificate for FTD, which is RAVPN-SSL in this case. Leave everything else as default. Once you are done, click Save.
 FMC object nav
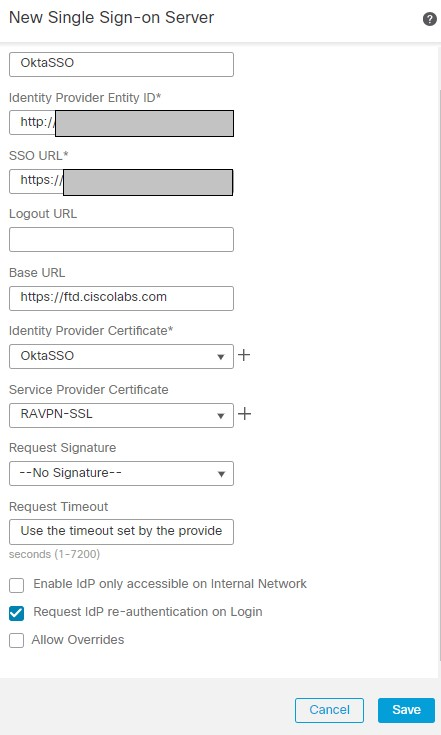 FMC SSO config
5. This SSO server is used as our Authentication in the Remote Access Profile. Navigate to Devices > Remote Access > Edit and edit the Connection Profile of Concern. Under the AAA Section, use the SSO server created earlier as the Authentication Method. Once done, click Save. Remember to save the changes by clicking Save on the top right corner.
 FMC Devices RA nav
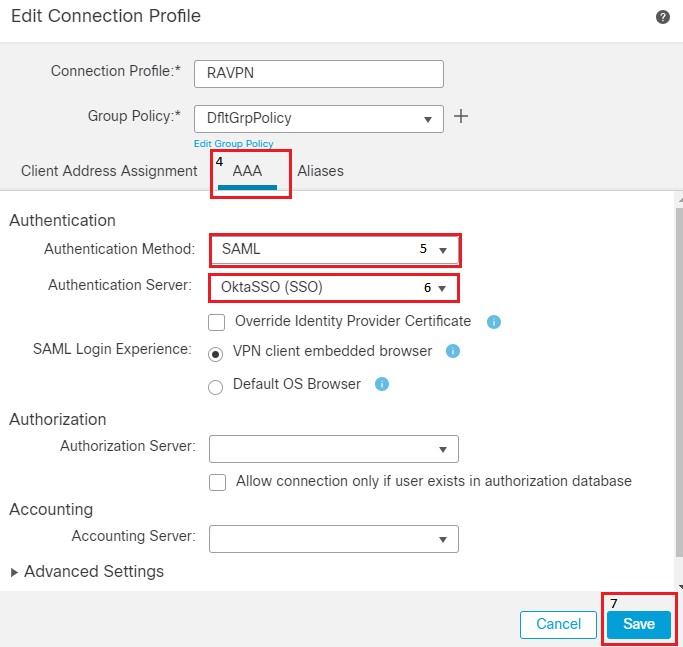 FMC Connection Profile settings
6. Next, create the three Group Policies named, Admins, Finance, and Sales.
7. The Group Policy DfltGrpPolicy has the Simultaneous Login Per User. value set to 0 so that it is not used by any user.
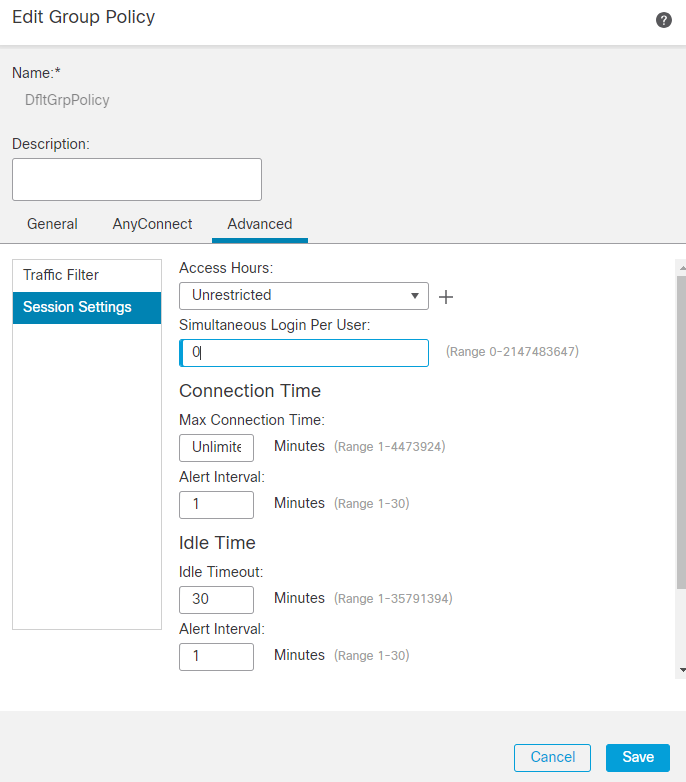 FMC DfltGrpPolicy Settings
8. Navigate to Advanced Section > Group Policies and click +. Click + again in order to create a new group policy.
9. The image shows an example of the group Admins. Enter the name as Admins and this group has Welcome Admins! as their banner value. This group also has Split Tunneling configured to Tunnel networks specified below which has access to both Finance and Sales team servers. Leave the rest of the options as defaults. Once you are done, click Save.
 FMC RAVPN Adv GP
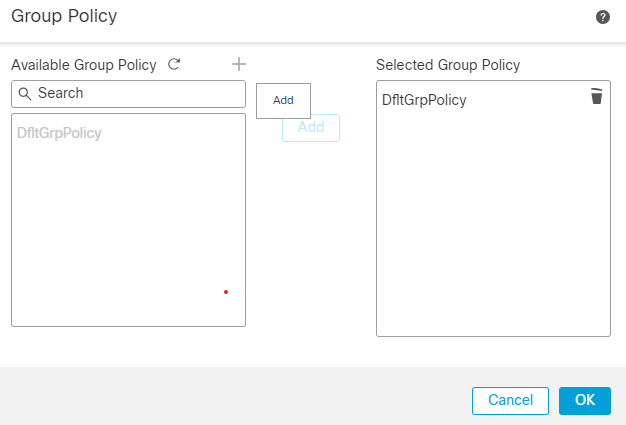 GP Add dialog
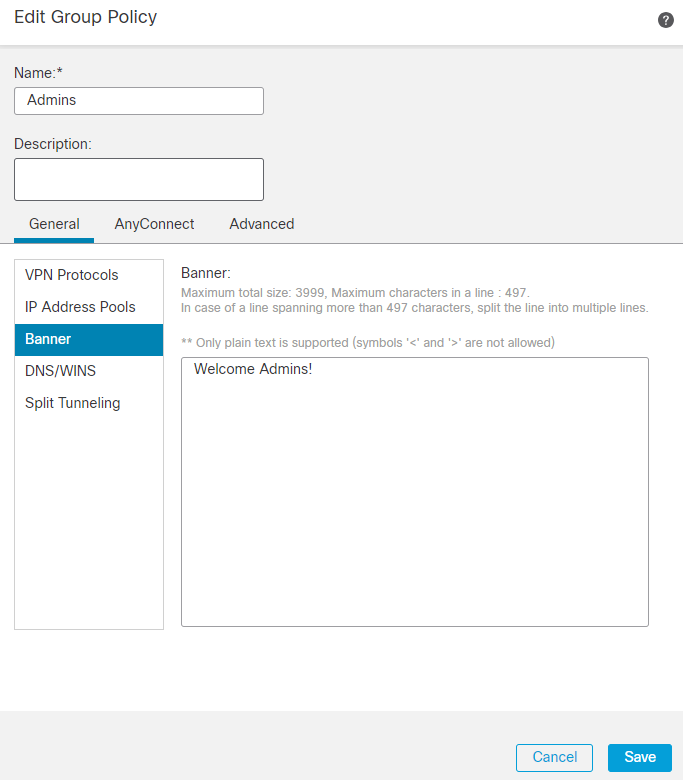 Admin GP dialog
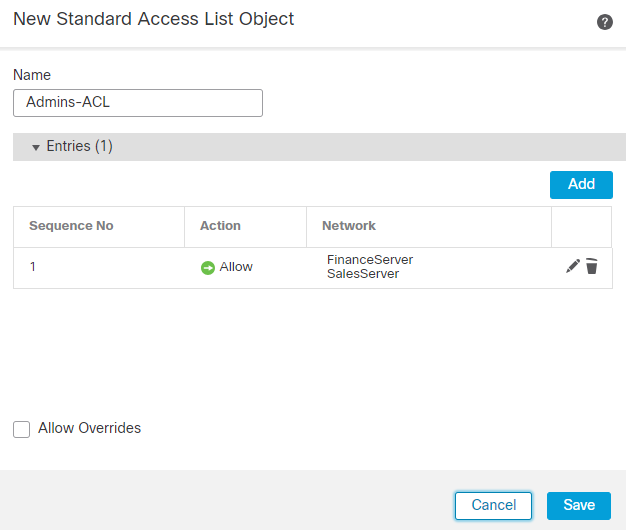 Admin GP ACL
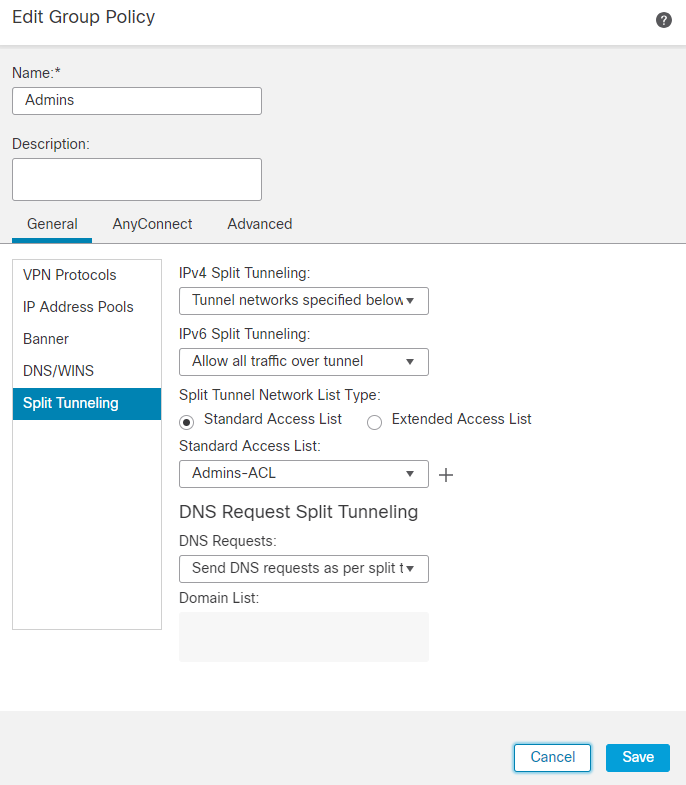 Admin GP ACL dialog
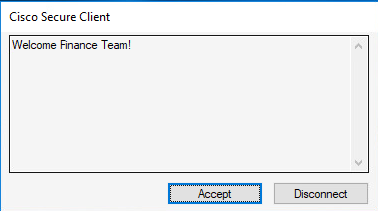
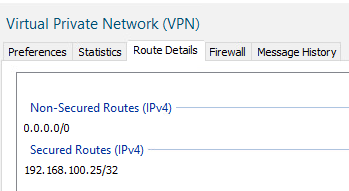
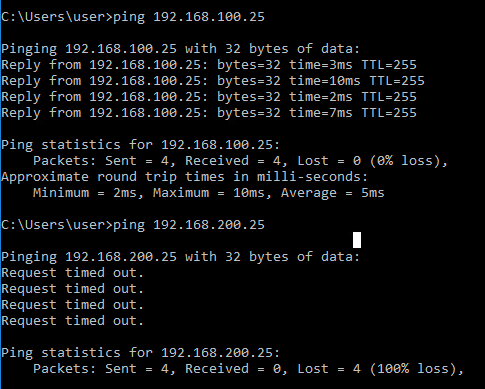
9. Similarly, create the remaining two groups Finance and Sales. In this lab, they are configured with banner values Welcome Finance Team! and Welcome Sales Team! respectively. They are also configured with split tunneling like the Admins group with them accessing only their servers, that is, the Finance group can access only FinanceServer and the Sales group can only access SalesServer.
10. Once created, add all of them and click OK.
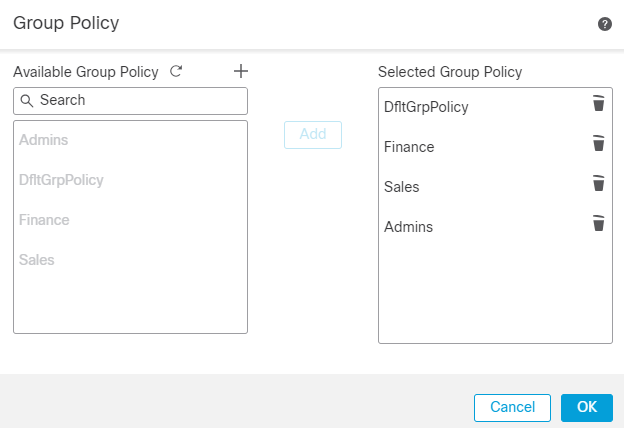 Add All GP
11. Ensure to click Save on the top right corner and deploy the changes.
12. The required configurations on FTD/FMC are completed. The remaining SAML configuration on Okta is configured in the next section.
Okta - SAML Configuration Part #2
1. Navigate to Applications > Applications and click Application > Sign on Section > Edit.
2. The custom group attribute configured in Okta - SAML Config Part #1 which is cisco_group_policy, must be sent in the SAML assertion. Click the dropdown arrow to the left of Attributes (Optional) and in the Group Attributes Statements (Optional), use the group as Name and cisco_group_policy as Filter which matches the regex ^((?!Everyone).*) as shown.
 Okta Sign on Settings
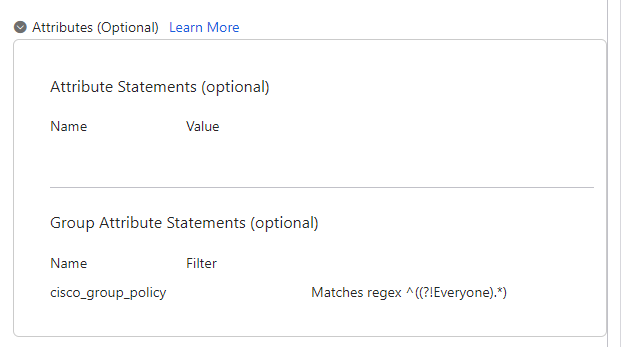 Okta App attribute

Note: The Regex filter ^((?!Everyone).*), gives the groups assigned to the user (which is only one per user in this lab) except Everyone, and send it as a value of cisco_group_policy in the SAML assertion.
4. Click Preview SAML in order to see what the assertion looks like.
5. Under Advanced Settings fill the values in the field, in order to complete the SAML configuration on Okta. Once done, click Save.
Entity ID: https://<VPN Base URL>/saml/sp/metadata/<Connection Profile Name>
Assertion Consumer URL: https://<VPN Base URL>/+CSCOE+/saml/sp/acs?tgname=<Connection Profile Name>
Single Logout Service URL: https://<VPN Base URL>/+CSCOE+/saml/sp/logout
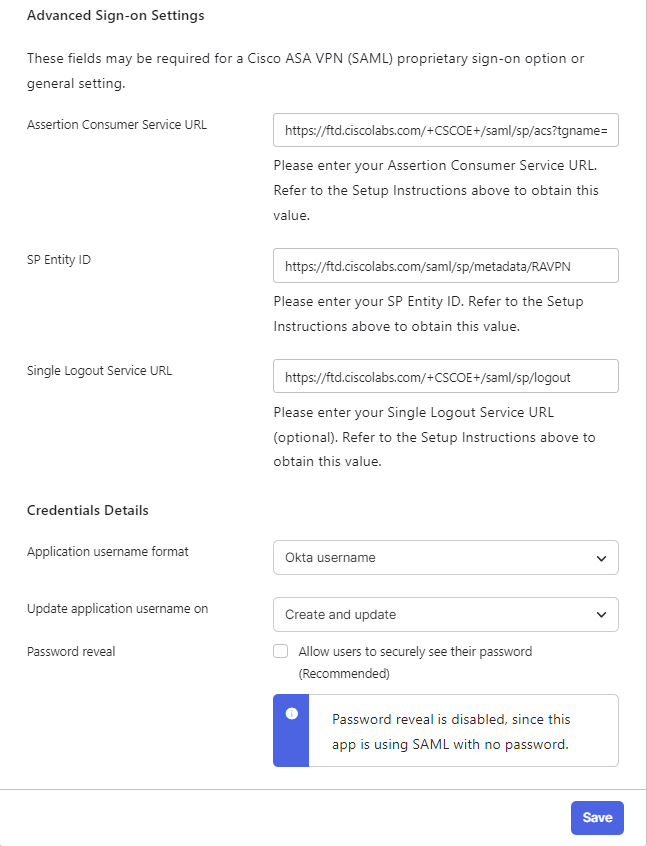 Okta SSO Setting
Okta - Users and Groups
1. Start by configuring the groups, create three groups based on the Network Diagram, Admins, Finance, and Sales.
2. Log in to Okta Admin Dashboard. Navigate to Directory > Groups.
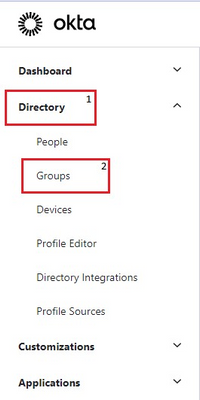 Okta directory group nav
3. Click Add group.
 Okta add Group
4. Fill in the group name and an optional description. Configuration is shown for the Admins group. After you are done, click Save.
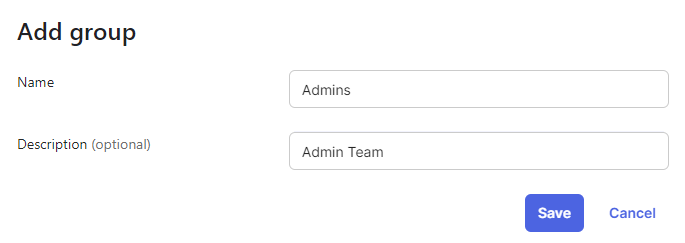 Okta Admin Group
5. Repeat the same steps for adding the Finance and Sales groups.
6. Next, navigate to Directory > Profile Editor > Groups as shown. Click Okta group.
 Okta group attribute
7. Click Add Attribute, and fill in the values as shown.
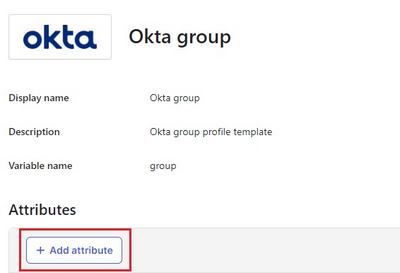 Okta add attribute
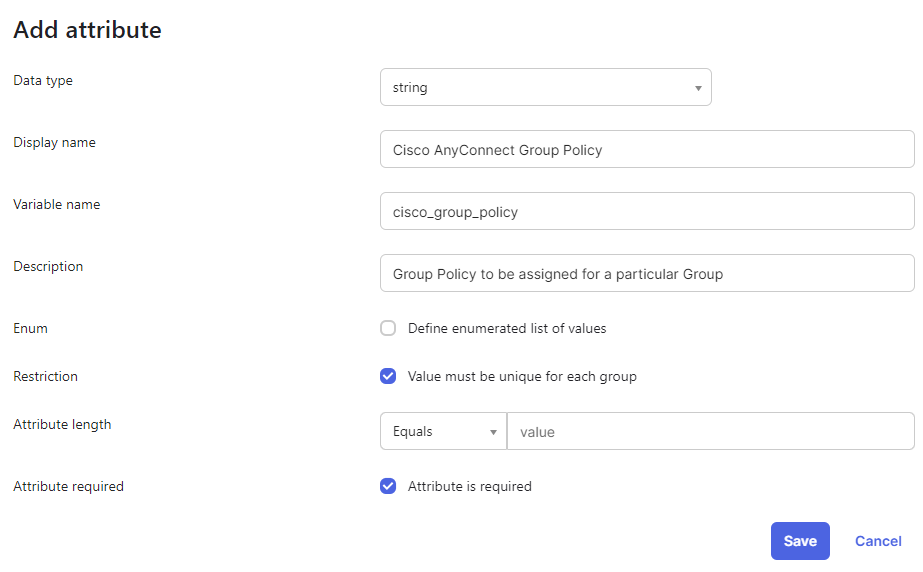 Okta group attribute dialog

Note: The value of the field Variable name must be strictly cisco_group_policy.
8. Once done, click Save.
9. Navigate to Directory > Groups, click any of the three groups you created earlier. The image shows an example for the Salesgroup.
 Okta Group list
10. Under the Profile section, the attribute created in Step 7. can be seen. Click Edit and fill in the value with the name of the Group Policy you want that group to be assigned. Configure the value Sales in order to keep it simple. Once done, click Save.
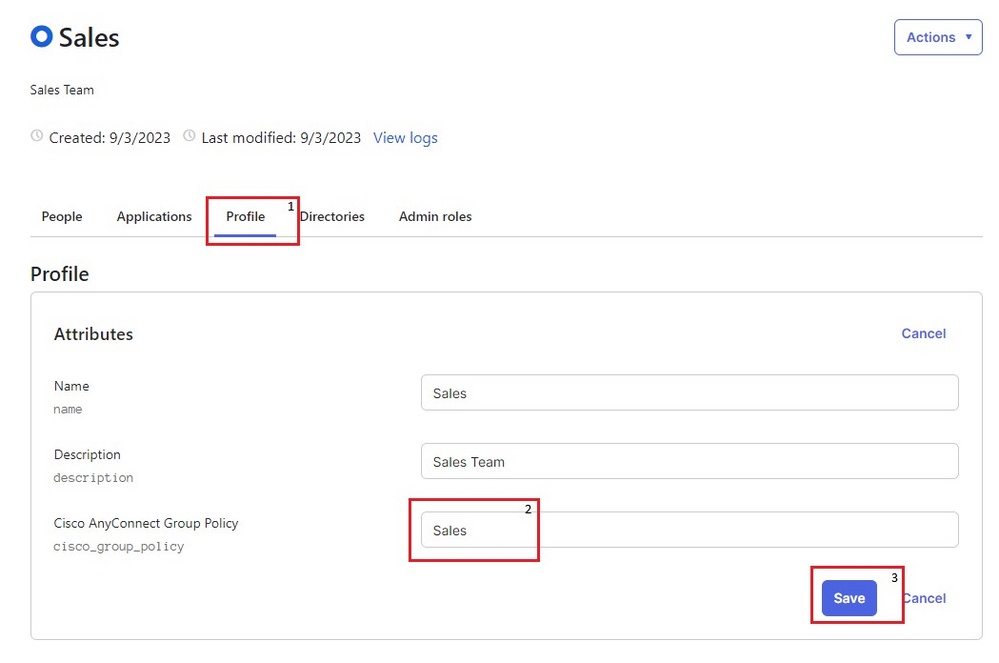 Okta Sales Group
11. Repeat the same steps for the groups Admins and Finance. Configure the value for cisco_group_policy to Admins and Finance respectively.

Note: The value of cisco_group_policy must be exactly the same as the group policy name configured earlier.
12. Next, create some users and assign them to the groups created in the previous steps. Navigate to Directory > People and click Add Person.
13. Create three users to test the lab, FinanceUser, SalesUser, and AdminUser that belong to Finance, Sales, and Admins groups respectively. The image shows an example for FinanceUser groups.
 Okta add person
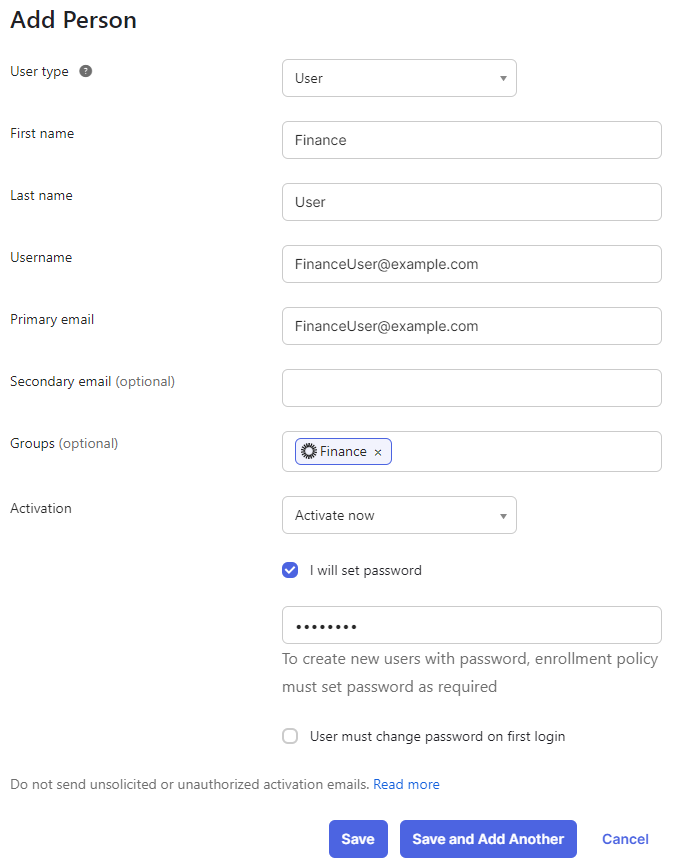 Okta finance user
14. Repeat the same steps for the remaining two users; AdminUser and SalesUser.
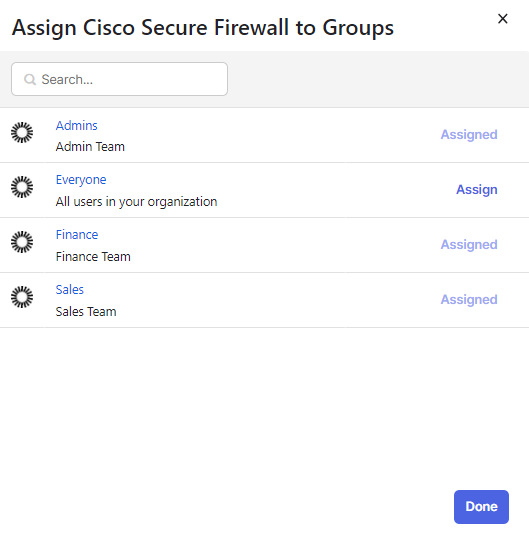
15. The final step is to add the groups created to the SAML application. Navigate to Applications > Applications > Edit > Assignments. Click Assign > Assign to Groups. Assign to the three groups created earlier and click Done.
 Okta assign user to group
 Okta group assign
Verify
Finance User
Banner
 Finance team banner
Secured Routes
 Secured routes for Finance
Server Reachability
 ICMP to destination
Session on FTD
firepower# sh vpn-sessiondb anyconnect filter name FinanceUser@xxxxxxx
Username : FinanceUser@xxxxxxx     Index : 14
Assigned IP : 10.72.1.1                 Public IP : 10.106.68.246

--------- OUTPUT OMMITTED ---------

Group Policy : Finance                  Tunnel Group : RAVPN
Duration : 0h:03m:26s
Sales User
Banner
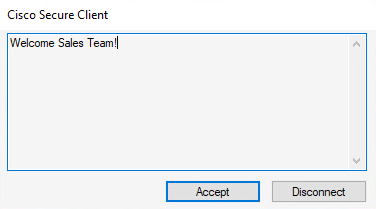 Sales Team banner
Secured Routes
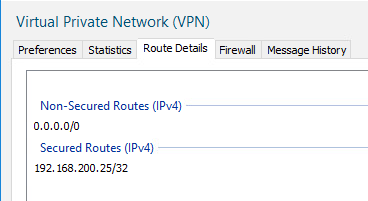 Sales team secured routes
Server Reachability
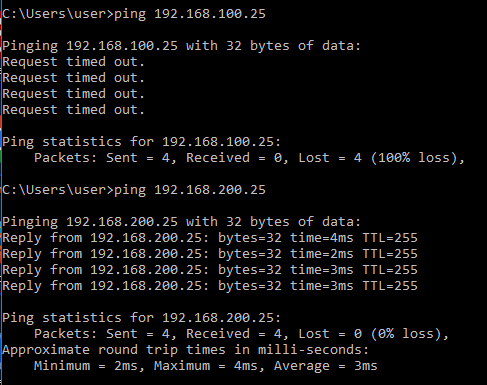 ICMP to destination
Session on FTD
firepower# sh vpn-sessiondb anyconnect filter name SalesUser@xxxxxxx
Username : SalesUser@xxxxxxx Index : 15
Assigned IP : 10.72.1.1           Public IP : 10.106.68.246

--------- OUTPUT OMMITTED ---------

Group Policy : Sales              Tunnel Group : RAVPN
Duration : 0h:02m:57s
Admin User
Banner
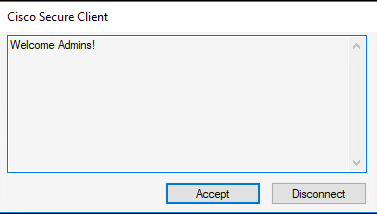 Admin team banner
Secured Routes
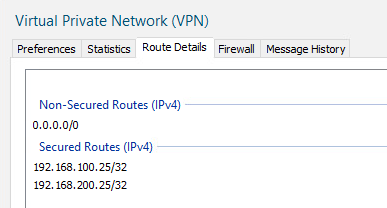 Admin Secured routes
Server Reachability
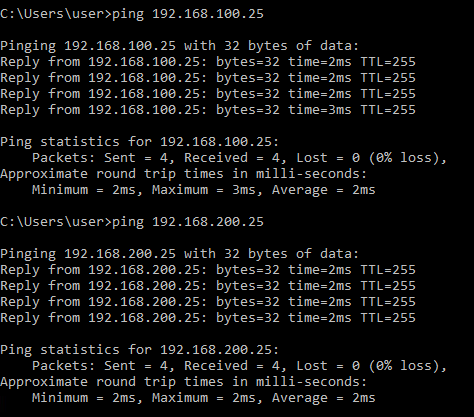 ICMP to destination
Session on FTD
firepower# sh vpn-sessiondb anyconnect filter name AdminUser@xxxxxxx
Username : AdminUser@xxxxxxx   Index : 16
Assigned IP : 10.72.1.1             Public IP : 10.106.68.246

--------- OUTPUT OMMITTED ---------

Group Policy : Admins               Tunnel Group : RAVPN
Duration : 0h:03m:05s
Troubleshoot
1. Ensure the time is synchronized on FTD and Okta. Check the same using show clock on the FTD CLI.
firepower# sh clock
05:14:52.494 UTC Mon Sep 4 2023
2. Apply SAML debugs in order to confirm if the SAML assertion is a Success.
firepower# debug webvpn saml 255
------------ OUTPUT OMMITTED ------------

Sep 04 05:20:42
[SAML] consume_assertion:
http://www[.]okta[.]com/XXXXXXXXXXXXXX FinanceUser@xxxxxxx
[saml] webvpn_login_primary_username: SAML assertion validation succeeded

------------ OUTPUT OMMITTED ------------
3. Refer to this document in order to troubleshoot common issues found on the client side.


 Feedback