Introduction
This document describes the steps to configure API access and use it to fetch resources information from the Secure Access.
Prerequisites
Cisco recommends that you have knowledge of these topics:
- Python 3.x
- REST API
- Cisco Secure Access
Requirements
These requirements must be fulfilled before proceeding further:
- Cisco Secure Access user account with theFull Adminuser role.
- Cisco Security Cloud Single Sign On (SCSO) account to sign in to Secure Access.
Components Used
The information in this document is based on these software and hardware versions:
- Secure Access Dashboard
- Python
The information in this document was created from the devices in a specific lab environment. All of the devices used in this document started with a cleared (default) configuration. If your network is live, ensure that you understand the potential impact of any command.
Configure
The Secure Access API provides a standard REST interface and supports the OAuth 2.0 Client Credentials Flow. To get started, sign in to Secure Access and create your Secure Access API keys. Then, use your API credentials to generate an API access token.

Note: API keys, passwords, secrets, and tokens allow access to your private data. You must never share your credentials with another user or organization.
Configure the API key from the Secure Access Dashboard before executing the scripts mentioned in this article.
Create an API Key
Create an API key and secret with these steps. Sign in to Secure Access with the URL: Secure Access
- From the left sidebar, select the option
Admin.
- Under
Admin select the option API Keys:
 Secure Access Dashboard Admin - API Keys
3. On the top right corner, click on the + button to Add a new API Key:
 Secure Access - Add API Key
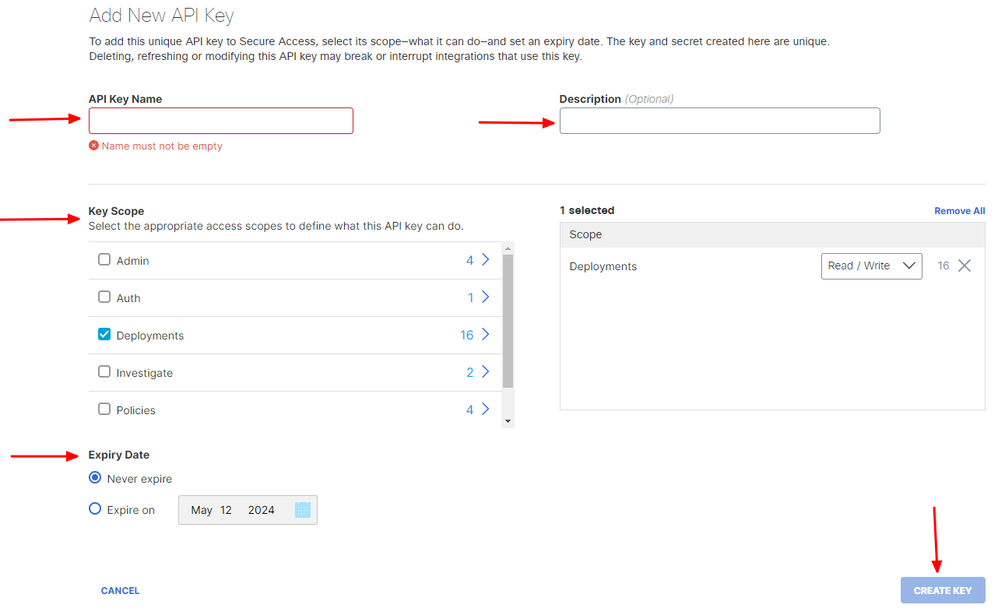
4. Provide the API Key Name, Description(Optional), and select the Key scope and Expiry date as per your requirement. Once done, click on the button Create:
 Secure Access - API Key Details
5. Copy the API Keyand the Key Secret and then click on ACCEPT AND CLOSE:
 Secure Access - API Key and Secret

Note: There is only one opportunity to copy your API secret. Secure Access does not save your API secret and you cannot retrieve it after its initial creation.
Python Code
There are multiple ways to write this code considering that the generated token is valid for 3600 seconds (1 Hour). You can either create 2 separate scripts in which the first script can be used to generate the Bearer Token and then a second script in which that Bearer Token can be used to make the API call (fetch/update or delete) to the resource you are interested in, or write a single script to take both the actions while making sure that if a bearer token is already generated, a condition is kept in the code that a new bearer token is not generated every time the script is executed.
In order to make it working in python, please make sure to install these libraries:
pip install oauthlib
pip install requests_oauthlib
Script 1:
Make sure to mention the correct client_idand client_secretin this script:
import requests
from oauthlib.oauth2 import BackendApplicationClient
from oauthlib.oauth2 import TokenExpiredError
from requests_oauthlib import OAuth2Session
from requests.auth import HTTPBasicAuth


token_url = 'https://api.sse.cisco.com/auth/v2/token'

client_id = "XXXXXXXXXXXXXXXXXXXXXXXXXXXX"
client_secret = "XXXXXXXXXXXXXXXXXXXXXXXXX"


class SecureAccessAPI:
    def __init__(self, url, ident, secret):
        self.url = url
        self.ident = ident
        self.secret = secret
        self.token = None

    def GetToken(self):
        auth = HTTPBasicAuth(self.ident, self.secret)
        client = BackendApplicationClient(client_id=self.ident)
        oauth = OAuth2Session(client=client)
        self.token = oauth.fetch_token(token_url=self.url, auth=auth)
        return self.token


# Get token
api = SecureAccessAPI(token_url, client_id, client_secret)
print("Token: " + str(api.GetToken()))
Output:
The output from this script must look something like this:
Token: {'token_type': 'bearer', 'access_token': 'eyJhbGciOiJSUzI1NiIsImtpZCI6IjcyNmI5MGUzLWxxxxxxxxxxxxxxxxxxxxxxxxxxxxxxxxxxxxx...', 'expires_in': 3600, 'expires_at': 1707767804.6489065}
The access_tokenis very long with thousands of characters and, therefore, to keep the output readable, it has been shortened just for this example.
Script 2:
The access_token from Script 1 can then be used in this script to make API calls. As an example, use Script 2 to fetch the information about the Network Tunnel Groups using the resource /deployments/v2/networktunnelgroups:
import requests
import pprint
import json
url = "https://api.sse.cisco.com/deployments/v2/networktunnelgroups"

BT = "eyJhbGciOiJSUzI1NiIsImtpZCI6IjcyNmI5MGUzLWxxxxxxxxxxxxxxxxxxxxxxxxxxxxxxxxxxxxx...'"

headers = { 'Authorization':f"Bearer {BT}"
,"Accept": "application/json" }

response = requests.request('GET', url, headers=headers)

json_object = json.loads(response.content)
pprint.pprint(json_object)
Output:
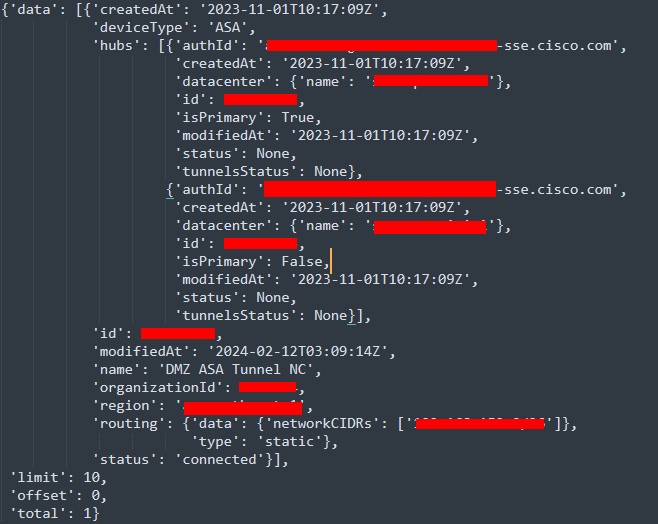
The output from this script must look something like this:
 Python output - Network Tunnel Groups
You can also fetch information about Policies, Roaming Computers, Reports, and so on, with the Secure Access Developers User Guide.
Troubleshoot
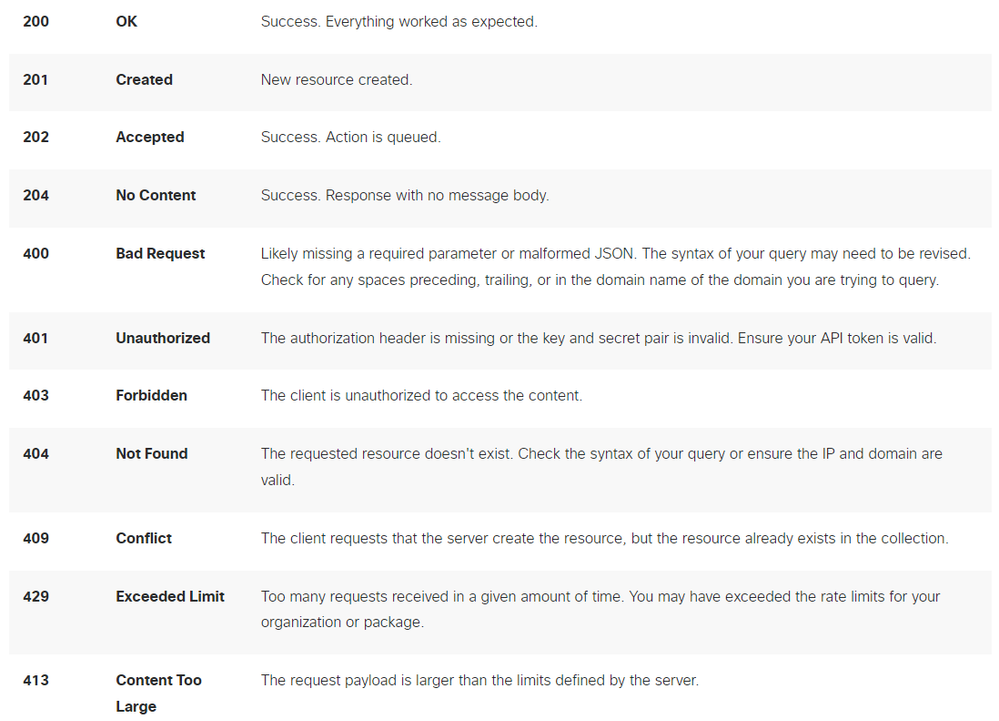
The Secure Access API endpoints use HTTP response codes to indicate success or failure of an API request. In general, codes in the 2xx range indicate success, codes in the 4xx range indicate an error that resulted from the provided information, and codes in the 5xx range indicate server errors. The approach to resolve the issue would depend on the response code that is received:
 REST API - Response codes 1
 REST API - Response codes 2
Related Information


 Feedback