ACS 5.x: TACACS+ Authentication and Command Authorization based on AD group membership Configuration Example
Available Languages
Contents
Introduction
This document provides an example of configuring TACACS+ Authentication and Command Authorization based on AD group membership of a user with Cisco Secure Access Control System (ACS) 5.x and later. ACS uses Microsoft Active Directory (AD) as an external identity store to store resources such as users, machines, groups, and attributes.
Prerequisites
Requirements
Ensure that you meet these requirements before you attempt this configuration:
-
ACS 5.x is fully integrated to the desired AD Domain. If the ACS is not integrated with the desired AD Domain, refer to ACS 5.x and later: Integration with Microsoft Active Directory Configuration Example for more information in order to perform the integration task.
Components Used
The information in this document is based on these software and hardware versions:
-
Cisco Secure ACS 5.3
-
Cisco IOS® Software Release 12.2(44)SE6.
Note: This configuration can be done on all the Cisco IOS devices.
-
Microsoft Windows Server 2003 Domain
The information in this document was created from the devices in a specific lab environment. All of the devices used in this document started with a cleared (default) configuration. If your network is live, make sure that you understand the potential impact of any command.
Conventions
Refer to the Cisco Technical Tips Conventions for more information on document conventions.
Configuration
Configure ACS 5.x for Authentication and Authorization
Before you begin the configuration of the ACS 5.x for Authentication and Authorization, ACS should have been integrated successfully with Microsoft AD. If the ACS is not integrated with the desired AD Domain, refer to ACS 5.x and later: Integration with Microsoft Active Directory Configuration Example for more information in order to perform the integration task.
In this section, you map two AD groups to two different command sets and two Shell profiles, one with full-access and the other with limited-access on the Cisco IOS devices.
-
Log into the ACS GUI using Admin credentials.
-
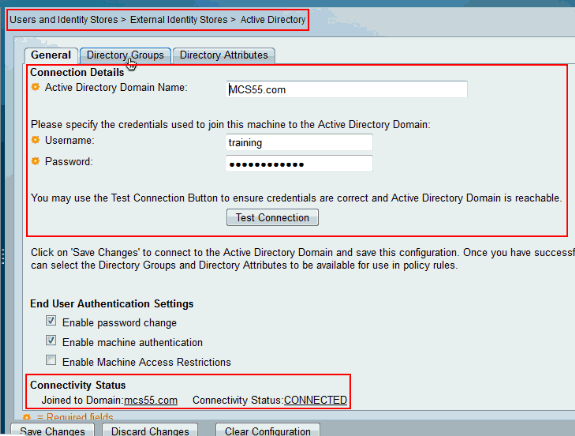
Choose Users and Identity Stores > External Identity Stores > Active Directory and verify that the ACS has joined the desired domain and also that the connectivity status is shown as connected.
Click on Directory Groups Tab.
-
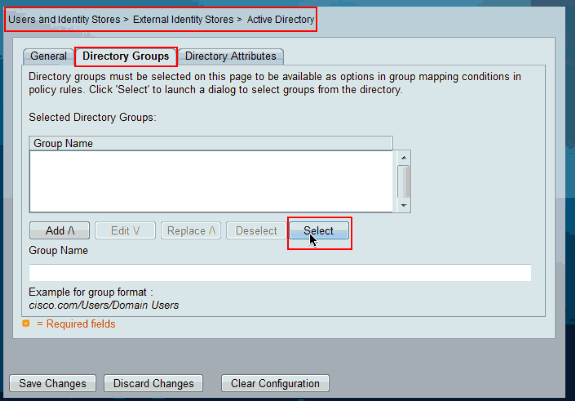
Click Select.
-
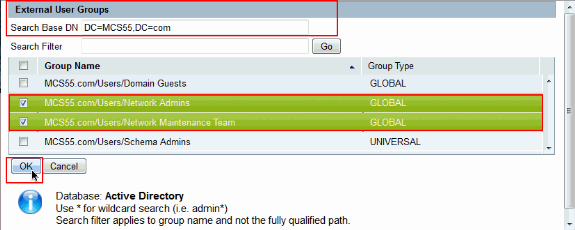
Choose the groups that need to be mapped to the Shell profiles and command sets in the later part of the configuration. Click OK.
-
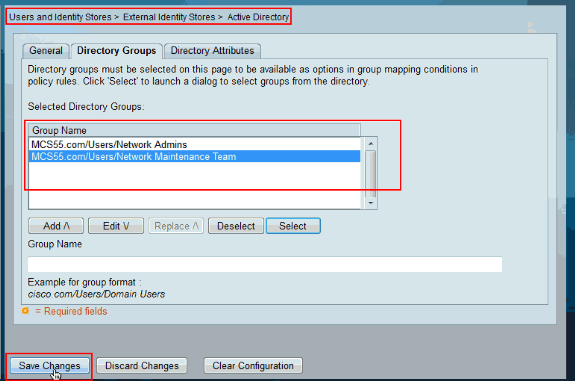
Click Save Changes.
-
Choose Access Policies > Access Services > Service Selection Rules and identify the access service, which processes the TACACS+ Authentication. In this example, it is Default Device Admin.

-
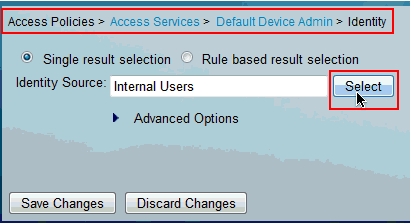
Choose Access Policies > Access Services > Default Device Admin > Identity and click Select next to Identity Source.
-
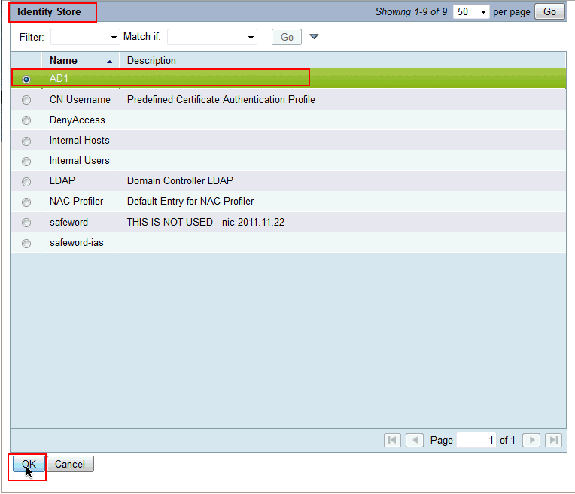
Choose AD1 and click OK.
-
Click Save Changes.

-
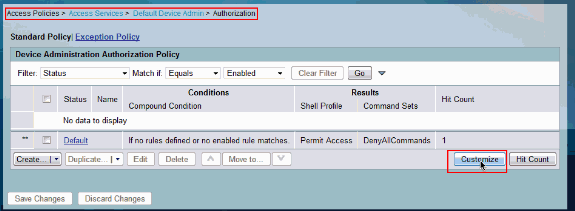
Choose Access Policies > Access Services > Default Device Admin > Authorization and click on Customize.
-
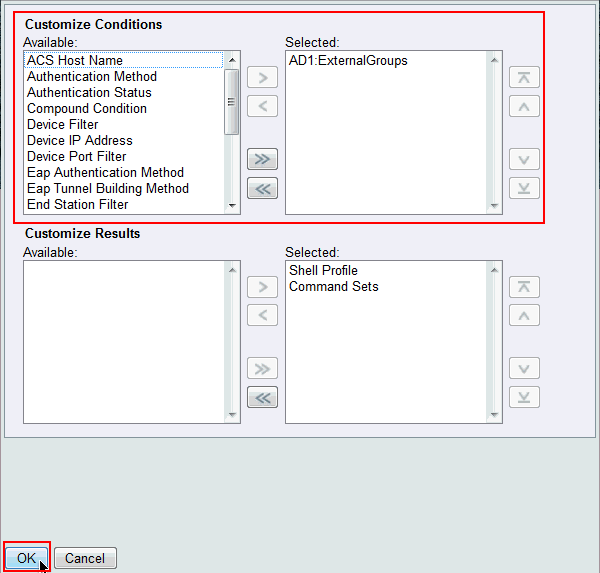
Copy AD1:ExternalGroups from Available to Selected section of Customize Conditions and then move Shell Profile and Command Sets from Available to Selected section of Customize Results. Now click OK.
-
Click Create in order to create a new Rule.
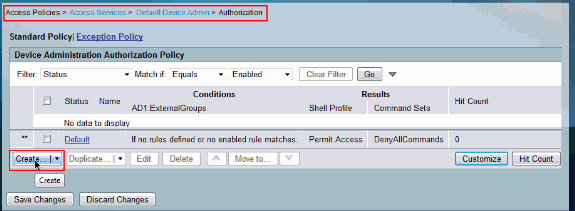
-
Click Select in the AD1:ExternalGroups Condition.
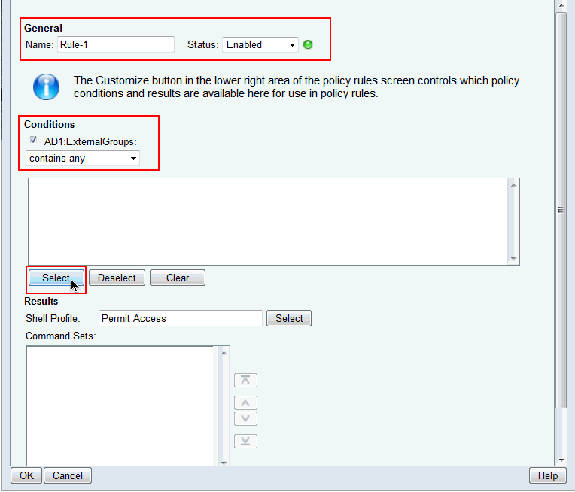
-
Choose the group that you want to provide full access on the Cisco IOS device. Click OK.
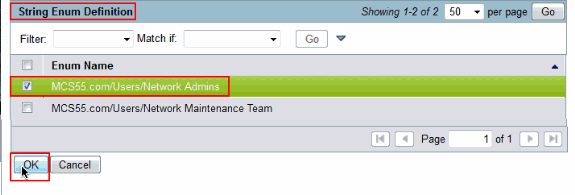
-
Click Select in the Shell Profile field.
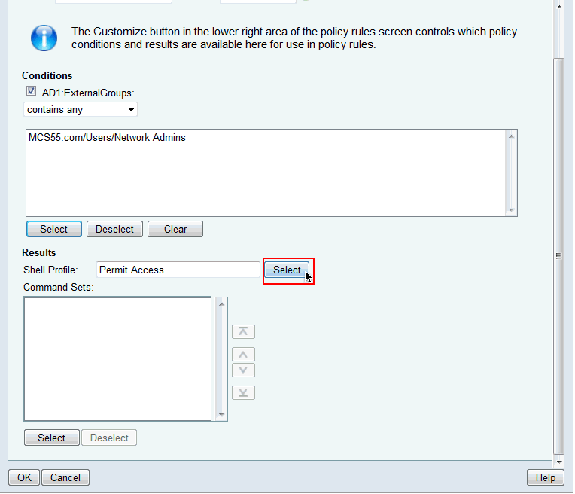
-
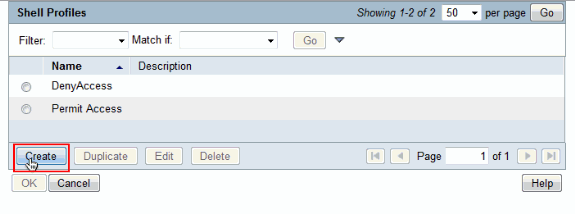
Click Create in order to create a new Shell Profile for full access users.
-
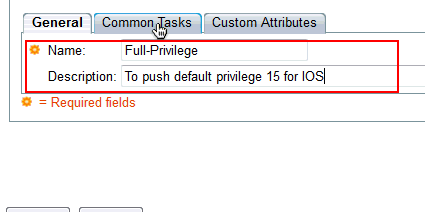
Provide a Name and Description(optional) in the General tab and click on Common Tasks tab.
-
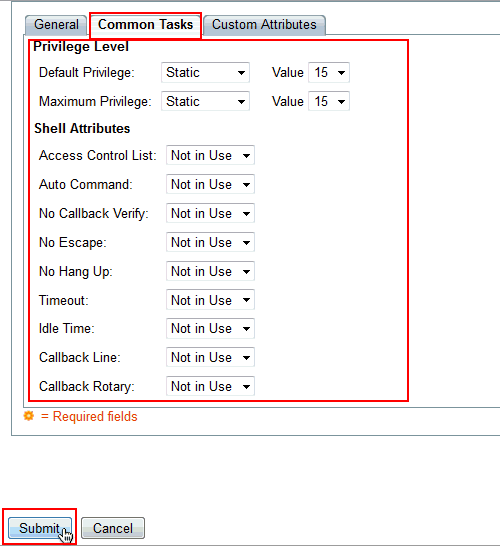
Change the Default Privilege and Maximum Privilege to Static with Value 15. Click Submit.
-
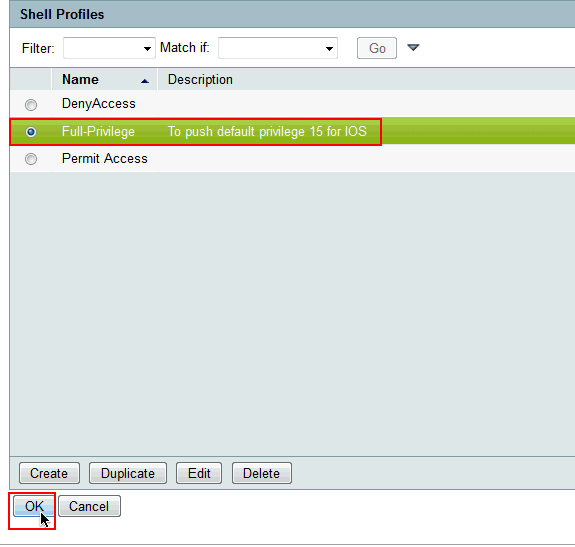
Now choose the newly created full access Shell Profile (Full-Privilege in this example) and click OK.
-
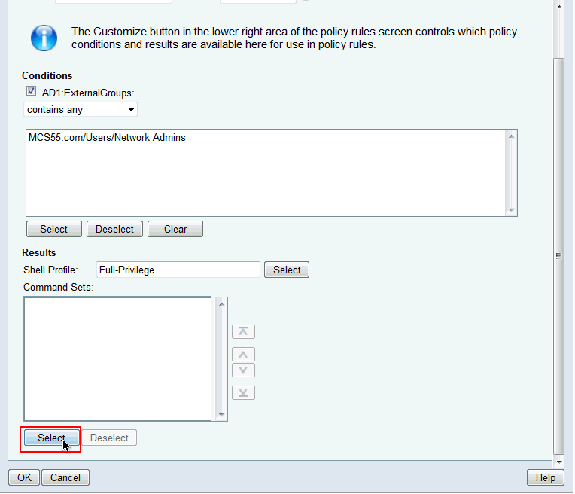
Click Select in the Command Sets field.
-
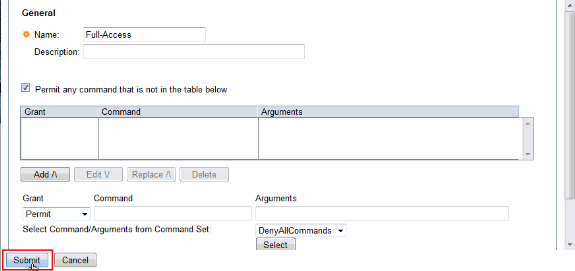
Click Create in order to create a new Command Set for Full-Access users.

-
Provide a Name and ensure that the check box next to Permit any command that is not in the table below is checked. Click Submit.
Note: Refer to Creating, Duplicating, and Editing Command Sets for Device Administration for more information on Command Sets.
-
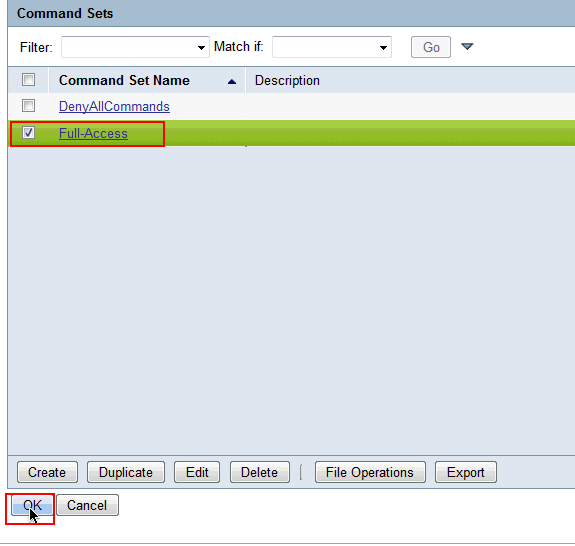
Click OK.
-
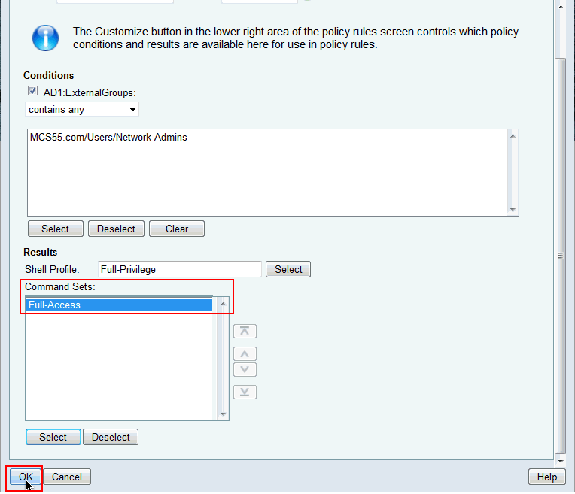
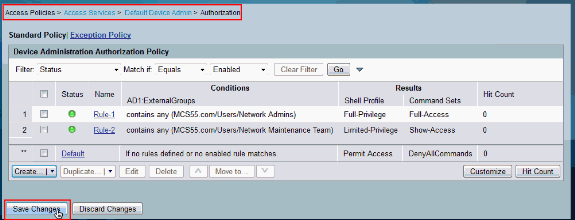
Click OK. This completes the configuration of Rule-1.
-
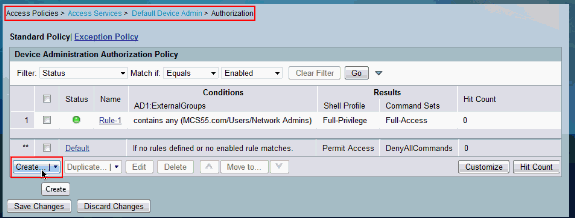
Click Create in order to create a new Rule for limited access users.
-
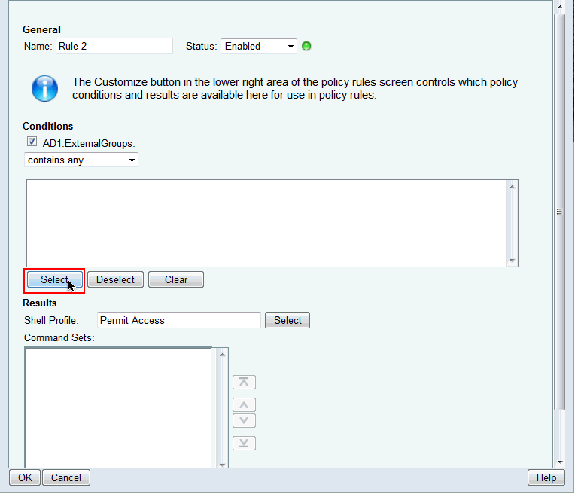
Choose AD1:ExternalGroups and click Select.
-
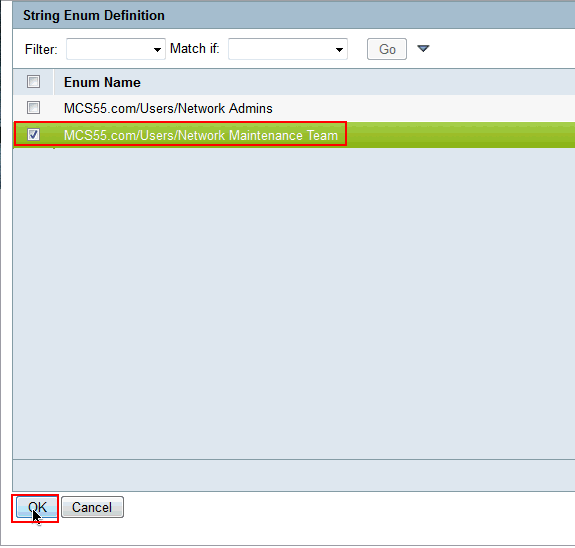
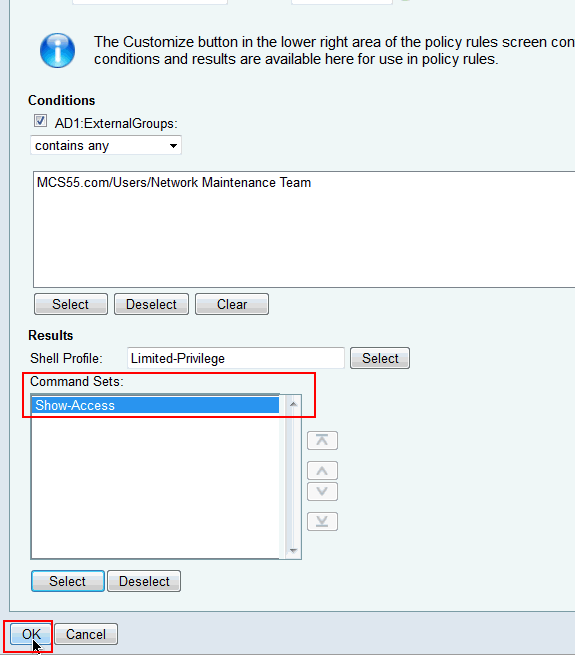
Choose the group (or) groups that you want to provide limited access to and click OK.
-
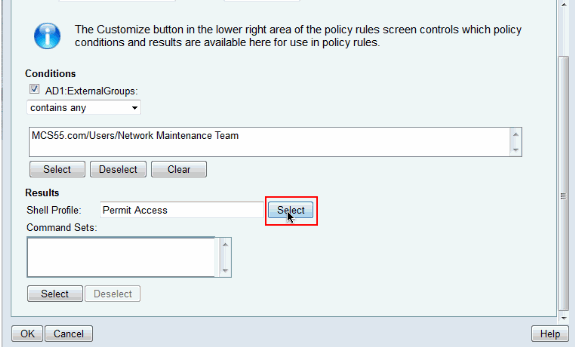
Click Select in the Shell Profile field.
-
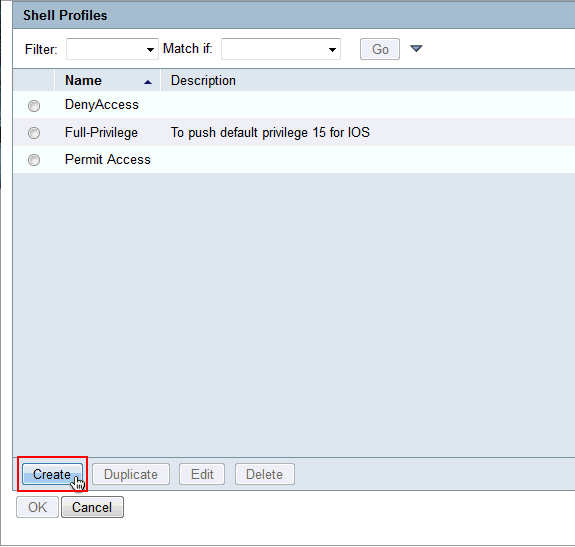
Click Create in order to create a new Shell Profile for limited access.
-
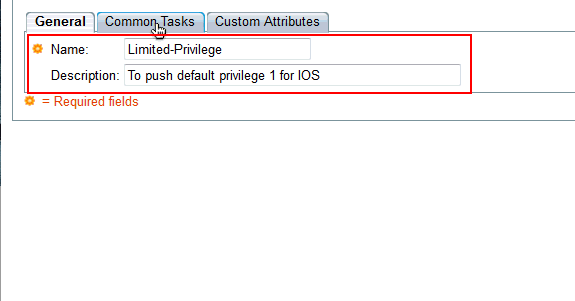
Provide a Name and Description(optional) in the General tab and click on Common Tasks tab.
-
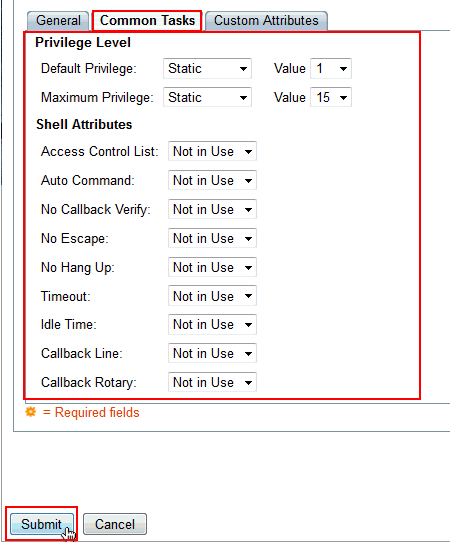
Change the Default Privilege and Maximum Privilege to Static with Values 1 and 15 respectively. Click Submit.
-
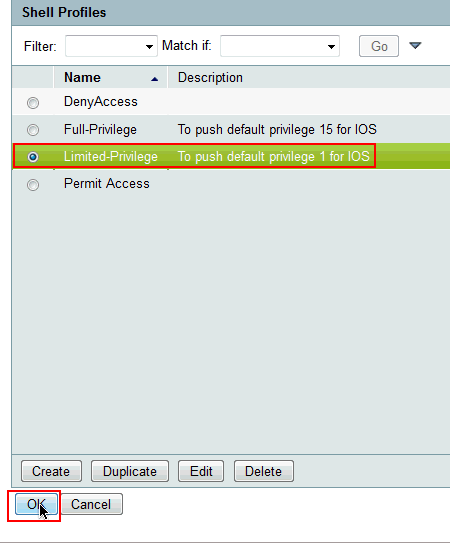
Click OK.
-
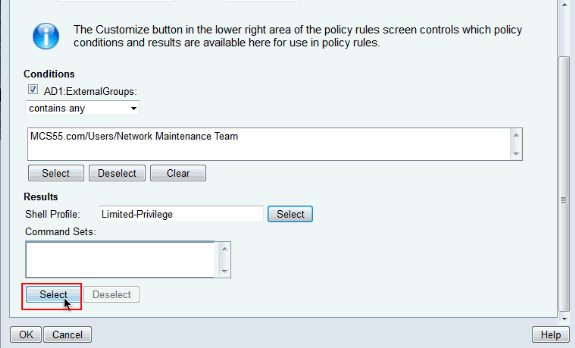
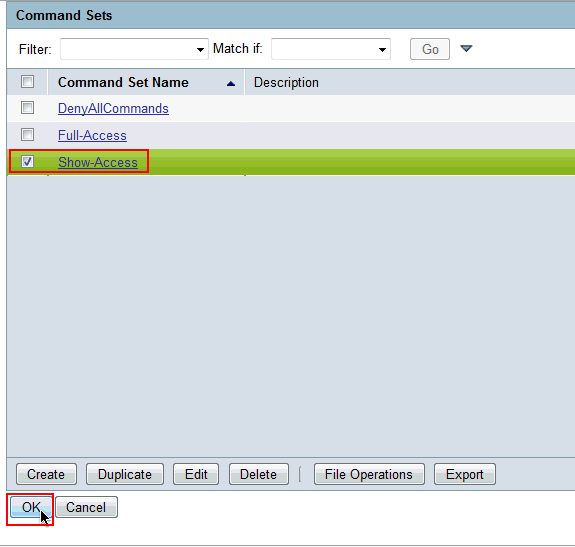
Click Select in the Command Sets field.
-
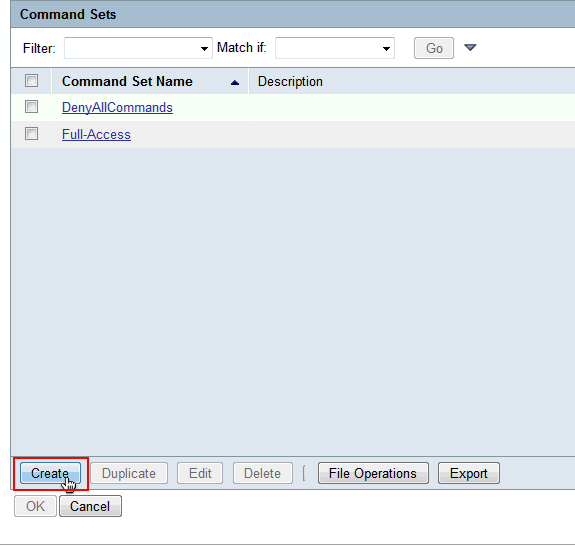
Click Create to create a new Command Set for the limited access group.
-
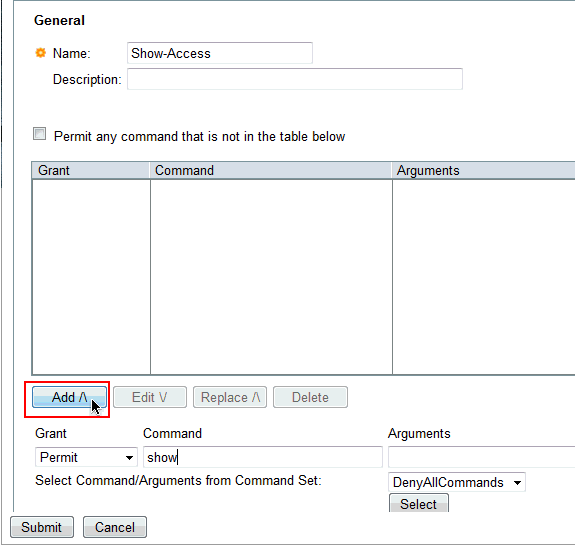
Provide a Name and ensure that the checkbox next to Permit any command that is not in the table below is not selected. Click Add after typing show in the space provided in the command section and choose Permit in the Grant section so that only the show commands are permitted for the users in the limited access group.
-
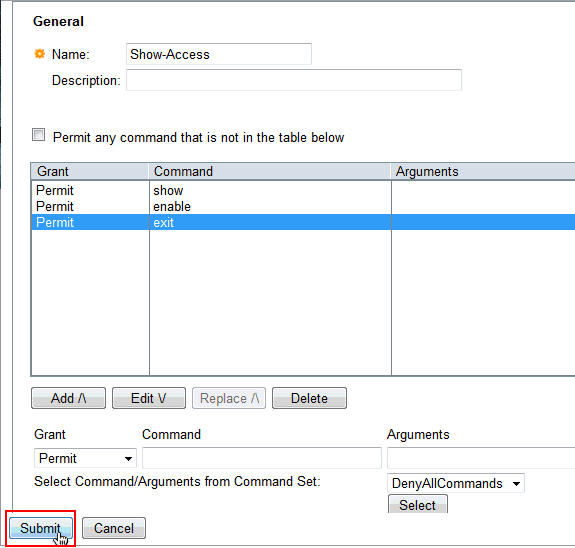
Similarly add any other commands to be permitted for the users in limited access group with the use of Add. Click Submit.
Note: Refer to Creating, Duplicating, and Editing Command Sets for Device Administration for more information on Command Sets.
-
Click OK.
-
Click OK.
-
Click Save Changes.
-
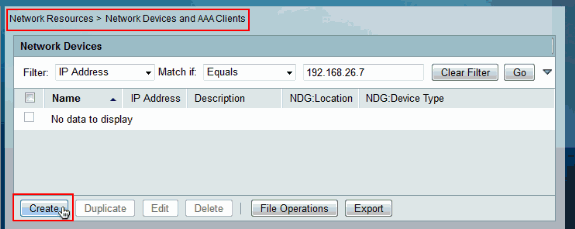
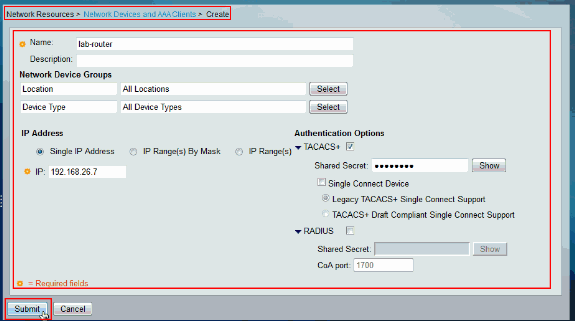
Click Create in order to add the Cisco IOS device as a AAA Client on the ACS.
-
Provide a Name, IP Address, Shared Secret for TACACS+ and click Submit.
Configure the Cisco IOS device for Authentication and Authorization
Complete these steps in order to configure Cisco IOS device and ACS for Authentication and Authorization.
-
Create a local user with full privilege for fallback with the username command as shown here:
username admin privilege 15 password 0 cisco123!
-
Provide the IP address of the ACS in order to enable AAA and add ACS 5.x as TACACS server.
aaa new-model
tacacs-server host 192.168.26.51 key cisco123
Note: The key should match with the Shared-Secret provided on the ACS for this Cisco IOS device.
-
Test the TACACS server reachability with the test aaa command as shown.
test aaa group tacacs+ user1 xxxxx legacy
Attempting authentication test to server-group tacacs+ using tacacs+
User was successfully authenticated.
The output of the previous command shows that the TACACS server is reachable and the user has been successfully authenticated.
Note: User1 and password xxx belong to AD. If the test fails please ensure that the Shared-Secret provided in the previous step is correct.
-
Configure login and enable authentications and then use the Exec and command authorizations as shown here:
aaa authentication login default group tacacs+ local
aaa authentication enable default group tacacs+ enable
aaa authorization exec default group tacacs+ local
aaa authorization commands 0 default group tacacs+ local
aaa authorization commands 1 default group tacacs+ local
aaa authorization commands 15 default group tacacs+ local
aaa authorization config-commands
Note: The Local and Enable keywords are used for fallback to the Cisco IOS local user and enable secret respectively if the TACACS server is unreachable.
Verify
In order to verify authentication and authorization login to the Cisco IOS device through Telnet.
-
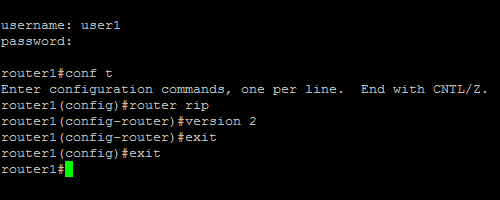
Telnet to the Cisco IOS device as user1 who belongs to the full-access group in AD. Network Admins group is the group in AD which is mapped to Full-Privilege Shell Profile and Full-Access Command set on the ACS. Try to run any command to ensure that you have full access.
-
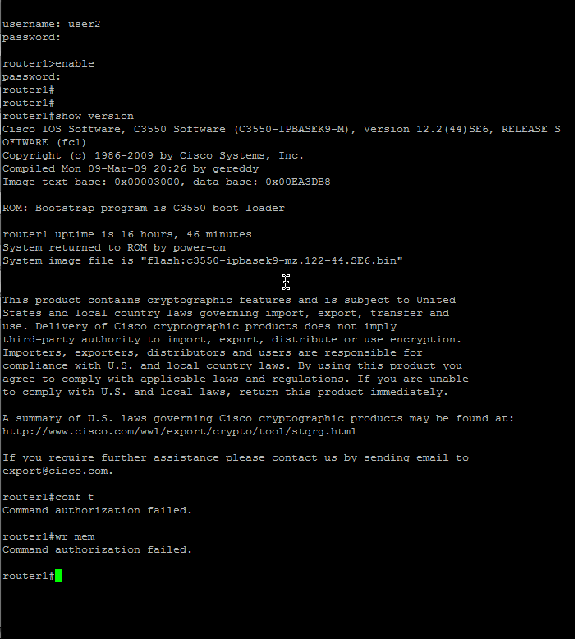
Telnet to the Cisco IOS device as user2 who belongs to the limited-access group in AD. (Network Maintenance Team group is the group in AD which is mapped to Limited-Privilege Shell Profile and Show-Access Command set on the ACS). If you try to run any command other than the ones mentioned in the Show-Access command set, you should get a Command Authorization Failed error, which shows that the user2 has limited access.
-
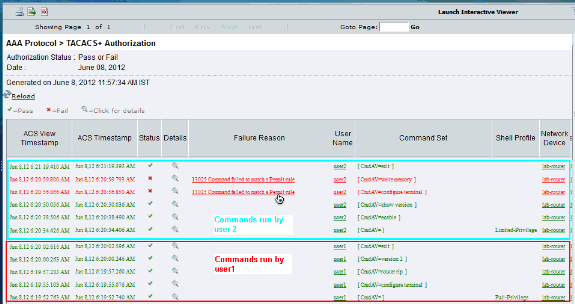
Login to the ACS GUI and launch Monitoring and Reports viewer. Choose AAA Protocol > TACACS+Authorization in order to verify the activities performed by user1 and user2.
Related Information
Revision History
| Revision | Publish Date | Comments |
|---|---|---|
1.0 |
20-Jun-2012 |
Initial Release |


 Feedback