Secure ACS for Windows v3.2 With EAP-TLS Machine Authentication
Available Languages
Contents
Introduction
This document describes how to configure Extensible Authentication Protocol–Transport Layer Security (EAP-TLS) with Cisco Secure Access Control System (ACS) for Windows version 3.2.
Note: Machine authentication is not supported with Novell Certificate Authority (CA). ACS can use EAP-TLS to support machine authentication to Microsoft Windows Active Directory. The end user client might limit the protocol for user authentication to the same protocol that is used for machine authentication. That is, use of EAP-TLS for machine authentication might require the use of EAP-TLS for user authentication. For more information about machine authentication, refer to the Machine Authentication section of the User Guide for Cisco Secure Access Control Server 4.1.
Note: When setting up ACS to authenticate machines via EAP-TLS and the ACS has been set up for Machine Authentication, the client must be configured to do machine authentication only. For more information, refer How to enable computer-only authentication for an 802.1X-based network in Windows Vista, in Windows Server 2008, and in Windows XP Service Pack 3.
Prerequisites
Requirements
There are no specific prerequisites for this document.
Components Used
The information in this document is based on the software and hardware versions below.
-
Cisco Secure ACS for Windows version 3.2
-
Microsoft Certificate Services (installed as Enterprise root certificate authority [CA])
Note: For more information, refer to Step-by-Step Guide to Setting up a Certification Authority
 .
. -
DNS Service with Windows 2000 Server with Service Pack 3 and hotfix 323172

Note: If you experience CA Server problems, install hotfix 323172
 . The Windows 2000 SP3 Client requires hotfix 313664
  to enable IEEE 802.1x authentication.
 -
Cisco Aironet 1200 Series Wireless Access Point 12.01T
-
IBM ThinkPad T30 running Windows XP Professional with Service Pack 1
The information presented in this document was created from devices in a specific lab environment. All of the devices used in this document started with a cleared (default) configuration. If you are working in a live network, ensure that you understand the potential impact of any command before using it.
Background Theory
Both EAP-TLS and Protected Extensible Authentication Protocol (PEAP) build and use a TLS/Secure Socket Layer (SSL) tunnel. EAP-TLS uses mutual authentication in which both the ACS (authentication, authorization, and accounting [AAA]) server and clients have certificates and prove their identities to each other. PEAP, however, uses only server-side authentication; only the server has a certificate and proves its identity to the client.
Conventions
For more information on document conventions, see the Cisco Technical Tips Conventions.
Network Diagram
This document uses the network setup shown in the diagram below.
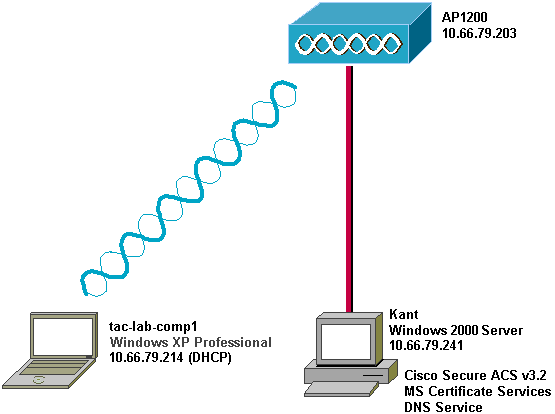
Configuring Cisco Secure ACS for Windows v3.2
Follow the steps below to configure ACS 3.2.
Obtain a Certificate for the ACS Server
Follow these steps to obtain a certificate.
-
On the ACS server, open a web browser, and enter http://CA-ip-address/certsrv in order to access the CA server.
-
Log in to the domain as Administrator.
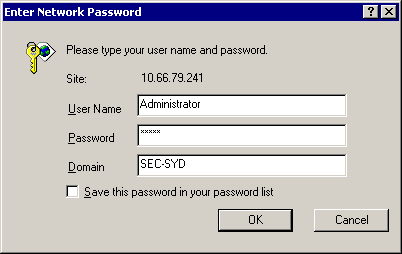
-
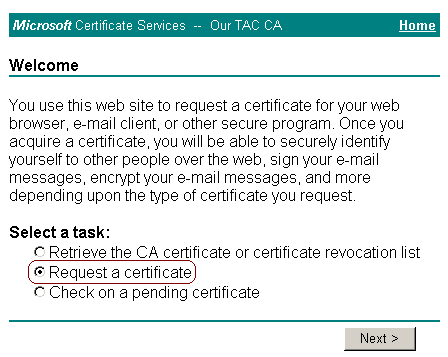
Select Request a certificate, and then click Next.
-
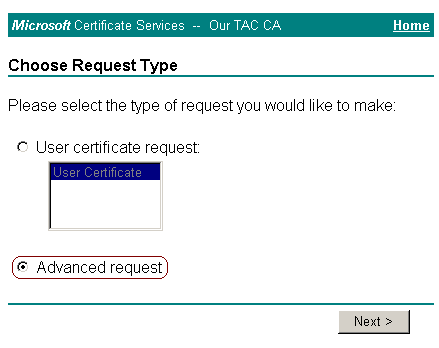
Select Advanced request, and then click Next.
-
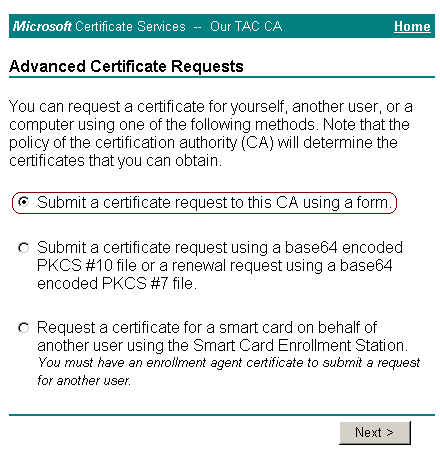
Select Submit a certificate request to this CA using a form, and then click Next.
-
Configure the certificate options:
-
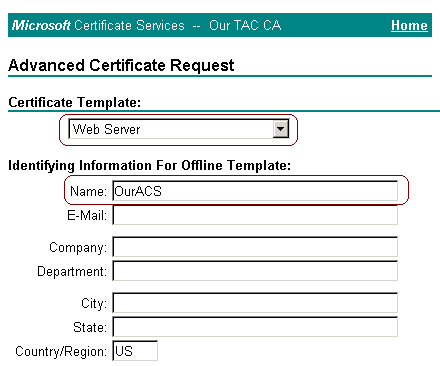
Select Web Server as the certificate template, and enter the name of the ACS server.
-
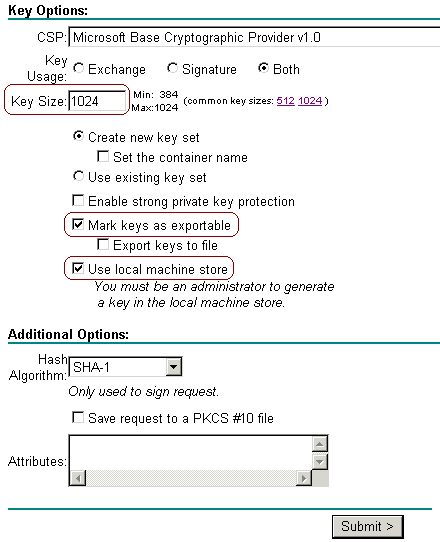
Enter 1024 in the Key Size field, and check the Mark keys as exportable and Use local machine store check boxes.
-
Configure other options as needed, and then click Submit.
Note: If the Potential Scripting Violation dialog box appears, click Yes to continue.

-
-
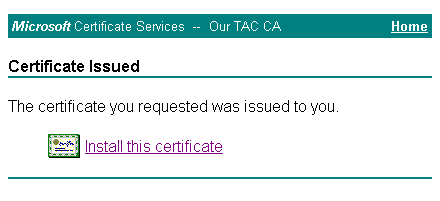
Click Install this certificate.
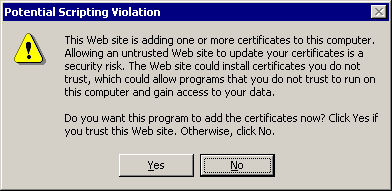
Note: If the Potential Scripting Violation dialog box appears, click Yes to continue.
-
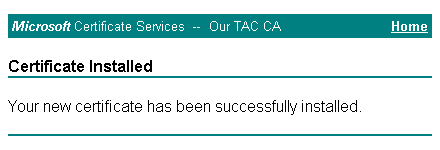
If the installation is successful, the Certificate Installed message appears.
Configure ACS to Use a Certificate From Storage
Complete these steps in order to configure ACS to use the certificate in storage.
-
Open a web browser, and enter http://ACS-ip-address:2002/ in order to access the ACS server.
-
Click System Configuration, and then click ACS Certificate Setup.
-
Click Install ACS Certificate.
-
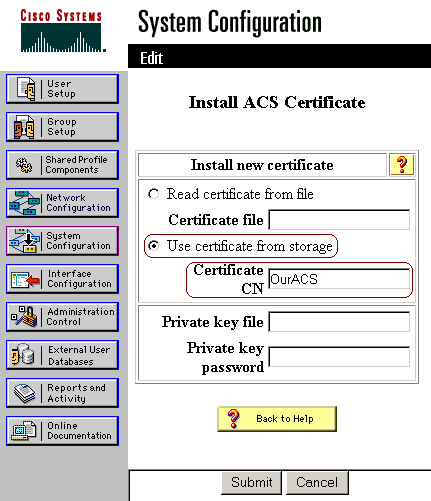
Click the Use certificate from storage radio button.
-
In the Certificate CN field, enter the name of the certificate that you assigned in step 5a of the Obtaining a Certificate From the ACS Serversection of this document.
-
Click Submit.
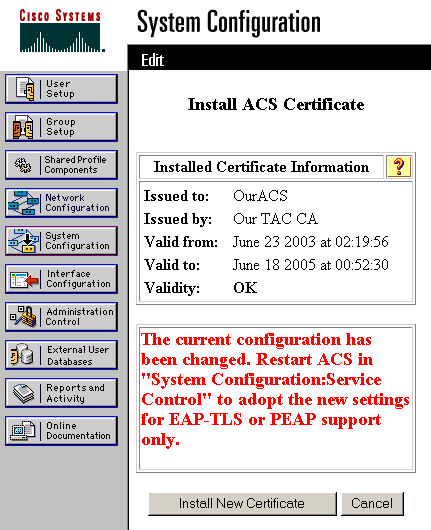
Once the configuration is complete, a confirmation message appears that indicates the configuration of the ACS server has been changed.
Note: You do not need to restart the ACS at this time.
Specify Additional Certificate Authorities That the ACS Should Trust
The ACS automatically trusts the CA that issued its own certificate. If the client certificates are issued by additional CAs, you must complete these steps:
-
Click System Configuration, and then click ACS Certificate Setup.
-
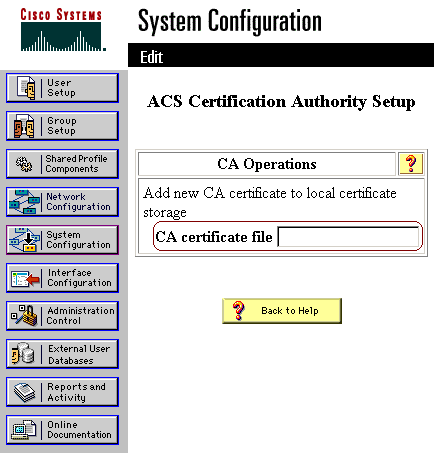
Click ACS Certificate Authority Setup to add CAs to the list of trusted certificates.
-
In the field for CA certificate file, enter the location of the certificate, and then click Submit.
-
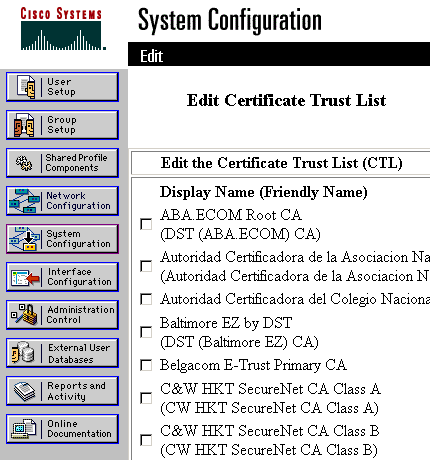
Click Edit Certificate Trust List.
-
Check all the CAs that the ACS should trust, and uncheck all the CAs that the ACS should not trust.
-
Click Submit.
Restart the Service and Configure EAP-TLS Settings on the ACS
Complete these steps in order to restart the service and configure EAP-TLS settings:
-
Click System Configuration, and then click Service Control.
-
Click Restart in order to restart the service.
-
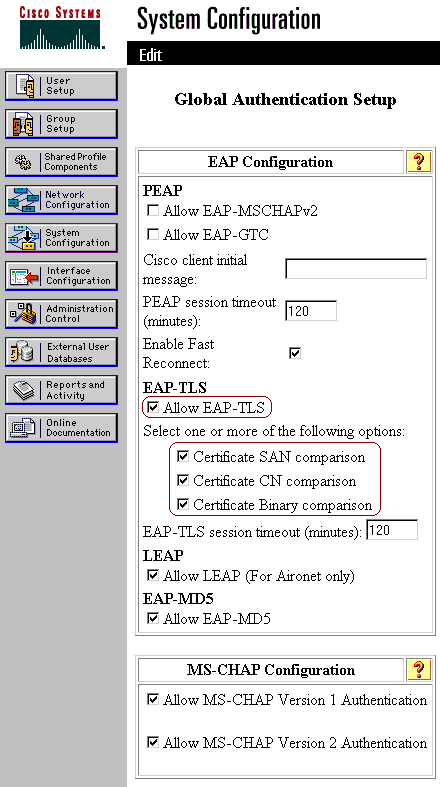
In order to configure EAP-TLS settings, click System Configuration, and then click Global Authentication Setup.
-
Check Allow EAP-TLS, and then check one or more of the certificate comparisons.
-
Click Submit.
Specify and Configure the Access Point as an AAA Client
Complete these steps in order to configure the access point (AP) as an AAA client:
-
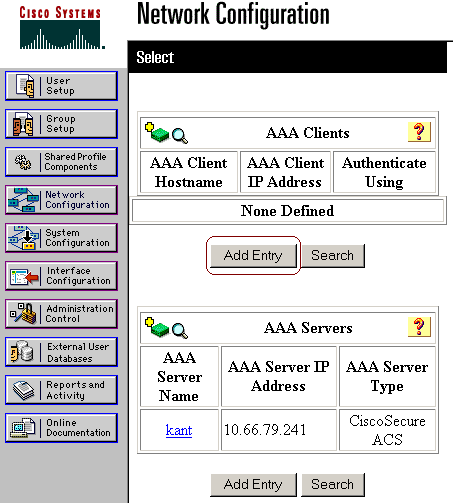
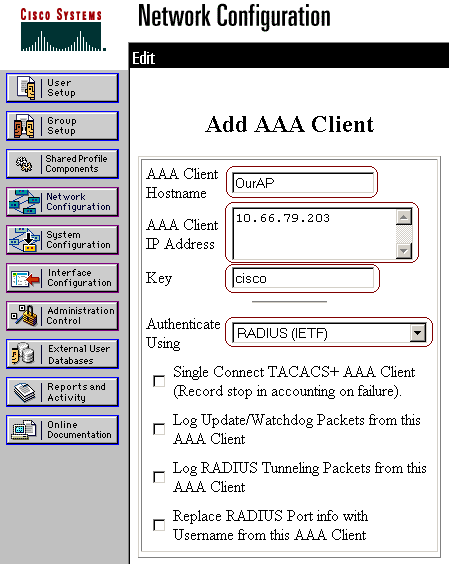
Click Network Configuration.
-
Under AAA Clients, click Add Entry.
-
Enter the access point host name in the AAA Client Hostname field and the IP address in the AAA Client IP Address field.
-
Enter a shared secret key for the ACS and the access point in the Key field.
-
Choose RADIUS (Cisco Aironet) as the authentication method, and click Submit.
Configure the External User Databases
Complete these steps in order to configure the external user databases.
-
Click External User Databases, and then click Database Configuration.
-
Click Windows Database.
Note: If there is no Windows database already defined, click Create New Configuration, and then click Submit.
-
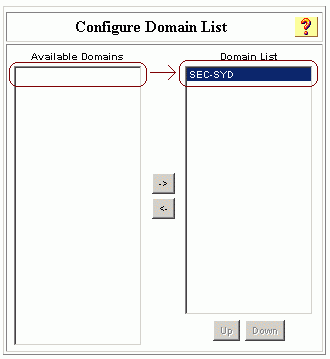
Click Configure.
-
Under Configure Domain List, move the SEC-SYD domain from Available Domains to Domain List.
-
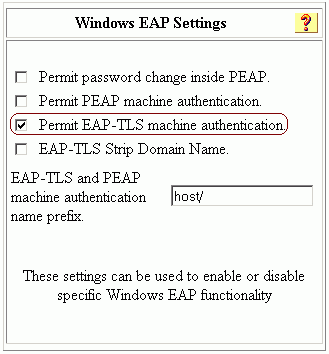
In the Windows EAP Settings area, click the Permit EAP-TLS machine authentication check box in order to enable machine authentication.
Note: Do not change the machine authentication name prefix. Microsoft currently uses "/host" (the default value) to distinguish between user and machine authentication.
-
Optionally, you can check the EAP-TLS Strip Domain Name check box in order to enable domain stripping.
-
Click Submit.
-
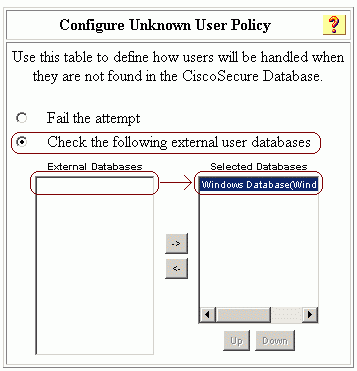
Click External User Databases, and then click Unknown User Policy.
-
Click the Check the following external user databases radio button.
-
Move Windows Database from the External Databases list to the Selected Databases list.
-
Click Submit.
Restart the Service
When you have finished configuring the ACS, complete these steps in order to restart the service:
-
Click System Configuration, and then click Service Control.
-
Click Restart.
Configuring MS Certificate Machine Autoenrollment
Complete these steps in order to configure the domain for automatic machine certificate enrollment:
-
Go to Control Panel > Administrative Tools > Open Active Directory Users and Computers.
-
Right-click domain sec-syd, and choose Properties.
-
Click the Group Policy tab.
-
Click Default Domain Policy, and then click Edit.
-
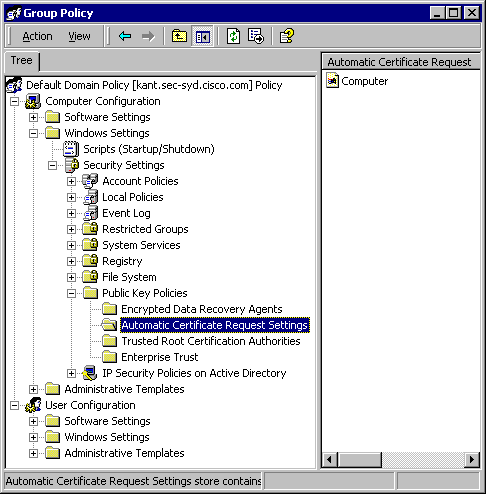
Go to Computer Configuration > Windows Settings > Security Settings > Public Key Policies > Automatic Certificate Request Settings.
-
On the menu bar, go to Action > New > Automatic Certificate Request, and click Next.
-
Choose Computer, and click Next.
-
Check the Certificate Authority, "Our TAC CA," in this example.
-
Click Next, and then click Finish.
Configuring the Cisco Access Point
Complete these steps in order to configure the AP to use the ACS as the authentication server:
-
Open a web browser, and enter http://AP-ip-address/certsrv in order to access AP.
-
On the toolbar, click Setup.
-
Under Services, click Security, and then click Authentication Server.
Note: If you configured accounts on the AP, you must log in.
-
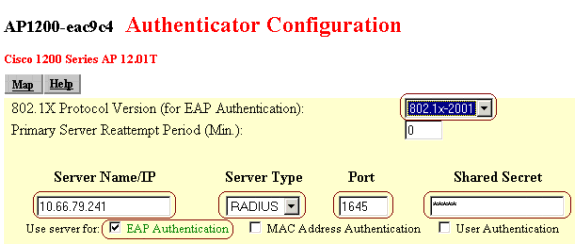
Enter the authenticator configuration settings:
-
Choose 802.1x-2001 for the 802.1x Protocol Version (for EAP Authentication).
-
Enter the IP address of the ACS server in the Server Name/IP field.
-
Choose RADIUS as the Server Type.
-
Enter 1645 or 1812 in the Port field.
-
Enter the shared secret key that you specified in Specify and Configure the Access Point as an AAA Client.
-
Check the option for EAP Authentication in order to specify how the server should be used.
-
-
When you are finished, click OK.
-
Click Radio Data Encryption (WEP).
-
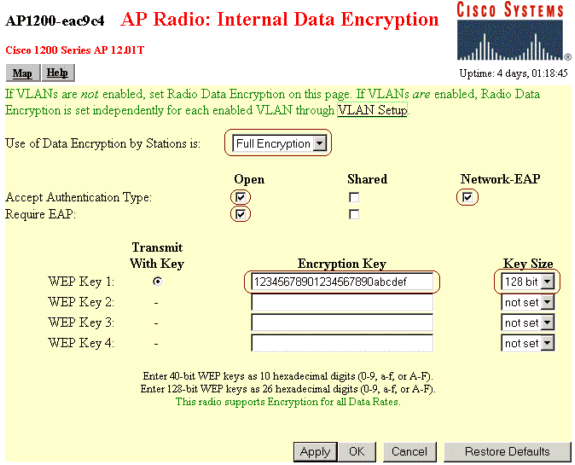
Enter the internal data encryption settings.
-
Choose Full Encryption from the Use of Data Encryption by Stations is drop-down list in order to set the level of data encryption.
-
For Accept Authentication Type, check the Open check box in order to set the type of authentication accepted, and check the Network-EAP in order to enable LEAP.
-
For Require EAP, check the Open check box in order to require EAP.
-
Enter an encryption key in the Encription Key field, and choose 128 bit from the Key Size drop-down list.
-
-
When you are finished, click OK.
-
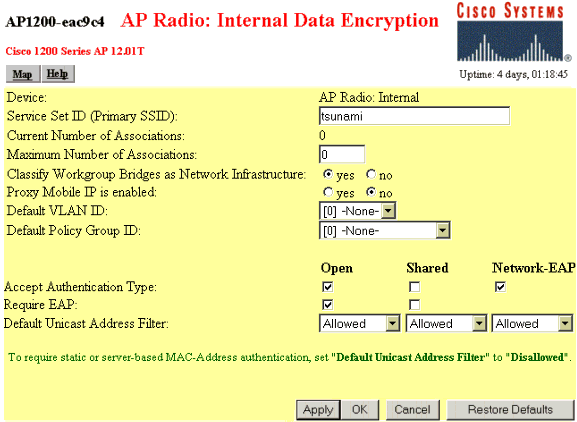
Go to Network > Service Sets > Select the SSID Idx in order to confirm that the correct Service Set Identifier (SSID) is used.
-
Click OK.
Configuring the Wireless Client
Complete these steps in order to configure ACS 3.2:
Join the Domain
Complete these steps in order to add the wireless client to the domain.
Note: In order to complete these steps, the wireless client must have connectivity to the CA, either through a wired connection or through the wireless connection with 802.1x security disabled.
-
Log in to Windows XP as local administrator.
-
Go to Control Panel > Performance and Maintenance > System.
-
Click the Computer Name tab, and then click Change.
-
Enter the host name in the Computer Name field.
-
Choose Domain, and then enter the name of the domain (SEC-SYD in this example).
-
Click OK.
-
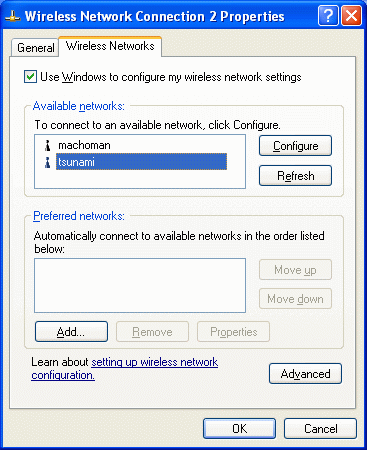
When the Login dialog box appears, log in in with an account with adequate permission to join the domain.
-
When the computer has successfully joined the domain, restart the computer.
The machine becomes a member of the domain. Since machine autoenrollment is configured, the machine has a certificate for the CA installed as well as a certificate for machine authentication.
Obtain a Certificate for the User
Complete these steps in order to obtain a certificate for the user.
-
Log in to Windows XP and the domain (SEC-SYD) on the wireless client (laptop) as the account that requires a certificate.
-
Open a web browser, and enter http://CA-ip-address/certsrv in order to access the CA server.
-
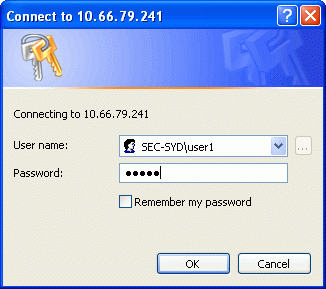
Log in to the CA server under the same account.
Note: The certificate is stored on the wireless client under the current user's profile; therefore, you must use the same account in order to log in to Windows and the CA.
-
Click the Request a certificate radio button, and then click Next.

-
Click the Advanced request radio button, and then click Next.

-
Click the Submit a certificate request to this CA using a form radio button, and then click Next.

-
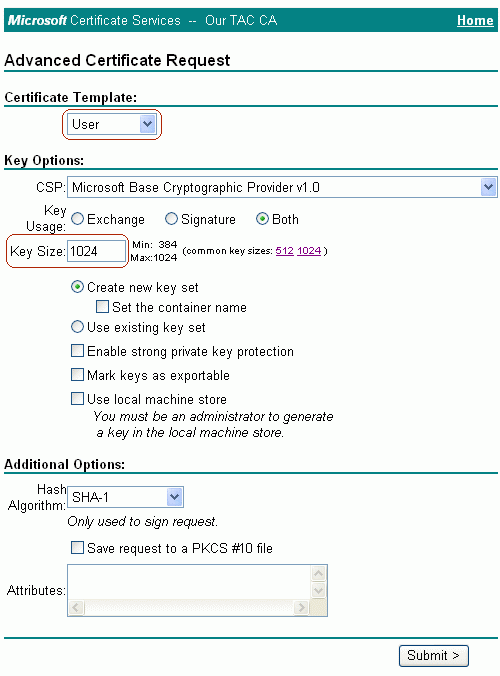
Choose User from the Certificate Template, and enter 1024 in the Key Size field.
-
Configure other options as needed, and click Submit.
Note: If the Potential Scripting Violation dialog box appears, click Yes to continue.

-
Click Install this certificate.

Note: If the Potential Scripting Violation dialog box appears, click Yes to continue.

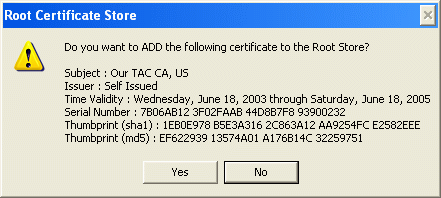
Note: The Root Certificate Store might appear if the CA's own certificate is not saved on the wireless client already. Click Yes in order to save the certificate to local storage.
If the installation is successful, a confirmation message appears.

Configure the Wireless Networking
Complete these steps in order to set the options for wireless networking:
-
Log in to the domain as a domain user.
-
Go to Control Panel > Network and Internet Connections > Network Connections.
-
Right-click Wireless Connection, and choose Properties.
-
Click the Wireless Networks tab.
-
Choose the wireless network from the list of available networks, and then click Configure.

-
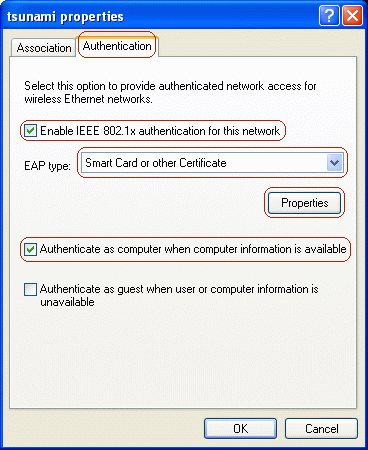
On the Authentication tab, check the Enable IEEE 802.1x authentication for this network check box.
-
Choose Smart Card or other Certificate from the EAP type drop-down list, and then click Properties.
Note: In order to enable machine authentication, check the Authenticate as computer when computer information is available check box.
-
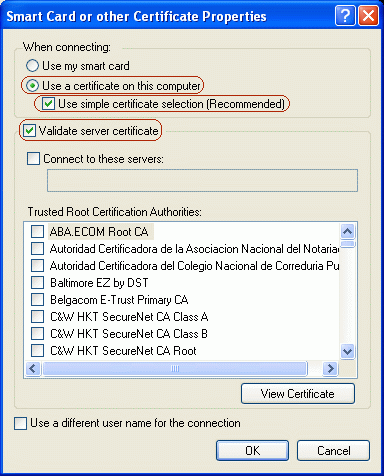
Click the Use a certificate on this computer radio button, and then check the Use simple certificate selection check box.
-
Check the Validate server certificatecheck box, and click OK.
Note: When the client joins the domain, the CA's certificate is installed automatically as a Trusted Root Certification Authority. The client automatically implicitly trusts the CA that signed the client's certificate. Additional CAs can be trusted by checking them in the Trusted Root Certification Authorities list.
-
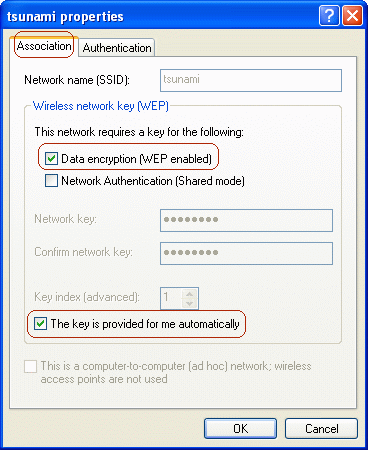
On the Association tab of the network properties window, check the Data encryption (WEP enabled) and The key is provided for me automatically check boxes.
-
Click OK, and then click OK again in order to close the network configuration window.
Verify
This section provides information you can use in order to confirm your configuration is working properly.
-
In order to verify that the wireless client has been authenticated, complete these steps:
-
On the wireless client, go to Control Panel > Network and Internet Connections > Network Connections.
-
On the menu bar, go to View > Tiles.
The wireless connection should display the "Authentication succeeded" message.
-
-
In order to verify that wireless clients have been authenticated, go to Reports and Activity > Passed Authentications > Passed Authentications active.csv on the ACS web interface.
Troubleshoot
This section provides information you can use to troubleshoot your configuration.
-
Verify that MS Certificate Services has been installed as an Enterprise root CA on a Windows 2000 Advanced Server with Service Pack 3.
-
Verify that you are using Cisco Secure ACS for Windows version 3.2 with Windows 2000 and Service Pack 3.
-
If machine authentication fails on the wireless client, there will be no network connectivity on the wireless connection. Only accounts that have their profiles cached on the wireless client will be able to log in to the domain. The machine must be plugged in to a wired network or set for wireless connection with no 802.1x security.
-
If automatic enrollment with the CA fails when it joins the domain, check Event Viewer for possible reasons.
-
If the wireless client's user profile does not have a valid certificate, you can still log on to the machine and domain if the password is correct, but note that the wireless connection will not have connectivity.
-
If the ACS certificate on the wireless client is invalid (which depends on the certificate's valid "from" and "to" dates, the client's date and time settings, and CA trust), then the client will reject it and authentication will fail. The ACS will log the failed authentication in the web interface under Reports and Activity > Failed Attempts > Failed Attempts XXX.csv with the Authentication Failure-Code similar to "EAP-TLS or PEAP authentication failed during SSL handshake." The expected error message in the CSAuth.log file is similar to this message:
AUTH 06/04/2003 14:56:41 E 0345 1644 EAP: buildEAPRequestMsg:
other side probably didn't accept our certificate
-
If the client's certificate on the ACS is invalid (which depends on the certificate's valid "from" and "to" dates, the server's date and time settings, and CA trust), then the server will reject it and authentication will fail. The ACS will log the failed authentication in the web interface under Reports and Activity > Failed Attempts > Failed Attempts XXX.csv with the Authentication Failure-Code similar to "EAP-TLS or PEAP authentication failed during SSL handshake." If the ACS rejects the client's certificate because the ACS does not trust the CA, the expected error message in the CSAuth.log file is similar to this message:
AUTH 06/04/2003 15:47:43 E 0345 1696 EAP: ProcessResponse:
SSL handshake failed, status = 3 (SSL alert fatal:unknown CA certificate)
If the ACS rejects the client's certificate because the certificate has expired, the expected error message in the CSAuth.log file is similar to this message:
AUTH 06/04/2005 15:02:08 E 0345 1692 EAP: ProcessResponse:
SSL handshake failed, status = 3 (SSL alert fatal:certificate expired)
-
In the logs on the ACS web interface, under both Reports and Activity > Passed Authentications > Passed Authentications XXX.csv and Reports and Activity > Failed Attempts > Failed Attempts XXX.csv, EAP-TLS authentications are shown in the format <user-id>@<domain>. PEAP authentications are shown in the format <DOMAIN>\<user-id>.
-
You can verify the ACS server's certificate and trust by following the steps below.
-
Log in to Windows on the ACS server with an account that has administrator privileges.
-
Go to Start > Run, type mmc, and click OK in order to open the Microsoft Management Console.
-
On the menu bar, go to Console > Add/Remove Snap-in, and click Add.
-
Choose Certificates, and click Add.
-
Choose Computer account, click Next, and then choose Local computer (the computer this console is running on).
-
Click Finish, click Close, and then click OK.
-
In order to verify that the ACS server has a valid server-side certificate, go to Console Root > Certificates (Local Computer) > Personal > Certificates, and verify that there is a certificate for the ACS server (named OurACS in this example).
-
Open the certificate, and verify these items:
-
There is no warning about the certificate not being verified for all its intended purposes.
-
There is no warning about the certificate not being trusted.
-
"This certificate is intended to - Ensures the identity of a remote computer."
-
The certificate has not expired and has become valid (check for valid "from" and "to" dates).
-
"You have a private key that corresponds to this certificate."
-
-
On the Details tab, verify that the Version field has the value V3 and that the Enhanced Key Usage field has Server Authentication (1.3.6.1.5.5.7.3.1).
-
In order to verify that the ACS server trusts the CA server, go to Console Root > Certificates (Local Computer) > Trusted Root Certification Authorities > Certificates, and verify that there is a certificate for the CA server (named Our TAC CA in this example).
-
Open the certificate, and verify these items:
-
There is no warning about the certificate not being verified for all its intended purposes.
-
There is no warning about the certificate not being trusted.
-
The certificate's intended purpose is correct.
-
The certificate has not expired and has become valid (check for valid "from" and "to" dates).
If the ACS and client did not use the same root CA, then verify that the whole chain of CA servers' certificates have been installed. The same applies if the certificate was obtained from a subcertificate authority.
-
-
-
You can verify the wireless client's machine certificate and trust by following the steps below.
-
Log in to Windows on the ACS server with an account that has administrator privileges. Open Microsoft Management Console by going to Start > Run, typing mmc, and clicking OK.
-
On the menu bar, go to Console > Add/Remove Snap-in, and then click Add.
-
Select Certificates and click Add.
-
Select Computer account, click Next, and then select Local computer (the computer this console is running on).
-
Click Finish, click Close, and then click OK.
-
Verify that the machine has a valid client-side certificate. If the certificate is invalid, machine authentication will fail. To verify the certificate, go to Console Root > Certificates (Local Computer) > Personal > Certificates. Verify that there is a certificate for the machine; the name will be in the format <host-name>.<domain>. Open the certificate and verify the following items.
-
There is no warning about the certificate not being verified for all its intended purposes.
-
There is no warning about the certificate not being trusted.
-
"This certificate is intended to - Proves your identity to a remote computer."
-
The certificate has not expired and has become valid (check for valid "from" and "to" dates).
-
"You have a private key that corresponds to this certificate."
-
-
-
On the Details tab, verify that the Version field has the value V3 and that the Enhanced Key Usage field contains at least the value Client Authentication (1.3.6.1.5.5.7.3.2); additional purposes may be listed. Ensure that the Subject field contains the value CN = <host-name>.<domain>; additional values may be listed. Verify that the host-name and domain match what is specified in the certificate.
-
To verify that the client's profile trusts the CA server, go to Console Root > Certificates (Current User) > Trusted Root Certification Authorities > Certificates. Verify that there is a certificate for the CA server (named Our TAC CA in this example). Open the certificate and verify the following items.
-
There is no warning about the certificate not being verified for all its intended purposes.
-
There is no warning about the certificate not being trusted.
-
The certificate's intended purpose is correct.
-
The certificate has not expired and has become valid (check for valid "from" and "to" dates).
If the ACS and client did not use the same root CA, then verify that the whole chain of CA servers' certificates have been installed. The same applies if the certificate was obtained from a subcertificate authority.
-
-
Verify the ACS settings as described in Configuring Cisco Secure ACS for Windows v3.2.
-
Verify the CA settings as described in Configuring MS Certificate Services.
-
Verify the AP settings as described in Configuring the Cisco Access Point.
-
Verify the wireless client settings as described in Configuring the Wireless Client.
-
Verify that the user account exists in the internal database of the AAA server or on one of the configured external databases, and ensure that the account has not been disabled.
-
Certificates issued by the CA built on the Secure Hash Algorithm 2 (SHA-2) are not compatible with Cisco Secure ACS since they are developed with Java which does not support SHA-2 as of now. In order to resolve this issue, reinstall the CA and configure it to issue certificates with SHA-1.
Related Information
Revision History
| Revision | Publish Date | Comments |
|---|---|---|
1.0 |
30-Jun-2003 |
Initial Release |


 Feedback