PIX/ASA 7.x: SSH/Telnet on the Inside and Outside Interface Configuration Example
Available Languages
Contents
Introduction
This document provides a sample configuration of Secure Shell (SSH) on the inside and outside interfaces of Cisco Series Security Appliance version 7.x and later. The configuration of the Series Security Appliance remotely with the command line involves the use of either Telnet or SSH. Because Telnet communications are sent in clear text, which includes passwords, SSH is highly recommended. SSH traffic is encrypted in a tunnel and thereby helps protect passwords and other configuration commands from interception.
The Security Appliance allows SSH connections to the security appliance for management purposes. The security appliance allows a maximum of five concurrent SSH connections for each security context, if available, and a global maximum of 100 connections for all of the contexts combined.
In this configuration example, the PIX Security Appliance is considered to be the SSH server. The traffic from SSH clients (10.1.1.2/24 and 172.16.1.1/16) to the SSH server is encrypted. The security appliance supports the SSH remote shell functionality provided in SSH versions 1 and 2 and supports Data Encryption Standard (DES) and 3DES ciphers. SSH versions 1 and 2 are different and are not interoperable.
Prerequisites
Requirements
There are no specific requirements for this document.
Components Used
The information in this document is based on Cisco PIX Firewall Software version 7.1 and 8.0.
The information in this document was created from the devices in a specific lab environment. All of the devices used in this document started with a cleared (default) configuration. If your network is live, make sure that you understand the potential impact of any command.
Note: SSHv2 is supported in PIX/ASA version 7.x and later and not supported in versions earlier to 7.x.
Related Products
This configuration can also be used with the Cisco ASA 5500 Series Security Appliance with software versions 7.x and later.
Conventions
Refer to the Cisco Technical Tips Conventions for more information on document conventions.
Configure
In this section, you are presented with the information to configure the features described in this document.
Note: Each configuration step is presented with the necessary information to use the command line or the Adaptive Security Device Manager (ASDM).
Note: Use the Command Lookup Tool (registered customers only) in order to obtain more information on the commands used in this section.
Network Diagram
This document uses this network setup:

SSH Configurations
This document uses these configurations:
SSH Access to the Security Appliance
Complete these steps in order to configure SSH access to the security appliance:
-
SSH sessions always require a username and password for authentication. There are two ways to meet this requirement.
Configure a username and password and use AAA:
Syntax :
pix(config)#username username password password

pix(config)#aaa authentication {telnet | ssh | http | serial} console {LOCAL |
server_group [LOCAL]}
Note: If you use a TACACS+ or RADIUS server group for authentication, you can configure the security appliance to use the local database as a fallback method if the AAA server is unavailable. Specify the server group name and then LOCAL (LOCAL is case sensitive). We recommend that you use the same username and password in the local database as the AAA server, because the security appliance prompt does not give any indication which method is used.
Note: Example :
pix(config)#aaa authentication ssh console TACACS+ LOCAL
Note: You can alternatively use the local database as your main method of authentication with no fallback. In order to do this, enter LOCAL alone.
Example :
pix(config)#aaa authentication ssh console LOCAL
OR
Use the default username of pix and the default Telnet password of cisco. You can change the Telnet password with this command:
pix(config)#passwd passwordNote: The password command can also be used in this situation. Both commands do the same thing.
-
Generate an RSA key pair for the PIX Firewall, which is required for SSH:
pix(config)#crypto key generate rsa modulus modulus_sizeNote: The modulus_size (in bits) can be 512, 768, 1024, or 2048. The larger the key modulus size you specify, the longer it takes to generate the RSA key pair. The value of 1024 is recommended.
Note: The command used to generate an RSA key pair is different for PIX software versions earlier than 7.x. In earlier versions, a domain name must be set before you can create keys.
Note: In multiple context mode, you must generate the RSA keys for every contexts. In addition, crypto commands are not supported in system context mode.
-
Specify the hosts allowed to connect to the security appliance.
This command specifies the source address, netmask and interface of the host(s) allowed to connect with SSH. It can be entered multiple times for multiple hosts, networks, or interfaces. In this example, one host on the inside and one host on the outside are permitted.
pix(config)#ssh 172.16.1.1 255.255.255.255 inside
pix(config)#ssh 10.1.1.2 255.255.255.255 outside
-
Optional: By default, the security appliance allows both SSH version 1 and version 2. Enter this command in order to restrict connections to a specific version:
pix(config)# ssh version <version_number>Note: The version_number can be 1 or 2.
-
Optional: By default, SSH sessions are closed after five minutes of inactivity. This timeout can be configured to last for between 1 and 60 minutes.
pix(config)#ssh timeout minutes
How to use an SSH Client
Provide the username and the login password of the PIX 500 Series Security Appliance while you open the SSH session. When you start an SSH session, a dot (.) displays on the security appliance console before the SSH user authentication prompt appears:
hostname(config)# .
The display of the dot does not affect the functionality of SSH. The dot appears at the console when a server key is generated or a message is decrypted with private keys during SSH key exchange before user authentication occurs. These tasks can take up to two minutes or longer. The dot is a progress indicator that verifies that the security appliance is busy and has not hung.
SSH versions 1.x and 2 are entirely different protocols and are not compatible. Download a compatible client. Refer to the Obtain an SSH Client section of Advanced Configurations for more information.
PIX Configuration
This document uses this configuration:
| PIX Configuration |
|---|
PIX Version 7.1(1) ! hostname pix enable password 8Ry2YjIyt7RRXU24 encrypted names ! interface Ethernet0 nameif outside security-level 0 ip address 192.168.200.1 255.255.255.0 ! interface Ethernet1 nameif inside security-level 100 ip address 172.16.5.10 255.255.0.0 ! passwd 2KFQnbNIdI.2KYOU encrypted ftp mode passive pager lines 24 mtu outside 1500 mtu inside 1500 no failover icmp permit any outside no asdm history enable arp timeout 14400 route outside 10.1.1.0 255.255.255.0 192.168.200.1 1 timeout xlate 3:00:00 timeout conn 1:00:00 half-closed 0:10:00 udp 0:02:00 icmp 0:00:02 timeout sunrpc 0:10:00 h323 0:05:00 h225 1:00:00 mgcp 0:05:00 timeout mgcp-pat 0:05:00 sip 0:30:00 sip_media 0:02:00 timeout uauth 0:05:00 absolute !--- AAA for the SSH configuration username ciscouser password 3USUcOPFUiMCO4Jk encrypted aaa authentication ssh console LOCAL http server enable http 172.16.0.0 255.255.0.0 inside no snmp-server location no snmp-server contact snmp-server enable traps snmp authentication linkup linkdown coldstar telnet timeout 5 !--- Enter this command for each address or subnet !--- to identify the IP addresses from which !--- the security appliance accepts connections. !--- The security appliance accepts SSH connections from all interfaces. ssh 10.1.1.2 255.255.255.255 outside !--- Allows the users on the host 172.161.1.1 !--- to access the security appliance !--- on the inside interface. ssh 172.16.1.1 255.255.255.255 inside !--- Sets the duration from 1 to 60 minutes !--- (default 5 minutes) that the SSH session can be idle, !--- before the security appliance disconnects the session. ssh timeout 60 console timeout 0 ! class-map inspection_default match default-inspection-traffic ! ! policy-map global_policy class inspection_default inspect dns maximum-length 512 inspect ftp inspect h323 h225 inspect h323 ras inspect netbios inspect rsh inspect rtsp inspect skinny inspect esmtp inspect sqlnet inspect sunrpc inspect tftp inspect sip inspect xdmcp ! service-policy global_policy global Cryptochecksum:a6b05fd04f9fbd0a39f1ca7328de91f7 : end |
Note: In order to access the management interface of the ASA/PIX using SSH, issue this command: ssh 172.16.16.160 255.255.255.255 Management
Configuration with ASDM 5.x
Complete these steps in order to configure the device for SSH using ASDM:
-
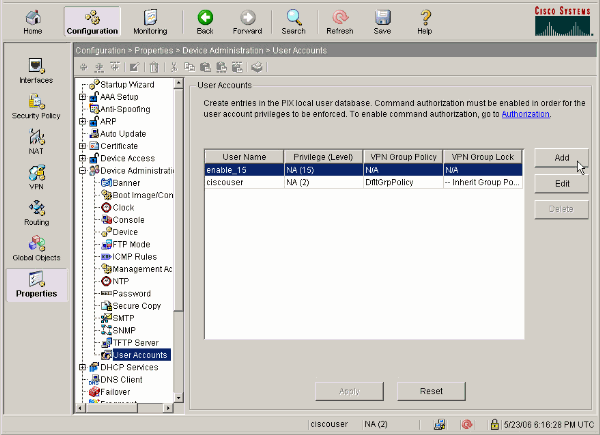
Choose Configuration > Properties > Device Administration > User Accounts in order to add a user with ASDM.
-
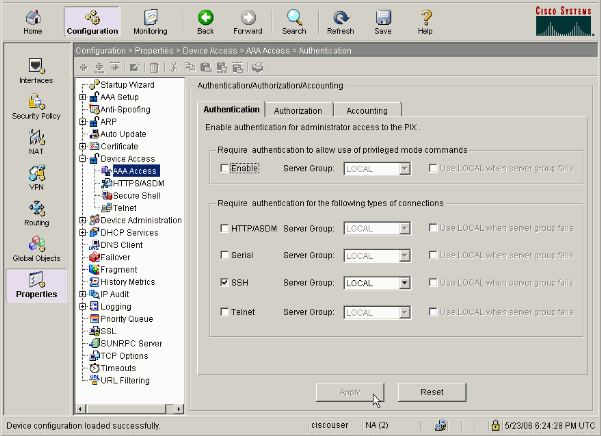
Choose Configuration > Properties > Device Access > AAA Access > Authentication in order to set up AAA authentication for SSH with ASDM.
-
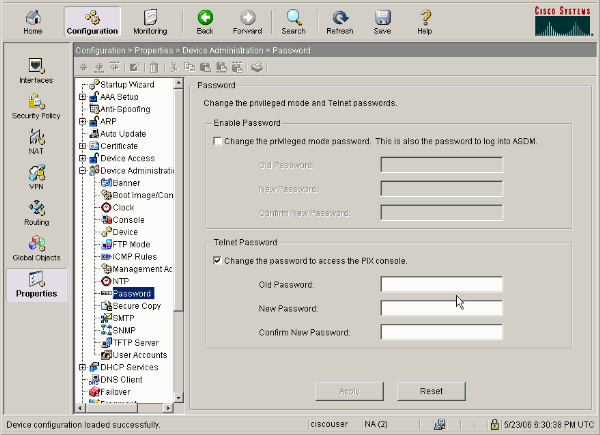
Choose Configuration > Properties > Device Administration > Password in order to change the Telnet password with ASDM.
-
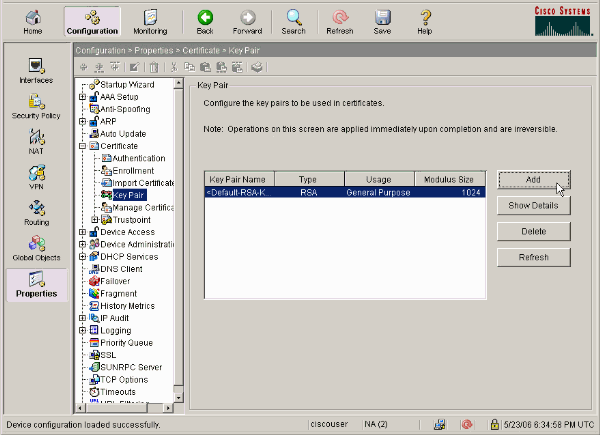
Choose Configuration > Properties > Certificate > Key Pair, click Add and use the default options presented in order to generate the same RSA keys with ASDM.
-
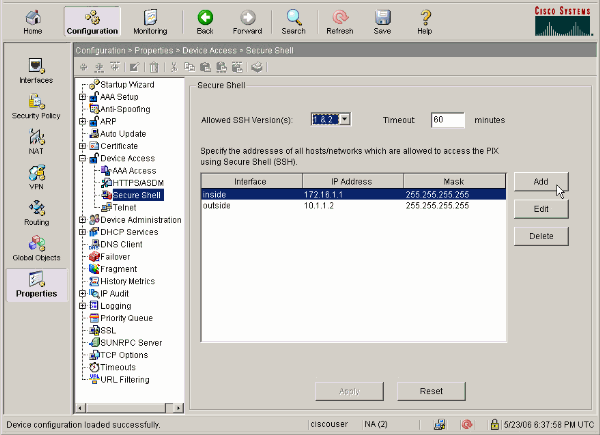
Choose Configuration > Properties > Device Access > Secure Shell in order to use ASDM to specify hosts allowed to connect with SSH and to specify the version and timeout options.
-
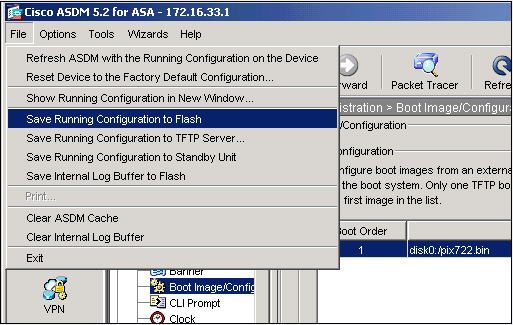
Click File > Save Running Configuration to Flash in order to save the configuration.
Configuration with ASDM 6.x
Complete these steps:
-
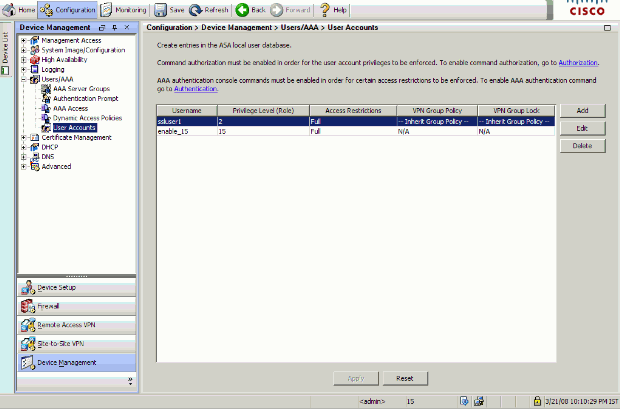
Choose Configuration > Device Management > Users/AAA > User Accounts in order to add a user with ASDM.
-
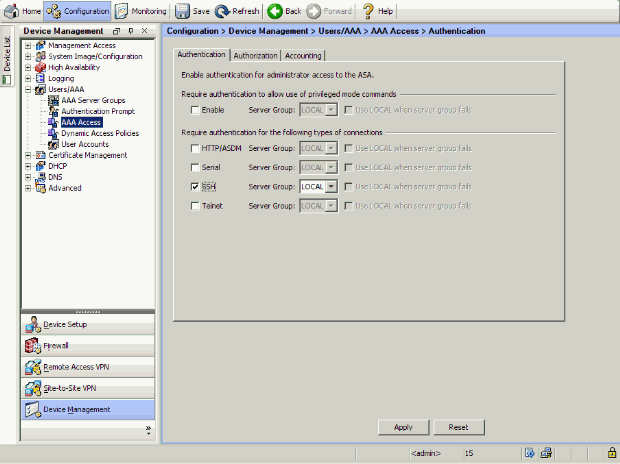
Choose Configuration > Device Management > Users/AAA > AAA Access > Authentication in order to set up AAA authentication for SSH with ASDM.
-
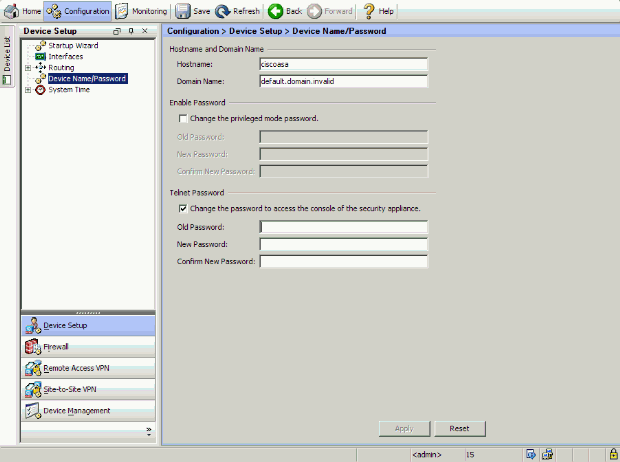
Choose Configuration > Device Setup > Device Name/Password in order to change the Telnet password with ASDM.
-
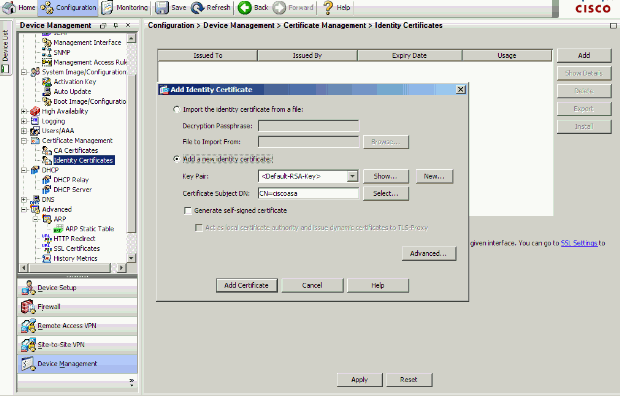
Choose Configuration > Device Management > Certificate Management > Identity Certificates, click Add and use the default options presented in order to generate the same RSA keys with ASDM.
-
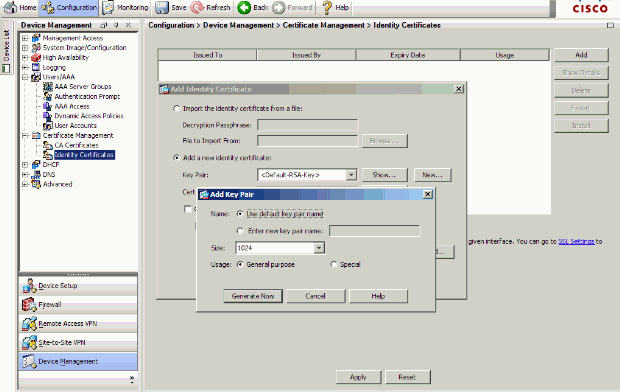
Under Add a new Identity certificate click New in order to add a default key pair if one does not exists. Then, click Generate Now.
-
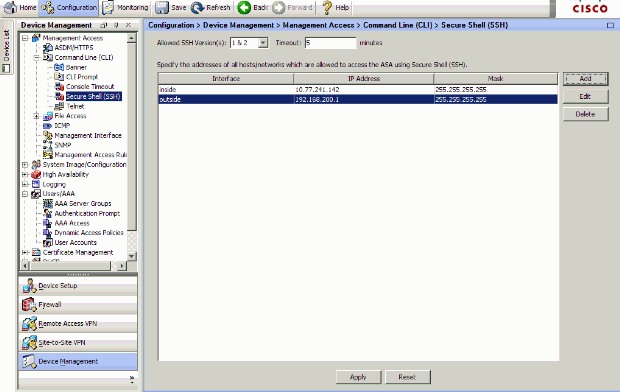
Choose Configuration > Device Management > Management Access > Command Line (CLI) > Secure Shell (SSH) in order to use ASDM to specify hosts allowed to connect with SSH and to specify the version and timeout options.
-
Click Save on top of the window in order to save the configuration.

-
When prompted to save the configuration on flash, choose Apply in order to save the configuration.
Telnet Configuration
In order to add Telnet access to the console and set the idle timeout, issue the telnet command in global configuration mode. By default, Telnet sessions that are left idle for five minutes are closed by the security appliance. In order to remove Telnet access from a previously set IP address, use the no form of this command.
telnet {{hostname | IP_address mask interface_name} | {IPv6_address interface_name} | {timeout number}}

no telnet {{hostname | IP_address mask interface_name} | {IPv6_address interface_name} | {timeout number}}
The telnet command lets you specify which hosts can access the security appliance console with Telnet.
Note: You can enable Telnet to the security appliance on all interfaces. However, the security appliance enforces that all Telnet traffic to the outside interface be protected by IPsec. In order to enable a Telnet session to the outside interface, configure IPsec on the outside interface to include IP traffic that is generated by the security appliance and enable Telnet on the outside interface.
Note: In general, if any interface that has a security level of 0 or lower than any other interface, then PIX/ASA does not allow Telnet to that interface.
Note: It is not recommended to access the security appliance through a Telnet session. The authentication credential information, such as password, is sent as clear text. The Telnet server and client communication happens only with the clear text. Cisco recommends to use SSH for a more secured data communication.
If you enter an IP address, you must also enter a netmask. There is no default netmask. Do not use the subnetwork mask of the internal network. The netmask is only a bit mask for the IP address. In order to limit access to a single IP address, use 255 in each octet; for example, 255.255.255.255.
If IPsec operates, you can specify an unsecure interface name, which is typically the outside interface. At a minimum, you can configure the crypto map command in order to specify an interface name with the telnet command.
Issue the password command in order to set a password for Telnet access to the console. The default is cisco. Issue the who command in order to view which IP addresses currently access the security appliance console. Issue the kill command in order to terminate an active Telnet console session.
In order to enable a Telnet session to the inside interface, review these examples:
Example 1
This example permits only the host 10.1.1.1 to gain access to the security appliance console through Telnet:
pix(config)#telnet 10.1.1.1 255.255.255.255 inside
Example 2
This example permits only the network 10.0.0.0/8 to gain access to the security appliance console through Telnet:
pix(config)#telnet 10.0.0.0 255.0.0.0 inside
Example 3
This example allows all networks to gain access to the security appliance console through Telnet:
pix(config)#telnet 0.0.0.0 0.0.0.0 inside
If you use the aaa command with the console keyword, the Telnet console access must be authenticated with an authentication server.
Note: If you have configured the aaa command in order to require authentication for the security appliance Telnet console access and the console login request times out, you can gain access to the security appliance from the serial console. In order to do this, enter the security appliance username and the password that is set with the enable password command.
Issue the telnet timeout command in order to set the maximum time that a console Telnet session can be idle before it is logged off by the security appliance. You cannot use the no telnet command with the telnet timeout command.
This example shows how to change the maximum session idle duration:
hostname(config)#telnet timeout 10

hostname(config)#show running-config telnet timeout

telnet timeout 10 minutes
SSH/Telnet Support in the ACS 4.x
If you look at the RADIUS functions, you can use the RADIUS for the SSH functionality.
When an attempt is made to access the security appliance with Telnet, SSH, HTTP, or a serial console connection and the traffic matches an authentication statement, the security appliance requests a username and password. It then sends these credentials to the RADIUS (ACS) server, and grants or denies CLI access based on the response from the server.
Refer to the AAA Server and Local Database Support section of Configuring AAA Servers and the Local Database for more information.
For instance, your ASA security appliance 7.0 needs an IP address from which the security appliance accepts connections, such as:
hostname(config)#ssh source_IP_address mask source_interface
Refer to the Allowing SSH Access section of Configuring AAA Servers and the Local Database for more information.
Refer to PIX/ASA : Cut-through Proxy for Network Access using TACACS+ and RADIUS Server Configuration Example for more information on how to configure SSH/Telnet access to PIX with ACS authentication.
Verify
Use this section in order to confirm that your configuration works properly.
The Output Interpreter Tool (registered customers only) (OIT) supports certain show commands. Use the OIT in order to view an analysis of show command output.
Debug SSH
Issue the debug ssh command in order to turn on SSH debugging.
pix(config)#debug ssh
   SSH debugging on
This output shows that the authentication request from host 10.1.1.2 (outside to PIX) to "pix" is successful:
pix#
	Device ssh opened successfully.
   SSH0: SSH client: IP = '10.1.1.2' interface # = 1
   SSH: host key initialised
   SSH0: starting SSH control process
   SSH0: Exchanging versions - SSH-1.99-Cisco-1.25
	SSH0: send SSH message: outdata is NULL
			server version string:SSH-1.99-Cisco-1.25SSH0: receive SSH message: 83 (83)
   SSH0: client version is - SSH-1.99-3.2.0 SSH Secure Shell for Windows
			client version string:SSH-1.99-3.2.0 SSH Secure Shell for WindowsSSH0:
begin    ser ver key generation
   SSH0: complete server key generation, elapsed time = 1760 ms
	SSH2 0: SSH2_MSG_KEXINIT sent
   SSH2 0: SSH2_MSG_KEXINIT received
   SSH2: kex: client->server aes128-cbc hmac-md5 none
   SSH2: kex: server->client aes128-cbc hmac-md5 none
   SSH2 0: expecting SSH2_MSG_KEXDH_INIT
   SSH2 0: SSH2_MSG_KEXDH_INIT received
   SSH2 0: signature length 143
   SSH2: kex_derive_keys complete
   SSH2 0: newkeys: mode 1
   SSH2 0: SSH2_MSG_NEWKEYS sent
   SSH2 0: waiting for SSH2_MSG_NEWKEYS
   SSH2 0: newkeys: mode 0
   SSH2 0: SSH2_MSG_NEWKEYS receivedSSH(pix): user authen method is
'no AAA', aaa server group ID = 0
   SSH(pix): user authen method is 'no AAA', aaa server group ID = 0
	SSH2 0: authentication successful for pix

!--- Authentication for the PIX was successful.

   SSH2 0: channel open request
   SSH2 0: pty-req request
   SSH2 0: requested tty: vt100, height 25, width 80
	SSH2 0: shell request
   SSH2 0: shell message received
If a user gives a wrong username, for example, "pix1" instead of "pix", the PIX Firewall rejects the authentication. This debug output shows the failed authentication:
pix#
Device ssh opened successfully.
SSH0: SSH client: IP = '10.1.1.2' interface # = 1
SSH: host key initialised
SSH0: starting SSH control process
SSH0: Exchanging versions - SSH-1.99-Cisco-1.25
SSH0: send SSH message: outdata is NULL
		server version string:SSH-1.99-Cisco-1.25SSH0: receive SSH message: 83 (83)
SSH0: client version is - SSH-1.99-3.2.0 SSH Secure Shell for Windows client version
	    string:SSH-1.99-3.2.0 SSH Secure Shell for WindowsSSH0: begin server key generation
SSH0: complete server key generation, elapsed time = 1960 ms
SSH2 0: SSH2_MSG_KEXINIT sent
SSH2 0: SSH2_MSG_KEXINIT received
SSH2: kex: client->server aes128-cbc hmac-md5 none
SSH2: kex: server->client aes128-cbc hmac-md5 none
SSH2 0: expecting SSH2_MSG_KEXDH_INIT
SSH2 0: SSH2_MSG_KEXDH_INIT received
SSH2 0: signature length 143
SSH2: kex_derive_keys complete
SSH2 0: newkeys: mode 1
SSH2 0: SSH2_MSG_NEWKEYS sent
SSH2 0: waiting for SSH2_MSG_NEWKEYS
SSH2 0: newkeys: mode 0
SSH2 0: SSH2_MSG_NEWKEYS receivedSSH(pix1): user authen method is
'no AAA', aaa server group ID = 0
SSH(pix1): user authen method is 'no AAA', aaa server group ID = 0
SSH2 0: authentication failed for pix1

!--- Authentication for pix1 was not successful due to the wrong username.
Similarly, if the user provides the wrong password, this debug ouput shows you the failed authentication.
pix#
Device ssh opened successfully.
SSH0: SSH client: IP = '10.1.1.2'  interface # = 1
SSH: host key initialised
SSH0: starting SSH control process
SSH0: Exchanging versions - SSH-1.99-Cisco-1.25
SSH0: send SSH message: outdata is NULL server version string:
SSH-1.99-Cisco-1.25SSH0: receive      SSH message: 83 (83)
SSH0: client version is - SSH-1.99-3.2.0 SSH Secure Shell for
Windows client version string:SSH-1.99-3.2.0
		SSH Secure Shell for WindowsSSH0: begin server key generation
SSH0: complete server key generation, elapsed time = 1920 ms
SSH2 0: SSH2_MSG_KEXINIT sent
SSH2 0: SSH2_MSG_KEXINIT received
SSH2: kex: client->server aes128-cbc hmac-md5 none
SSH2: kex: server->client aes128-cbc hmac-md5 none
SSH2 0: expecting SSH2_MSG_KEXDH_INIT
SSH2 0: SSH2_MSG_KEXDH_INIT received
SSH2 0: signature length 143
SSH2: kex_derive_keys complete
SSH2 0: newkeys: mode 1
SSH2 0: SSH2_MSG_NEWKEYS sent
SSH2 0: waiting for SSH2_MSG_NEWKEYS
SSH2 0: newkeys: mode 0
SSH2 0: SSH2_MSG_NEWKEYS receivedSSH(pix): user authen method
is 'no AAA', aaa server group ID = 0
     SSH(pix): user authen method is 'no AAA', aaa server group ID = 0
SSH2 0: authentication failed for pixSSH(pix): user authen method
is 'no AAA', aaa server group ID = 0
SSH2 0: authentication failed for pix

!--- Authentication for PIX was not successful due to the wrong password.
View Active SSH Sessions
Issue this command in order to check the number of SSH sessions that are connected and the connection state to the PIX:
pix#show ssh session

SID Client IP       Version Mode Encryption Hmac     State            Username
0   10.1.1.2        1.99    IN   aes128-cbc md5      SessionStarted   pix
                            OUT  aes128-cbc md5      SessionStarted   pix
Choose Monitoring > Properties > Device Access > Secure Shell Sessions in order to view the sessions with ASDM.
View Public RSA Key
Issue this command in order to view the public portion of the RSA keys on the security appliance:
pix#show crypto key mypubkey rsa

Key pair was generated at: 19:36:28 UTC May 19 2006
Key name: <Default-RSA-Key>
 Usage: General Purpose Key
 Modulus Size (bits): 1024
 Key Data:

  30819f30 0d06092a 864886f7 0d010101 05000381 8d003081 89028181 00c172f4
  95f66c34 2c2ced37 aa3442d8 12158c93 131480dd 967985ab 1d7b92d9 5290f695
  8e9b5b0d d88c0439 6169184c d8fb951c 19023347 d6b3f939 99ac2814 950f4422
  69b67328 f64916b1 82e15341 07590da2 390fbefd 38758888 7319196c de61aef1
  165c4bab 03d081d5 ddaf15cc c9ddb204 c2b451e0 f19ce0f3 485b1d69 8b020301 0001
Choose Configuration > Properties > Certificate > Key Pair, and click Show Details in order to view RSA keys with ASDM.
Troubleshoot
This section provides information you can use to troubleshoot your configuration.
How to Remove the RSA Keys from the PIX
Certain situations, such as when you upgrade PIX sofware or change the SSH version in the PIX, can require you to remove and re-create RSA keys. Issue this command in order to remove the RSA key pair from the PIX:
pix(config)#crypto key zeroize rsa
Choose Configuration > Properties > Certificate > Key Pair, and click Delete in order to remove RSA keys with ASDM.
SSH Connection Failed
Error message on PIX/ASA:
%PIX|ASA-3-315004: Fail to establish SSH session because RSA host key retrieval failed.
The corresponding error message on the SSH Client machine:
Selected cipher type <unknown> not supported by server.
In order to resolve this issue, remove and re-create the RSA keys. Issue this command in order to remove the RSA key pair from ASA:
ASA(config)#crypto key zeroize rsa
Issue this command in order to generate the new key:
ASA(config)# crypto key generate rsa modulus 1024
Unable to Access ASA with SSH
Error message:
ssh_exchange_identification: read: Connection reset by peer
In order to resolve this issue, complete these steps:
-
Either reload the ASA or remove all SSH related config and the RSA keys.
-
Reconfigure the SSH comands and regenerate the RSA keys.
Unable to Access Secondary ASA Using SSH
When ASA is in failover mode, it is not possible to SSH to the standby ASA through the VPN tunnel. This is because the reply traffic for the SSH takes the outside interface of the standby ASA.
Related Information
- Cisco PIX 500 Series Security Appliances
- Cisco ASA 5500 Series Adaptive Security Appliances
- Cisco PIX Firewall Software
- Cisco Secure PIX Firewall Command References
- Configuring SSH Connections - Cisco routers & Cisco Concentrators
- Requests for Comments (RFCs)

- Technical Support & Documentation - Cisco Systems
Revision History
| Revision | Publish Date | Comments |
|---|---|---|
1.0 |
10-Mar-2006 |
Initial Release |
Contact Cisco
- Open a Support Case

- (Requires a Cisco Service Contract)


 Feedback