PIX/ASA 7.x ASDM: Restrict the Network Access of Remote Access VPN Users
Available Languages
Contents
Introduction
This document provides a sample configuration using the Cisco Adaptive Security Device Manager (ASDM) for restricting what internal networks remote access VPN users can access behind the PIX Security Appliance or Adaptive Security Appliance (ASA). You can limit remote access VPN users to only the areas of the network that you want them to access when you:
-
Create access lists.
-
Associate them with group policies.
-
Associate those group policies with tunnel groups.
Refer to Configuring the Cisco VPN 3000 Concentrator for Blocking with Filters and RADIUS Filter Assignment in order to learn more about the scenario where the VPN Concentrator blocks the access from VPN users.
Prerequisites
Requirements
Ensure that you meet these requirements before you attempt this configuration:
-
The PIX can be configured using the ASDM.
Note: Refer to Allowing HTTPS Access for ASDM in order to allow the PIX to be configured by the ASDM.
-
You have at least one known good remote access VPN configuration in place.
Note: If you do not have any such configurations, refer to ASA as a Remote VPN Server using ASDM Configuration Example for information on how to configure one good remote access VPN configuration.
Components Used
The information in this document is based on these software and hardware versions:
-
Cisco Secure PIX 500 Series Security Appliance version 7.1(1)
Note: The PIX 501 and 506E Security Appliances do not support version 7.x.
-
Cisco Adaptive Security Device Manager version 5.1(1)
Note: The ASDM is only available in PIX or ASA 7.x.
The information in this document was created from the devices in a specific lab environment. All of the devices used in this document started with a cleared (default) configuration. If your network is live, make sure that you understand the potential impact of any command.
Related Products
This configuration can also be used with these hardware and software versions:
-
Cisco ASA 5500 Series Adaptive Security Appliance version 7.1(1)
Network Diagram
This document uses this network setup:
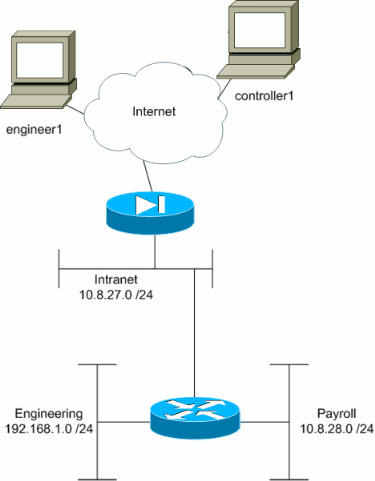
In this configuration example, a small corporate network with three subnets is supposed. This diagram illustrates the topology. The three subnets are Intranet, Engineering, and Payroll. The goal of this configuration example is to permit payroll personnel remote access to the Intranet and Payroll subnets and prevent them from accessing the Engineering subnet. Also, the engineers should be able to remotely access the Intranet and Engineering subnets, but not the Payroll subnet. The payroll user in this example is "controller1". The engineering user in this example is "engineer1".
Conventions
Refer to the Cisco Technical Tips Conventions for more information on document conventions.
Configure Access via ASDM
Complete these steps to configure the PIX Security Appliance using ASDM:
-
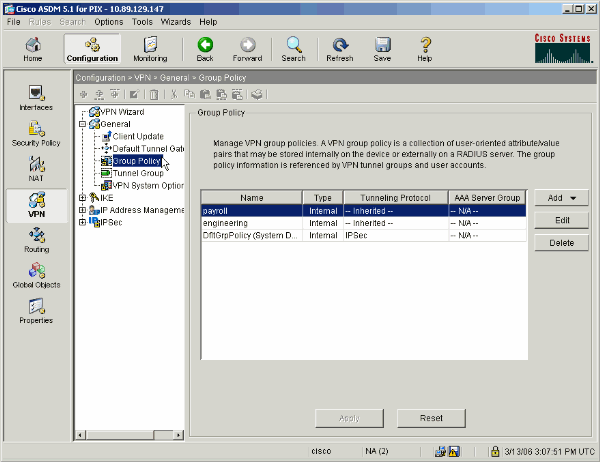
Select Configuration > VPN > General > Group Policy.
-
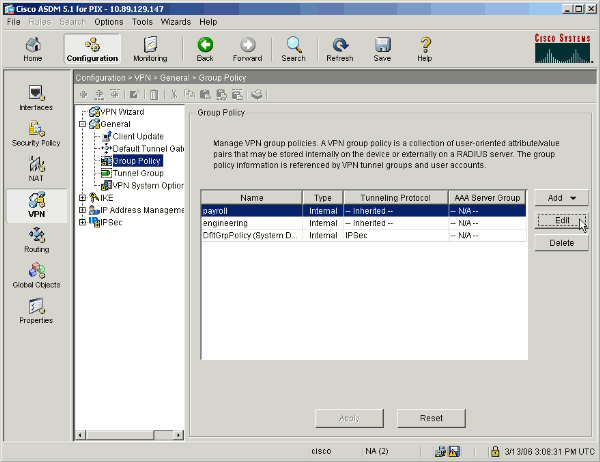
Based on what steps were taken to configure tunnel groups on the PIX, Group Policies might already exist for those tunnel groups whose users you wish to restrict. If a suitable Group Policy already exists, choose it and click Edit. Otherwise, click Add and choose Internal Group Policy....
-
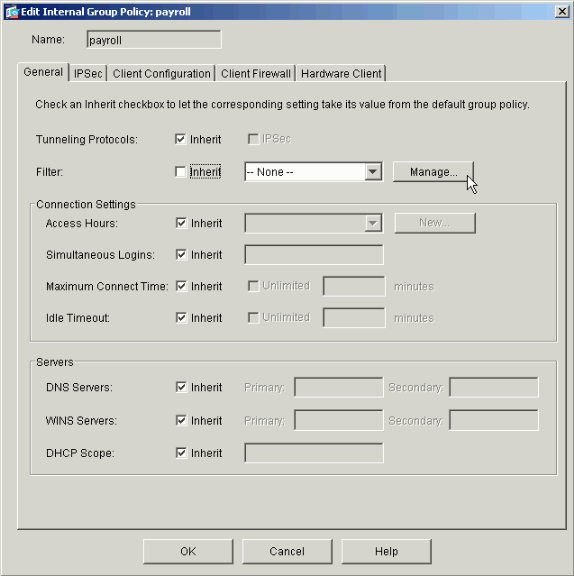
If necessary, enter or change the name of the Group Policy at the top of the window that opens.
-
On the General tab uncheck the Inherit box next to Filter and then click Manage.
-
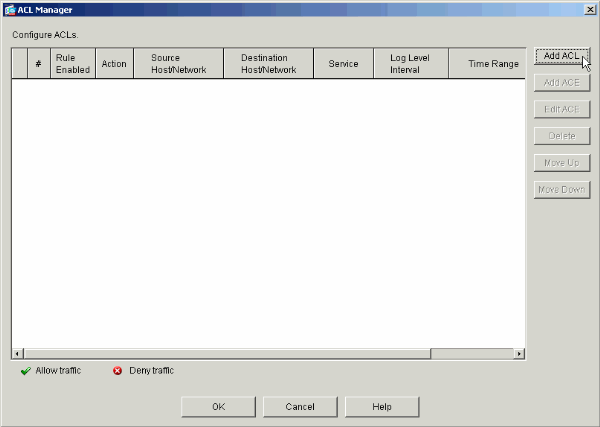
Click Add ACL to create a new access list in the ACL Manager window that appears.
-
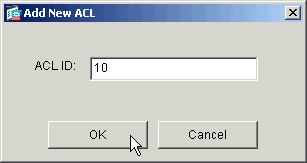
Choose a number for the new access list and click OK.
-
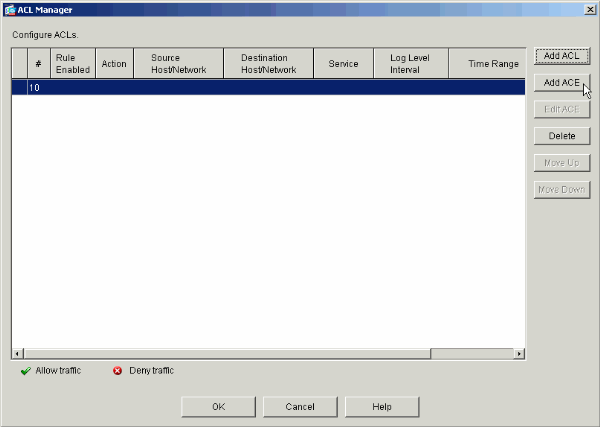
With your new ACL selected on the left, click Add ACE to add a new access control entry to the list.
-
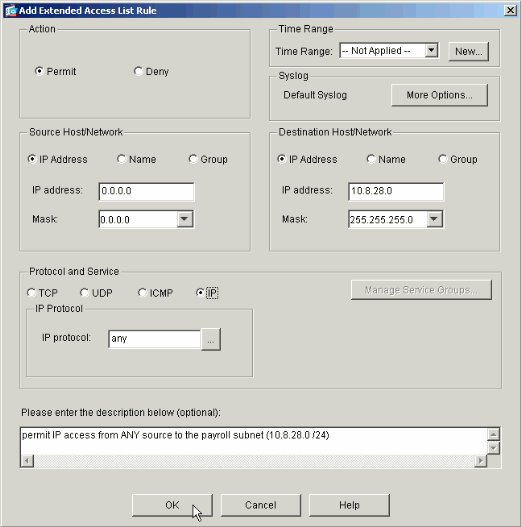
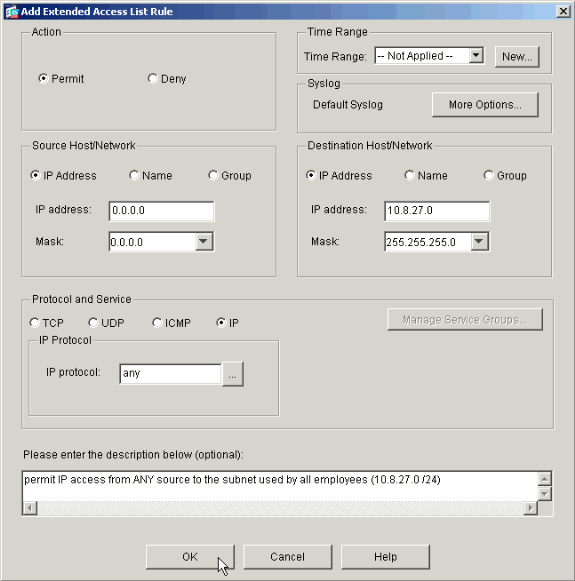
Define the access control entry (ACE) that you wish to add.
In this example, the first ACE in ACL 10 permits IP access to the Payroll subnet from any source.
Note: By default, ASDM selects only TCP as the protocol. You must choose IP if you wish to permit or deny users full IP access. Click OK when you are finished.
-
The ACE that you just added now appears in the list. Choose Add ACE again to add any additional lines to the access list.
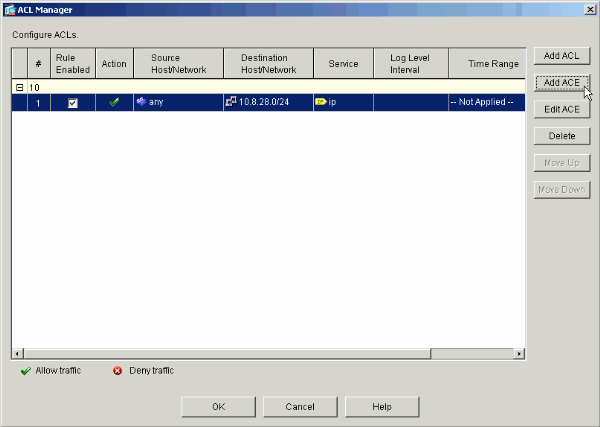
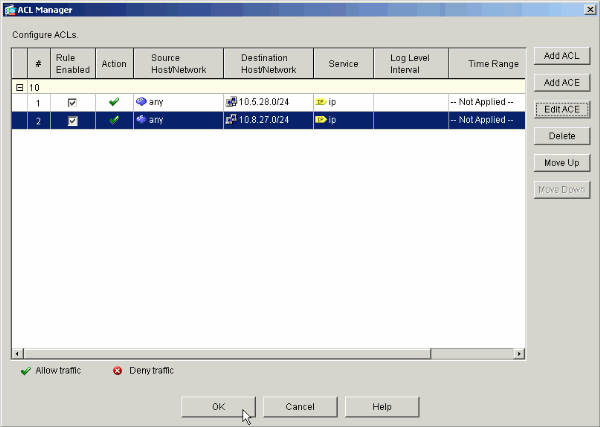
In this example, a second ACE is added to ACL 10 in order to permit access to the Intranet subnet.
-
Click OK once you are done adding ACEs.
-
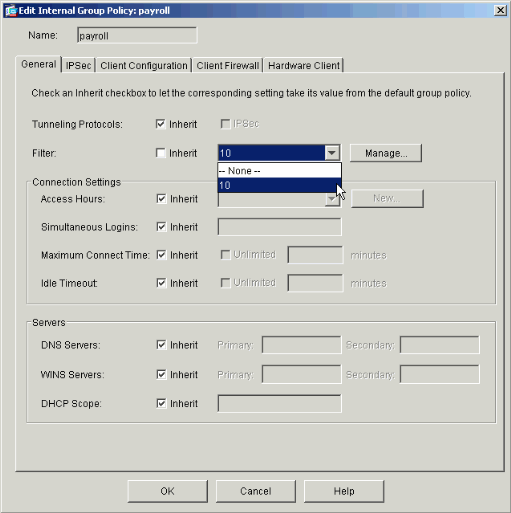
Select the ACL that you defined and populated in the last steps to be the filter for your Group Policy. Click OK when you are done.
-
Click Apply to send the changes to the PIX.
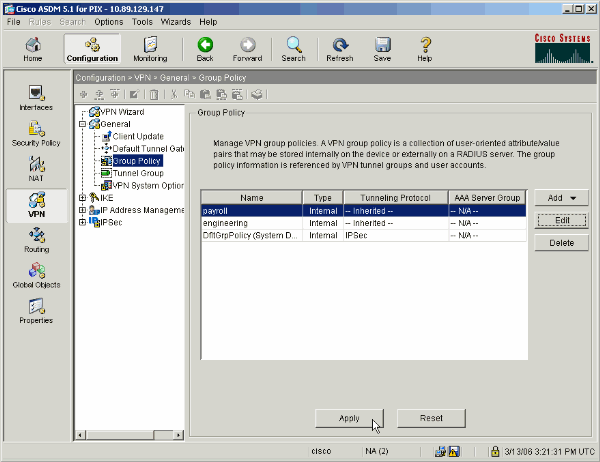
-
If you have it configured to do so under Options > Preferences, the ASDM previews the commands that it is about to send to the PIX. Click Send.
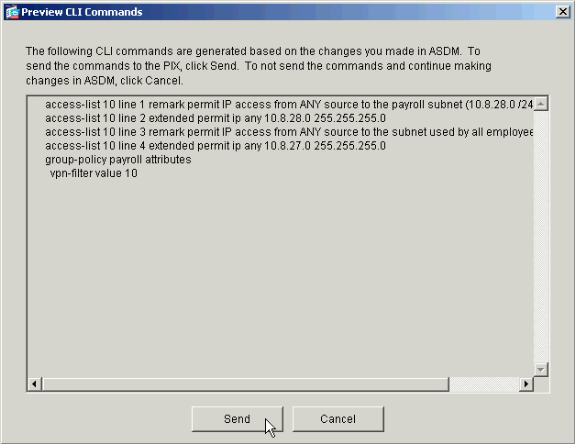
-
Apply the Group Policy that was just created or modified to the correct tunnel group. Click Tunnel Group in the left frame.
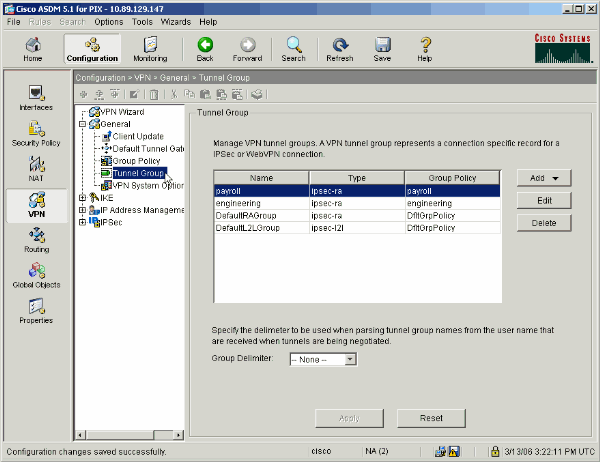
-
Choose the Tunnel Group that you wish to apply the Group Policy to and click Edit.
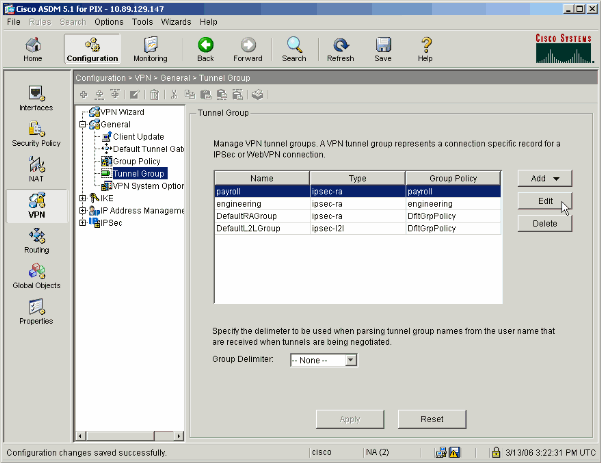
-
If your Group Policy was created automatically (see step 2), verify that the Group Policy you just configured is selected in the drop-down box. If your Group Policy was not automatically configured, select it from the drop-down box. Click OK when you are done.
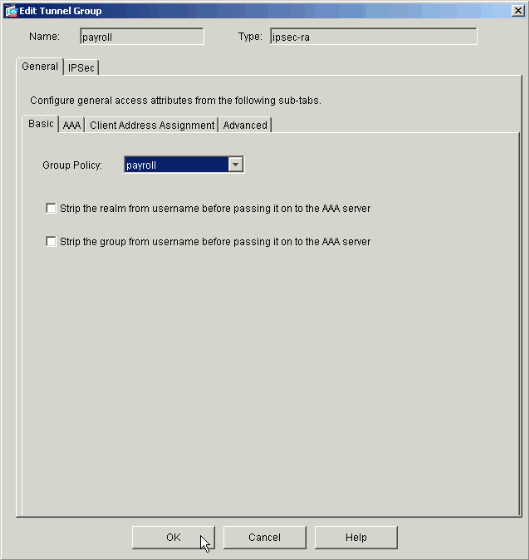
-
Click Apply and, if prompted, click Send to add the change to the PIX configuration.
If the Group Policy was already selected you might receive a message that says "No changes were made." Click OK.
-
Repeat steps 2 through 17 for any additional Tunnel Groups to which you would like to add restrictions.
In this configuration example, it is also necessary to restrict the access of the engineers. While the procedure is the same, these are a few windows on which differences are notable:
-
New Access List 20
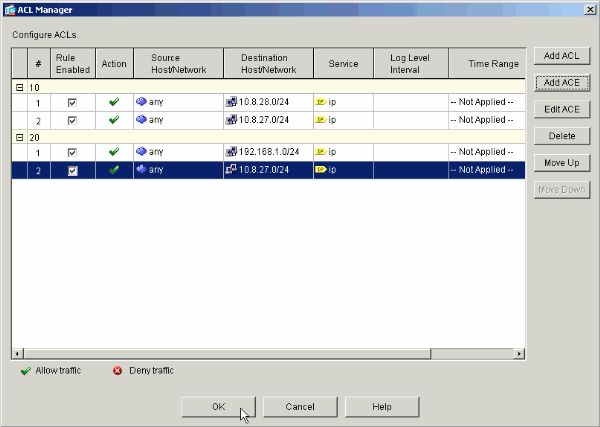
-
Choose Access List 20 as a filter in the Engineering Group Policy.
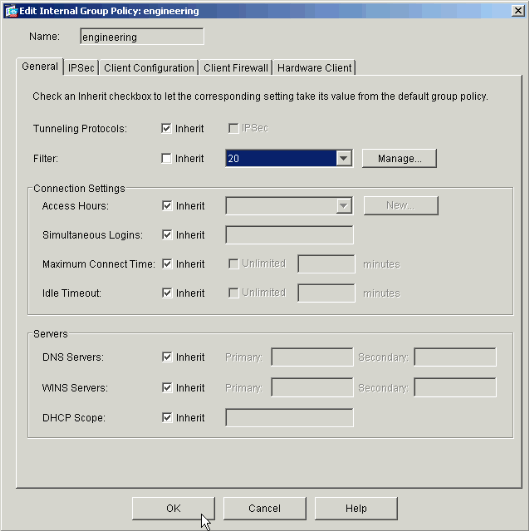
-
Verify that the Engineering Group Policy is set for the Engineering Tunnel Group.
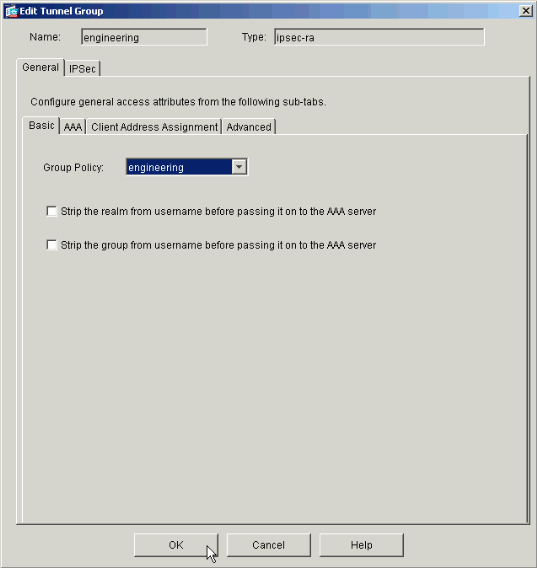
-
Configure Access via CLI
Complete these steps to configure the security appliance using the CLI:
Note: Some of the commands shown in this output are brought down to a second line due to spatial reasons.
-
Create two different access control lists (15 and 20) that are applied to users as they connect to the remote access VPN. This access list is called on later in the configuration.
ASAwCSC-CLI(config)#access-list 15 remark permit IP access from ANY
source to the payroll subnet (10.8.28.0/24)

ASAwCSC-CLI(config)#access-list 15 extended permit ip
any 10.8.28.0 255.255.255.0

ASAwCSC-CLI(config)#access-list 15 remark Permit IP access from ANY
source to the subnet used by all employees (10.8.27.0)

ASAwCSC-CLI(config)#access-list 15 extended permit ip
any 10.8.27.0 255.255.255.0

ASAwCSC-CLI(config)#access-list 20 remark Permit IP access from ANY
source to the Engineering subnet (192.168.1.0/24)

ASAwCSC-CLI(config)#access-list 20 extended permit ip
any 192.168.1.0 255.255.255.0

ASAwCSC-CLI(config)#access-list 20 remark Permit IP access from ANY
source to the subnet used by all employees (10.8.27.0/24)

ASAwCSC-CLI(config)#access-list 20 extended permit ip
any 10.8.27.0 255.255.255.0
-
Create two different VPN address pools. Create one for Payroll and one for the Engineering remote users.
ASAwCSC-CLI(config)#ip local pool Payroll-VPN
172.10.1.100-172.10.1.200 mask 255.255.255.0

ASAwCSC-CLI(config)#ip local pool Engineer-VPN 172.16.2.1-172.16.2.199
mask 255.255.255.0
-
Create policies for Payroll that only apply to them when they connect.
ASAwCSC-CLI(config)#group-policy Payroll internal

ASAwCSC-CLI(config)#group-policy Payroll attributes

ASAwCSC-CLI(config-group-policy)#dns-server value 10.8.27.10

ASAwCSC-CLI(config-group-policy)#vpn-filter value 15


!--- Call the ACL created in step 1 for Payroll.


ASAwCSC-CLI(config-group-policy)#vpn-tunnel-protocol IPSec

ASAwCSC-CLI(config-group-policy)#default-domain value payroll.corp.com

ASAwCSC-CLI(config-group-policy)#address-pools value Payroll-VPN


!--- Call the Payroll address space that you created in step 2.
-
This step is the same as step 3 except it is for the Engineering group.
ASAwCSC-CLI(config)#group-policy Engineering internal

ASAwCSC-CLI(config)#group-policy Engineering attributes

ASAwCSC-CLI(config-group-policy)#dns-server value 10.8.27.10

ASAwCSC-CLI(config-group-policy)#vpn-filter value 20


!--- Call the ACL that you created in step 1 for Engineering.


ASAwCSC-CLI(config-group-policy)#vpn-tunnel-protocol IPSec

ASAwCSC-CLI(config-group-policy)#default-domain value Engineer.corp.com

ASAwCSC-CLI(config-group-policy)#address-pools value Engineer-VPN


!--- Call the Engineering address space that you created in step 2.
-
Create local users and assign the attributes you just created to those users to restrict their access to resources.
ASAwCSC-CLI(config)#username engineer password cisco123

ASAwCSC-CLI(config)#username engineer attributes

ASAwCSC-CLI(config-username)#vpn-group-policy Engineering

ASAwCSC-CLI(config-username)#vpn-filter value 20

ASAwCSC-CLI(config)#username marty password cisco456

ASAwCSC-CLI(config)#username marty attributes

ASAwCSC-CLI(config-username)#vpn-group-policy Payroll

ASAwCSC-CLI(config-username)#vpn-filter value 15
-
Create tunnel-groups that contain connection policies for the Payroll users.
ASAwCSC-CLI(config)#tunnel-group Payroll type ipsec-ra

ASAwCSC-CLI(config)#tunnel-group Payroll general-attributes

ASAwCSC-CLI(config-tunnel-general)#address-pool Payroll-VPN

ASAwCSC-CLI(config-tunnel-general)#default-group-policy Payroll

ASAwCSC-CLI(config)#tunnel-group Payroll ipsec-attributes

 ASAwCSC-CLI(config-tunnel-ipsec)#pre-shared-key time1234
-
Create tunnel-groups that contain connection policies for the Engineering users.
ASAwCSC-CLI(config)#tunnel-group Engineering type ipsec-ra

ASAwCSC-CLI(config)#tunnel-group Engineering general-attributes

ASAwCSC-CLI(config-tunnel-general)#address-pool Engineer-VPN

ASAwCSC-CLI(config-tunnel-general)#default-group-policy Engineering

ASAwCSC-CLI(config)#tunnel-group Engineering ipsec-attributes

ASAwCSC-CLI(config-tunnel-ipsec)#pre-shared-key Engine123
Once you configuration is entered, you can see this highlighted area in your configuration:
| Device Name 1 |
|---|
ASA-AIP-CLI(config)#show running-config ASA Version 7.2(2) ! hostname ASAwCSC-ASDM domain-name corp.com enable password 9jNfZuG3TC5tCVH0 encrypted names ! interface Ethernet0/0 nameif Intranet security-level 0 ip address 10.8.27.2 255.255.255.0 ! interface Ethernet0/1 nameif Engineer security-level 100 ip address 192.168.1.1 255.255.255.0 ! interface Ethernet0/2 nameif Payroll security-level 100 ip address 10.8.28.0 ! interface Ethernet0/3 no nameif no security-level no ip address ! interface Management0/0 no nameif no security-level no ip address ! passwd 2KFQnbNIdI.2KYOU encrypted ftp mode passive dns server-group DefaultDNS domain-name corp.com access-list Inside_nat0_outbound extended permit ip any 172.10.1.0 255.255.255.0 access-list Inside_nat0_outbound extended permit ip any 172.16.2.0 255.255.255.0 access-list 15 remark permit IP access from ANY source to the Payroll subnet (10.8.28.0/24) access-list 15 extended permit ip any 10.8.28.0 255.255.255.0 access-list 15 remark Permit IP access from ANY source to the subnet used by all employees (10.8.27.0) access-list 15 extended permit ip any 10.8.27.0 255.255.255.0 access-list 20 remark Permit IP access from Any source to the Engineering subnet (192.168.1.0/24) access-list 20 extended permit ip any 192.168.1.0 255.255.255.0 access-list 20 remark Permit IP access from Any source to the subnet used by all employees (10.8.27.0/24) access-list 20 extended permit ip any 10.8.27.0 255.255.255.0 pager lines 24 mtu MAN 1500 mtu Outside 1500 mtu Inside 1500 ip local pool Payroll-VPN 172.10.1.100-172.10.1.200 mask 255.255.255.0 ip local pool Engineer-VPN 172.16.2.1-172.16.2.199 mask 255.255.255.0 no failover icmp unreachable rate-limit 1 burst-size 1 asdm image disk0:/asdm-522.bin no asdm history enable arp timeout 14400 global (Intranet) 1 interface nat (Inside) 0 access-list Inside_nat0_outbound nat (Inside) 1 192.168.1.0 255.255.255.0 nat (Inside) 1 10.8.27.0 255.255.255.0 nat (Inside) 1 10.8.28.0 255.255.255.0 route Intranet 0.0.0.0 0.0.0.0 10.8.27.2 timeout xlate 3:00:00 timeout conn 1:00:00 half-closed 0:10:00 udp 0:02:00 icmp 0:00:02 timeout sunrpc 0:10:00 h323 0:05:00 h225 1:00:00 mgcp 0:05:00 mgcp-pat 0:05:00 timeout sip 0:30:00 sip_media 0:02:00 sip-invite 0:03:00 sip-disconnect 0:02:00 timeout uauth 0:05:00 absolute group-policy Payroll internal group-policy Payroll attributes dns-server value 10.8.27.10 vpn-filter value 15 vpn-tunnel-protocol IPSec default-domain value payroll.corp.com address-pools value Payroll-VPN group-policy Engineering internal group-policy Engineering attributes dns-server value 10.8.27.10 vpn-filter value 20 vpn-tunnel-protocol IPSec default-domain value Engineer.corp.com address-pools value Engineer-VPN username engineer password LCaPXI.4Xtvclaca encrypted username engineer attributes vpn-group-policy Engineering vpn-filter value 20 username marty password 6XmYwQOO9tiYnUDN encrypted privilege 0 username marty attributes vpn-group-policy Payroll vpn-filter value 15 no snmp-server location no snmp-server contact crypto ipsec transform-set ESP-3DES-SHA esp-3des esp-sha-hmac crypto dynamic-map Outside_dyn_map 20 set pfs crypto dynamic-map Outside_dyn_map 20 set transform-set ESP-3DES-SHA crypto map Outside_map 65535 ipsec-isakmp dynamic Outside_dyn_map crypto map Outside_map interface Outside crypto isakmp enable Outside crypto isakmp policy 10 authentication pre-share encryption 3des hash sha group 2 lifetime 86400 tunnel-group Payroll type ipsec-ra tunnel-group Payroll general-attributes address-pool vpnpool default-group-policy Payroll tunnel-group Payroll ipsec-attributes pre-shared-key * tunnel-group Engineering type ipsec-ra tunnel-group Engineering general-attributes address-pool Engineer-VPN default-group-policy Engineering tunnel-group Engineering ipsec-attributes pre-shared-key * telnet timeout 5 ssh timeout 5 console timeout 0 ! class-map inspection_default match default-inspection-traffic ! ! policy-map type inspect dns migrated_dns_map_1 parameters message-length maximum 512 policy-map global_policy class inspection_default inspect dns migrated_dns_map_1 inspect ftp inspect h323 h225 inspect h323 ras inspect netbios inspect rsh inspect rtsp inspect skinny inspect esmtp inspect sqlnet inspect sunrpc inspect tftp inspect sip inspect xdmcp ! service-policy global_policy global prompt hostname context Cryptochecksum:0e579c85004dcfb4071cb561514a392b : end ASA-AIP-CLI(config)# |
Verify
Use the monitoring capabilities of the ASDM to verify your configuration:
-
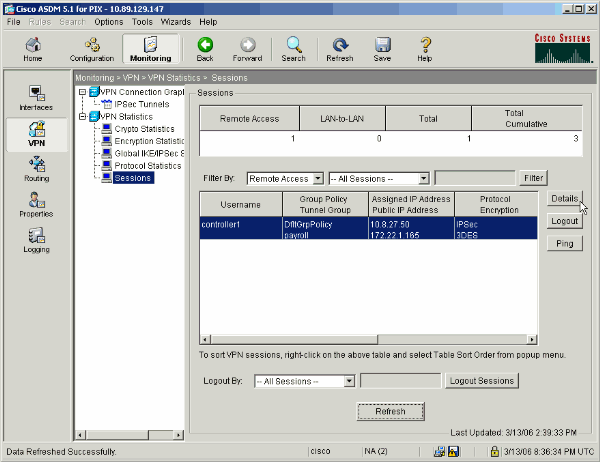
Select Monitoring > VPN > VPN Statistics > Sessions.
You see the active VPN sessions on the PIX. Select the session that you are interested in and click Details.
-
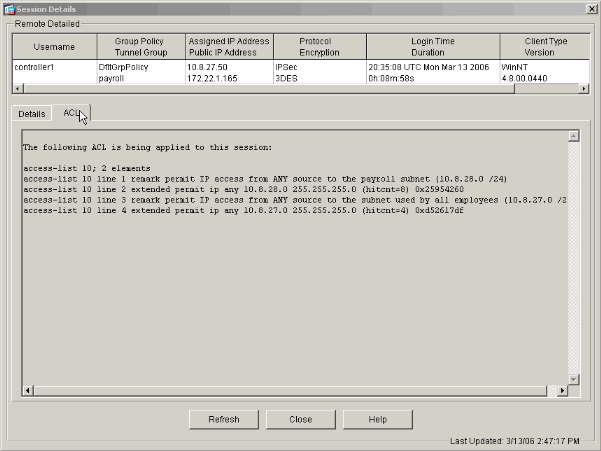
Select the ACL tab.
The ACL hitcnts reflects traffic that flows through the tunnel from the client to the permitted network(s).
Troubleshoot
There is currently no specific troubleshooting information available for this configuration.
Related Information
- Cisco ASA 5500 Series Adaptive Security Appliances ASA as a Remote VPN Server using ASDM Configuration Example
- Cisco PIX 500 Series Security Appliances Configuration Examples and TechNotes
- Cisco ASA 5500 Series Adaptive Security Appliances Configuration Examples and TechNotes
- Cisco VPN Client Configuration Examples and TechNotes
- Technical Support & Documentation - Cisco Systems
Revision History
| Revision | Publish Date | Comments |
|---|---|---|
1.0 |
03-Mar-2006 |
Initial Release |
Contact Cisco
- Open a Support Case

- (Requires a Cisco Service Contract)


 Feedback