Configure TLS/SSL Certificates in ISE
Available Languages
Download Options
Bias-Free Language
The documentation set for this product strives to use bias-free language. For the purposes of this documentation set, bias-free is defined as language that does not imply discrimination based on age, disability, gender, racial identity, ethnic identity, sexual orientation, socioeconomic status, and intersectionality. Exceptions may be present in the documentation due to language that is hardcoded in the user interfaces of the product software, language used based on RFP documentation, or language that is used by a referenced third-party product. Learn more about how Cisco is using Inclusive Language.
Contents
Introduction
This document describes TLS/SSL Certificates in Cisco ISE, the kinds and roles of ISE certificates, and how to perform common tasks and troubleshoot.
Prerequisites
Requirements
Cisco recommends that you have knowledge of these topics:
- Cisco Identity Services Engine (ISE)
- The terminology used to describe different types of ISE and AAA deployments.
- RADIUS protocol and AAA basics
- SSL/TLS and x509 certificates
- Public Key Infrastructure(PKI) basics
Components Used
The information in this document is based on the Cisco ISE, Releases 2.4 - 2.7 software and hardware versions. It covers ISE from version 2.4 to 2.7, however, it must be similar or identical to other ISE 2.x Software Releases unless stated otherwise.
The information in this document was created from the devices in a specific lab environment. All of the devices used in this document started with a cleared (default) configuration. If your network is live, ensure that you understand the potential impact of any command.
Server Certificates
Server Certificates are used by servers to present the identity of the server to the clients for authenticity and to provide a secure channel for communication. These can be self-signed (where the server issues the certificate to itself) or issued by a Certificate Authority (either internal to an organization or from a well-known vendor).
Server Certificates are typically issued to hostnames or Fully Qualified Domain Name (FQDN) of the server, or they can also be a wildcard certificate (*.domain.com ). The host(s), domain, or subdomain(s) it is issued to is typically mentioned in the Common Name(CN) or Subject Alternative Name (SAN) fields.
Wildcard certificates are SSL certificates that use a wildcard notation (an asterisk in place of hostname) and thus allow the same certificate to be shared across multiple hosts in an organization. For example, CN or SAN value for a wildcard certificates Subject Name can look similar to *.company.com and can be used to secure any hosts of this domain such as server1.com , server2.com , and so on.
Certificates typically use Public-Key cryptography or asymmetric encryption.
- Public Key: The public key is present in the certificate in one of the fields, and is shared publicly by a system when a device tries to communicate with it.
- Private Key: The private key is private to the end system and is paired with the Public Key. Data encrypted by a public key can only be decrypted by the specific paired private key and vice versa.
ISE Certificates
Cisco ISE relies on public key infrastructure (PKI) to provide secure communication with endpoints, users, administrators, and so on, as well as between Cisco ISE nodes in a multinode deployment. PKI relies on x.509 digital certificates to transfer public keys for the encryption and decryption of messages, and to verify the authenticity of other certificates presented by users and devices. Cisco ISE has two categories of certificates usually used:
- System Certificates: These are server certificates that identify a Cisco ISE node to clients. Every Cisco ISE node has its own local certificates, each of which is stored on the node along with the respective private key.
- Trusted Certificates Store Certificates: These are Certificate Authority (CA) certificates used to validate the certificates presented to the ISE for various purposes. These Certificates in the Certificate Store are managed on the Primary Administration node and are replicated to all other nodes in a distributed Cisco ISE deployment. The Certificate Store also contains certificates that are generated for the ISE nodes by the internal certificate authority of ISE intended for BYOD.
System Certificates
System certificates can be used for one or more roles. Each role serves a different purpose and is explained here:
- Admin: This is used to secure all communication over 443 (Admin GUI), as well as for replication, and for any port/usage not listed here.
- Portal: This is used to secure HTTP communication over the portals like Centralized Web Authentication (CWA) Portal, Guest, BYOD, Client provisioning, Native Supplicant Provisioning portals, and so on. Each Portal must be mapped to a Portal Group Tag (default is Default Portal Group Tag) which instructs the portal on the specifically tagged certificate to be used. The Portal Group Tag name drop-down menu in the Edit options of the certificate allows you to create a new tag or to choose a tag that exists.
- EAP: This is a role that specifies the certificate presented to clients for 802.1x authentication. Certificates are used with nearly every possible EAP method such as EAP-TLS, PEAP, EAP-FAST, and so on. With tunneled EAP methods such as PEAP and FAST, Transport Layer Security (TLS) is used to secure the credential exchange. The client credentials are not sent to the server until after this tunnel is established to ensure a secure exchange.
- RADIUS DTLS: This role specifies the certificate to be used for a DTLS connection (TLS connection over UDP) to encrypt RADIUS traffic between a Network Access Device (NAD) and the ISE. NAD must be DTLS encryption capable for this feature to work.
- SAML: The server certificate is used to secure communication with the SAML Identity Provider (IdP). A certificate designated for SAML use cannot be used for any other service such as Admin, EAP authentication, and so on.
- ISE Messaging Service: Since 2.6, ISE uses ISE Messaging Service instead of the legacy Syslog protocol to log data. This is used to encrypt this communication.
- PxGrid: This certificate is used for PxGrid services on ISE.
When ISE is installed, it generates a Default Self-Signed Server Certificate. This is assigned for EAP Authentication, Admin, Portal, and RADIUS DTLS by default. It is recommended to move these roles to an internal CA or a well-known CA-signed certificate.

Tip: It is a good practice to ensure both the FQDN and IP addresses of the ISE server are added to the SAN field of the ISE System certificate. In general, to ensure certificate authentication in Cisco ISE is not impacted by minor differences in certificate-driven verification functions, use lowercase hostnames for all Cisco ISE nodes deployed in a network.
Note: The format for an ISE certificate must be Privacy Enhanced Mail (PEM) or Distinguished Encoding Rules (DER).
Trusted Certificates Store
Certificate authority certificates must be stored at Administration > System > Certificates > Certificate Store and they must have the Trust for client authentication use-case to ensure that ISE uses these certificates to validate the certificates presented by the endpoints, devices, or other ISE nodes.
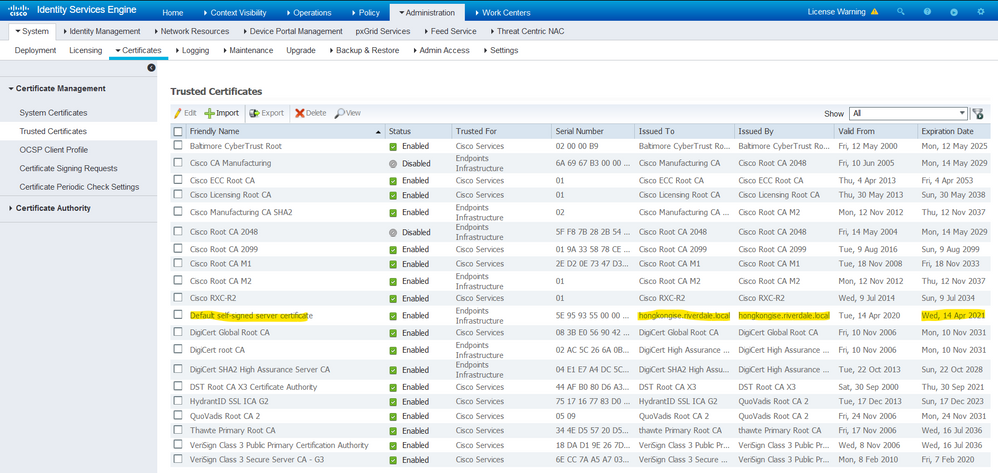
Basic Tasks
The certificate has an expiry date and can be revoked or required to be replaced at some point. If the ISE server certificate expires, serious problems can arise unless they are replaced with a new, valid certificate.
Note: If the certificate that is used for the Extensible Authentication Protocol (EAP) expires, clients authentications can fail because the client does not trust the ISE certificate anymore. If a certificate used for portals expires, clients and browsers can refuse to connect to the portal. If the Admin usage certificate expires, the risk is even greater which prevents an administrator to log in to the ISE anymore and the distributed deployment can cease to function as it must.
Generate a Self-Signed Certificate
To generate new self-signed certificates, navigate to Administration > System > Certificates > System Certificates. Click the Generate Self Signed Certificate.
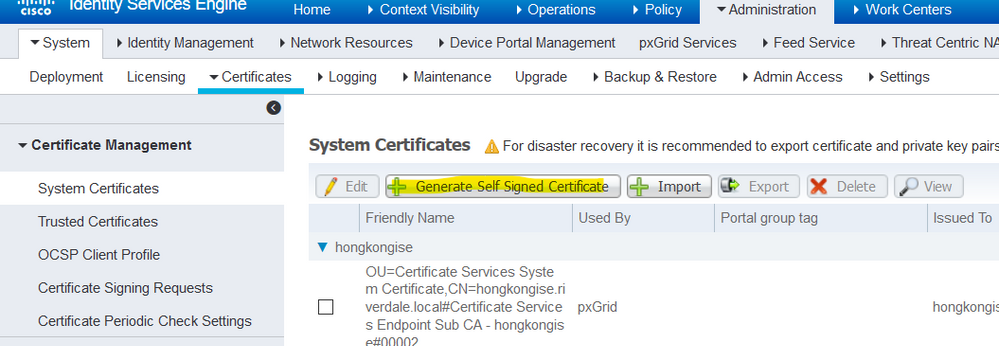
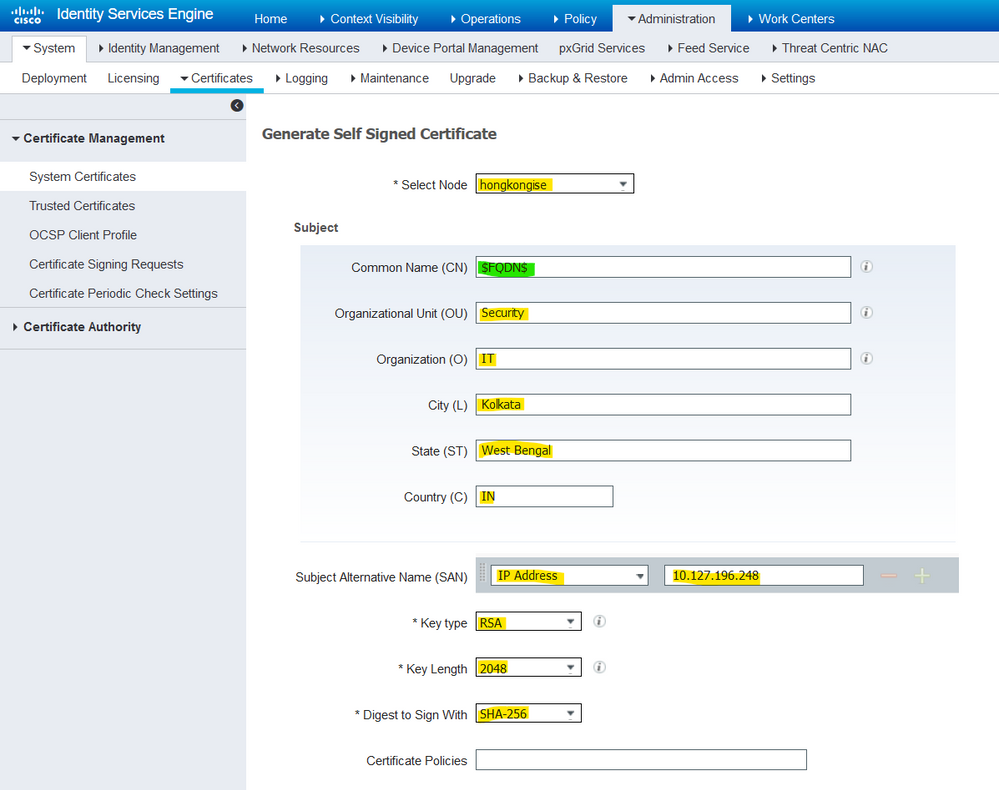
This list describes the fields in the Generate Self Signed Certificate page.
Self-Signed Certificate Settings Field Name Usage Guidelines:
- Select Node: (Required) The node for which it is needed to generate the system certificate.
- CN: (Required if SAN is not specified) By default, the CN is the FQDN of the ISE node for which the self-signed certificate is generated.
- Organizational Unit (OU): Organizational Unit name, for example, Engineering.
- Organization (O): Organization name, for example, Cisco.
- City (L): (Do not abbreviate) City name, for example, San Jose.
- State (ST): (Do not abbreviate) State name, for example, California.
- Country (C): Country name. The two-letter ISO country code is needed. For example, the US.
- SAN: An IP address, DNS name, or Uniform Resource Identifier (URI) that is associated with the certificate.
- Key Type: Specify the algorithm to be used to create the public key: RSA or ECDSA.
- Key Length: Specify the bit size for the public key. These options are available for RSA: 512 1024 2048 4096 and these options are available for ECDSA: 256 384.
- Digest to Sign With: Choose one of these hash algorithms: SHA-1 or SHA-256.
- Certificate Policies: Enter the certificate policy OID or list of OIDs that the certificate must conform to. Use commas or spaces to separate the OIDs.
- Expiration TTL: Specify the number of days after which the certificate expires.
- Friendly Name: Enter a friendly name for the certificate. If no name is specified, Cisco ISE automatically creates a name in the format
<common name> # <issuer> # <nnnnn>where<nnnnn>is a unique five-digit number. - Allow Wildcard Certificates: Check this checkbox in order to generate a self-signed wildcard certificate (a certificate that contains an asterisk (*) in any CN in the Subject and/or the DNS name in the SAN. For example, the DNS name assigned to the SAN can be
*.domain.com. - Usage: Choose the service for which this system certificate must be used. The available options are:
- Admin
- EAP Authentication
- RADIUS DTLS
- pxGrid
- SAML
- Portal
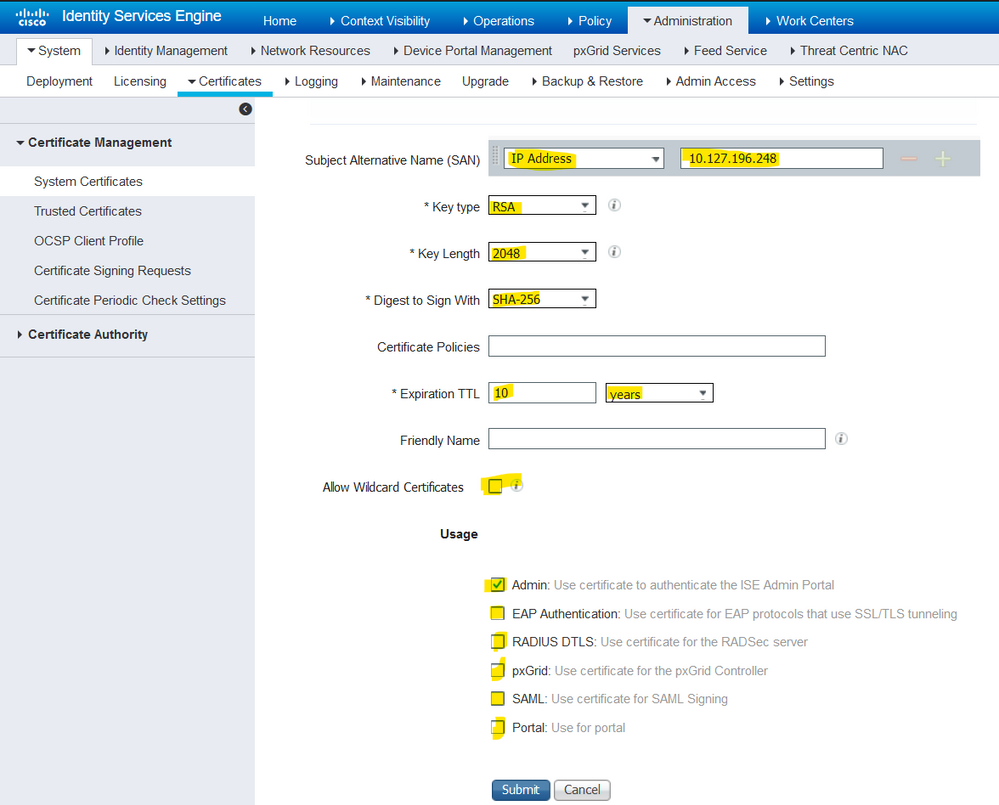
Note: RSA and ECDSA public keys can have different key lengths for the same security level. Choose 2048 if the intention is to get a public CA-signed certificate or deploy Cisco ISE as a FIPS-compliant policy management system.
Renew a Self-Signed Certificate
In order to view the self-signed certificates that exist, navigate to Administration > System > Certificates > System Certificates in the ISE console. Any certificate with the Issued To and Issued By if mentioned in the same ISE server FQDN, then it is a self-signed certificate. Choose this certificate, and clickEdit.
Under Renew Self Signed Certificate, check theRenewal Period box, and set the Expiration TTL as needed. Finally, click Save.
Install a Trusted Certificate
Obtain the Base 64 encoded certificate(s) from the Root CA, Intermediate CA(s), and/or the Hosts required to be trusted.
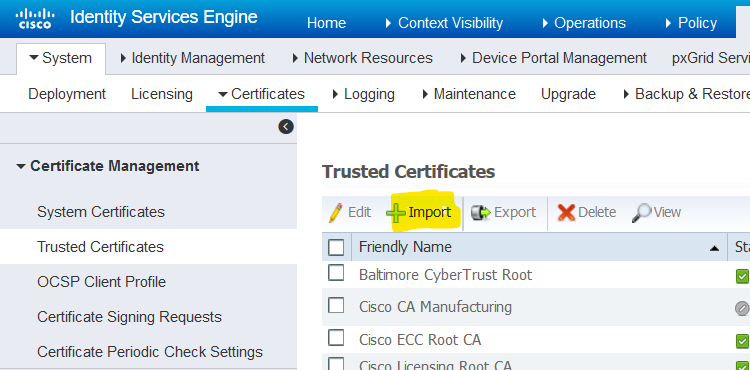
1. Log in to the ISE node and navigate to Administration > System > Certificate > Certificate Management > Trusted Certificates and click Import, as shown in this image.
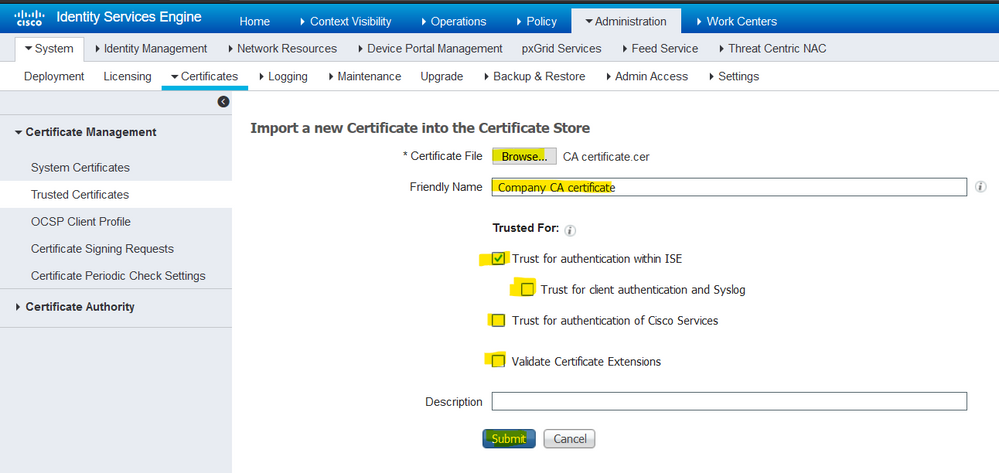
2. On the next page, upload the CA certificate(s) that were obtained (in the same order as described earlier). Assign them a friendly name and a description that explains what the certificate is for in order to keep track.
As per usage needs, check the boxes next to:
- Trust for authentication within ISE - This is to add new ISE nodes when they have the same trusted CA certificate loaded to their Trusted Certificate store.
- Trust for client authentication and Syslog - Enable this in order to use the certificate to authenticate endpoints that connect to ISE with EAP and/or trust Secure Syslog servers.
- Trust for authentication of Cisco Services - This is needed only to trust external Cisco services such as a feed service.
3. Finally, click Submit. Now, the certificate must be visible in the Trusted Store and be synced to all secondary ISE nodes (if in a deployment).
Install a CA-Signed Certificate
Once the Root and Intermediate CA(s) certificates are added to the Trusted Certificate Store, a Certificate Signing Request (CSR) can be issued and the certificate signed based on the CSR can be bound to the ISE node.
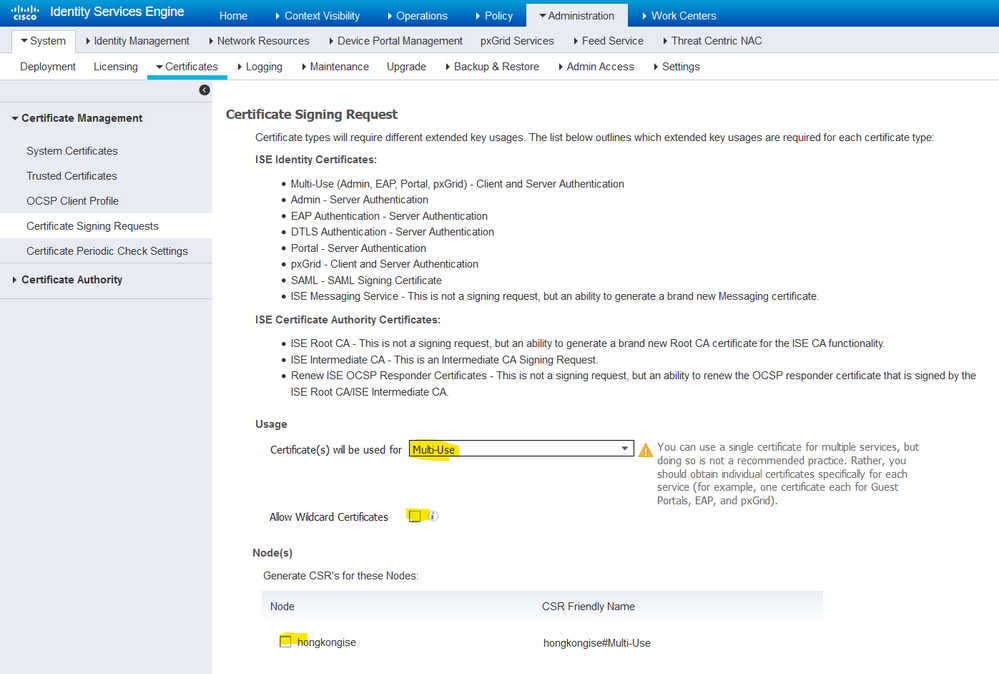
1. In order to do so, navigate to Administration > System > Certificates > Certificate Signing Requests and clickGenerate Certificate Signing Requests (CSR) to generate a CSR.
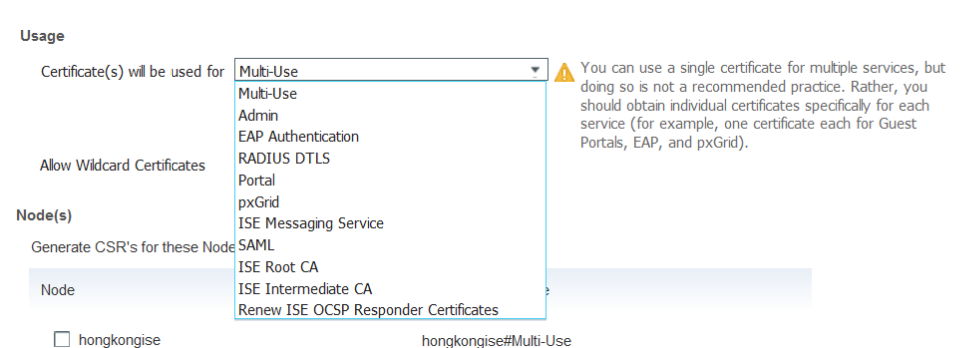
2. On the page that comes up, under the Usage section, choose the role to be used from the drop-down menu.
If the certificate is used for multiple roles, choose Multi-Use. Once the certificate is generated, the roles can be changed if necessary. In most cases, the certificate can be set to be used for Multi-use in the Used For drop-down; this allows the certificate to be usable for all ISE web portals.
3. Check the box next to the ISE node(s) to choose the node(s) for which the certificate is generated.
4. If the purpose is to install/generate a wildcard certificate, check the Allow Wildcard Certificates box.
5. Fill out the subject information based on details about the host or organization (Organizational Unit, Organization, City, State, and Country).
6. In order to finish this, click Generate, and then click Exporton the pop-up that comes up.
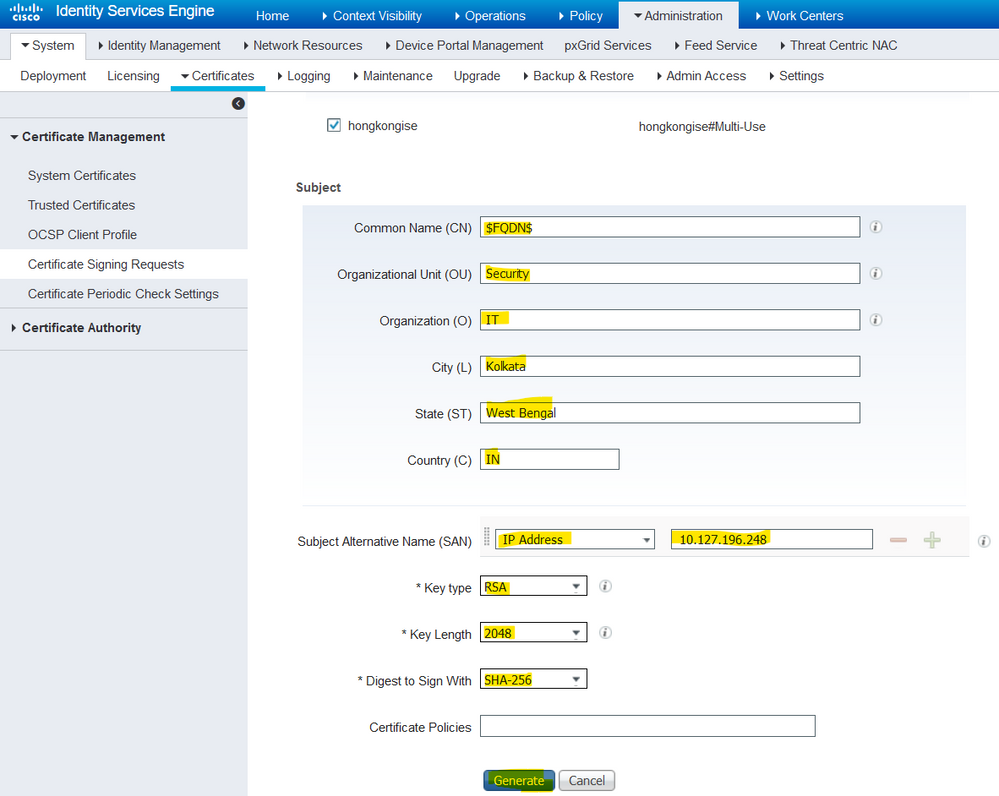
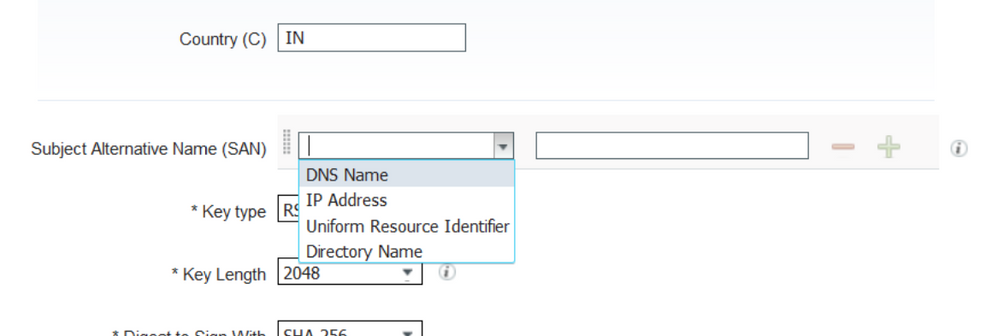
This downloads the Base-64-encoded Certificate Request request that was just created. This PEM file must be sent to the CA for signing, and obtain the resultant signed certificate CER file (Base 64 encoded).
Note: Under the CN field, ISE auto-populates the nodes FQDN.
Note: In ISE 1.3 and 1.4, it was required to issue two CSRs at least to use pxGrid. One is dedicated to pxGrid, and the other, for the rest of the services. Since 2.0 and later, this is all on one CSR.
Note: If the certificate is used for EAP authentications the * symbol must not be in the Subject CN field as Windows supplicants reject the server certificate. Even when Validate Server Identity is disabled on the supplicant, the SSL handshake can fail when the * is in the CN field. Instead, a generic FQDN can be used in the CN field, and then the *.domain.com can be used on the SAN DNS Name field. Some Certificate Authorities (CA) can add the wildcard (*) in the CN of the certificate automatically even if it is not present in the CSR. In this scenario, a special request is required to be raised to prevent this action.
7. Once the certificate has been signed by the CA (that was generated from the CSR as shown in the video, here if Microsoft CA is used), go back into ISE GUI, and navigate to Administration > System > Certificates > Certificate Management > Certificate Signing Request. Check the box next to the CSR previously created, and click the Bind Certificate button.

8. Next, upload the signed certificate that was just received, and give it a friendly name for ISE. Then, proceed to choose the boxes next to usages as per need for the certificate (like Admin and EAP authentication, Portal, and so on) and clickSubmit, as shown in this image:
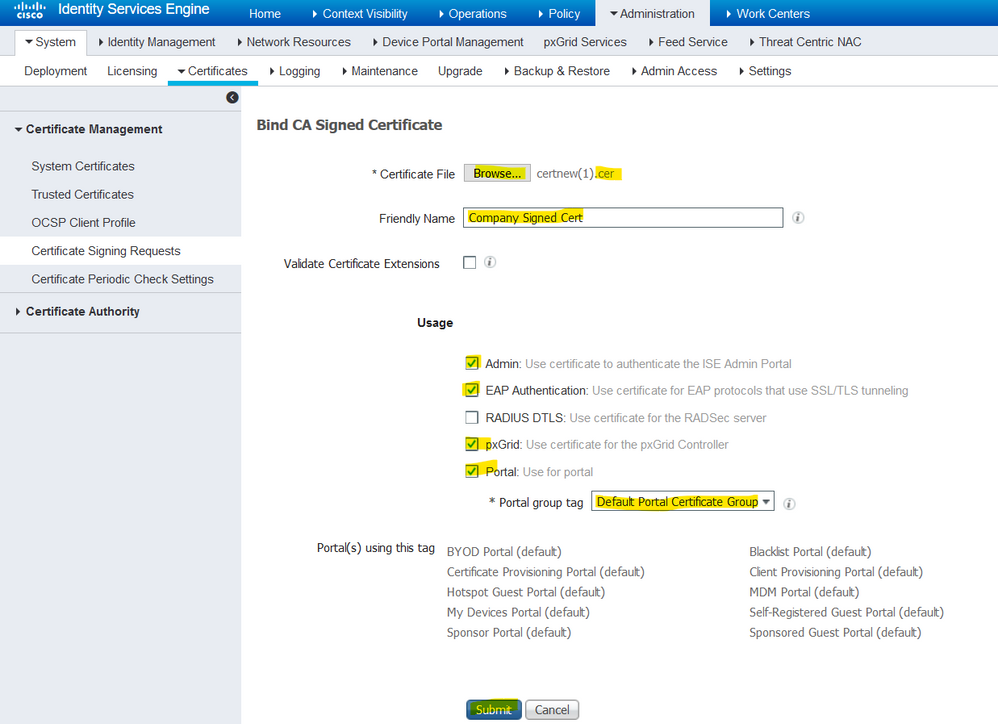
If the Admin Role has been chosen for this certificate, the ISE node must restart its services. Based on the version and resources allocated to the VM, this can take 10-15 minutes. In order to check the status of the application, open the ISE command line and issue the show application status ise command.


If the admin or portal role was chosen at the certificate import, it can be verified that the new certificate is in place when the admin or the portal pages in the browser are accessed. Choose the lock symbol in the browser and under the certificate, the path verifies the full chain is present and trusted by the machine. The browser must trust the new admin, or portal certificate, as long as the chain was built correctly, and if the certificate chain is trusted by the browser.
Note: In order to renew a current CA-signed system certificate, generate a fresh CSR, and bind the signed certificate to it with the same options. Since it is possible to install a new certificate on the ISE before it is active, plan to install the new certificate before the old certificate expires. This overlap period between the old certificate expiration date and the new certificate start date gives time to renew certificates and plan their swap with little or no downtime. Obtain a new certificate with a start date that precedes the expiration date of the old certificate. The time period between those two dates is the change window. Once the new certificate enters its valid date range, enable the protocols needed (Admin/EAP/Portal). Remember, if Admin usage is enabled, there is a service restart.
Tip: It is recommended to use the Company Internal CA for Admin and EAP certificates, and a publicly-signed certificate for Guest/Sponsor/Hotspot/etc portals. The reason is that if a user or guest comes onto the network and the ISE portal uses a privately-signed certificate for the Guest Portal, they get certificate errors or potentially have their browser block them from the portal page. To avoid all that, use a publicly-signed certificate for Portal use to ensure a better user experience. Additionally, each deployment node(s) IP address must be added to the SAN field to avoid a certificate warning when the server is accessed via the IP address.
Backup Certificates and Private Keys
It is recommended to export:
1. All system certificates (from all the nodes in the deployment) along with their private keys (this is needed to reinstall them) to a secure location. Keep a note of the certificate configuration (what service the certificate was used for).
2. All certificates from the Trusted Certificates Store of the Primary Administration Node. Keep a note of the certificate configuration (what service the certificate was used for).
3. All Certificate Authority Certificates.
In order to do so,
- Navigate to
Administration > System > Certificates > Certificate Management > System Certificates. Choose the certificate and clickExport. ChooseExport Certificatesand Private Keys radio button. Enter the Private Key Password and Confirm the Password. ClickExport. - Navigate to
Administration > System > Certificates > Certificate Management > Trusted Certificates. Choose the certificate and clickExport. ClickSave Fileto export the certificate. - Navigate to
Administration > System > Certificates > Certificate Authority > Certificate Authority Certificates. Choose the certificate and clickExport. ChooseExport Certificatesand Private Keys radio button. Enter the Private Key Password and Confirm Password. ClickExport. ClickSave Fileto export the certificate.
Troubleshoot
Check Certificate Validity
The upgrade process fails if any certificate in the Cisco ISE Trusted Certificates or System Certificates store has expired. Ensure to check the validity in the Expiration Date field of the Trusted Certificates and System Certificates windows (Administration > System > Certificates > Certificate Management), and renew them, if necessary, before the upgrade.
Also, check the validity in the Expiration Date field of the certificates in the CA Certificates window (Administration > System > Certificates > Certificate Authority > Certificate Authority Certificates), and renew them, if necessary, before the upgrade.
Delete a Certificate
In case a certificate in the ISE is expired or unused, it needs to be removed. Ensure to have the certificates exported (with their private keys, if applicable) prior to deletion.
In order to delete an expired certificate, navigate to Administration > System > Certificates > Certificate Management. Click System Certificates Store. Choose the expired certificate(s) and click Delete.
Refer to the same for Trusted Certificates and Certificate Authority Certificates stores.
Supplicant Does not Trust the ISE Server Certificate on an 802.1x Authentication
Verify if ISE sends the full certificate chain for the SSL handshake process.
With EAP methods that require a server certificate (that is, PEAP) and Validate Server Identity is selected in the client OS settings, the supplicant validates the certificate chain with the certificates it has in its local trust store as part of the authentication process. As part of the SSL handshake process, ISE presents its certificate and also any Root and/or intermediate certificates present in its chain. The supplicant is not be able to validate the server identity if the chain is incomplete or if it lacks this chain in its trust store.
In order to verify the certificate chain is passed back to the client, take a packet capture from ISE (Operations > Diagnostic Tools > General Tools > TCP Dump) or Wireshark capture on the endpoint at the time of the authentication. Open the capture and apply the filter ssl.handshake.certificates in Wireshark and find an access challenge.
Once chosen, navigate to Expand Radius Protocol > Attribute Value Pairs > EAP-Message Last segment > Extensible Authentication Protocol > Secure Sockets Layer > Certificate > Certificates.
If the chain is incomplete, navigate to ISE Administration > Certificates > Trusted Certificates and verify that the Root and/or Intermediate certificates are present. If the certificate chain is passed successfully, the chain itself must be verified as valid with the method outlined here.
Open each certificate (server, intermediate, and root) and verify the chain of trust to match the Subject Key Identifier (SKI) of each certificate to the Authority Key Identifier (AKI) of the next certificate in the chain.
ISE Certificate Chain is Correct but Endpoint Rejects ISEs Server Certificate During Authentication
If ISE presents its full certificate chain for the SSL handshake and the supplicant has still rejected the certificate chain; the next step is to verify that the Root and/or Intermediate certificates are in the clients Local Trust Store.
In order to verify this from a Windows device, launch mmc.exe(Microsoft Management Console), navigate to File > Add-Remove Snap-in. From the available snap-ins column, choose Certificates and click Add. Choose either My user account or Computer account based on the authentication type in use (User or Machine) and then click OK.
Under the console view, choose Trusted Root Certification Authorities and Intermediate Certification Authorities to verify the presence of Root and Intermediate certificates in the local trust store.
An easy way to verify that this is a Server Identity Check issue, uncheck Validate Server Certificate under the supplicant profile configuration and test it again.
Frequently Asked Questions
What to do when ISE Throws a Warning that the Certificate Already Exists?
This message means ISE detected a System Certificate with the exact same OU parameter, and a duplicate certificate was tried to install. Since duplicate system certificate is not supported, it is advised to simply change any of the City/State/Dept. values to a slightly different value to ensure the new certificate is different.
Why does the Browser Throw a Warning that States the Portal Page from ISE is Presented by an Untrusted Server?
This happens when the browser does not trust the identity certificate of the server.
First, ensure the portal certificate visible on the browser is what was expected and had been configured on ISE for the portal.
Second, ensure access to the portal via FQDN - in case of the IP address in use, ensure both the FQDN and IP address are in the SAN and/or CN fields of the certificate.
Finally, ensure the portal certificate chain (ISE portal, Intermediate CA(s), Root CA certificates) is imported on/trusted by the client OS/browser software.
Note: Some later versions of iOS, Android OSs, and Chrome/Firefox browsers have strict security expectations of the certificate. Even if these points are met, they can refuse to connect if the Portal and Intermediate CAs are less than SHA-256.
What to do When an Upgrade Fails due to Invalid Certificates?
The upgrade process fails if any certificate in the Cisco ISE Trusted Certificates or System Certificates store has expired. Ensure to check the validity in the Expiration Date field of the Trusted Certificates and System Certificates windows (Administration > System > Certificates > Certificate Management), and renew them, if necessary, before the upgrade.
Also, check the validity in the Expiration Date field of the certificates in the CA Certificates window (Administration > System > Certificates > Certificate Authority > Certificate Authority Certificates), and renew them, if necessary, before the upgrade.
Before the ISE upgrade, ensure that the internal CA certificate chain is valid.
Navigate to Administration > System > Certificates > Certificate Authority Certificates. For each node in the deployment, choose the certificate with Certificate Services Endpoint Sub CA in the Friendly Name column. Click Viewand check if the Certificate Status is a good message and is visible.
If any certificate chain is broken, ensure to fix the issue before the Cisco ISE upgrade process begins. In order to fix the issue, navigate to Administration > System > Certificates > Certificate Management > Certificate Signing Requests, and generate one for the ISE Root CA option.
Related Information
Revision History
| Revision | Publish Date | Comments |
|---|---|---|
3.0 |
04-Apr-2024 |
Updated PII, Style Requirements and Formatting. |
1.0 |
04-Jun-2020 |
Initial Release |
Contributed by Cisco Engineers
- Reetam MandalTechnical Consulting Engineer
Contact Cisco
- Open a Support Case

- (Requires a Cisco Service Contract)
 Feedback