Configure ISE Guest Accounts with REST API
Available Languages
Download Options
Bias-Free Language
The documentation set for this product strives to use bias-free language. For the purposes of this documentation set, bias-free is defined as language that does not imply discrimination based on age, disability, gender, racial identity, ethnic identity, sexual orientation, socioeconomic status, and intersectionality. Exceptions may be present in the documentation due to language that is hardcoded in the user interfaces of the product software, language used based on RFP documentation, or language that is used by a referenced third-party product. Learn more about how Cisco is using Inclusive Language.
Contents
Introduction
This document describes how to use Representational State Transfer (REST) API feature to perform guest-related tasks on the Identity Services Engine (ISE). The Cisco Guest API is a REST-based set of operations that provide secure HTTPS and authenticated access to manage Cisco guest users. With the API, one can create, read, update, delete, and search for guest users.
Prerequisites
Requirements
Cisco recommends that you have the knowledge of these topics:
- ISE
- External RESTful Services
- REST clients like Insomnia, RESTED, etc.
Components Used
The information in this document is based on these software and hardware versions:
- Cisco ISE, Release 2.6
- Insomnia REST client v7.1.1
The information in this document was created from the devices in a specific lab environment. All of the devices used in this document started with a cleared (default) configuration. If your network is live, ensure that you understand the potential impact of any command.
Note: The procedure is similar or identical for other ISE versions. You can use these steps on all 2.x ISE Software Releases unless stated otherwise.
Background Information
In order to use the API, External RESTful Services (ERS) enabled and sponsor authentication needs to be set up in ISE. ERS supports basic authentication and is run over port 9060. The authentication credentials are encrypted and are part of the request header. ERS requires the ISE administrator to assign special privileges to a user to perform operations.
The document will cover these configuration steps:
1. Enable ERS on ISE
2. Set up admin and sponsor account for ERS
3. Create a guest account
4. Read, update, delete guest data
Configure
Enable ERS on ISE
In order to use the REST API feature on ISE, ERS must be enabled.
Navigate to Administration > System > Settings > ERS settings > Enable ERS for read/write as shown in the image.
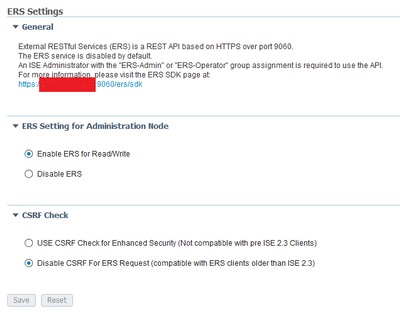
All the information related to ERS is available as a Software Development Kit (SDK) on HTTPS port 9060 of ISE. This can be accessed after you enable ERS and logging in with an admin account with the privileges of "ERS-Admin" or "ERS-Operator".
Set Up Admin and Sponsor Account for ERS
In order to use ERS, ISE requires an admin account which has the privileges of ERS-Admin or ERS-operator assigned to it. Admin accounts need to be created and added to the respective groups. Alternatively, ERS access works for the Super-Admin account as well.
In order to use APIs for guest features, ERS admin requires raw data of the portals such as the portal ID, guest identity groups, etc. However, in order to read/create/update or delete any guest data, a sponsor account with ERS access enabled is required.
- For the purpose of this document, an internal ISE user account is used as the sponsor.
- Navigate to Administration > Identity Management > Identities and add a network access user as shown in the image.
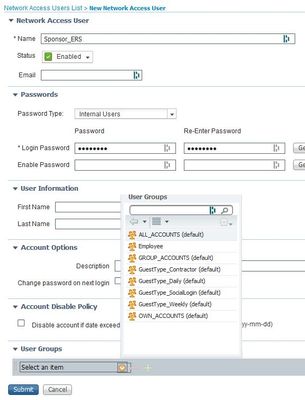
- This user account must be added to one of the sponsor groups.
- The example account is mapped to the default sponsor group named ALL_ACCOUNTS.
- In order to allow ERS access for this sponsored group, go to Work Centres > Guest Access > Portal & Components > Sponsor Groups and open the assigned sponsor group.
- Enable the option:
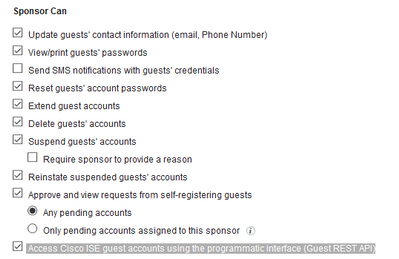
Create a Guest Account
In order to create a guest account through API, it is necessary that the API call is made to ISE as a sponsor and via a sponsored portal that it recognises.
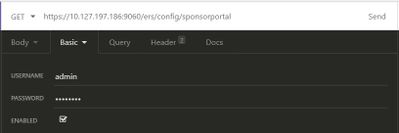
Step 1. In order to fetch the portal IDs of all the sponsor portals pre-configured on ISE, use any REST client with the information provided here:
| Method | GET |
| URL | https://<ISE-IP>:9060/ers/config/sponsorportal |
| Credentials | Use ERS Admin credentials |
| Headers |
Content-Type: application/xml Accept: application/xml |
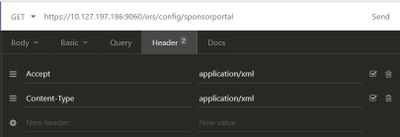
Expected Output:
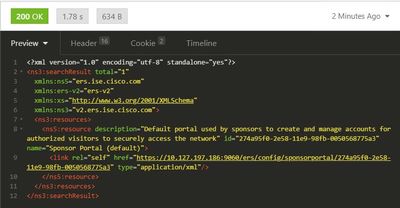
<?xml version="1.0" encoding="utf-8" standalone="yes"?>
<ns3:searchResult total="1"
xmlns:ns5="ers.ise.cisco.com"
xmlns:ers-v2="ers-v2"
xmlns:xs="http://www.w3.org/2001/XMLSchema"
xmlns:ns3="v2.ers.ise.cisco.com">
<ns3:resources>
<ns5:resource description="Default portal used by sponsors to create and manage accounts for authorized visitors to securely access the network"
id="274a95f0-2e58-11e9-98fb-0050568775a3" name="Sponsor Portal (default)">
<link rel="self" href="https://10.127.197.186:9060/ers/config/sponsorportal/274a95f0-2e58-11e9-98fb-0050568775a3" type="application/xml"/>
</ns5:resource>
</ns3:resources>
</ns3:searchResult>
The value of interest is the Portal ID of the Sponsor portal that is intended to be used in order to create guest users. The ID is "274a95f0-2e58-11e9-98fb-0050568775a3" in this example.
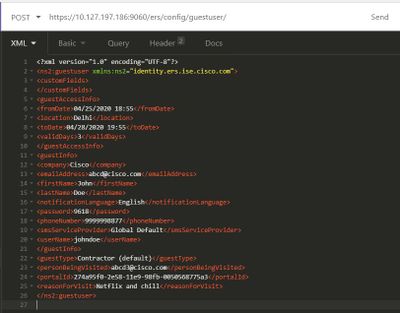
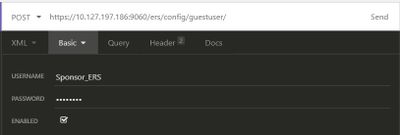
Step 2. Use this API call in order to create a guest account. The value of portalID here is the one fetched from Step 1.
| Method | POST |
| URL | https://<ISE-IP>:9060/ers/config/guestuser/ |
| Credentials | Use sponsor account credentials |
| Headers |
Content-Type: application/vnd.com.cisco.ise.identity.guestuser.2.0+xml Accept: application/vnd.com.cisco.ise.identity.guestuser.2.0+xml |
| Body |
<?xml version="1.0" encoding="UTF-8"?> |
Note: The body content shown here can be used as a template (available in SDK too). Ensure that the fromDate, toDate corresponds to validDays. The location, guest type and other values must be valid in reference to the ISE used, only then the call will succeed.
Note: The credentials used when you make this call must be a valid sponsor account mapped to a sponsor group. ERS admin credentials here will not work. Refer to the previous section of this guide for more details.
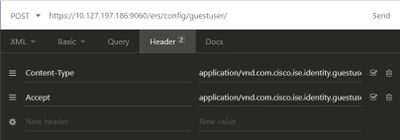
Expected Output:

Navigate to ISE GUI > Master GuestReport in order to verify if the account was created:

Note: There is no option to specify a customized username and password combination per guest account from a sponsor portal. This API method can be used to fulfil that requirement.
Read, Update, Delete Guest Data
Here are some example API calls to perform various actions on guest data. All the available options and their formats are available in the SDK.
- Get a guest user account details by name:
| Method | GET |
| URL | https://<ISE-IP>:9060/ers/config/guestuser/name/{name} |
| Credentials | Use sponsor account credentials |
| Headers |
Content-Type: application/xml Accept: application/xml |

Expected Output:
200 OK

<?xml version="1.0" encoding="utf-8" standalone="yes"?>
<ns4:guestuser id="3b967932-86f8-11ea-aafe-72889dc971d1" name="johndoe"
xmlns:ers="ers.ise.cisco.com"
xmlns:xs="http://www.w3.org/2001/XMLSchema"
xmlns:ns4="identity.ers.ise.cisco.com">
<link rel="self" href="https://10.127.197.186:9060/ers/config/guestuser/name/johndoe" type="application/xml"/>
<customFields/>
<guestAccessInfo>
<fromDate>04/25/2020 18:55</fromDate>
<location>Delhi</location>
<toDate>04/28/2020 19:55</toDate>
<validDays>3</validDays>
</guestAccessInfo>
<guestInfo>
<company>Cisco</company>
<creationTime>04/25/2020 18:55</creationTime>
<emailAddress>abcd@cisco.com</emailAddress>
<enabled>false</enabled>
<firstName>John</firstName>
<lastName>Doe</lastName>
<notificationLanguage>English</notificationLanguage>
<password>9618</password>
<phoneNumber>9999998877</phoneNumber>
<smsServiceProvider>Global Default</smsServiceProvider>
<userName>johndoe</userName>
</guestInfo>
<guestType>Contractor (default)</guestType>
<personBeingVisited>abcd3@cisco.com</personBeingVisited>
<reasonForVisit>Visiting Bob from Accounting</reasonForVisit>
<sponsorUserId>1f7627f0-86f8-11ea-aafe-72889dc971d1</sponsorUserId>
<sponsorUserName>Sponsor_ERS</sponsorUserName>
<status>AWAITING_INITIAL_LOGIN</status>
</ns4:guestuser>
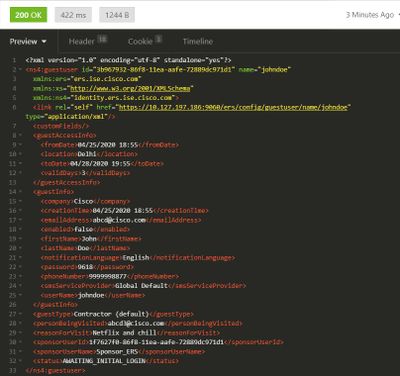
- Reset a guest user password:
This requires to first fetch the guest ID from the call and then use it in this API. The guestuser ID is "3b967932-86f8-11ea-aafe-72889dc971d1" in this example.
| Method | PUT |
| URL | https://<ISE-IP>:9060/ers/config/guestuser/resetpassword/{id} |
| Credentials | Use sponsor account credentials |
| Headers |
Content-Type: application/xml Accept: application/xml |
This method does not allow to specify the new password. ISE will return the output with the new auto-generated password.
Expected output:
200 OK

<?xml version="1.0" encoding="utf-8" standalone="yes"?>
<ns3:operationResult
xmlns:xs="http://www.w3.org/2001/XMLSchema"
xmlns:ns3="ers.ise.cisco.com">
<attributesList>
<attribute name="password" value="2557"/>
</attributesList>
</ns3:operationResult>
- Delete a guest account by name:
| Method | DELETE |
| URL | https://<ISE-IP>:9060/ers/config/guestuser/name/{name} |
| Credentials | Use sponsor account credentials |
| Headers |
Content-Type: application/xml Accept: application/xml |
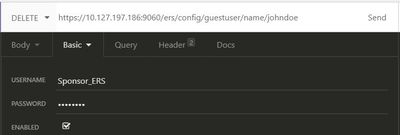
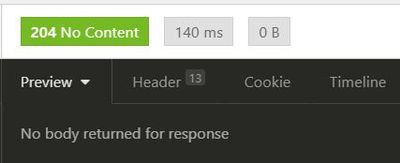
Expected output:
Verify
There is currently no verification procedure available for this configuration.
Troubleshoot
This section provides information you can use in order to troubleshoot your configuration.
Some common errors and its possible causes:
- A guest account creation fails with error:
     401 Unauthorized

     <message type="ERROR" code="CRUD operation exception">
    <title>Sponsor does not have permission to access REST Apis</title>
     </message>
Fix: This means the sponsor account used to make the guest account is mapped to a sponsor group where ERS access is not enabled. Edit the sponsor group that corresponds to this and enable Access Cisco ISE guest accounts with the use of the programmatic interface (Guest REST API).
   400 Bad Request

   <message type="ERROR" code="CRUD operation exception">
    <title>Creating GuestUser failed due to com.cisco.cpm.guestaccess.validation.GuestAccessValidationException: Portal not found for portal session e1fc15a7-a170-4d6a-b02c-0ab7b0bc54ff</title>
Fix: The portal ID entered in the call does not exist on ISE or is incorrect. From 'Get' call for sponsor portal, fetch the correct portal ID of the portal.
- API response codes and their possible meanings:
200 (OK): Indicates the REST API successfully carried out the desired action.
201 (Created): Indicates a resource was created inside a collection.
204 (No Content): This is usually sent as a response to PUT, POST or DELETE requests.
400 (Bad Request): Generic error code for issues like malformed request syntax, invalid parameters, etc. Read the message details if available to understand the cause.
401(Unauthorised): This indicates that the action was undertaken with wrong credentials, no credentials or the account is not authorized to perform this action.
500(Internal Server Error): Indicates an issue on the server side. Logs on ISE may help understand the cause.
For more details on REST API usage for ISE, refer to Guest REST API.
Contributed by Cisco Engineers
- Shivam KumarCisco TAC Engineer
Contact Cisco
- Open a Support Case

- (Requires a Cisco Service Contract)
 Feedback