Introduction
This document describes the configuration of DHCP server and relay services in Firepower Threat Defense (FTD) through Firepower Management Center.
Prerequisites
Requirements
Cisco recommends that you have knowledge of these topics:
- Knowledge of Firepower technology
- Basic Knowledge of Adaptive Security Appliance (ASA)
- Knowledge of Dynamic Host Control Protocol (DHCP) Server/ DHCP Relay
Components Used
The information in this document is based on these software and hardware versions:
- ASA Firepower Threat Defense Image for ASA (5506X/5506H-X/5506W-X, ASA 5508-X, ASA 5516-X) running software version 6.0.1 and higher.
- ASA Firepower Threat Defense Image for ASA (5515-X, ASA 5525-X, ASA 5545-X, ASA 5555-X, ASA 5585-X) running software version 6.0.1 and higher.
- Firepower Management Center (FMC) version 6.0.1 and higher.
The information in this document was created from the devices in a specific lab environment. All of the devices used in this document started with a cleared (default) configuration. If your network is live, ensure that you understand the potential impact of any command.
Note: FTD appliance can be registered to the FMC. Click Register a Device with a FireSIGHT Management Center in order to register the FTD to the FMC.
Background Information
DHCP provides network configuration parameters automatically such as IP addresses, DNS server details, and other parameters to the DHCP clients. FTD routed interface can act as DHCP server to provide the IP addresses to the clients.
FTD provides the DHCP relay services to the internal client, wherein clients are connected to one of the interfaces of the FTD, and the external DHCP server is connected to the other. The relay service operation is transparent to the clients.
Configure DHCP Server
In order to configure the DHCP server, log in to the FMC GUI and navigate to Devices > Device Management. Click edit buttonof the FTD appliance. Navigate to DHCP tab and click DHCP Server tab.

In order to configure DHCP server, perform three steps.
Step 1. Enable DHCP server/ configure the DHCP Pool.
Step 2. Configure the advanced parameters.
Step 3. Configure the DNS/ WINS Server.
Note: Ensure that the IP address and logical name must be configured on the interfaces before you start DHCP configuration.

Enable DHCP Server/Configure the DHCP Pool
You can use any routed interface as the DHCP server, and interface's IP address acts as the gateway for the end client. Hence, you just need to define the IP address range.
In order to enable the DHCP server on any interface, click Add button in Server tab.
Interface: Specify the interface from the drop-down list where you want to enable the DHCP server.
Address Pool: Specify the IP address range.
Enable DHCP Server: Enable the checkbox to enable the DHCP server on this interface.

Click OK to save the DHCP configuration.
Configure the DNS/WINS Server
DHCP Server provides the DNS/ WINS/Domain name parameters along with IP address details to the end client. These parameters help in the name resolution. Therefore, it is important to configure these parameters correctly.
There are two options to configure this:
First, if any of FTD's interface is configured as DHCP client, then you can choose option Auto-Configuration. This method takes the configuration of DNS/ WINS/ domain name information from the DHCP server and provides the same information to the DHCP client.
Second, you can set your own DNS/ WINS domain name parameters, which are provided to the end client.
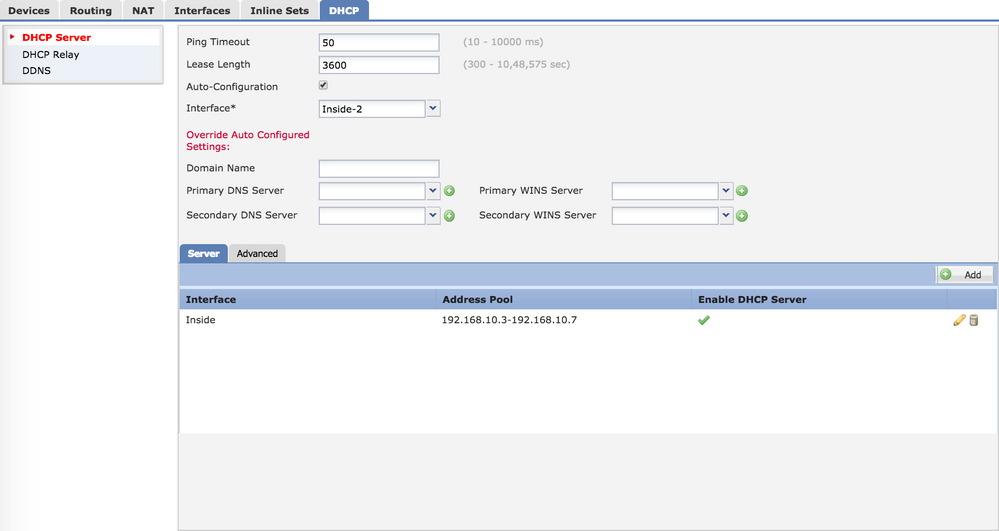
In order to configure this, navigate to DHCP tab.
- Ping Timeout: To avoid address conflicts, the FTD sends two ICMP ping packets to an address before it assigns that address to a DHCP client. This command specifies the timeout value for those packets.
- Lease Length: This lease equals the amount of time (in seconds) the client can use its allocated IP address before the lease expires.
- Auto Configuration: Enable this checkbox to configure the auto configuration for DNS/WINS/Domain Name.
- Interface: Specify the interface which acts as a DHCP client.
Override Auto Configured Setting: Configure this option, if you want to assign your own DNS/WINS/Domain Name to the end client.
Domain Name: Specify the domain name.
Primary DNS Server: Specify the primary DNS server. Either you can select the network object from the drop-down list or click the plus (+) icon and create a network object for primary DNS server.
Secondary DNS Server: Specify the secondary DNS server. Either you can select the network object from the drop-down list or click the plus (+) icon and create a network object for secondary DNS server.
Primary WINS Server: Specify the secondary DNS server. Either you can select the network object from the drop-down list or click the plus (+) icon and create a network object for secondary DNS server.
Secondary WINS Server: Specify the secondary DNS server. Either you can select the network object from the drop-down list or click the plus (+) icon and create a network object for secondary DNS server.

Configure the Advanced Parameters
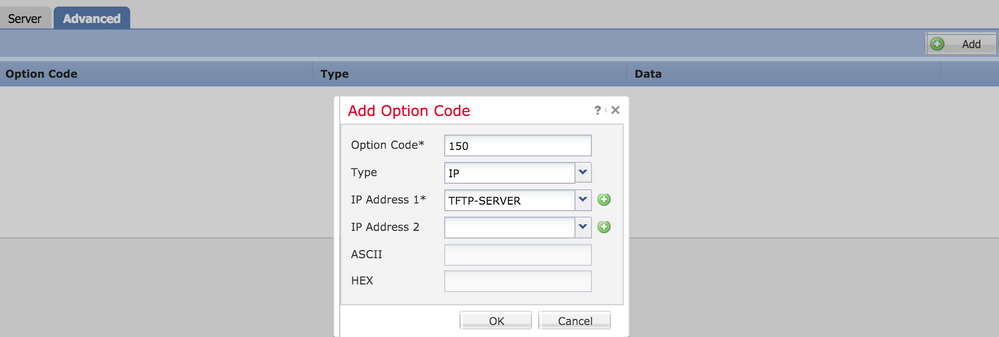
FTD interface's DHCP server has the ability to include DHCP codes and options. For example, Cisco IP phones can send a request with option (150/ 66) to the DHCP server to obtain the IP address of TFTP server so that the phones can download the firmware from the TFTP server.
In order to configure this, navigate to DHCP> Advanced option and click Add.
- Option Code: Specify the option code as per listed in RFC 2132, RFC 2562, RFC 5510.
- Type: Specify the type from the drop-down.
- IP Address 1: If you choose type option as IP, then specify the IP address of first TFTP server.
- IP Address 2: If you choose type option as IP, then specify the IP address of first TFTP server.
- ASCII: If you choose type option as ASCII, then specify the ASCII value.
- HEX: If you choose type option as HEX, then specify the HEX value.

Click OK to save the configuration.
Click Save button to save the platform setting. Navigate to Deploy option, choose the FTD appliance where you want to apply the changes and click Deploy button to start deployment of platform setting.
Click Save button to save the platform setting. Navigate to Deploy option, choose the FTD appliance where you want to apply the changes and click the Deploy button to start deployment of platform setting.
Configure DHCP Relay
FTD interface operates as DHCP Relay agent between client and external DHCP server. Interface listens for the client request and adds vital configuration data, such as client's links information which is needed by DHCP server to allocate the address for the client. When DHCP server responds, interface forwards the reply packet back to the DHCP client.
The configuration of DHCP Relay has mainly two configuration steps.
Step 1. Configure the DHCP Relay Agent.
Step 2. Configure External DHCP Server.
Configure the DHCP Relay Agent
Navigate to Devices > Device Management. Click edit button of the FTD appliance. Navigate toDHCP > DHCP Relay option. Click Add button.
Interface: Specify the interface from the drop-down list where interface listens for the client request. DHCP client can connect directly to this interface for IP address request.
Enable DHCP Relay: Enable the checkbox to enable the DHCP relay service.
Set Route: Enable the check box to set the interface IP address as the default gateway.

Click OK button to save the DHCP relay agent configuration.
Configure External DHCP Server
You need to specify the IP address of external DHCP server where client request is forwarded.
To specify the DHCP server, navigate to DHCP Server and click Add .
Server: Specify the IP address of DHCP server. Either you can select the network object from the drop-down list or click the plus (+) icon and create a network object for DHCP server.
Interface: Specify the interface where DHCP server connects.

Click OK to save the configuration.
Click Save button to save the platform setting. Navigate to Deploy option, choose the FTD appliance where you want to apply the changes and click the Deploy button to start deployment of platform setting.
Monitor and Troubleshoot
- Ensure that the FTD is registered to the FMC before you start to configure the DHCP Server/Relay.
- Verify the connectivity to DHCP server in DHCP Relay configuration.
> system support diagnostic-cli
Attaching to ASA console ... Press 'Ctrl+a then d' to detach.
Type help or '?' for a list of available commands.

><Press Enter>
firepower# ping <DHCP_SERVER_IP>
- Verify the DHCP related configuration in FTD CLI. You can log in to FTD CLI to management interface and run the command
firepower# show running-config dhcpd.
dhcpd auto_config Inside-2
!
dhcpd address 192.168.10.3-192.168.10.7 Inside
!
- Ensure that the policy deployment is applied successfully.
- Ensure that you configure the correct DNS/WINS server entry either by Auto-Configuration or by Manual configuration.
- IP address pool can be in the same subnet of the Interface IP address.
- Ensure that the IP address and logical name can be configured on the interfaces.
- You can take the packet capture on the FTD routed interface to troubleshoot the issue, wherein client does not get an IP address. In the packet captures, you can verify the DORA process of the DHCP server. You can use ASA Packet Captures with CLI and ASDM Configuration Example to take the packet capture.
- Verify the DHCP statistics from the command line.
firepower# show dhcpd statistics
- Verify the DHCP binding information from the CLI.
firepower# show dhcpd binding
- Enable the appropriate logging at Devices > Platform Settings > FTD Policy > System logging and deploy the platform settings to the FTD. Log in to FTD CLI and run the command to check the Syslog messages.
 Attaching to ASA console ... Press 'Ctrl+a then d' to detach.
Type help or '?' for a list of available commands.

firepower# show logging
Related Information


 Feedback