Configure SNMP Syslog Traps for ASA and FTD
Available Languages
Download Options
Bias-Free Language
The documentation set for this product strives to use bias-free language. For the purposes of this documentation set, bias-free is defined as language that does not imply discrimination based on age, disability, gender, racial identity, ethnic identity, sexual orientation, socioeconomic status, and intersectionality. Exceptions may be present in the documentation due to language that is hardcoded in the user interfaces of the product software, language used based on RFP documentation, or language that is used by a referenced third-party product. Learn more about how Cisco is using Inclusive Language.
Contents
Introduction
This document describes how to configure the Simple Network Management Protocol (SNMP) traps to send Syslog messages on the Cisco Adaptive Security Appliance (ASA) and Firepower Threat Defense (FTD).
Prerequisites
Requirements
Cisco recommends that you have knowledge of these topics:
- Basic knowledge of Cisco ASA
- Basic knowledge of Cisco FTD
- Basic knowledge of the SNMP protocol
Components Used
The information in this document is based on the following software version:
- Cisco Firepower Threat Defense for AWS 6.6.0
- Firepower Management Center Version 6.6.0
- Cisco Adaptive Security Appliance Software Version 9.12(3)9
The information in this document was created from the devices in a specific lab environment. All of the devices used in this document started with a cleared (default) configuration. If your network is live, ensure that you understand the potential impact of any command.
Background Information
Cisco ASA and FTD have multiple capabilities to provide logging information. However, there are specific locations where a Syslog server is not an option. SNMP traps offer an alternative if there is an SNMP server available.
This is a useful tool to send specific messages for troubleshooting or monitoring purposes. For example, if there is a relevant problem that has to be tracked down during failover scenarios, SNMP traps for class ha on both FTD and ASA can be used to focus on those messages only.
Further information related to Syslog classes can be found in this document.
The purpose of this article is to provide configuration examples for ASA using Command Line Interface (CLI), FTD managed by FMC, and FTD managed by Firepower Device Manager (FDM).
If Cisco Defense Orchestrator (CDO) is used for FTD, this configuration has to be added to the FDM interface.
Caution: For high syslog rates, it is recommended to configure a rate limit on syslog messages to prevent impact in other operations.
This is the information used for all the examples in this document.
SNMP Version: SNMPv3
SNMPv3 Group: group-name
SNMPv3 User: admin-user with HMAC SHA algorithm for authentication
SNMP Server IP address: 10.20.15.12
ASA/FTD Interface to use to communicate with the SNMP Server: Outside
Syslog Message-ID: 111009
Configure
ASA Configuration
These steps can be used to configure SNMP Traps on an ASA following the below information.
Step 1. Configure the messages to add to the Syslog List.
logging list syslog-list message 111009
Step 2. Configure SNMPv3 Server parameters.
snmp-server enable

snmp-server group group-name v3 auth
snmp-server user admin-user group-name v3 auth sha cisco123
Step 3. Enable SNMP traps.
snmp-server enable traps syslog
Step 4. Add the SNMP traps as a logging destination.
logging history syslog-list
FTD Configuration Managed by FDM
These steps can be used to configure a specific Syslog list to send to the SNMP server when FTD is managed by FDM.
Step 1. Navigate to Objects > Event List Filters and select on the + button.
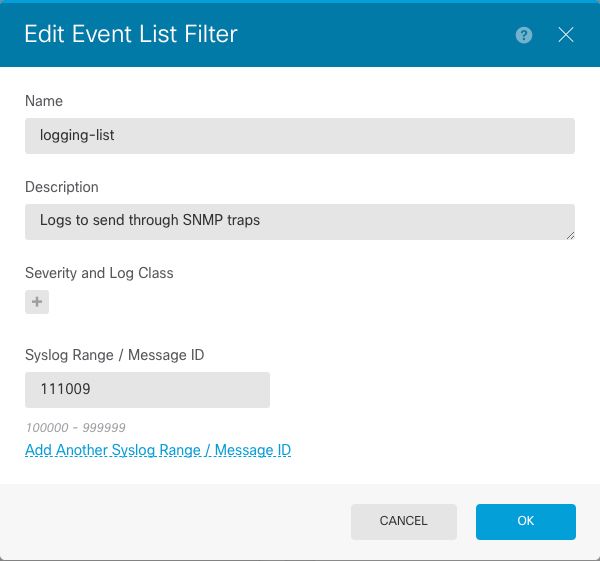
Step 2. Name the Even List and include the relevant classes or message IDs. Then, select OK.

Step 3. Navigate to Advanced Configuration > FlexConfig > FlexConfig Objects from the FDM home screen and select the + button.
Create the next FlexConfig Objects with the listed information:
Name: SNMP-Server
Description (Optional): SNMP Server Information
Template:
snmp-server enable
snmp-server group group-name v3 auth
snmp-server user admin-user group-name v3 auth sha cisco123
snmp-server host outside 10.20.15.12 version 3 admin-user
Negate Template:
no snmp-server host outside 10.20.15.12 version 3 admin-user
no snmp-server user admin-user group-name v3 auth sha cisco123
no snmp-server group group-name v3 auth
no snmp-server enable

Name: SNMP-Traps
Description (Optional): Enable SNMP Traps
Template:
snmp-server enable traps syslog
Negate Template:
no snmp-server enable traps syslog

Name: Logging-history
Description (Optional): Object to set SNMP traps syslog messages
Template:
logging history logging-list
Negate Template:
no logging history logging-list

Step 4. Navigate to Advanced Configuration > FlexConfig > FlexConfig Policy and add all the objects created in the previous step. The order is irrelevant as the dependant commands are included in the same object (SNMP-Server). Select Save once the three objects are there and the Preview section shows the list of commands.

Step 5. Select the Deploy icon to apply changes.
FTD Configuration Managed by FMC
The examples above, illustrate similar scenarios as the previous but these changes are configured on the FMC and then deployed to an FTD managed by it. SNMPv2 can also be used. This article explains how to use set up an SNMP server with this version on FTD using FMC management.
Step 1. Navigate to Devices > Platform Settings and select Edit on the Policy assigned to the managed device to apply the configuration to.
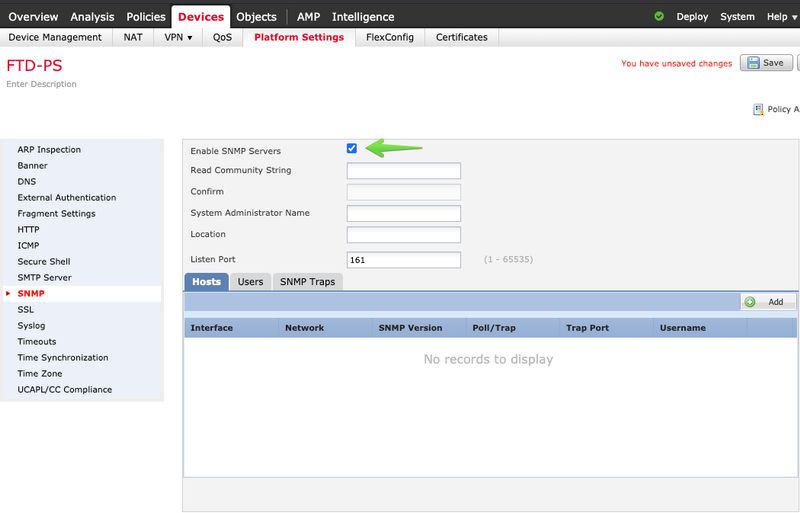
Step 2. Navigate to SNMP and check the Enable SNMP Servers option.

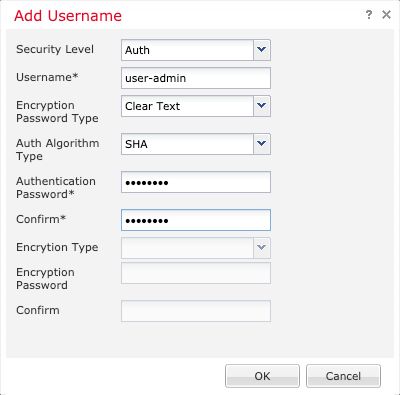
Step 3. Select the Users tab and select the Add button. Fill the User information.

Step 4. Select Add in the Hosts tab. Fill the information related to the SNMP Server. If you use an interface instead of a zone, ensure to manually add the interface name in the right corner section. Select OK once all the necessary information is included.

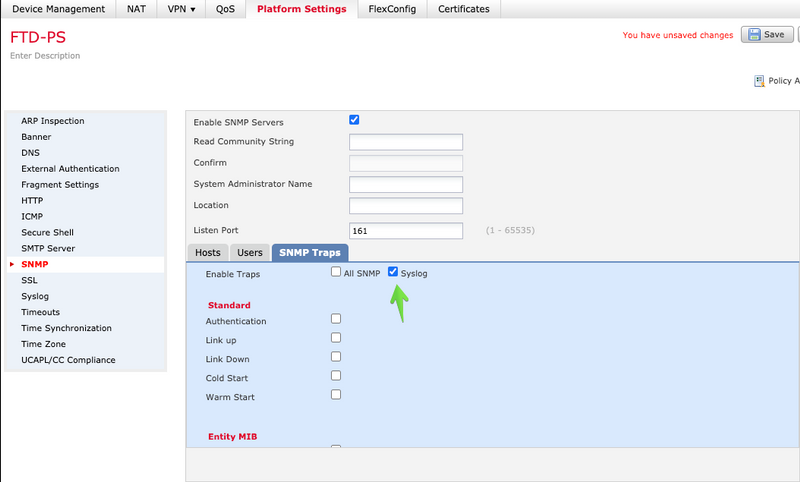
Step 5. Select the SNMP Traps tab and check the Syslog box. Ensure to remove all the other traps checkmarks if those are not required.

Step 6. Navigate to Syslog and select the Event Lists tab. Select the Add button. Add a name and the messages to include in the list. Select OK to continue.

Step 7. Select the Logging Destinations tab and select the Add button.
Change the Logging Destination to SNMP Trap.
Select User Event List and choose the event list created in Step 6 next to it.
Select OK to finish editing this section.

Step 8. Select the Save button and Deploy the changes to the managed device.
Verify
The commands below can be used in both FTD CLISH and ASA CLI.
Show snmp-server statistics
The "show snmp-server statistics" command provides information about how many times a trap has been sent. This counter can include other traps.
# show snmp-server statistics
0 SNMP packets input
 0 Bad SNMP version errors
 0 Unknown community name
 0 Illegal operation for community name supplied
 0 Encoding errors
 0 Number of requested variables
 0 Number of altered variables
 0 Get-request PDUs
 0 Get-next PDUs
 0 Get-bulk PDUs
 0 Set-request PDUs (Not supported)
2 SNMP packets output
 0 Too big errors (Maximum packet size 1500)
 0 No such name errors
 0 Bad values errors
 0 General errors
 0 Response PDUs
 2 Trap PDUs
The message ID used in this example triggers every time a user executes a command. Every time a "show" command is issued, the counter increase.
Show logging setting
The "show logging setting" provides information about the messages sent by each destination. History logging indicates the counters for SNMP traps. The Trap logging statistics are related to Syslog hosts counters.
# show logging setting
Syslog logging: enabled
 Facility: 20
 Timestamp logging: enabled
 Hide Username logging: enabled
 Standby logging: disabled
 Debug-trace logging: disabled
 Console logging: disabled
 Monitor logging: disabled
 Buffer logging: level debugging, 30 messages logged
 Trap logging: level debugging, facility 20, 30 messages logged
 Global TCP syslog stats::
  NOT_PUTABLE: 0, ALL_CHANNEL_DOWN: 0
  CHANNEL_FLAP_CNT: 0, SYSLOG_PKT_LOSS: 0
  PARTIAL_REWRITE_CNT: 0
 Permit-hostdown logging: disabled
 History logging: list syslog-list, 14 messages logged
 Device ID: disabled
 Mail logging: disabled
 ASDM logging: disabled
Issue the command "show logging queue" to ensure that no messages are being dropped.
# show logging queue

Logging Queue length limit : 512 msg(s)
0 msg(s) discarded due to queue overflow
0 msg(s) discarded due to memory allocation failure
Current 0 msg on queue, 231 msgs most on queue
Related Information
Contributed by Cisco Engineers
- Created by Cesar Lopez ZamarripaCisco Security Technical Leader
- Edited by Cesar Ivan Monterrubio RamirezCisco Technical Consulting Engineer
Contact Cisco
- Open a Support Case

- (Requires a Cisco Service Contract)
 Feedback