Introduction
This document describes configuration steps on the Cisco Email Security Appliance (ESA) to allow simulated phishing platforms campaigns successfully.
Prerequisites
Requirements
Cisco recommends that you have knowledge of these topics:
- Creation of Message and Content Filters on the ESA.
- Configuration of the Host Access Table (HAT).
- Understanding of the Cisco ESA's incoming email pipeline.
Components Used
This document is not restricted to specific software and hardware versions.
The information in this document was created from the devices in a specific lab environment. All of the devices used in this document started with a cleared (default) configuration. If your network is live, ensure that you understand the potential impact of any command.
Background Information
Simulated phishing platforms allows administrators to run phishing campaigns as part of a cycle to manage one of the biggest threats which uses the email systems as a vector of social engineering attacks.
Problem
When the ESA is not prepared for such simulations, it is not unusual for its scanning engines to stop the phishing campaign messages, resulting in failure or decrease of effectiveness of the simulations.
Solution
Caution: In this configuration example, TRUSTED mail flow policy is selected to allow the ESA to pass through larger simulated phishing campaigns without any throttling. Running continuous phishing campaigns of high volume may impact email processing performance.
To ensure the phishing campaign messages are not stopped by any security component of the ESA configuration needs to be put in place.
- Create a new Sender Group: GUI > Mail Policies > HAT Overview and bind it to TRUSTED mail flow policy (alternatively a new policy can be created with similar options under GUI > Mail Policies > Mail Flow Policies).
- Add the sending host(s) or IP(s) of the simulated phishing platform to this Sender Group. If the simulated phishing platform has a large range of IPs, you can add partial hostnames instead or IP ranges if applicable.
- Order the Sender Group above your BLOCKLIST Sender Group to ensure it's being matched statically rather than SBRS.
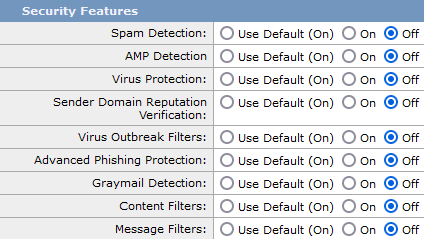
- Disable all the security feature for the TRUSTED mail flow policy under GUI > Mail Policies > Mail Flow Policies > TRUSTED (or your newly created mail flow policy):

5. Submit these changes, and commit.
Prior AsyncOS v.14
Caution: In this configuration example, TRUSTED mail flow policy is selected to allow the ESA to pass through larger simulated phishing campaigns without any throttling. Running continuous phishing campaigns of high volume may impact email processing performance.
To ensure the phishing campaign messages are not stopped by any security component of the ESA configuration needs to be put in place.
- Create a new Sender Group: GUI > Mail Policies > HAT Overview and bind it to TRUSTED mail flow policy.
- Add the sending host(s) or IP(s) of the simulated phishing platform to this Sender Group. If the simulated phishing platform has a large range of IPs, you can add partial hostnames instead or IP ranges if applicable.
- Order the Sender Group above your BLOCKLIST Sender Group to ensure it's being matched statically rather than SBRS.
- Submit these changes, and commit.
- Navigate to the CLI and add new message filter, CLI > filters, copy and modify the syntax and add the filter.
-
skip_engines_for_simulated_phishing:
if (sendergroup == "name_of_the_newly_created_sender_group")
{
insert-header("x-sp", "uniquevalue");
log-entry("Skipped scanning engines for simulated phishing");
skip-spamcheck();
skip-viruscheck();
skip-ampcheck();
skip-marketingcheck();
skip-socialcheck();
skip-bulkcheck();
skip-vofcheck();
skip-filters();
}
.
- Order the message filter up in the list to ensure it will not get skipped by another message filter above it which includes skip-filters action.
- Press Enter key to navigate back to he main command prompt of AsyncOS and issue the command "commit" to commit the changes. (do not click CTRL+C - it will erase all the changes).
- Navigate to the GUI> Mail Policies > Incoming Content Filters
- Create a new Incoming Content Filter with condition "Other Header" set to look for the custom header "x-sp" and its uniquevalue configured in the message filter and configure the action Skip Remaining Content Filters (Final Action).
- Order the content filter to "1" to ensure that other filters will not take action against the simulated phishing message.
- Navigate to GUI > Mail Policies > Incoming Mail Policies and assign the content filter to the required policy.
- Submit and commit changes.
- Run the simulated phishing platform campaign and monitor the mail_logs/Message Tracking to verify flow and policy rule matching.


 Feedback