How-to configure Cisco Secure Email Account Settings for Microsoft Azure (Microsoft 365) API
Available Languages
Download Options
Bias-Free Language
The documentation set for this product strives to use bias-free language. For the purposes of this documentation set, bias-free is defined as language that does not imply discrimination based on age, disability, gender, racial identity, ethnic identity, sexual orientation, socioeconomic status, and intersectionality. Exceptions may be present in the documentation due to language that is hardcoded in the user interfaces of the product software, language used based on RFP documentation, or language that is used by a referenced third-party product. Learn more about how Cisco is using Inclusive Language.
Contents
Introduction
This document provides a step-by-step "how-to" for registering a new application in Microsoft Azure (Azure Active Directory) to generate the needed Client ID, Tenant ID, and Client credentials, and then the configuration for Account Settings on a Cisco Secure Email Gateway or Cloud Gateway. Configuration of the Account Settings and associated Account Profile are required when a mail administrator configures Mailbox Auto Remediation (MAR) for Advanced Malware Protection (AMP) or URL Filtering or utilizes the Remediate action from Message Tracking on the Cisco Secure Email and Web Manager or Cisco Secure Gateway/Cloud Gateway.
Mailbox Auto Remediation Process Flow
An attachment (file) in your email or a URL may be scored as malicious at any time, even after it has reached a user's mailbox. AMP on Cisco Secure Email (via Cisco Secure Malware Analytics) can identify this development as new information emerges and will push retrospective alerts to Cisco Secure Email. Cisco Talos provides the same with URL analysis, as of AsyncOS 14.2 for Cisco Secure Email Cloud Gateway. If your organization is using Microsoft 365 to manage mailboxes, you can configure Cisco Secure Email to perform auto-remediation actions on the messages in a user's mailbox when these threat verdicts change.
Cisco Secure Email communicates securely and directly to Microsoft Azure Active Directory to gain access to Microsoft 365 mailboxes. For example, if an email with an attachment is processed through your gateway and scanned by AMP, the file attachment (SHA256) is provided to AMP for file reputation. The AMP disposition can be marked as Clean (step 5, Figure 1), and then delivered to the end recipient's Microsoft 365 mailbox. At a later time, the AMP disposition is changed to Malicious, Cisco Malware Analytics sends a retrospective verdict update (step 8, Figure 1) to any gateway that has processed that specific SHA256. Once the gateway receives the retrospective verdict update of Malicious (if configured), the gateway will then take one of the following Mailbox Auto Remediation (MAR) actions: Forward, Delete, or Forward and Delete.
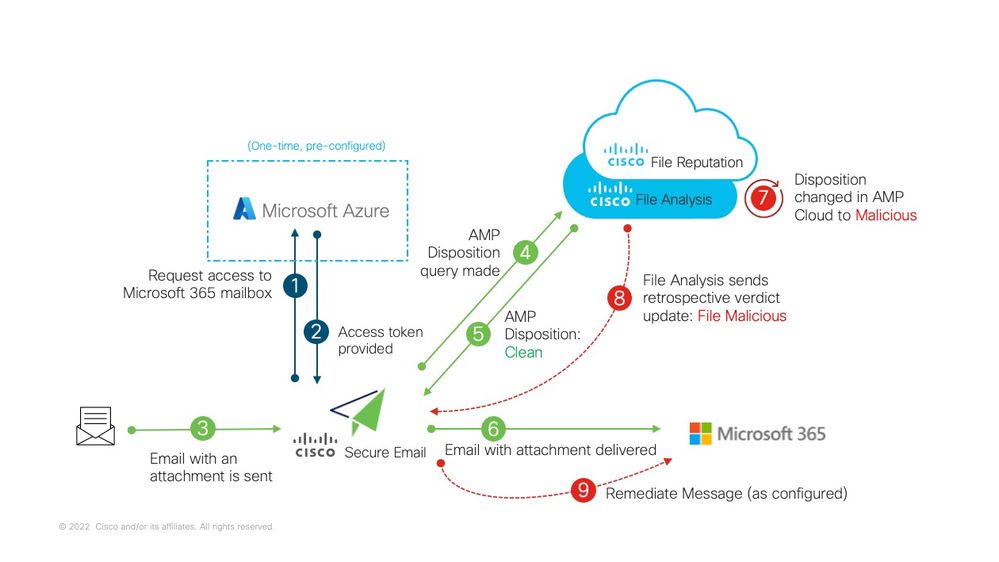 Figure 1: MAR (for AMP) on Cisco Secure Email
This guide is on how-to configure Cisco Secure Email with Microsoft 365 for Mailbox Auto Remediation only. AMP (File Reputation and File Analysis) and/or URL Filtering on the gateway should already be configured. For further details on File Reputation and File Analysis, please consult the User Guide for the version of AsyncOS you have deployed.
Prerequisites
1. Microsoft 365 account subscription (Please make sure that your Microsoft 365 account subscription includes access to Exchange, such as an Enterprise E3 or Enterprise E5 account.)
2. Microsoft Azure administrator account and access to http://portal.azure.com
3. Both the Microsoft 365 and Microsoft Azure AD accounts are tied properly to an active "user@domain.com" email address, and you are able to send and receive emails via that email address.
You will be creating the following values in order to configure the Cisco Secure Email gateway API communication to Microsoft Azure AD:
- Client ID
- Tenant ID
- Client secret
Note: Starting with AsyncOS 14.0, Account Settings allows configuration using a Client secret when creating the Microsoft Azure App Registration. This is the easier and preferred method.
Optional - If you are NOT utilizing the Client secret, you will need to create and have ready:
- Thumbprint
- The private key (PEM file)
Creating the thumbprint and private key are covered in the Appendix of this guide:
- An active public (or private) certificate (CER) and the private key used to sign the certificate (PEM), or the ability to create a public certificate (CER) and the ability to save the private key used to sign the certificate (PEM). Cisco provides two methods in this document to get this done based on your administration preference:
- Certificate: Unix/Linux/OS X (utilizing OpenSSL)
- Certificate: Windows (utilizing PowerShell)
- Access to Windows PowerShell, usually administered from a Windows Host or Server -or- access to Terminal application via Unix/Linux
In order to build these required values, you will need to complete the steps provided in this document.
Register an Azure app for use with Cisco Secure Email
Application Registration
|
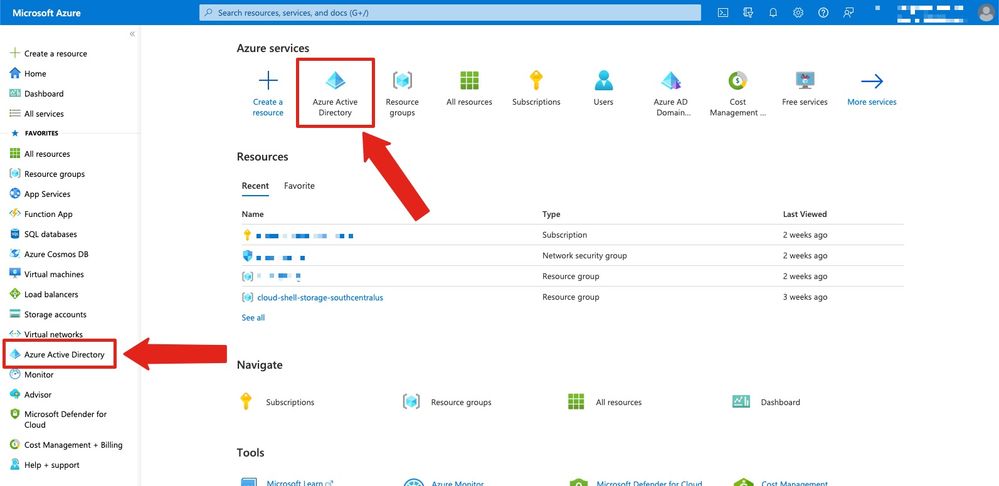
Login to your Microsoft Azure Portal 1. Click on Azure Active Directory (Figure 2) 2. Click on App registrations 3. Click on + New registration 4. On the "Register an application" page: a. Name: Cisco Secure Email MAR (or the name of your choice) [Note: You may leave this blank, or feel free to use https://www.cisco.com/sign-on for fill-in] |
|
Once completed with the above steps you will be presented with your application:
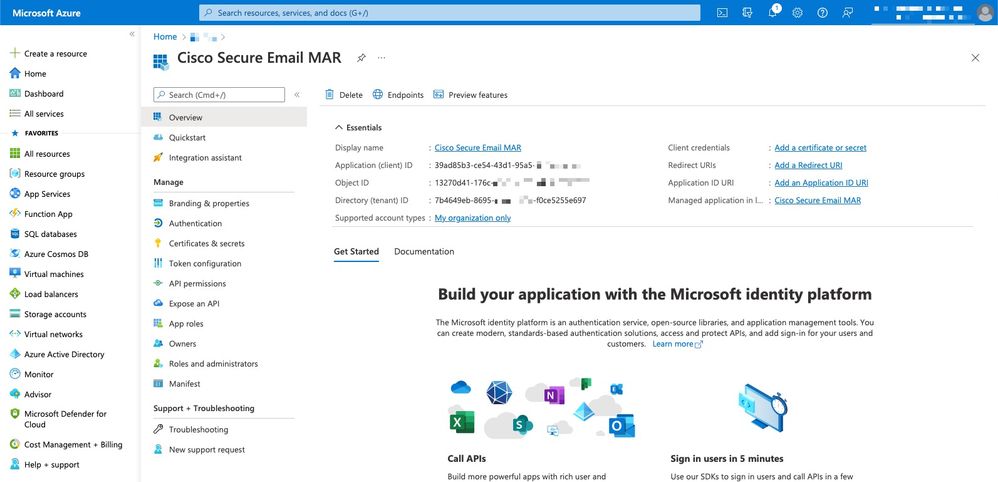 Figure 3: Microsoft Azure Active Directory application page
Certificates and Secrets
If you are running AsyncOS 14.0 or newer, Cisco recommends configuring your Azure app to utilize a client secret. On your application pane, in the Manage options:
1. Select Certificates & secrets
2. In the Client secrets section, click + New client secret
3. Add a description to help identify what this client secret is for, e.g. "Cisco Secure Email remediation"
4. Select an expiration period
5. Click Add
6. Mouse over to the right of the value that is generated, and click the Copy to Clipboard icon
7. Save this value to your notes, note this as "Client secret”
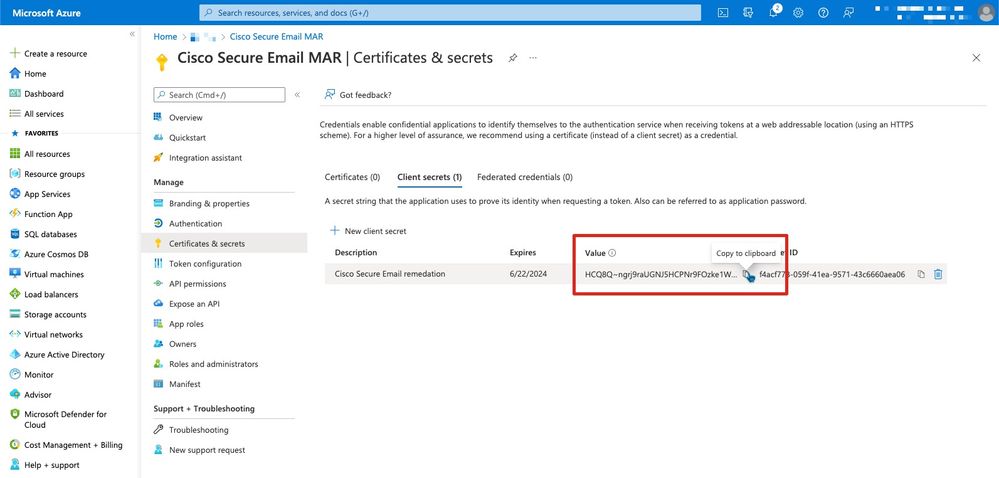 Figure 4: Microsoft Azure create client secret example
Note: Once you exit your active Microsoft Azure session, the value of the client secret you just generated will *** out the value. If you do not record and safeguard the value before exiting, you will need to recreate the client secret in order to see the clear text output.
Optional - If you are not configuring your Azure application with a Client secret, please configure your Azure app to use your certificate. On your application pane, in the Manage options:
- Select Certificates & secrets
- Click Upload certificate
- Select the CRT file (as created earlier)
- Click Add
API Permissions
Note: Starting in AsyncOS 13.0 for Email Security, the API permissions for Microsoft Azure to Cisco Secure Email communication required changed from using Microsoft Exchange to Microsoft Graph. If you have already configured MAR and you are upgrading your existing Cisco Secure Email gateway to AsyncOS 13.0, you may simply update/add the new API permissions. (If you are running an older version of AsyncOS, 11.x or 12.x, please see Appendix B before you continue.)
On your application pane, in the Manage options:
- Select API permissions
- Click + Add a permission
- Select Microsoft Graph
- Select the below permissions on Application permissions:
- Mail > "Mail.Read" (Read mail in all mailboxes)
- Mail > "Mail.ReadWrite" (Read and write mail in all mailboxes)
- Mail > "Mail.Send" (Send mail as any user)
- Directory > "Directory.Read.All" (Read directory data) [*Optional: If you are using LDAP Connector/LDAP synchronization, enable. If not, this is not required.]
- Optional: You will see that Microsoft Graph by default is enabled for “User.Read” permissions; you may leave this as configured or click Read and click Remove permission to remove this from your API permissions associated with your application.
- Click Add permissions (or Update permissions, if Microsoft Graph was already listed)
- Finally, click on Grant admin consent for... to ensure that your new permissions are applied to the application
- There will be an in-pane pop-up that asks:
"Do you want to grant consent for the requested permissions for all accounts in <Azure Name>? This will update any existing admin consent records this application already has to match what is listed below."
Click Yes
At this point, you should see a green success message and the "Admin Consent Required" column display Granted.
Getting Your Client ID and Tenant ID
On your application pane, in the Manage options:
- Click Overview
- Mouse over to the right of your Application (Client) ID and click the Copy to Clipboard icon
- Save this value to your notes, note this as "Client ID”
- Mouse over to the right of your Directory (tenant) ID and click the Copy to Clipboard icon
- Save this value to your notes, note this as "Tenant ID"
 Figure 5: Microsoft Azure... Client ID, Tenant ID example
Configuring Your Cisco Secure Email Gateway/Cloud Gateway
At this time, you should have the following values prepared and saved to your notes:
- Client ID
- Tenant ID
- Client secret
Optional, if not using Client secret:
- Thumbprint
- The private key (PEM file)
You are ready to use the created values from your notes and configure the Account Settings on the Cisco Secure Email gateway!
Create Account Profile
- Log in to your gateway
- Navigate to System Administration > Account Settings
- Note: If you are running a version prior to AsyncOS 13.x, this will be System Administration > Mailbox Settings
- Click Enable
- Click the checkbox for Enable Account Settings and click Submit
- Click Create Account Profile
- Provide a profile name and description (something that will uniquely describe your account if you have multiple domains)
- As you are defining a Microsoft 365 connection, leave the profile type as Office 365 / Hybrid (Graph API)
- Enter your Client ID
- Enter your Tenant ID
- For Client credentials do one of the following, as you have configured in Azure:
- Click Client Secret and paste in your configured client secret, or...
- Click Client Certificate and enter in your Thumbprint and also provide your PEM by clicking "Choose File"
- Click Submit
- Click Commit Changes in the upper right-hand of the UI
- Enter in any comments and complete the configuration changes by clicking Commit Changes
Check Connection
The next step is only to verify the API connection from your Cisco Secure Email gateway to Microsoft Azure:
- From the same Account Details page, click Test Connection
- Enter in a valid email address for the domain that is managed in your Microsoft 365 account
- Click Test Connection
- You should receive a success message (Figure 6)
- Click Done to finish
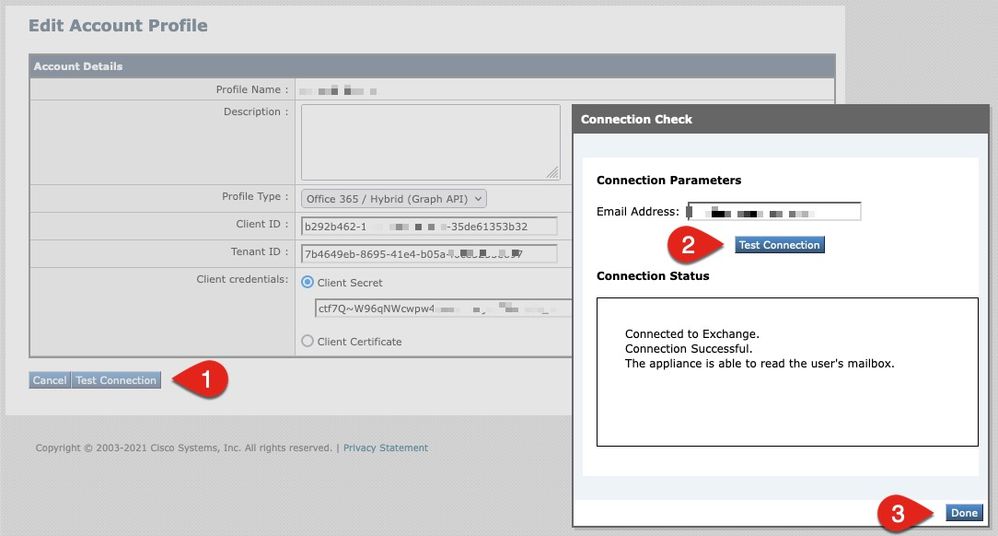 Figure 6: Account Profile/Connection Check example
6. In the Domain Mapping section, click Create Domain Mapping
7. Enter in your domain name(s) that are associated with the Microsoft 365 account you have just validated the API connection for
The following is a list of valid domain formats that can be used to map a Mailbox Profile:
- The domain can be the special keyword 'ALL' to match all domains in order to create a default domain mapping.
- Domain names such as 'example.com' - Matches any address with this domain.
- Partial domain names such as '@.partial.example.com' - Matches any address ending with this domain
- Multiple domains can be entered by using a comma-separated list of domains.
8. Click Submit
9. Click Commit Changes in the upper right-hand of the UI
10. Enter in any comments and complete the configuration changes by clicking Commit Changes
Enable Mailbox Auto Remediation (MAR) for Advanced Malware Protection in Mail Policy
Complete this step to enable MAR in the AMP configuration for mail policies.
- Navigate to Mail Policies > Incoming Mail Policies
- Click on the settings in the Advanced Malware Protection column for the policy name you wish to configure (ex., Figure 7):
 Figure 7: Enable MAR (incoming mail policies)
- Scroll to the bottom of the page
- Click the checkbox for Enable Mailbox Auto Remediation (MAR)
- Select one of the following actions you wish to take for MAR (ex., Figure 8):
- Forward to: <enter in email address>
- Delete
- Forward to: <enter in email address> and Delete
 Figure 8: Enable MAR for AMP configuration example
- Click Submit
- Click Commit Changes in the upper right-hand of the UI
- Enter in any comments and complete the configuration changes by clicking Commit Changes
Enable Mailbox Auto Remediation (MAR) for URL Filtering
Starting with AsyncOS 14.2 for Cisco Secure Email Cloud Gateway, URL Filtering now includes URL Retrospective Verdict and URL Remediation.
- Navigate to Security Services > URL Filtering
- If you do not already have URL Filtering configured, click Enable
- Click the checkbox for "Enable URL Category and Reputation Filters"
- The Advanced Settings with the default settings
- Click Submit
Your URL Filtering should look similar to the following:
 Figure 9: URL Filtering post-enable example
In order to see URL Retrospection with-in URL Filtering, perform the following, or have a support case opened for Cisco to perform:
esa1.hcxxyy-zz.iphmx.com> urlretroservice enable

URL Retro Service is enabled.

esa1.hcxxyy-zz.iphmx.com> websecurityconfig

URL Filtering is enabled.
No URL list used.
Web Interaction Tracking is enabled.
URL Retrospective service based Mail Auto Remediation is disabled.
URL Retrospective service status - Unavailable

Disable URL Filtering? [N]>

Do you wish to disable Web Interaction Tracking? [N]>

Do you wish to add URLs to the allowed list using a URL list? [N]>


Enable URL Retrospective service based Mail Auto Remediation to configure remediation actions.

Do you wish to enable Mailbox Auto Remediation action? [N]> y

URL Retrospective service based Mail Auto Remediation is enabled.

Please select a Mailbox Auto Remediation action:
1. Delete
2. Forward and Delete
3. Forward
[1]> 1

esa1.hcxxyy-zz.iphmx.com> commit

Please enter some comments describing your changes:
[]>

Do you want to save the current configuration for rollback? [Y]>

Changes committed: Tue Mar 29 19:43:48 2022 EDT
Once complete, refresh your UI on the URL Filtering page and you should now see similar to the following:
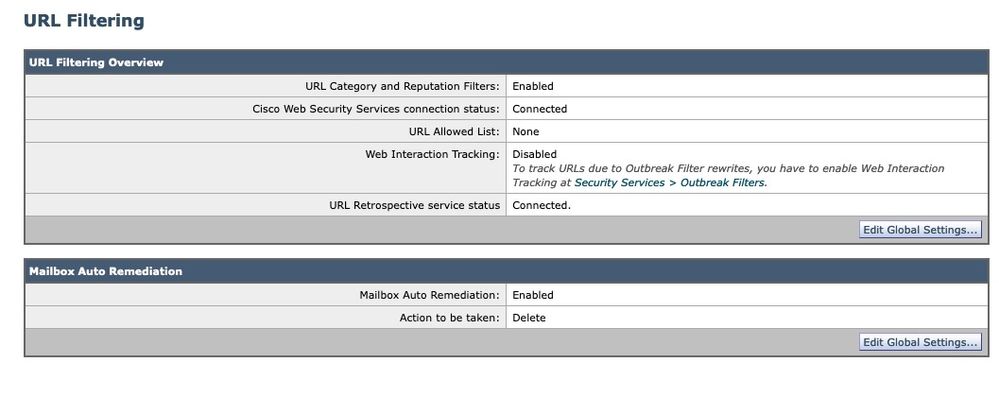 Figure 10: URL Filtering (AsyncOS 14.2 for Cisco Secure Email Cloud Gateway)
URL protection is now ready to perform remedial actions when a verdict changes score. For more information, please see Protecting Against Malicious or Undesirable URLs in the User Guide for AsyncOS 14.2 for Cisco Secure Email Cloud Gateway.
Configuration complete!
At this time Cisco Secure Email is ready to continuously evaluate emerging threats as new information becomes available and notify you about files that are determined to be threats after they have entered your network.
When a retrospective verdict is produced from File Analysis (Cisco Secure Malware Analytics), an info message is sent to the Email Security administrator (if configured). Example:
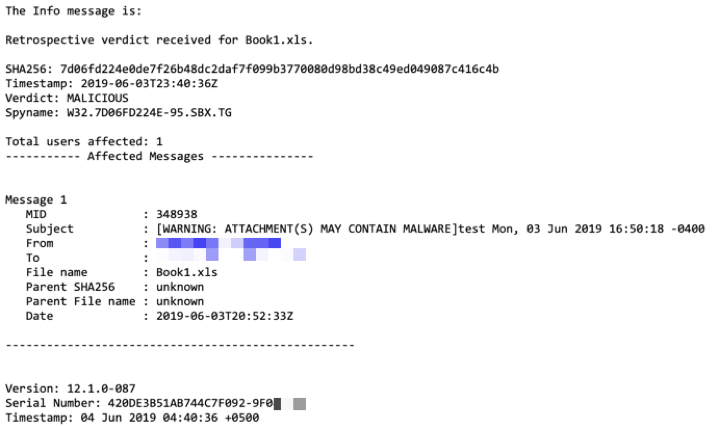
Mailbox Auto Remediation will be taken as configured if configured against the mail policy.
Mailbox Auto Remediation Report Examples
Reporting for any SHA256 that has been remediated will be in the Mailbox Auto Remediation report available both on the Cisco Secure Email gateway and Cisco Secure Email and Web Manager.
 Figure 11: (Legacy UI) Mailbox Auto Remediation Report
 Figure 12: (NG UI) Mailbox Auto Remediation Report
Mailbox Auto Remediation Logging
Mailbox Auto Remediation has an individual log, “mar”. The Mailbox Auto Remediation logs will contain all communication activity between your Cisco Secure Email gateway and Microsoft Azure, Microsoft 365.
An example of the mar logs:
Mon May 27 02:24:28 2019 Info: Version: 12.1.0-087 SN: 420DE3B51AB744C7F092-9F0000000000
Mon May 27 02:24:28 2019 Info: Time offset from UTC: 18000 seconds
Fri May 31 01:11:53 2019 Info: Process ready for Mailbox Auto Remediation
Fri May 31 01:17:57 2019 Info: Trying to connect to Azure AD.
Fri May 31 01:17:57 2019 Info: Requesting token from Azure AD.
Fri May 31 01:17:58 2019 Info: Token request successful.
Fri May 31 01:17:58 2019 Info: The appliance is able to read the user's(robsherw@bce-demo.info) mailbox.
Fri May 31 04:41:54 2019 Info: Trying to perform the configured action on MID:312391 SHA256:de4dd03acda0a24d0f7e375875320538952f1fa30228d1f031ec00870ed39f62 Recipient:robsherw@bce-demo.info.
Fri May 31 04:41:55 2019 Info: Message containing attachment(s) for which verdict update was(were) available was not found in the recipient's (robsherw@bce-demo.info) mailbox.
Tue Jun  4 04:42:20 2019 Info: Trying to perform the configured action on MID:348938 SHA256:7d06fd224e0de7f26b48dc2daf7f099b3770080d98bd38c49ed049087c416c4b Recipient:robsherw@bce-demo.info.
Tue Jun  4 04:42:21 2019 Info: Message containing attachment(s) for which verdict update was(were) available was not found in the recipient's (robsherw@bce-demo.info) mailbox.
Troubleshooting Cisco Secure Email Gateway
If you are not seeing successful results for the connection status test, you may wish to review the application registration performed from Microsoft Azure AD.
From the Cisco Secure Email gateway, set your MAR logs to the 'trace' level and re-test the connection.
For unsuccessful connections, logs may show similar to:
Thu Mar 30 16:08:49 2017 Info: Trying to connect to Azure AD.
Thu Mar 30 16:08:49 2017 Info: Requesting token from Azure AD.
Thu Mar 30 16:08:50 2017 Info: Error in requesting token: AADSTS70001: Application with identifier '445796d4-8e72-4d06-a72c-02eb47a4c59a' was not found in the directory ed437e13-ba50-479e-b40d-8affa4f7e1d7
 Trace ID: 4afd14f4-ca97-4b15-bba4-e9be19f30d00
 Correlation ID: f38e3388-729b-4068-b013-a08a5492f190
 Timestamp: 2017-03-30 20:08:50Z
Thu Mar 30 16:08:50 2017 Info: Error while requesting token AADSTS70001: Application with identifier '445796d4-8e72-4d06-a72c-02eb47a4c59a' was not found in the directory ed437e13-ba50-479e-b40d-8affa4f7e1d7
 Trace ID: 4afd14f4-ca97-4b15-bba4-e9be19f30d00
 Correlation ID: f38e3388-729b-4068-b013-a08a5492f190
 Timestamp: 2017-03-30 20:08:50Z
Confirm the Application ID, Directory ID (which is the same as the Tenant ID), or other associated identifiers from the log with your application in Azure AD. If you are unsure of the values, delete the application from the Azure AD portal and start over.
For a successful connection, logs should be similar to:
Thu Mar 30 15:51:58 2017 Info: Trying to connect to Azure AD.
Thu Mar 30 15:51:58 2017 Info: Requesting token from Azure AD.
Thu Mar 30 15:51:58 2017 Trace: command session starting
Thu Mar 30 15:52:00 2017 Info: Token request successful.
Thu Mar 30 15:52:00 2017 Info: The appliance is able to read the user's(myuser@mydomain.onmicrosoft.com) mailbox.
Troubleshooting Azure AD
Note: Cisco TAC and Cisco Support are not entitled to troubleshoot customer-side issues with Microsoft Exchange, Microsoft Azure AD, or Office 365.
For customer-side issues with Microsoft Azure AD, you will need to engage Microsoft Support. Please see the "Help + support" option from your Microsoft Azure Dashboard. You may be able to open direct support requests to Microsoft Support from the dashboard.
Appendix A
Note: This is ONLY required if you are NOT utilizing the Client secret for setting up your Azure application.
Building a Public and Private Certificate and Key Pair
Tip: Please have the output saved locally for $base64Value, $base64Thumbprint, and $keyid, as they will be required later in the configuration steps. Please have the .crt and associated .pem of your certificate in an available, local folder on your computer.
Note: If you already have a certificate (x509 format/standard) and private key, skip this section. Be sure you have both CRT and PEM files, as you will need them in the coming sections!
Certificate: Unix/Linux (utilizing openssl)
|
Values to be created: |
|
● Thumbprint ● Public Certificate (CRT file) ● Private Key (PEM file) |
Administrators using Unix/Linux/OS X, for the purpose and execution of the provided script, it is under the assumption that you have OpenSSL installed.
Note: Run the commands 'which openssl' and 'openssl version' in order to verify OpenSSL installation. Install OpenSSL if it is not present!
See the following document for assistance: Azure AD Configuration Script for Cisco Secure Email
From your host (UNIX/Linux/OS X):
- From a terminal application, text editor (or however you are comfortable creating a shell script), create a script by copying the following: https://raw.githubusercontent.com/robsherw/my_azure/master/my_azure.sh
- Paste the script
- Be sure that you make the script executable! Run the following command: chmod u+x my_azure.sh
- Run the script: ./my_azure.sh
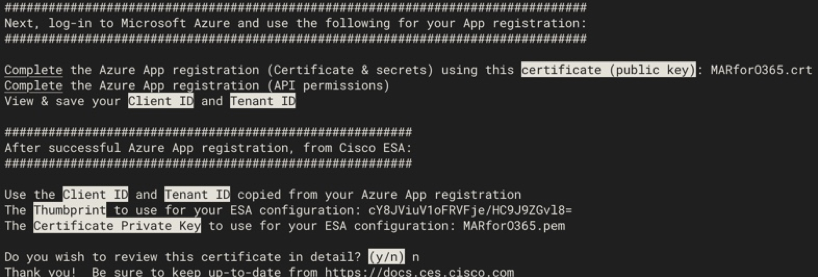 Figure 13: screen output from my_azure.sh
As you see in Figure 2, the script builds and calls out the Public Certificate (CER file)needed for the Azure App registration. The script also calls out theThumbprintandCertificate Private Key (PEM file)you will use in the Configuring Cisco Secure Email section.
youhave the needed values to register our application in Microsoft Azure!
[Skip the next section! Please proceed to "Register an Azure app for use with Cisco Secure Email"]
Certificate: Windows (utilizing PowerShell)
For administrators using Windows, you will need to utilize an application or have the knowledge to create a self-signed certificate. This certificate is used in order to create the Microsoft Azure application and associate API communication.
|
Values to be created: |
|
● Thumbprint ● Public Certificate (CRT file) ● Private Key (PEM file) |
Our example for this document to create a self-signed certificate is using XCA (https://hohnstaedt.de/xca/,https://sourceforge.net/projects/xca/).
Note: XCA can be downloaded for Mac, Linux, or Windows.
|
1. Create a database for your certificate and keys: a. Select File from the toolbar b. Select New Database c. Create a password for your database (you will need it in later steps, so remember it!) 2. Click on the Certificates tab, then click New Certificate |
|
|
3. Click on the Subject tab and fill in the following: a. Internal Name b. countryName c. stateOrProvinceName d. localityName e. organizationName f. organizationalUnitName (OU) g. commonName (CN) h. emailAddress 4. Click on Generate a New Key 5. At the pop-up, verify the provided information (changing as desired): a. Name b. Keytype: RSA c. Keysize: 2048 bit d. Click on Create e. Acknowledge the "Successfully created the RSA private key 'Name' " pop-up by clicking on OK |
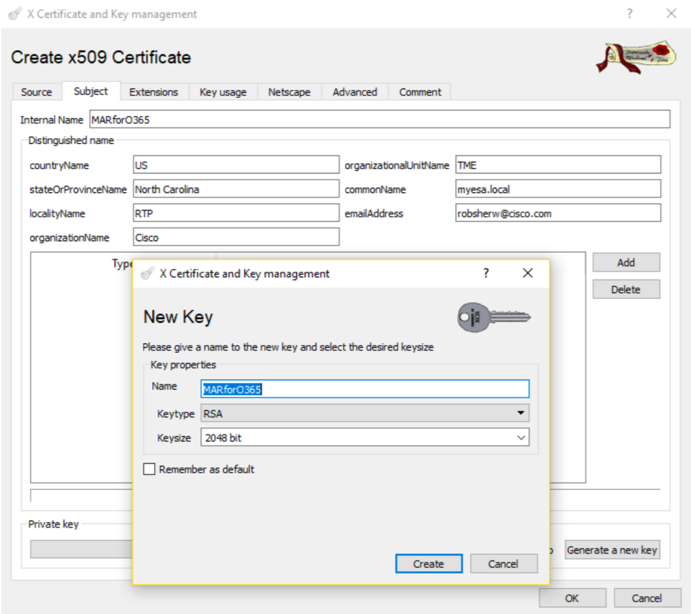 Figure 14: Using XCA (steps 3-5) Figure 14: Using XCA (steps 3-5) |
|
6. Click on the Key usage tab and select the following: a. Under X509v3 Key Usage: Digital Signature, Key Encipherment b. Under X509v3 Extended Key Usage: E-Mail Protection |
 Figure 15: Using XCA (step 6) Figure 15: Using XCA (step 6) |
|
7. Click on OK to apply changes to your certificate 8. Acknowledge the "Successfully created the certificate 'Name' " pop-up by clicking on OK |
Next, you will want to export both the Public Certificate (CER file) and Certificate Private Key (PEM file) for use in the PowerShell commands up next, and for use in the Configuring Cisco Secure Email steps:
|
1. Click and highlight the Internal Name of your newly created certificate. 2. Click Export a. Set the save directory for ease of access (changing as desired) b. Assure the Export Format is set to PEM (.crt) c. Click OK |
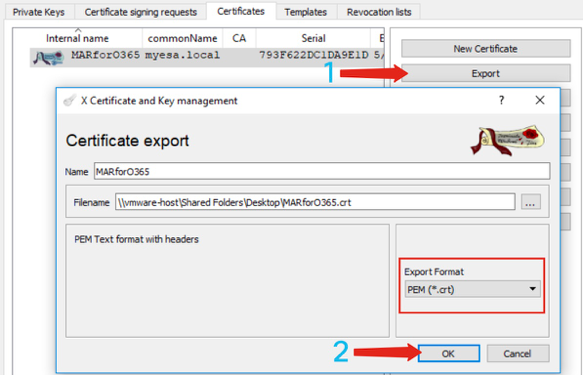 Figure 16: Using XCA (export CRT)(steps 1-2) Figure 16: Using XCA (export CRT)(steps 1-2) |
|
3. Click on the Private Keys tab 4. Click and highlight the Internal Name of your newly created certificate. 5. Click Export a. Set the save directory for ease of access (changing as desired) b. Assure the Export Format is set to PEM private (.pem) c. Click OK 6. Exit and close XCA |
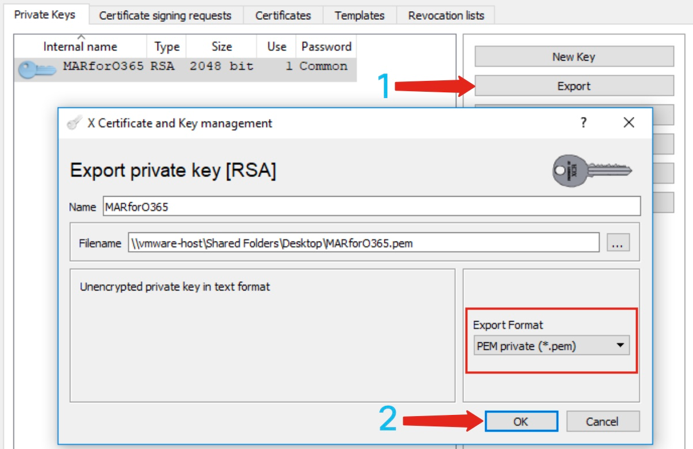 Figure 17: Using XCA (export PEM) (steps 3-5) Figure 17: Using XCA (export PEM) (steps 3-5) |
Finally, you will take your created certificate and extract the Thumbprint, which is needed for Configuring Cisco Secure Email.
- Using Windows PowerShell, run the following:
$cer = New-Object System.Security.Cryptography.X509Certificates.X509Certificate2
$cer.Import("c:\Users\joe\Desktop\myCert.crt")
$bin = $cer.GetRawCertData()
$base64Value = [System.Convert]::ToBase64String($bin)
$bin = $cer.GetCertHash()
$base64Thumbprint = [System.Convert]::ToBase64String($bin)
$keyid = [System.Guid]::NewGuid().ToString()[Note: “c:\Users\joe\Desktop...” is the location on your PC where your CRT file is saved.]
- In order to get values for the upcoming steps, saving to a file or to copying to your clipboard:
$base64Thumbprint | Out-File c:\Users\joe\Desktop\base64Thumbprint.txt
$base64Thumbprint
Note: “c:\Users\joe\Desktop...” is the location on your PC where you are saving the output.
The expected output when running the PowerShell command should like similar to the following:
PS C:\Users\joe\Desktop> $base64Thumbprint
75fA1XJEJ4I1ZVFOB2xqkoCIh94=
As you see, the PowerShell command calls out the base64Thumbprint, which is the Thumbprint needed for Cisco Secure Email gateway configuration.
You have also completed creating the Public Certificate (CER file) needed for the Azure App registration. And you have created the Certificate Private Key (PEM file)you will use in the Configuring Cisco Secure Email section.
You have the needed values to register your application in Microsoft Azure!
[Please proceed to "Register an Azure app for use with Cisco Secure Email"]
Appendix B
Note: This is ONLY required if you are running AsyncOS 11.x or 12.x for Email on your gateway.
API Permissions (AsyncOS 11.x, 12.x)
On your application pane, in the Manage options...
- Select API permissions
- Click + Add a permission
- Scroll down to Supported legacy APIs and select Exchange
- Select the below permissions on Delegated permissions:
- EWS > “EWS.AccessAsUser.All” (Access mailboxes as the signed-in user via Exchange Web Services)
- Mail > "Mail.Read" (Read user mail)
- Mail > "Mail.ReadWrite" (Read and write user mail)
- Mail > "Mail.Send" (Send mail as a user)
- Scroll to the top of the pane...
- Select the below permissions on Application permissions:
- “full_access_as_app” (Use Exchange Web Services with full access to all mailboxes)
- Mail > "Mail.Read" (Read user mail)
- Mail > "Mail.ReadWrite" (Read and write user mail)
- Mail > "Mail.Send" (Send mail as a user)
- Optional: You will see that Microsoft Graph by default is enabled for “User.Read” permissions; you may leave this as configured or click Read and click Remove permission to remove this from your API permissions associated with your application.
- Click Add permissions (or Update permissions, if Microsoft Graph was already listed)
- Finally, click on Grant admin consent for... to ensure that your new permissions are applied to the application
- There will be an in-pane pop-up that asks:
"Do you want to grant consent for the requested permissions for all accounts in <Azure Name>? This will update any existing admin consent records this application already has to match what is listed below."
Click Yes
At this point, you should see a green success message and the "Admin Consent Required" column display Granted, similar to shown:
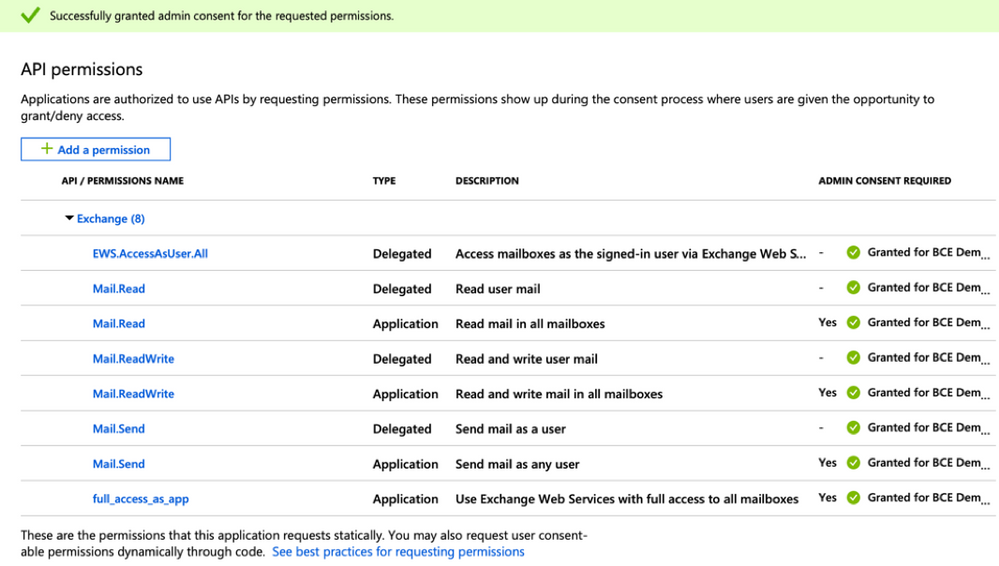 Figure 18: Microsoft Azure App registration (API permissions required)
[Please proceed to "Register an Azure app for use with Cisco Secure Email"]
Related Information
- Cisco Email Security Appliance - Product Support
- Cisco Email Security Appliance - Release Notes
- Cisco Email Security Appliance - End-User Guide
Revision History
| Revision | Publish Date | Comments |
|---|---|---|
2.0 |
22-Jun-2022 |
Refresh of article w/ updated preference for utilizing Client secret from w/in Microsoft Azure. |
1.0 |
31-Aug-2021 |
Initial Release |
Contributed by Cisco Engineers
- Robert SherwinCisco Secure Email Technical Marketing Engineer
Contact Cisco
- Open a Support Case

- (Requires a Cisco Service Contract)
 Feedback