Introduction
This document describes the process for using custom configuration files in order to install the Cisco Email Security Plug-in.
Cisco Email Security Plug-In Installation Using Custom Configuration Files
Install the Cisco Email Security Plug-in
- Download and install the latest version of the plug-in. (Download files are available from the Products Page.)
- Install the plug-in via standard installation. (See Administrator Guide for Cisco Email Security Plug-in for details.)
- Load the Business Class Email (BCE) signed XML configuration file.
- Confirm that the plug-in works as expected for encryption. (This would be assuring custom configurations to the BCE XML for decrypt/flag/encrypt, and then also additional custom configuration for CommonComponentsConfiguration XML.)
Construct a Custom Configuration Config Directory
- On a Windows host or Network Server, create a custom installation directory. (For this example, using a network share: \\172.18.250.59\share\my_plugin_install)
- On the Windows host, navigate to the standard installation directory:
-
C:\ProgramData\Cisco\Cisco IronPort Email Security Plug-In\
- Copy the 'Common' directory from the standard installation directory to the custom installation directory.
- On the Windows host, from the standard installation directory, open the user_id directory:
-
C:\ProgramData\Cisco\Cisco IronPort Email Security Plug-In\<user_id>
- Copy the existing config_1.xml and CommonComponentsConfig.xml files to the custom installation directory, into the 'Common' directory.
- From the custom installation directory, in the 'Common' directory that is being constructed for custom installation, delete the used_configs.bin and cachedFolders.xml files, if present.
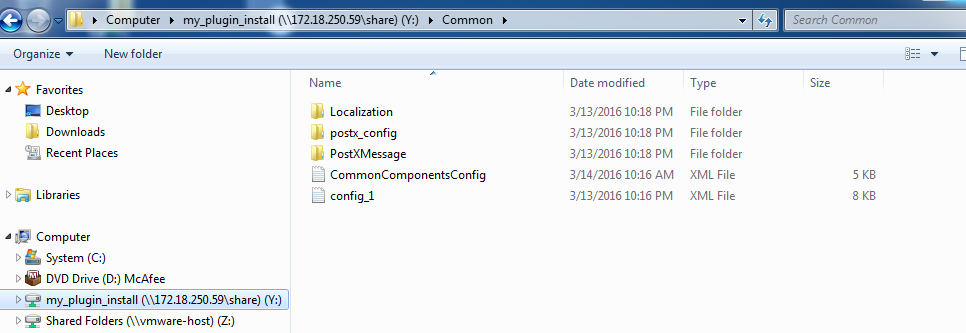
At this point, the custom installation directory structure should be similar to the following:

Edit the CommonComponentsConfig.xml
Edit the CommonComponentsConfig.xml file to to be user agnostic, allowing any user to load the configuration to their Outlook profile.
- Using a text editor, from the custom installation directory, in the 'Common' directory that is being constructed for custom installation, modify the CommonComponentsConfig.xml file.
- Find the accountFileNames tag:
-
<accountFileNames>
 <accountFileName filePath="config_1.xml" emailAddressAndKeyServer="user@domain.com res.cisco.com" defaultReportAccount="true" defaultEncryptAccount="true" profileName="[Cisco Enterprise Exchange]" />
</accountFileNames>
- Edit the accountFileNames section, removing the pre-exisiting emailAddress and profileName entries:
-
<accountFileNames>
 <accountFileName filePath="config_1.xml" emailAddressAndKeyServer="*" defaultReportAccount="true" defaultEncryptAccount="true" />
</accountFileNames>
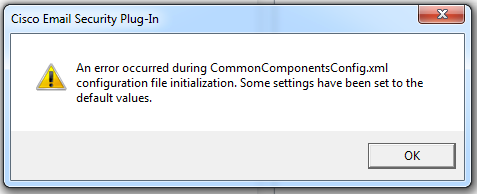
Note: Assure that the accountFileName syntax is properly formatted. If the accountFileName configuration line is incorrect, Outlook will set the plug-in to default values and will also mark the plug-in as Inactive for Outlook Add-ins:

Deploy the Custom Configuration Files
Un-install the standard installation of the plug-in that was performed from the beginning of this article. This can be done via normal un-install from Windows: Control Panel > Programs and Features > Cisco Email Security Plug-In, and selecting Uninstall/Change. Complete the steps as prompted.
At this point the custom configuration files are ready to install. From the Windows CLI, run the following syntax to install:
Cisco Email Security Plugin.exe /exenoui /qn UseCustomConfig="\\{SHARED_DIR}\{CONFIG_FOLDER}
Where the directory after the "=" specifies the directory to the customized configuration files.
Other switch parameters used during the .exe installation:
| Switch |
Description |
| /exenoui |
Launches the EXE setup without UI |
| /qn |
q , qn - No UI |
Continuing with the example constructed above, using the following:
C:>CiscoEmailSecurity-7-5-2-009.exe /exenoui /qn UseCustomConfig="\\172.18.250.59\share\my_plugin_install"
The installation usually takes ~30 seconds to complete. Once the install has finished, after opening Outlook, final product installation in the Outlook ribbon bar would be similar to:

From New E-mail, the Encryption option should be highlighted and ready for use:

The encryption option will be set based on the original BCE XML configuration:
 <!--
 Plugin related configuration. Valid type edition values are:
 decrypt - Plugin can only decrypt PXE envelopes.
 flag - Plugin can decrypt and flag a message for encryption.
 encrypt - Plugin can decrypt and encrypt a message on the device.
 -->
 <plugin edition="flag">
Troubleshooting


 Feedback