ASA 8.x Import RDP Plug-in for use with WebVPN Configuration Example
Available Languages
Contents
Introduction
This document describes how to import the Remote Desktop Protocol (RDP) plug-in for use with WebVPN.
Prerequisites
Requirements
Configure basic WebVPN before you attempt the procedures described in this document.
Components Used
This document uses an ASA 5510 that runs software version 8.0(2) and ASDM version 6.0(2). A Windows 2003 server is used to connect to the RDP plug-in via WebVPN. The client desktop has JRE 1.4.2_05-b04 installed. A TFTP server is used to import the plug-in through the command line.
The information in this document was created from the devices in a specific lab environment. All of the devices used in this document started with a cleared (default) configuration. If your network is live, make sure that you understand the potential impact of any command.
Conventions
Refer to the Cisco Technical Tips Conventions for more information on document conventions.
Configure
In order to import and use the RDP plug-in, complete these steps:
Step 1. Obtain the RDP Java Plug-in
You can download the RDP plug-in, along with other WebVPN compatible plug-ins, from the Cisco Software Center. For more information about the RDP plug-in, refer to this URL: http://properjavardp.sourceforge.net/ ![]()
Note: The RDP plug-in provided on the Cisco website is optimized for JRE 1.4. You might experience usability problems if you use the RDP plug-in with other JRE releases. To resolve issues with the RDP plug-in, use the ssl server-version any command instead of the ssl server-version tlsv1-only command, which is used by default.
Step 2. Import the RDP Plug-in
In order to use the RDP plug-in with WebVPN, you must import the plug-in to the ASA.
ASDM Example
-
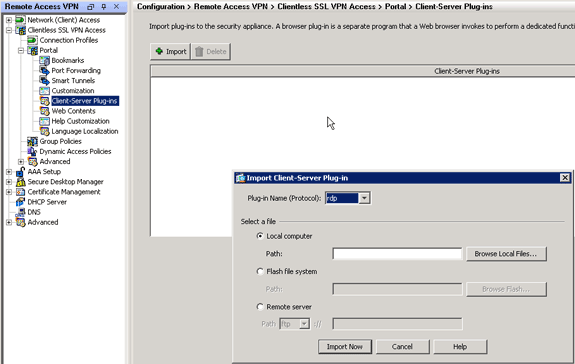
In the ASDM application, click Configuration, and then click Remote Access VPN.
-
Expand Clientless SSL VPN Access, expand Portal, and then choose Client-Server Plug-ins.
-
Click Import.

-
Select rdp from the Plug-in Name (Protocol) drop-down list.
-
Click the Local computer radio button, and click Browse Local Files.
-
Browse to the location in which you saved the RDP plug-in, and select the file.
-
Click Import Now.
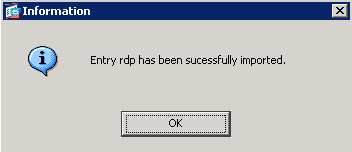
This Information dialog box appears.

-
Click OK.
Command-Line Example
This command-line example uses TFTP in order to import the WebVPN plug-in.
| ciscoasa |
|---|
ciscoasa#import webvpn plug-in protocol rdp tftp://192.168.50.5/rdp-plugin.jar !--- Use the import webvpn plug-in protocol command in order to import WebVPN !--- plug-ins. This example uses tftp in order to import the RDP plug-in. !!!!!!!!!!!!!!!!!!!!!!!!!!!!!!!!!!!!!!!!!!!!!!!!!!!!!!!!!!!!!!!!!!!!!!!!!!!! !!!!!!!!!!!!!!!!!!!!!!!!!!!!!!!!!!!!!!!!!!!!!!!!!!!!!!!!!!!!!!!!!!!!!!!!!!!! !!!!!!!!!!!!!!!!!!!!!!!!!!!!!!!!!!!!!!!!!!!!!!!!!!!!!!!!!!!!!!!!!!!!!!!!!!!! !!!!!!!!!!!!!!!!!!!!!!!!!!!!!!!!!!!!!!!!!!!!!!!!!!!!!!!!!!!!!!!!!!!!!!!!!!!! !!!!!!!!!!!!!!!!!!!!!!!!!!!!!!! ciscoasa# |
Step 3. Define RDP Connection Parameters (Optional)
When you connect with the RDP plugin, you can define connection parameters within the URL.
In order to define RDP connection parameters within the URL, complete these steps:
-
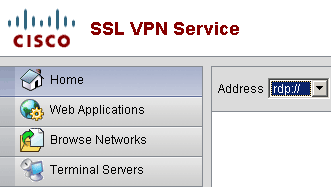
Within the VPN Service browser, select rdp:// from the Address drop-down list within your browser.

-
Insert a forward slash (/) and question mark (?) after the host name or IP address, and separate individual parameters with the ampersand symbol (&) as shown in this image:

-
Define the port parameter directly after the host name or IP address. This example uses port 5587.

For a full list of connection parameters, click Terminal Servers located on the left side of the VPN Service browser. This table lists some of the more common parameters:
| WebVPN RDP Plug-in Variables | ||
|---|---|---|
| Parameter | Argument | Definition |
| console | yes | Enters the current console session if defined. |
| username | string | User name used to log in to the RDP server. |
| password | string | Password used to log in the RDP server (not recommended). |
| domain | string | Domain name used to log in to RDP server. |
| geometry | widthxhieght | Defines the height and width of the screen (for example: 800x600 or 1024x768). |
| port | integer | RDP port number. The default RDP port number is 3389. |
Note: You can use RDP connection parameters in RDS bookmark entries as well. This image shows an example of an RDP bookmark entry:

Step 4. Connect to an RDP Server
In order to connect to an RDP server, complete these steps:
-
Establish a WebVPN session, and choose rdp:// from the Address drop-down list.

-
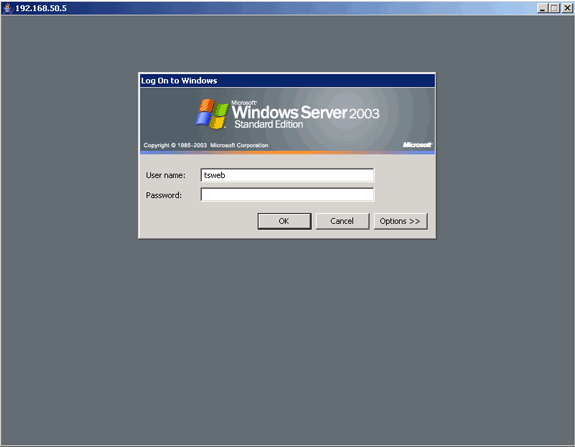
Enter the IP address of the RDP server or the connection parameters you defined in Step 3, and click Browse.
The RDP session appears in a new window.

Step 5. Verify the Configuration
Use these procedures in order to verify that the RDP plug-in was imported successfully.
-
Use the show import webvpn plug-in command in order to display the current WebVPN plug-ins, and verify rdp is listed in the ouput of the command.
-
Verify that rdp:// is available as a URI option in the Address drop-down list when you are connected to WebVPN.
Troubleshoot
Use these procedures in order to troubleshoot errors when you use the RDP plug-in:
-
Clear Browser Cache
This procedure deletes all files that are currently stored in the cache of your browser.
-
In Internet Explorer, choose Tools > Internet Options.
-
In the Temporary Internet Files section, click the General tab, and then click Delete Files.
-
-
Clear JRE Cache
This procedure deletes all files that are currently stored in the Java cache.
-
In Windows, click Start, and choose Settings > Control Panel.
-
In the Control Panel, double-click Java Plug-in.
-
Click the Cache tab, and click Clear.
-
-
Uninstall/Reinstall JRE
-
In Windows, click Start, and choose Settings > Control Panel > Add or Remove Programs.
-
Choose the Java Runtime Environment program, and click Remove.
-
Download the new JRE from the Java website (http://www.java.com/en/download/
 ), and install the new JRE.
 Note: The RDP plug-in runs best and is optimized for JRE 1.4.
-
-
Uninstall the RDP Plug-in
If the RDP option is not listed as a URI in the address field when you are logged into WebVPN, uninstall and reinstall the RDP plug-in. In order to remove the RDP plug-in from WebVPN, complete one of these procedures:
-
WebVPN—Navigate to Configuration > Remote Access VPN > Clientless SSL VPN Access > Portal > Client-Server Plug-ins, select the RDP plug-in, and click Delete.
-
CLI—Use the revert webvpn plug-in rdp command in order to remove the plug-in.
-
Related Information
Revision History
| Revision | Publish Date | Comments |
|---|---|---|
1.0 |
31-Aug-2007 |
Initial Release |
Contact Cisco
- Open a Support Case

- (Requires a Cisco Service Contract)


 Feedback