ASA 8.0: How to Change the WebVPN Logo
Available Languages
Contents
Introduction
This document illustrates how to change the logo that appears on the WebVPN login and portal pages. By using customizations that can be edited with the web-based Customization Editor, the Adaptive Security Appliance (ASA) provides a means to change nearly everything about the look and feel of the WebVPN portal.
In this document, the Adaptive Security Device Manager (ASDM) and the Customization Editor are used to upload a new logo to the ASA. Then the new logo is configured to appear before and after users log in. This configuration is performed using ASDM 6.0(2) on an ASA that runs software version 8.0(2).
This document is part of a set of documents about configuring WebVPN on the ASA.
Prerequisites
Requirements
There are no specific requirements for this document.
Components Used
The information in this document is based on ASDM 6.0(2) on an ASA that runs software version 8.0(2).
Conventions
Refer to Cisco Technical Tips Conventions for more information on document conventions.
Change the WebVPN Logo
In this section, you are presented with the information to upload a new logo and configure the ASA in order to display it on the WebVPN login and portal pages.
Upload and Configure the Logo
Complete these steps in order to upload and configure the new logo:
-
Navigate to Configuration > Remote Access VPN > Clientless SSL VPN Access > Portal > Web Contents.
-
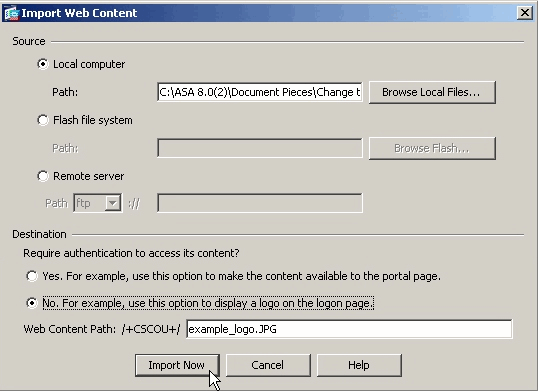
Point the ASA to your logo and click Import Now in order to upload it. Make sure you choose No under Destination if you want this logo to appear before a user logs in.
-
Once you have uploaded the logo, navigate to Configuration > Remote Access VPN > Clientless SSL VPN Access > Portal > Customization.
-
Choose a customization to edit, or create a new one.
Note: Cisco does not recommend that you make substantial changes to the Default Customization.
-
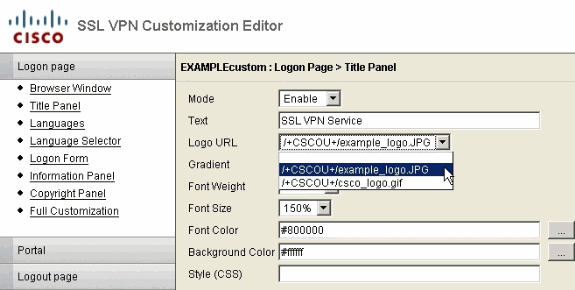
On the Editor web page that appears, navigate to Title Panel under Logon Page.
-
Select your logo in the Logo URL drop-down.
-
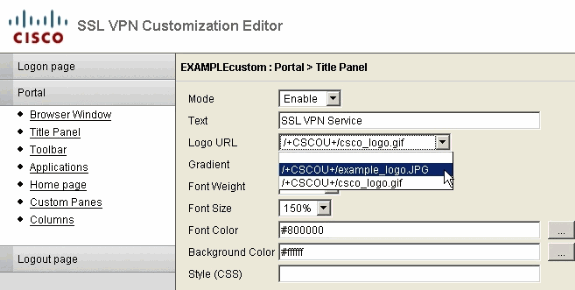
Navigate to Title Panel under Portal.
-
Select your logo in the Logo URL drop-down.
-
Click Save in the upper right and close the Editor web page.
Apply the Customization
It is important to make sure that the customization that you have configured is applied to the correct connection profile (tunnel group) in order for the logo to appear on the login and portal pages. Unless users connect to the ASA with a group-url, it is necessary to apply the customization to the DefaultWEBVPNGroup for the logo to appear before login.
This table shows where the customization should be applied for a given configuration:
| User Login Method | |||
|---|---|---|---|
| Login without Group Selection (use default) | Login with Group Selection | Group-URL | |
| Customization visible on Login Page | DefaultWEBVPNGroup | DefaultWEBVPNGroup | User's Connection Profile (tunnel group) |
| Customization visible on Portal Page | DefaultWEBVPNGroup | User's Connection Profile (tunnel group) | User's Connection Profile (tunnel group) |
Complete these steps in order to configure the customization in the connection profile (tunnel group):
-
Navigate to Configuration > Remote Access VPN > Clientless SSL VPN Access > Connection Profiles.
-
Select the DefaultWEBVPNGroup (or your desired group) and click Edit.
-
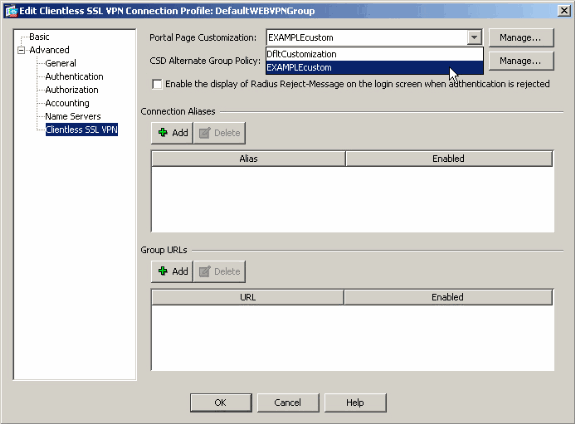
Select Advanced > Clientless SSL VPN in the left pane.
-
Verify that your customization is selected from the Portal Page Customization drop-down.
Customize the AnyConnect VPN Client Logo
You can customize certain elements, such as the corporate logo, of the AnyConnect client graphical user interface that the remote user sees when logging in. You customize the AnyConnect client user interface by replacing files that affect the interface with your own custom files. For example, with a Windows installation, you can change the company logo from the default Cisco logo by replacing the company_logo.bmp file with your own file.
Refer to Customizing the End-user Experience of the Cisco AnyConnect VPN Client Administrator Guide, Version 2.0 for more information on the configuration.
Verify
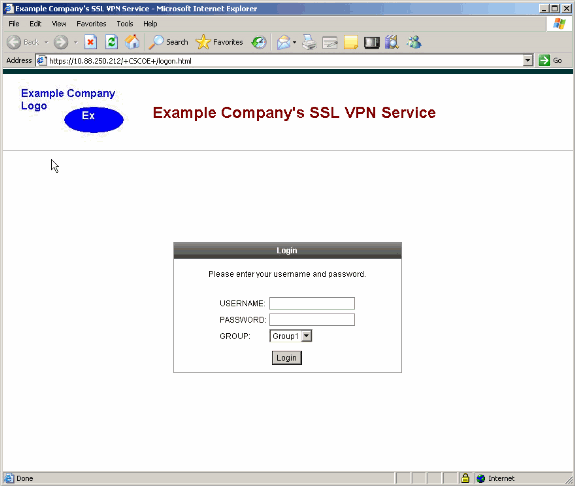
Navigate to the WebVPN login page of the ASA to verify that the logo has been changed and that the customization is properly applied.
Troubleshoot
If the logo does not appear, make sure that the customization is applied to the correct connection profile (tunnel group). See the Apply the Customization section for more information.
Related Information
Revision History
| Revision | Publish Date | Comments |
|---|---|---|
1.0 |
16-Aug-2007 |
Initial Release |
Contact Cisco
- Open a Support Case

- (Requires a Cisco Service Contract)


 Feedback