ASA 7.x Manually Install 3rd Party Vendor Certificates for use with WebVPN Configuration Example
Available Languages
Bias-Free Language
The documentation set for this product strives to use bias-free language. For the purposes of this documentation set, bias-free is defined as language that does not imply discrimination based on age, disability, gender, racial identity, ethnic identity, sexual orientation, socioeconomic status, and intersectionality. Exceptions may be present in the documentation due to language that is hardcoded in the user interfaces of the product software, language used based on RFP documentation, or language that is used by a referenced third-party product. Learn more about how Cisco is using Inclusive Language.
Contents
Introduction
This configuration example describes how to manually install a 3rd party vendor digital certificate on the ASA for use with WebVPN. A Verisign Trial Certificate is used in this example. Each step contains the ASDM application procedure and a CLI example.
Prerequisites
Requirements
This document requires that you have access to a certificate authority (CA) for certificate enrollment. Supported 3rd party CA vendors are Baltimore, Cisco, Entrust, iPlanet/Netscape, Microsoft, RSA, and VeriSign.
Components Used
This document uses an ASA 5510 that runs software version 7.2(1) and ASDM version 5.2(1). However, the procedures in this document work on any ASA appliance that runs 7.x with any compatible ASDM version.
The information in this document was created from the devices in a specific lab environment. All of the devices used in this document started with a cleared (default) configuration. If your network is live, make sure that you understand the potential impact of any command.
Conventions
Refer to the Cisco Technical Tips Conventions for more information on document conventions.
Configure
In order to install a 3rd party vendor digital certificate on the PIX/ASA, complete these steps:
Step 1. Verify that the Date, Time, and Time Zone Values are Accurate
ASDM Procedure
-
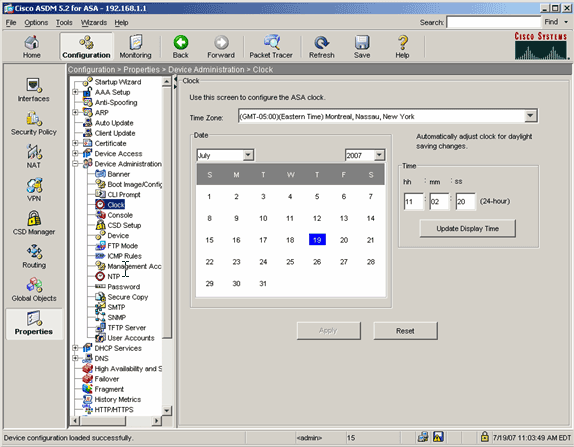
Click Configuration, and then click Properties.
-
Expand Device Administration, and choose Clock.
-
Verify that the information listed is accurate.
The values for Date, Time, and Time Zone must be accurate in order for proper certificate validation to occur.
Command Line Example
| ciscoasa |
|---|
ciscoasa#show clock 11:02:20.244 UTC Thu Jul 19 2007 ciscoasa |
Step 2. Generate the RSA Key Pair
The generated RSA public key is combined with the ASA's identity information to form a PKCS#10 certificate request. You should distinctly identify the key name with the Trustpoint for which you create the key pair.
ASDM Procedure
-
Click Configuration, and then click Properties.
-
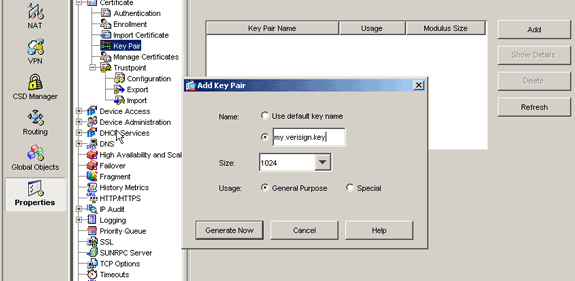
Expand Certificate, and choose Key Pair.
-
Click Add.
-
Enter the key name, choose the modulus size, and select the usage type. Note: The recommended key pair size is 1024.
-
Click Generate.
The key pair you created should be listed in the Key Pair Name column.
Command Line Example
| ciscoasa |
|---|
ciscoasa#conf t ciscoasa(config)#crypto key generate rsa label my.verisign.key modulus 1024 ! Generates 1024 bit RSA key pair. "label" defines the name of the key pair. INFO: The name for the keys will be: my.verisign.key Keypair generation process begin. Please wait... ciscoasa(config)# |
Step 3. Create the Trustpoint
Trustpoints are required to declare the Certificate Authority (CA) that your ASA will use.
ASDM Procedure
-
Click Configuration, and then click Properties.
-
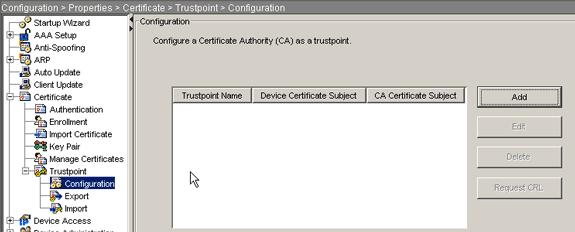
Expand Certificate, and then expand Trustpoint.
-
Choose Configuration, and click Add.
-
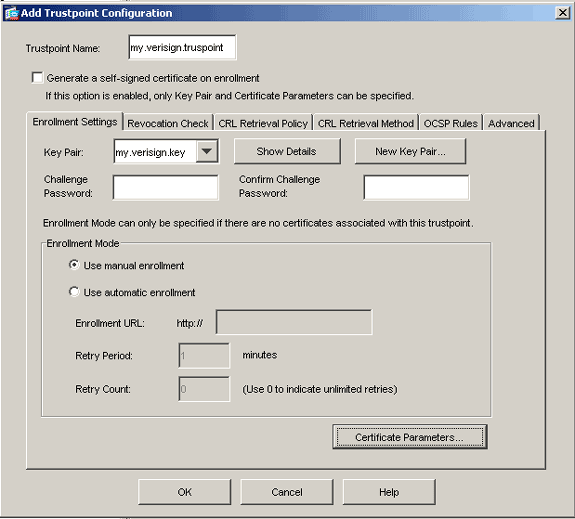
Configure these values:
-
Trustpoint Name: The trustpoint name should be relevant to the intended usage. (This example uses my.verisign.trustpoint.)
-
Key pair: Select the key pair generated in Step 2. (my.verisign.key)
-
-
Ensure Manual Enrollment is selected.
-
Click Certificate Parameters.
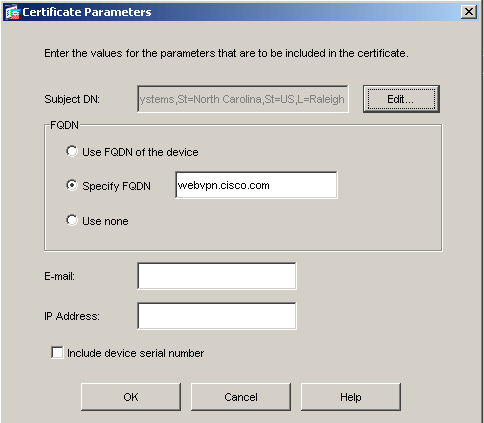
The Certificate Parameters dialog box appears.
-
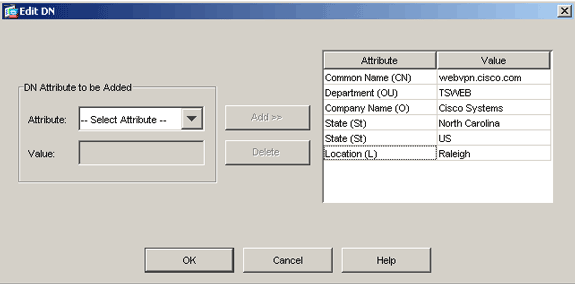
Click Edit, and configure the attributes listed in this table:
Attribute Description CN Fully qualified domain name (FQDN) that will be used for connections to your firewall (for example, webvpn.cisco.com) OU Department name O Company name (avoid special characters) C Country code (2 letter code without punctuation) St State (must be spelled out; for example, North Carolina) L City In order to configure these values, choose a value from the Attribute drop-down list, enter the value, and click Add.
-
Once the appropriate values are added, click OK.
-
In the Certificate Parameters dialog box, enter the FQDN in the Specify FQDN field.
This value should be same FQDN you used for the Common Name (CN).
-
Click OK.
-
Verify the correct key pair is selected, and click the Use manual enrollment radio button.
-
Click OK, and then click Apply.
Command Line Example
| ciscoasa |
|---|
ciscoasa(config)#crypto ca trustpoint my.verisign.trustpoint


! Creates the trustpoint.

ciscoasa(config-ca-trustpoint)#enrollment terminal


! Specifies cut and paste enrollment with this trustpoint.


ciscoasa(config-ca-trustpoint)#subject-name CN=wepvpn.cisco.com,OU=TSWEB,
                               O=Cisco Systems,C=US,St=North Carolina,L=Raleigh


! Defines x.500 distinguished name.


ciscoasa(config-ca-trustpoint)#keypair my.verisign.key


! Specifies key pair generated in Step 3.


ciscoasa(config-ca-trustpoint)#fqdn webvpn.cisco.com


! Specifies subject alternative name (DNS:).


ciscoasa(config-ca-trustpoint)#exit
|
Step 4. Generate the Certificate Enrollment
ASDM Procedure
-
Click Configuration, and then click Properties.
-
Expand Certificate, and choose Enrollment.
-
Verify the Trustpoint created in Step 3 is selected, and click Enroll.
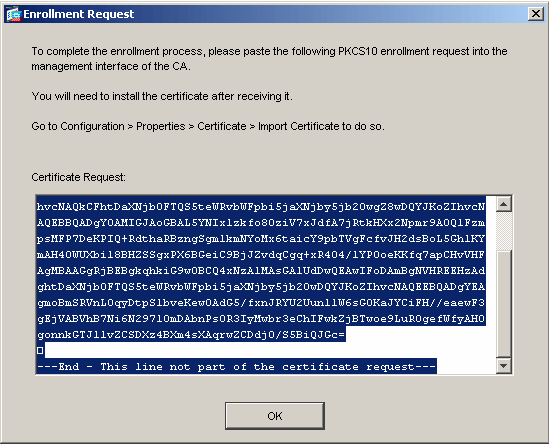
A dialog box appears that lists the certificate enrollment request (also referred to as a certificate signing request).
-
Copy the PKCS#10 enrollment request to a text file, and then submit the CSR to the appropriate 3rd party vendor.
After the 3rd party vendor receives the CSR, they should issue an identity certificate for installation.
Command Line Example
| Device Name 1 |
|---|
ciscoasa(config)#crypto ca enroll my.verisign.trustpoint
! Initiates CSR. This is the request to be
! submitted via web or email to the 3rd party vendor.
% Start certificate enrollment ..
% The subject name in the certificate will be: CN=webvpn.cisco.com,OU=TSWEB,
O=Cisco Systems,C=US,St=North Carolina,L=Raleigh
% The fully-qualified domain name in the certificate will be: webvpn.cisco.com
% Include the device serial number in the subject name? [yes/no]: no
! Do not include the device's serial number in the subject.
Display Certificate Request to terminal? [yes/no]: yes
! Displays the PKCS#10 enrollment request to the terminal.
! You will need to copy this from the terminal to a text
! file or web text field to submit to the 3rd party CA.
Certificate Request follows:
MIICHjCCAYcCAQAwgaAxEDAOBgNVBAcTB1JhbGVpZ2gxFzAVBgNVBAgTDk5vcnRo
IENhcm9saW5hMQswCQYDVQQGEwJVUzEWMBQGA1UEChMNQ2lzY28gU3lzdGVtczEO
MAwGA1UECxMFVFNXRUIxGzAZBgNVBAMTEmNpc2NvYXNhLmNpc2NvLmNvbTEhMB8G
CSqGSIb3DQEJAhYSY2lzY29hc2EuY2lzY28uY29tMIGfMA0GCSqGSIb3DQEBAQUA
A4GNADCBiQKBgQCmM/2VteHnhihS1uOj0+hWa5KmOPpI6Y/MMWmqgBaB9M4yTx5b
Fm886s8F73WsfQPynBDfBSsejDOnBpFYzKsGf7TUMQB2m2RFaqfyNxYt3oMXSNPO
m1dZ0xJVnRIp9cyQp/983pm5PfDD6/ho0nTktx0i+1cEX0luBMh7oKargwIDAQAB
oD0wOwYJKoZIhvcNAQkOMS4wLDALBgNVHQ8EBAMCBaAwHQYDVR0RBBYwFIISY2lz
Y29hc2EuY2lzY28uY29tMA0GCSqGSIb3DQEBBAUAA4GBABrxpY0q7SeOHZf3yEJq
po6wG+oZpsvpYI/HemKUlaRc783w4BMO5lulIEnHgRqAxrTbQn0B7JPIbkc2ykkm
bYvRt/wiKc8FjpvPpfOkjMK0T3t+HeQ/5QlKx2Y/vrqs+Hg5SLHpbhj/Uo13yWCe
0Bzg59cYXq/vkoqZV/tBuACr
---End - This line not part of the certificate request---
Redisplay enrollment request? [yes/no]: |
Step 5. Authenticate the Trustpoint
Once you receive the identity certificate from the 3rd party vendor, you can proceed with this step.
ASDM Procedure
-
Save the identity certificate to your local computer.
-
If you were provided a base64-encoded certificate that did not come as a file, you must copy the base64 message, and paste it into a text file.
-
Rename the file with a .cer extension.
Note: Once the file is renamed with the .cer extension, the file icon should display as a certificate.
-
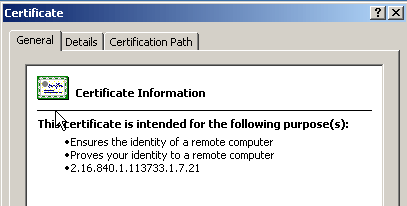
Double-click the certificate file.
The Certificate dialog box appears.
Note: If the "Windows does not have enough information to verify this certificate" message appears in the General tab, you must obtain the 3rd party vendor root CA or intermediate CA certificate before you continue with this procedure. Contact your 3rd party vendor or CA administrator in order to obtain the issuing root CA or intermediate CA certificate.
-
Click the Certificate Path tab.
-
Click the CA certificate located above your issued identity certificate, and click View Certificate.
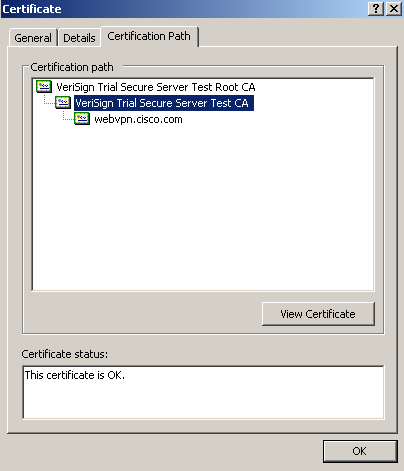
Detailed information about the intermediate CA certificate appears.
 Warning: Do not install the identity (device) certificate in this step. Only the root, subordinate root, or CA certificate are added in this step. The identity (device) certificates are installed in Step 6.
 -
Click Details.
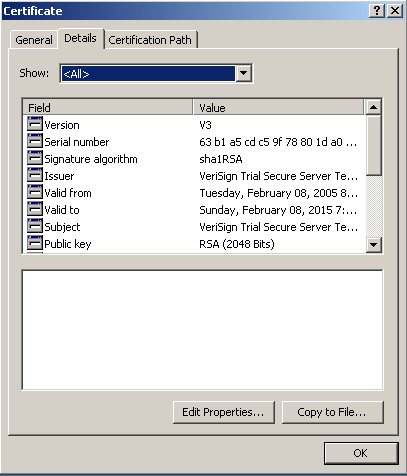
-
Click Copy to File.
-
Within the Certificate Export Wizard, click Next.
-
In the Export File Format dialog box, click the Base-64 encoded X.509 (.CER) radio button, and click Next.
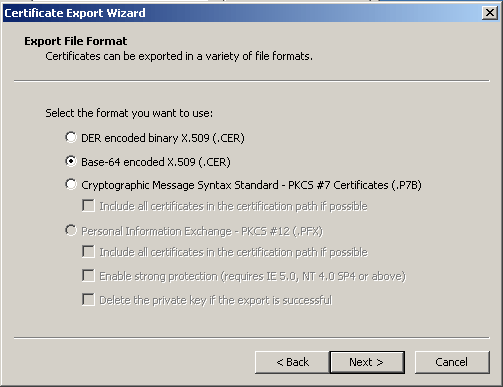
-
Enter the file name and location to which you want to save the CA certificate.
-
Click Next, and then click Finish.
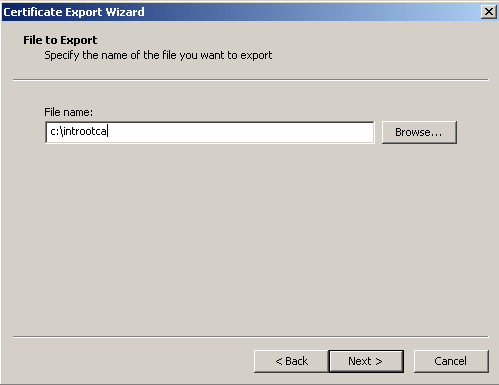
-
Click OK in the Export Successful dialog box.
-
Browse to the location where you saved the CA certificate.
-
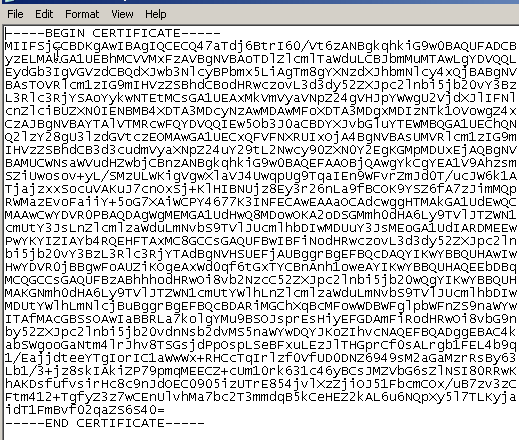
Open the file with a text editor, such as Notepad. (Right-click the file, and choose Send To > Notepad.)
The base64-encoded message should appear similar to the certificate in this image:
-
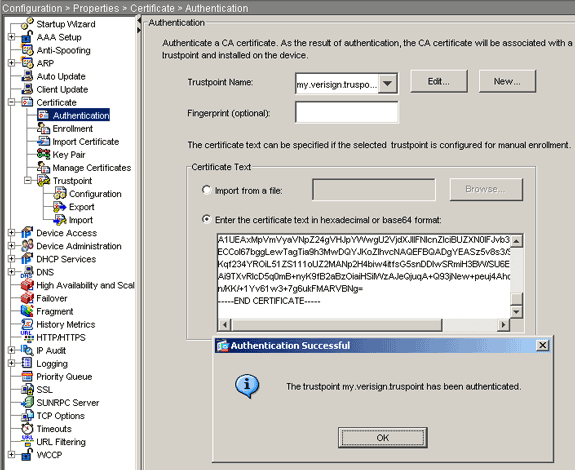
Within ASDM, click Configuration, and then click Properties.
-
Expand Certificate, and choose Authentication.
-
Click the Enter the certificate text in hexadecimal or base64 format radio button.
-
Paste the base64-formatted CA Certificate from your text editor into the text area.
-
Click Authenticate.
-
Click OK.
Command Line Example
| ciscoasa |
|---|
ciscoasa(config)#crypto ca authenticate my.verisign.trustpoint


! Initiates the prompt to paste in the base64 CA root
! or intermediate certificate.


Enter the base 64 encoded CA certificate.
End with the word "quit" on a line by itself
-----BEGIN CERTIFICATE-----
MIIEwDCCBCmgAwIBAgIQY7GlzcWfeIAdoGNs+XVGezANBgkqhkiG9w0BAQUFADCB
jDELMAkGA1UEBhMCVVMxFzAVBgNVBAoTDlZlcmlTaWduLCBJbmMuMTAwLgYDVQQL
EydGb3IgVGVzdCBQdXJwb3NlcyBPbmx5LiAgTm8gYXNzdXJhbmNlcy4xMjAwBgNV
BAMTKVZlcmlTaWduIFRyaWFsIFNlY3VyZSBTZXJ2ZXIgVGVzdCBSb290IENBMB4X
DTA1MDIwOTAwMDAwMFoXDTE1MDIwODIzNTk1OVowgcsxCzAJBgNVBAYTAlVTMRcw
FQYDVQQKEw5WZXJpU2lnbiwgSW5jLjEwMC4GA1UECxMnRm9yIFRlc3QgUHVycG9z
ZXMgT25seS4gIE5vIGFzc3VyYW5jZXMuMUIwQAYDVQQLEzlUZXJtcyBvZiB1c2Ug
YXQgaHR0cHM6Ly93d3cudmVyaXNpZ24uY29tL2Nwcy90ZXN0Y2EgKGMpMDUxLTAr
BgNVBAMTJFZlcmlTaWduIFRyaWFsIFNlY3VyZSBTZXJ2ZXIgVGVzdCBDQTCCASIw
DQYJKoZIhvcNAQEBBQADggEPADCCAQoCggEBALsXGt1M4HyjXwA+/NAuwElv6IJ/
DV8zgpvxuwdaMv6fNQBHSF4eKkFDcJLJVnP53ZiGcLAAwTC5ivGpGqE61BBD6Zqk
d85lPl/6XxK0EdmrN7qVMmvBMGRsmOjje1op5f0nKPqVoNK2qNUB6n451P4qoyqS
E0bdru16quZ+II2cGFAG1oSyRy4wvY/dpVHuZOZqYcIkK08yGotR2xA1D/OCCmZO
5RmNqLLKSVwYHhJ25EskFhgR2qCxX2EQJdnDXuTw0+4tlqj97ydk5iDoxjKfV6sb
tnp3TIY6S07bTb9gxJCk4pGbcf8DOPvOfGRu1wpfUUZC8v+WKC20+sK6QMECAwEA
AaOCAVwwggFYMBIGA1UdEwEB/wQIMAYBAf8CAQAwSwYDVR0gBEQwQjBABgpghkgB
hvhFAQcVMDIwMAYIKwYBBQUHAgEWJGh0dHBzOi8vd3d3LnZlcmlzaWduLmNvbS9j
cHMvdGVzdGNhLzAOBgNVHQ8BAf8EBAMCAQYwEQYJYIZIAYb4QgEBBAQDAgEGMB0G
A1UdDgQWBBRmIo6B4DFZ3Sp/q0bFNgIGcCeHWjCBsgYDVR0jBIGqMIGnoYGSpIGP
MIGMMQswCQYDVQQGEwJVUzEXMBUGA1UEChMOVmVyaVNpZ24sIEluYy4xMDAuBgNV
BAsTJ0ZvciBUZXN0IFB1cnBvc2VzIE9ubHkuICBObyBhc3N1cmFuY2VzLjEyMDAG
A1UEAxMpVmVyaVNpZ24gVHJpYWwgU2VjdXJlIFNlcnZlciBUZXN0IFJvb3QgQ0GC
ECCol67bggLewTagTia9h3MwDQYJKoZIhvcNAQEFBQADgYEASz5v8s3/SjzRvY2l
Kqf234YROiL51ZS111oUZ2MANp2H4biw4itfsG5snDDlwSRmiH3BW/SU6EEzD9oi
Ai9TXvRIcD5q0mB+nyK9fB2aBzOiaiHSiIWzAJeQjuqA+Q93jNew+peuj4AhdvGN
n/KK/+1Yv61w3+7g6ukFMARVBNg=
-----END CERTIFICATE-----
quit


! Manually pasted certificate into CLI.


INFO: Certificate has the following attributes:
Fingerprint:     8de989db 7fcc5e3b fdde2c42 0813ef43
Do you accept this certificate? [yes/no]: yes

Trustpoint 'my.verisign.trustpoint' is a subordinate CA
                and holds a non self-signed certificate.
Trustpoint CA certificate accepted.

% Certificate successfully imported
ciscoasa(config)# |
Step 6. Install the Certificate
ASDM Procedure
Use the identity certificate provided by the 3rd party vendor to perform these steps:
-
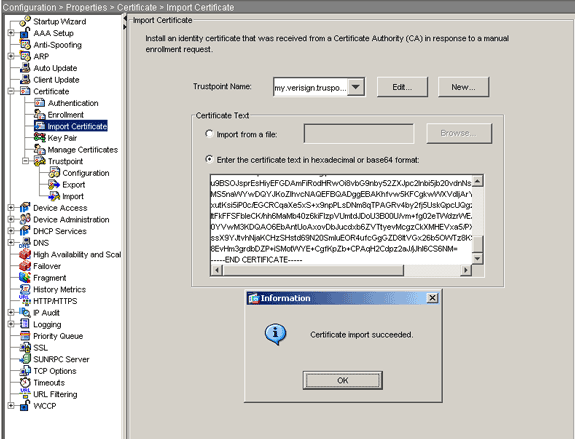
Click Configuration, and then click Properties.
-
Expand Certificate, and then choose Import Certificate.
-
Click the Enter the certificate text in hexadecimal or base64 format radio button, and paste the base64 identity certificate into the text field.
-
Click Import, and then click OK.
Command Line Example
| ciscoasa |
|---|
ciscoasa(config)#crypto ca import my.verisign.trustpoint certificate ! Initiates prompt to paste the base64 identity certificate ! provided by the 3rd party vendor. % The fully-qualified domain name in the certificate will be: webvpn.cisco.com Enter the base 64 encoded certificate. End with the word "quit" on a line by itself -----BEGIN CERTIFICATE----- MIIFZjCCBE6gAwIBAgIQMs/oXuu9K14eMGSf0mYjfTANBgkqhkiG9w0BAQUFADCB yzELMAkGA1UEBhMCVVMxFzAVBgNVBAoTDlZlcmlTaWduLCBJbmMuMTAwLgYDVQQL EydGb3IgVGVzdCBQdXJwb3NlcyBPbmx5LiAgTm8gYXNzdXJhbmNlcy4xQjBABgNV BAsTOVRlcm1zIG9mIHVzZSBhdCBodHRwczovL3d3dy52ZXJpc2lnbi5jb20vY3Bz L3Rlc3RjYSAoYykwNTEtMCsGA1UEAxMkVmVyaVNpZ24gVHJpYWwgU2VjdXJlIFNl cnZlciBUZXN0IENBMB4XDTA3MDcyNjAwMDAwMFoXDTA3MDgwOTIzNTk1OVowgbox CzAJBgNVBAYTAlVTMRcwFQYDVQQIEw5Ob3J0aCBDYXJvbGluYTEQMA4GA1UEBxQH UmFsZWlnaDEWMBQGA1UEChQNQ2lzY28gU3lzdGVtczEOMAwGA1UECxQFVFNXRUIx OjA4BgNVBAsUMVRlcm1zIG9mIHVzZSBhdCB3d3cudmVyaXNpZ24uY29tL2Nwcy90 ZXN0Y2EgKGMpMDUxHDAaBgNVBAMUE2Npc2NvYXNhMS5jaXNjby5jb20wgZ8wDQYJ KoZIhvcNAQEBBQADgY0AMIGJAoGBAL56EvorHHlsIB/VRKaRlJeJKCrQ/9kER2JQ 9UOkUP3mVPZJtYN63ZxDwACeyNb+liIdKUegJWHI0Mz3GHqcgEkKW1EcrO+6aY1R IaUE8/LiAZbA70+k/9Z/UR+v532B1nDRwbx1R9ZVhAJzA1hJTxSlEgryosBMMazg 5IcLhgSpAgMBAAGjggHXMIIB0zAJBgNVHRMEAjAAMAsGA1UdDwQEAwIFoDBDBgNV HR8EPDA6MDigNqA0hjJodHRwOi8vU1ZSU2VjdXJlLWNybC52ZXJpc2lnbi5jb20v U1ZSVHJpYWwyMDA1LmNybDBKBgNVHSAEQzBBMD8GCmCGSAGG+EUBBxUwMTAvBggr BgEFBQcCARYjaHR0cHM6Ly93d3cudmVyaXNpZ24uY29tL2Nwcy90ZXN0Y2EwHQYD VR0lBBYwFAYIKwYBBQUHAwEGCCsGAQUFBwMCMB8GA1UdIwQYMBaAFGYijoHgMVnd Kn+rRsU2AgZwJ4daMHgGCCsGAQUFBwEBBGwwajAkBggrBgEFBQcwAYYYaHR0cDov L29jc3AudmVyaXNpZ24uY29tMEIGCCsGAQUFBzAChjZodHRwOi8vU1ZSU2VjdXJl LWFpYS52ZXJpc2lnbi5jb20vU1ZSVHJpYWwyMDA1LWFpYS5jZXIwbgYIKwYBBQUH AQwEYjBgoV6gXDBaMFgwVhYJaW1hZ2UvZ2lmMCEwHzAHBgUrDgMCGgQUS2u5KJYG DLvQUjibKaxLB4shBRgwJhYkaHR0cDovL2xvZ28udmVyaXNpZ24uY29tL3ZzbG9n bzEuZ2lmMA0GCSqGSIb3DQEBBQUAA4IBAQAnym4GVThPIyL/9ylDBd8N7/yW3Ov3 bIirHfHJyfPJ1znZQXyXdObpZkuA6Jyu03V2CYNnDomn4xRXQTUDD8q86ZiKyMIj XM2VCmcHSajmMMRyjpydxfk6CIdDMtMGotCavRHD9Tl2tvwgrBock/v/54o02lkB SmLzVV7crlYJEuhgqu3Pz7qNRd8N0Un6c9sbwQ1BuM99QxzIzdAo89FSewy8MAIY rtab5F+oiTc5xGy8w7NARAfNgFXihqnLgWTtA35/oWuy86bje1IWbeyqj8ePM9Td 0LdAw6kUU1PNimPttMDhcF7cuevntROksOgQPBPx5FJSqMiUZGrvju5O -----END CERTIFICATE----- quit INFO: Certificate successfully imported ciscoasa(config)# |
Step 7. Configure WebVPN to Use the Newly Installed Certificate
ASDM Procedure
-
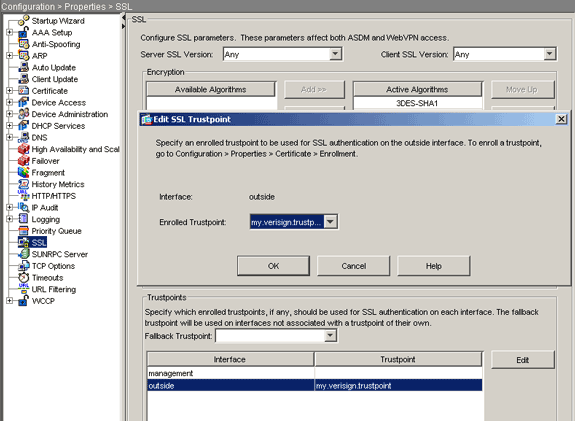
Click Configuration, click Properties, and then choose SSL.
-
In the Trustpoints area, select the interface that will be used to terminate WebVPN sessions. (This example uses the outside interface.)
-
Click Edit.
The Edit SSL Trustpoint dialog box appears.
-
From the Enrolled Trustpoint drop-down list, choose the trustpoint you created in Step 3.
-
Click OK, and then click Apply.
Your new certificate should now be utilized for all WebVPN sessions that terminate on the interface specified. See the Verify section in this document for information on how to verify a successful installation.
Command Line Example
| ciscoasa |
|---|
ciscoasa(config)#ssl trust-point my.verisign.trustpoint outside ! Specifies the trustpoint that will supply the SSL ! certificate for the defined interface. ciscoasa(config)#write memory Building configuration... Cryptochecksum: 694687a1 f75042af ccc6addf 34d2cb08 8808 bytes copied in 3.630 secs (2936 bytes/sec) [OK] ciscoasa(config)# ! Save configuration. |
Verify
This section describes how to confirm that the installation of your 3rd party vendor certificate was successful.
Replace Self-Signed Certificate from ASA
This section describes how to replace the installed self-signed certificate from the ASA.
-
Issue a certificate signing request to Verisign.
After you receive the requested certificate from Verisign, you can install it directly under the same trustpoint.
-
Type this command: crypto ca enroll Verisign
You are prompted to answer questions.
-
For Display Certificate Request to terminal, enter yes, and send the output to Verisign.
-
Once they give you the new certificate, type this command: crypto ca import Verisign certificate
View Installed Certificates
ASDM Procedure
-
Click Configuration, and click Properties.
-
Expand Certificate, and choose Manage Certificates.
The CA certificate used for Trustpoint authentication and the identity certificate that was issued by the 3rd party vendor should appear in the Manage Certificates area.

Command Line Example
| ciscoasa |
|---|
ciscoasa(config)#show crypto ca certificates


! Displays all certificates installed on the ASA.


Certificate
  Status: Available
  Certificate Serial Number: 32cfe85eebbd2b5e1e30649fd266237d
  Certificate Usage: General Purpose
  Public Key Type: RSA (1024 bits)
  Issuer Name:
    cn=VeriSign Trial Secure Server Test CA
    ou=Terms of use at https://www.verisign.com/cps/testca (c)05
    ou=For Test Purposes Only. No assurances.
    o=VeriSign\, Inc.
    c=US
  Subject Name:
    cn=webvpn.cisco.com
    ou=Terms of use at www.verisign.com/cps/testca (c)05
    ou=TSWEB
    o=Cisco Systems
    l=Raleigh
    st=North Carolina
    c=US
  OCSP AIA:
    URL: http://ocsp.verisign.com
  CRL Distribution Points:
    [1]  http://SVRSecure-crl.verisign.com/SVRTrial2005.crl
  Validity Date:
    start date: 00:00:00 UTC Jul 19 2007
    end   date: 23:59:59 UTC Aug 2 2007
  Associated Trustpoints: my.verisign.trustpoint


! Identity certificate received from 3rd party vendor displayed above.


CA Certificate
  Status: Available
  Certificate Serial Number: 63b1a5cdc59f78801da0636cf975467b
  Certificate Usage: General Purpose
  Public Key Type: RSA (2048 bits)
  Issuer Name:
    cn=VeriSign Trial Secure Server Test Root CA
    ou=For Test Purposes Only. No assurances.
    o=VeriSign\, Inc.
    c=US
  Subject Name:
    cn=VeriSign Trial Secure Server Test CA
    ou=Terms of use at https://www.verisign.com/cps/testca (c)05
    ou=For Test Purposes Only. No assurances.
    o=VeriSign\, Inc.
    c=US
  Validity Date:
    start date: 00:00:00 UTC Feb 9 2005
    end   date: 23:59:59 UTC Feb 8 2015
  Associated Trustpoints: my.verisign.trustpoint


! CA intermediate certificate displayed above.
|
Verify Installed Certificate for WebVPN with a Web Browser
In order to verify that WebVPN uses the new certificate, complete these steps:
-
Connect to your WebVPN interface through a web browser. Use https:// along with the FQDN you used to request the certificate (for example, https://webvpn.cisco.com).
If you receive one of these security alerts, perform the procedure that corresponds to that alert:
-
The Name of the Security Certificate Is Invalid or Does Not Match the Name of the Site
Verify that you used the correct FQDN/CN in order to connect to the WebVPN interface of the ASA. You must use the FQDN/CN that you defined when you requested the identity certificate. You can use the show crypto ca certificates trustpointname command in order to verify the certificates FQDN/CN.
-
The security certificate was issued by a company you have not chosen to trust...
Complete these steps in order to install the 3rd party vendor root certificate to your web browser:
-
In the Security Alert dialog box, click View Certificate.
-
In the Certificate dialog box, click the Certificate Path tab.
-
Select the CA certificate located above your issued identity certificate, and click View Certificate.
-
Click Install Certificate.
-
In the Certificate Install Wizard dialogue box, click Next.
-
Select the Automatically select the certificate store based on the type of certificate radio button, click Next, and then click Finish.
-
Click Yes when you receive the Install the certificate confirmation prompt.
-
At the Import operation was successful prompt, click OK, and then click Yes.
-
Note: Since this example uses the Verisign Trial Certificate the Verisign Trial CA Root Certificate must be installed in order to avoid verification errors when users connect.
-
-
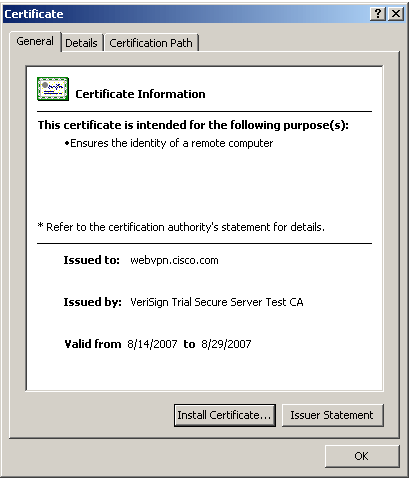
Double-click the lock icon that appears in the lower-right corner of the WebVPN login page.
The installed certificate information should appear.
-
Review the contents to verify that it matches your 3rd party vendors certificate.
Steps To Renew the SSL Certificate
Complete these steps in order to renew the SSL certificate:
-
Select the trust-point you need to renew.
-
Choose enroll.
This message appears:
If it is successfully enrolled again, the current cert will be replaced with the new ones. Do you want to continue?
-
Choose yes.
This will generate a new CSR.
-
Send the CSR to your CA and then import the new ID cert when you get it back.
-
Remove and reapply the trust-point to the outside interface.
Commands
On the ASA, you can use several show commands at the command line to verify the status of a certificate.
-
show crypto ca trustpoint— Displays configured trustpoints.
-
show crypto ca certificate—Displays all the certificates installed on the system.
-
show crypto ca crls—Displays cached certificate revocation lists (CRL).
-
show crypto key mypubkey rsa—Displays all generated crypto key pairs.
Troubleshoot
This section provides information you can use to troubleshoot your configuration.
Here are some possible errors that you might encounter:
-
% Warning: CA cert is not found. The imported certs might not be usable.INFO: Certificate successfully imported
CA certificate was not authenticated correctly. Use the show crypto ca certificate trustpointname command in order to verify that the CA certificate was installed. Look for the line that begins with CA Certificate. If the CA certificate is installed, verify that it references the correct trustpoint.
ciscoasa ciscoasa#show crypto ca certificate my.verisign.trustpoint | b CA Certificate CA Certificate Status: Available Certificate Serial Number: 63b1a5cdc59f78801da0636cf975467b Certificate Usage: General Purpose Public Key Type: RSA (2048 bits) Issuer Name: cn=VeriSign Trial Secure Server Test Root CA ou=For Test Purposes Only. No assurances. o=VeriSign\, Inc. c=US Subject Name: cn=VeriSign Trial Secure Server Test CA ou=Terms of use at https://www.verisign.com/cps/testca (c)05 ou=For Test Purposes Only. No assurances. o=VeriSign\, Inc. c=US Validity Date: start date: 19:00:00 EST Feb 8 2005 end date: 18:59:59 EST Feb 8 2015 Associated Trustpoints: my.verisign.trustpoint ciscoasa# -
ERROR: Failed to parse or verify imported certificate
This error can occur when you install the identity certificate and do not have the correct intermediate or root CA certificate authenticated with the associated trustpoint. You must remove and reauthenticate with the correct intermediate or root CA certificate. Contact your 3rd party vendor in order to verify that you received the correct CA certificate.
-
Certificate does not contain general purpose public key
This error can occur when you attempt to install your identity certificate to the wrong Trustpoint. You attempt to install an invalid identity certificate, or the key pair associated with the Trustpoint does not match the public key contained in the identity certificate. Use the show crypto ca certificates trustpointname command in order to verify you installed your identity certificate to the correct trustpoint. Look for the line stating Associated Trustpoints: If the wrong trustpoint is listed, use the procedures described in this document in order to remove and reinstall to the appropriate trustpoint, also Verify the keypair has not change since the CSR was generated.
-
Error Message: %PIX|ASA-3-717023 SSL failed to set device certificate for trustpoint [trustpoint name]
This message displays when a failure occurs when you set a device certificate for the given trustpoint in order to authenticate the SSL connection. When the SSL connection comes up, an attempt is made to set the device certificate that will be used. If a failure occurs, an error message is logged that includes the configured trustpoint that should be used to load the device certificate and the reason for the failure.
trustpoint name—Name of the trustpoint for which SSL failed to set a device certificate.
Recommended Action: Resolve the issue indicated by the reason reported for the failure.
-
Ensure that the specified trustpoint is enrolled and has a device certificate.
-
Make sure the device certificate is valid.
-
Reenroll the trustpoint, if required.
-
Related Information
Revision History
| Revision | Publish Date | Comments |
|---|---|---|
1.0 |
09-Dec-2019 |
Initial Release |
Contact Cisco
- Open a Support Case

- (Requires a Cisco Service Contract)


 Warning: Do not install the identity (device) certificate in this step. Only the root, subordinate root, or CA certificate are added in this step. The identity (device) certificates are installed in


 Feedback