Cisco Secure Desktop (CSD 3.1.x) on ASA 7.2.x for Windows Configuration Example using ASDM
Available Languages
Contents
Introduction
Cisco Secure Desktop (CSD) extends the security of SSL VPN technology. CSD provides a separate partition on a user's workstation for session activity. This vault area is encrypted during sessions and completely removed at the end of an SSL VPN session. Windows can be configured with the full security benefits of CSD. Macintosh, Linux, and Windows CE have access only to the Cache Cleaner, Web Browsing, and File Access features. CSD can be configured for Windows, Macintosh, Windows CE, and Linux devices on these platforms:
-
Cisco Adaptive Security Appliance (ASA) 5500 Series
-
Cisco routers that run Cisco IOS® Software Releases 12.4(6)T and later
-
Cisco VPN 3000 Series concentrators Version 4.7 and later
-
Cisco WebVPN Module on Catalyst 6500 and 7600 Series routers
Note: CSD Release 3.3 now lets you configure Cisco Secure Desktop to run on remote computers that run Microsoft Windows Vista. Previously, Cisco Secure Desktop was limited to computers that ran Windows XP or 2000. Refer to the New Feature Enhancement - Secure Desktop on Vista section of the Release Notes for Cisco Secure Desktop, Release 3.3, for more information.
This example primarily covers the installation and configuration of CSD on the ASA 5500 Series for Windows clients. Optional configurations for Windows CE, Mac, and Linux clients are added for completion.
CSD is used in conjunction with SSL VPN technology (Clientless SSL VPN, Thin-Client SSL VPN, or SSL VPN Client (SVC)). CSD adds value to the secure sessions of SSL VPN technology.
Prerequisites
Requirements
Ensure that you meet these requirements before you attempt this configuration:
Requirements for theASA device
-
Cisco CSD release 3.1 or later
-
Cisco ASA software Version 7.1.1 or later
-
Cisco Adaptive Security Device Manager (ASDM) release 5.1.1 or later
Note: CSD Version 3.2 supports on ASA Version 8.x only
Note: Refer to Allowing HTTPS Access for ASDM in order to allow the ASA to be configured by the ASDM.
Requirements for Client computers
-
Remote clients should have local administrative privileges; it is not required, but it is highly suggested.
-
Remote clients must have Java Runtime Environment (JRE) Version 1.4 or higher.
-
Remote client browsers: Internet Explorer 6.0, Netscape 7.1, Mozilla 1.7, Safari 1.2.2, or Firefox 1.0
-
Cookies enabled and Popups allowed on remote clients
Components Used
The information in this document is based on these software and hardware versions:
-
Cisco ASDM Version 5.2(1)
-
Cisco ASA Version 7.2(1)
-
Cisco CSD Version-securedesktop-asa-3.1.1.32-k9.pkg
The information in this document was created from the devices in a specific lab environment. All the devices used in this document began with a cleared (default) configuration. If your network is live, make sure that you understand the potential impact of any command. The IP addresses used in this configuration are RFC 1918 addresses. These IP addresses are not legal on the Internet and are to be used only in a test lab environment.
Conventions
Refer to the Cisco Technical Tips Conventions for more information on document conventions.
Background Information
CSD operates with SSL VPN technology, so the Clientless, Thin-Client, or SVC should be activated before the configuration of CSD.
Network Diagram
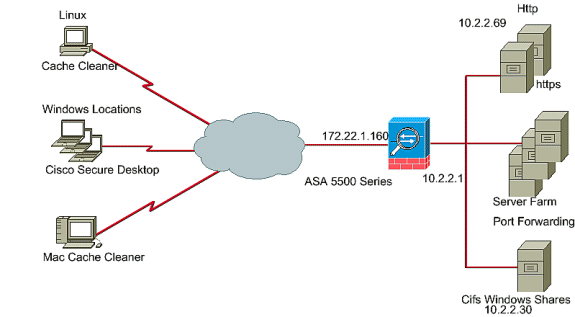
Different Windows Locations can be configured with the full security aspects of CSD. Macintosh, Linux, and Windows CE have access only to the Cache Cleaner and/or web browsing and file access.
This document uses this network setup:
Configure CSD on the ASA for Windows Clients
Configure CSD on the ASA for Windows Clients with five major steps:
-
Obtain, install, and enable the CSD software on the Cisco ASA.
-
Optional Configuration for Windows CE, Macintosh, and Linux Clients.
Obtain, Install, and Enable the CSD Software
Complete these steps to obtain, install, and enable the CSD software on the Cisco ASA.
-
Download the CSD software securedesktop-asa*.pkg and readme files onto your management station from the Cisco Software Download website.
-
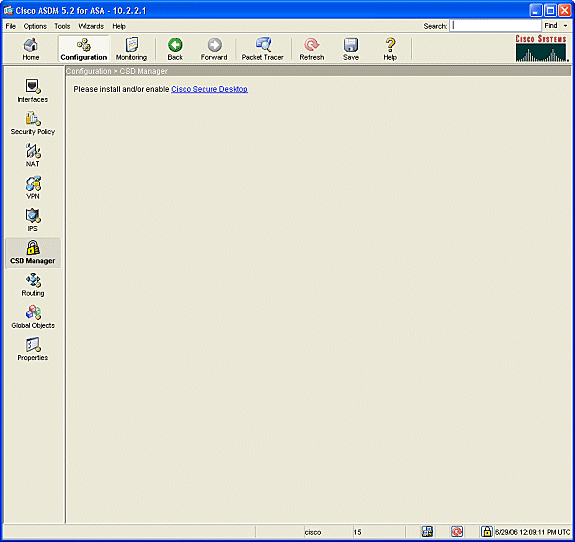
Log in to ASDM and click the Configuration button. From the left menu, click the CSD Manager button, and click the Cisco Secure Desktop link.
-
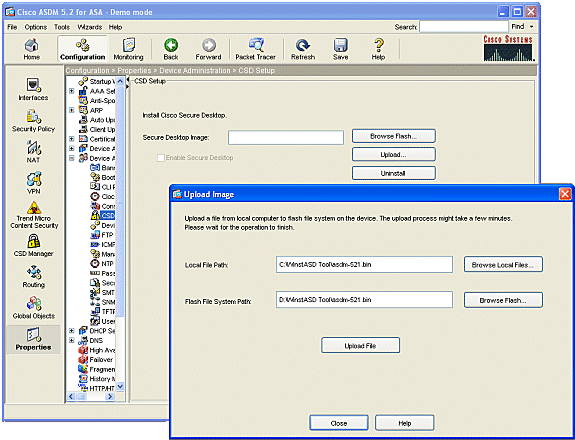
Click Upload to display the Upload Image window.
-
Either enter the path of the new .pkg file on the management station or click Browse Local Files to locate file.
-
Either enter the location on flash in which to place the file or click Browse Flash.
-
Click Upload File.
-
When prompted, click OK > Close > OK.
-
-
Once the client image is loaded to flash, check the Enable SSL VPN Client check box, and then click Apply.
-
Click Save, and then click Yes to accept the changes.
Define Windows Locations
Complete these steps to define Windows Locations.
-
Click the Configuration button.
-
From the left menu, click the CSD Manager button, and click the Cisco Secure Desktop link.
-
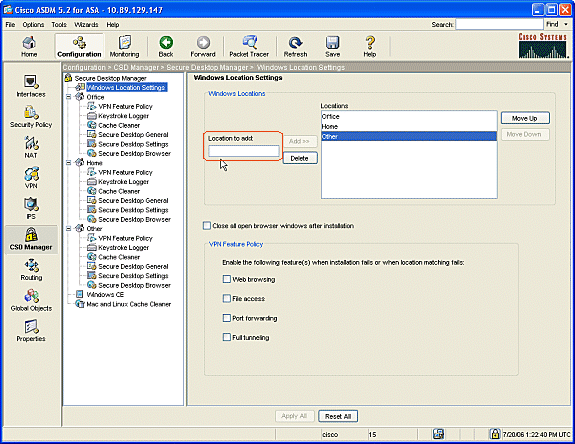
From the navigation pane, click Windows Location Settings.
-
Type a location name in the Location to Add field and click Add.
Note the three locations in this example: Office, Home, and Others.
-
Office represents workstations that are located inside the security boundary of the corporation.
-
Home represents users who work from home.
-
Other represents any location other than the two locations mentioned.
-
-
Create your own locations dependent on the layout of your network architecture for sales, guests, partners, and others.
-
As you create Windows Locations, the navigation pane expands with configurable modules for each new location. Click Apply All.
-
Click Save, and then click Yes to accept the changes.
Windows Location Identification
Complete these steps to define Windows Location Identification.
-
Identify the locations that were created in Define Windows Locations.
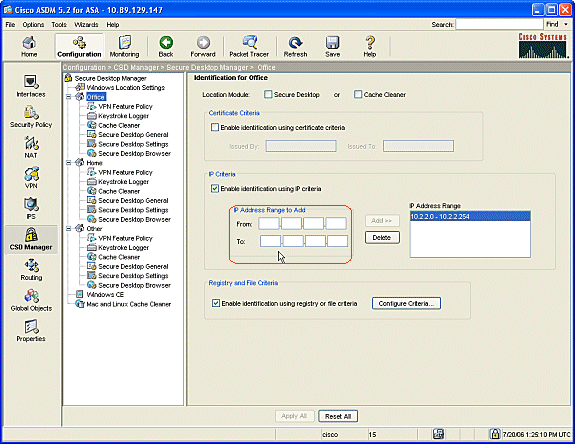
-
To identify the location Office, click Office in the navigation pane.
-
Uncheck Secure Desktop and Cache Cleaner because these are internal computers.
-
Check Enable identification using IP criteria.
-
Enter the IP address ranges of your internal computers.
-
Check Enable identification using registry or file criteria. This differentiates internal office workers from the occasional guests on the network.
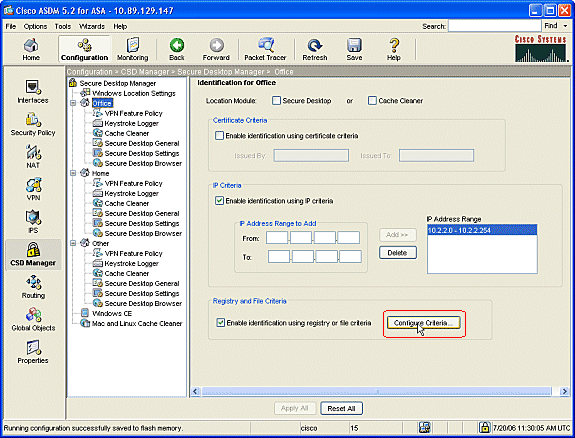
-
-
Click Configure Criteria. A simple example of a file "DoNotDelete.txt" is configured. This file must exist on your internal Windows computers and is simply a placeholder. You can also configure a Windows registry key to identify internal office computers. Click OK in the Add File Criterion window. Click OK in the Registry and File Criteria window.
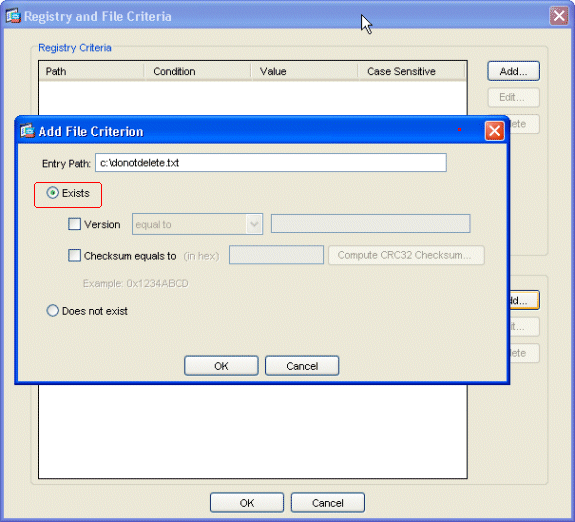
-
Click Apply All in the Identification for Office window. Click Save, and then click Yes to accept the changes.
-
To identify the location Home, click Home in the navigation pane.
-
Check Enable identification using registry or file criteria.
-
Click Configure Criteria.
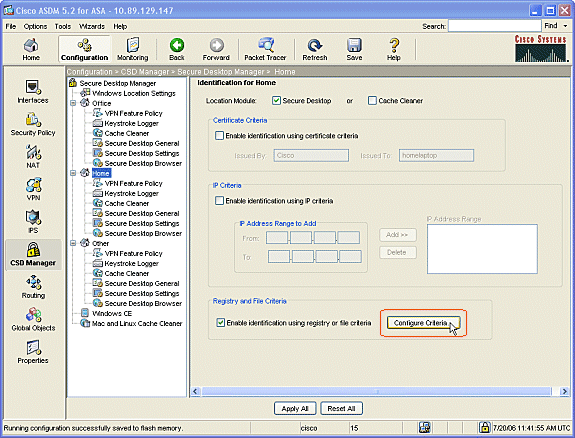
-
-
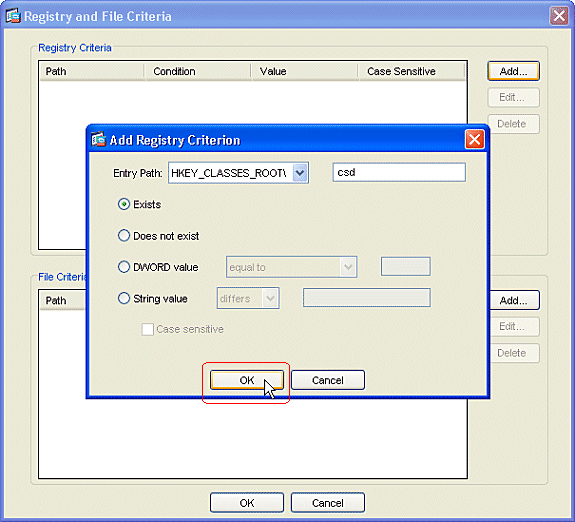
Home computer clients must have been configured with this registry key by an Administrator. Click OK in the Add Registry Criterion window. Click OK in the Registry and File Criteria window.
-
Under Location Module, check Secure Desktop. Click Apply All in the Identification for Home window. Click Save, and then click Yes to accept the changes.
-
To identify the location Other, click Other in the navigation pane.
-
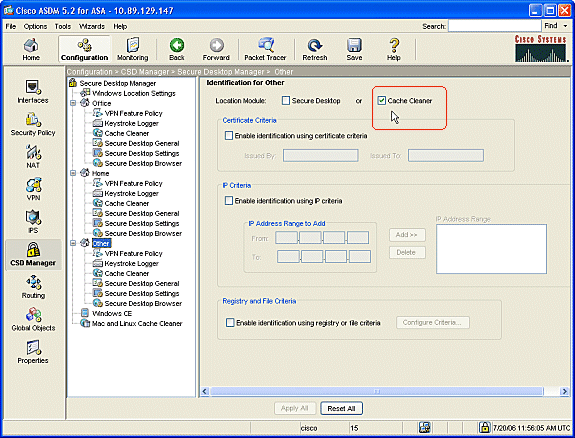
Check only the Cache Cleaner box and uncheck all other boxes.
-
Click Apply All in the Identification for Other window.
-
Click Save, and then click Yes to accept the changes.
-
Configure Windows Location Module
Complete these steps to configure the modules under each of the three locations you created.
-
For Office clients, do nothing since Secure Desktop and Cache Cleaner were not chosen in the previous steps. The ASDM application allows you to configure the Cache Cleaner even if it were not chosen in a previous step. Keep the default settings for the Office locations.
Note: The VPN Feature Policy is not discussed in this step, but it will be discussed in a subsequent step for all locations.
-
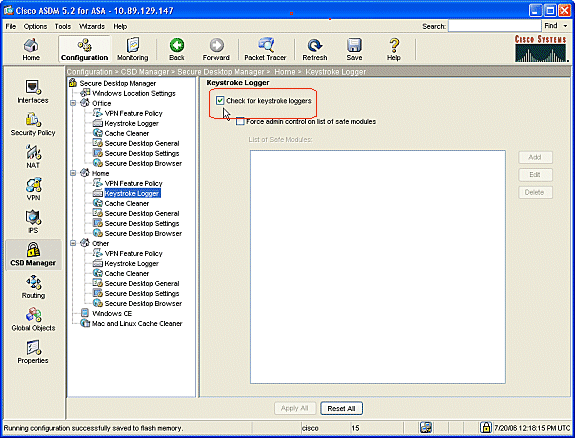
For Home clients, click Home and Keystroke Logger in the navigation pane.
-
In the Keystroke Logger window, check Check for keystroke loggers.
-
Click Apply All in the Keystroke Logger window.
-
Click Save, and then click Yes to accept the changes.
-
-
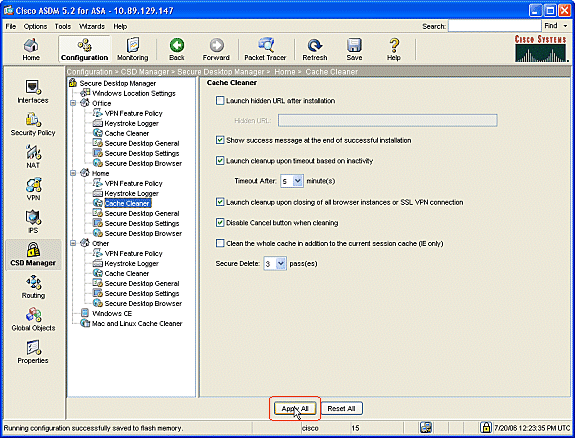
Under Home, choose Cache Cleaner and the parameters to suit your environment.
-
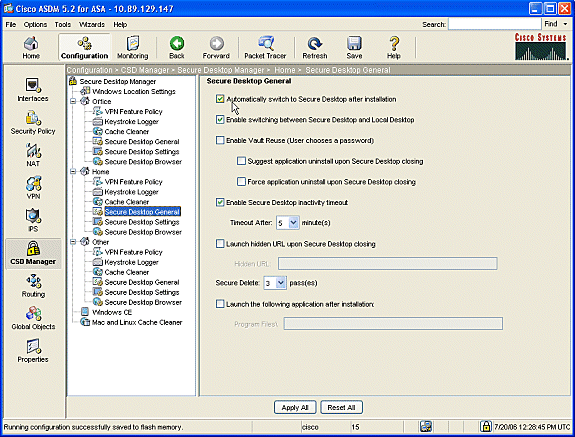
Under Home, choose Secure Desktop General and the parameters to suit your environment.
-
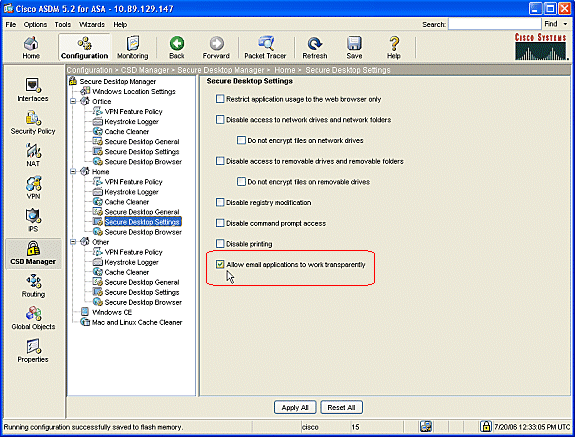
Under Home, choose Secure Desktop Settings.
-
Check Allow email applications to work transparently, and configure the other settings to suit your environment.
-
Click Apply All.
-
Click Save, and then click Yes to accept the changes.
-
Configure Windows Location Features
Configure the VPN Feature policy for each of the locations you created.
-
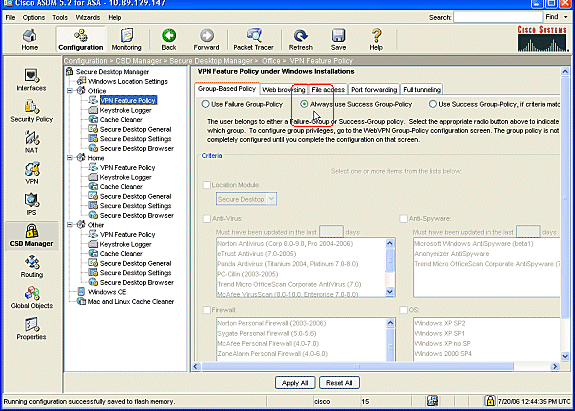
In the navigation pane, clickOffice, and then click VPN Feature Policy.
-
Click the Group-Based Policy tab.
-
Click the Always use Success Group-Policy radio button.
-
Click the Web browsing tab, and check the Always Enabled radio button.
-
Follow the same procedure for the File access, Port forwarding, and Full tunneling tabs.
-
Click Apply All.
-
Click Save, and then click Yes to accept the changes.
-
-
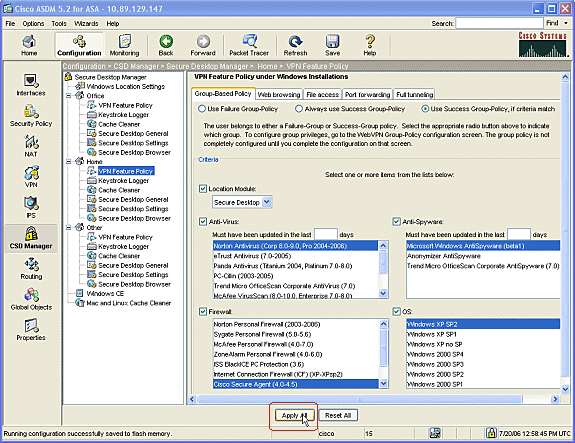
For Home users, each corporation can require specific policies before access is allowed. In the navigation pane, click Home, and click VPN Feature Policy.
-
Click the Group-Based Policy tab.
-
Click the Use Success Group-Policy radio button if preconfigured criteria match, such as a specific registry key, known file name, or digital certificate.
-
Check theLocation Module checkbox and choose Secure Desktop.
-
Choose the Anti-Virus, Anti-Spyware, Firewall, and OS areas in accordance with your company security policy. Home users will not be allowed onto the network unless their computers meet your configured criteria.
-
-
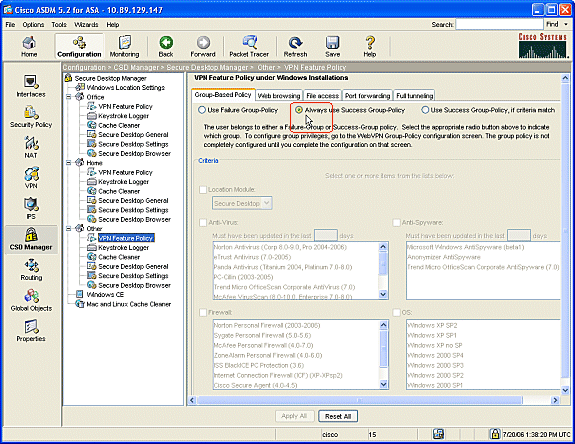
In the navigation pane, click Other and click VPN Feature Policy.
-
Click the Group-Based Policy tab.
-
Click the Always use Success Group-Policy radio button.
-
-
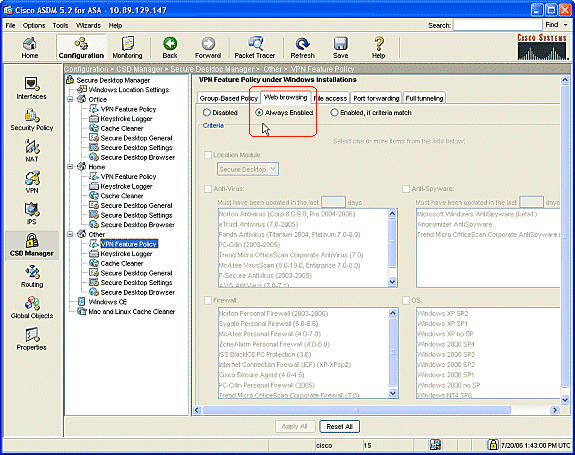
For clients in this VPN Feature Policy location, click the Web Browsing tab, and click the Always Enabled radio dial.
-
Click the File Access tab, and click the Disable radio button.
-
Repeat the step with the Port Forwarding and Full Tunneling tabs.
-
Click Apply All.
-
Click Save, and then click Yes to accept the changes.
-
Optional Configurations for Windows CE, Macintosh, and Linux Clients
These configurations are optional.
-
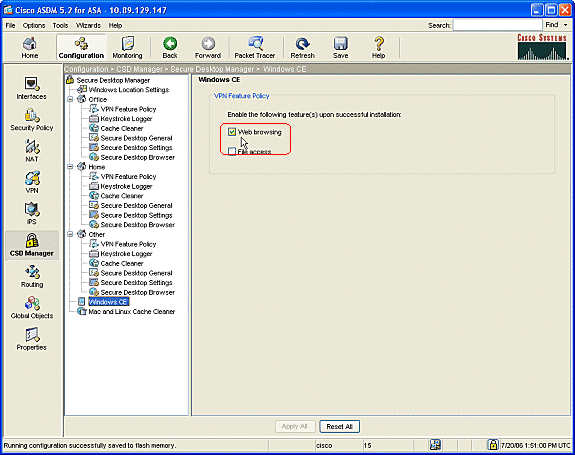
If you choose Windows CE from the navigation pane, check the Web browsing check box.
-
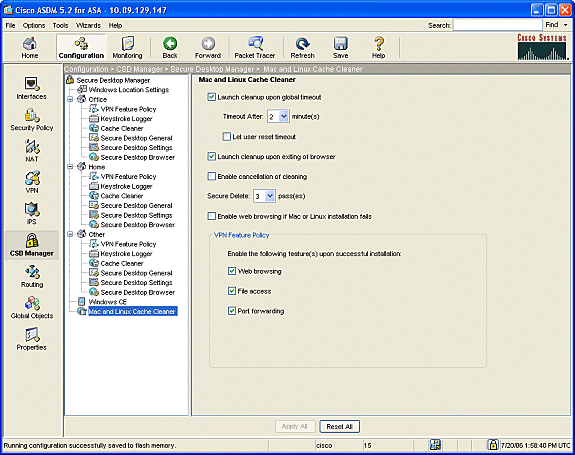
If you choose Mac and Linux Cache Cleaner from the navigation pane, check the Launch cleanup upon global timeout radio dial.
-
Change the timeout to your specification.
-
Under theVPN Feature Policy area, check the Web browsing , File access, and Port forwarding radio dials for these clients.
-
-
Whether you choose Windows CE or Mac and Linux Cache Cleaner, click Apply All.
-
Click Save, and then click Yes to accept the changes.
Configure
Configuration
This configuration reflects the changes ASDM made to enable CSD: Most of the CSD configurations are kept in a separate file on flash.
| Ciscoasa |
|---|
ciscoasa#show running-config Building configuration... ASA Version 7.2(1) ! hostname ciscoasa domain-name cisco.com enable password 2KFQnbNIdI.2KYOU encrypted names ! interface Ethernet0/0 nameif outside security-level 0 ip address 172.22.1.160 255.255.255.0 ! interface Ethernet0/1 nameif inside security-level 100 ip address 10.2.2.1 255.255.255.0 ! interface Ethernet0/2 shutdown no nameif no security-level no ip address ! interface Management0/0 shutdown no nameif no security-level no ip address management-only ! passwd 2KFQnbNIdI.2KYOU encrypted ftp mode passive dns server-group DefaultDNS domain-name cisco.com no pager logging enable logging asdm informational mtu outside 1500 mtu inside 1500 !--- ASDM location on disk0 asdm image disk0:/asdm521.bin no asdm history enable arp timeout 14400 nat-control timeout xlate 3:00:00 timeout conn 1:00:00 half-closed 0:10:00 udp 0:02:00 icmp 0:00:02 timeout sunrpc 0:10:00 h323 0:05:00 h225 1:00:00 mgcp 0:05:00 mgcp-pat 0:05:00 timeout sip 0:30:00 sip_media 0:02:00 sip-invite 0:03:00 sip-disconnect 0:02:00 timeout uauth 0:05:00 absolute !--- some group policy attributes group-policy GroupPolicy1 internal group-policy GroupPolicy1 attributes vpn-tunnel-protocol IPSec l2tp-ipsec webvpn webvpn functions url-entry file-access file-entry file-browsing username user1 password mbO2jYs13AXlIAGa encrypted privilege 15 username user1 attributes vpn-group-policy GroupPolicy1 username cisco password 3USUcOPFUiMCO4Jk encrypted privilege 15 username cisco attributes vpn-group-policy DfltGrpPolicy webvpn port-forward none port-forward-name value Application Access http server enable http 10.2.2.0 255.255.255.0 inside no snmp-server location no snmp-server contact snmp-server enable traps snmp authentication linkup linkdown coldstart !--- tunnel group information tunnel-group DefaultWEBVPNGroup general-attributes default-group-policy GroupPolicy1 tunnel-group DefaultWEBVPNGroup webvpn-attributes hic-fail-group-policy GroupPolicy1 nbns-server 10.2.2.30 timeout 2 retry 2 telnet timeout 5 ssh timeout 5 console timeout 0 ! class-map inspection_default match default-inspection-traffic ! ! policy-map type inspect dns preset_dns_map parameters message-length maximum 512 policy-map global_policy class inspection_default inspect dns preset_dns_map inspect ftp inspect h323 h225 inspect h323 ras inspect netbios inspect rsh inspect rtsp inspect skinny inspect esmtp inspect sqlnet inspect sunrpc inspect tftp inspect sip inspect xdmcp ! service-policy global_policy global !--- webvpn parameters webvpn port 1443 enable outside enable inside !--- csd location csd image disk0:/securedesktop-asa-3.1.1.32-k9.pkg csd enable customization DfltCustomization title text YOUR-COMPANY SSL VPN Services title style background-color: rgb(204,204,255);color: rgb(51,0,255); border-bottom:5px groove #669999;font-size:larger;vertical-align:middle;text-align: left;font-weight:bold url-list ServerList "Windows Shares" cifs://10.2.2.30 1 url-list ServerList "Tacacs Server" http://10.2.2.69:2002 2 tunnel-group-list enable prompt hostname context Cryptochecksum:a840d81f0af21d869db4fa559e83d6d0 : end ! end |
Verify
Use this section to confirm that your configurations for Clientless SSL VPN, Thin-Client SSL VPN, or SSL VPN Client (SVC) are operating properly.
Test CSD with a PC that has been configured with various Windows Locations. Each test should provide a different access in accordance with the policies that you have configured in the above example.
You can change the port number and the interface where the Cisco ASA listens for WebVPN connections.
-
The default port is 443. If you use the default port, the access is https://ASA IP Address.
-
The use of a different port changes the access to https://ASA IP Address:newportnumber.
Commands
Several show commands are associated with WebVPN. You can execute these commands at the command-line interface (CLI) to show statistics and other information. To see the use of show commands in detail, refer to Verifying WebVPN Configuration.
Note: The Output Interpreter Tool (registered customers only) (OIT) supports certain show commands. Use the OIT to view an analysis of show command output.
Troubleshoot
This section provides information you can use to troubleshoot your configuration.
If you have problems with the remote client, check these:
-
Are pop-ups, Java, and / or ActiveX enabled in the web browser? These may need to be enabled depending upon the type of SSL VPN connection in use.
-
The client must accept the digital certificates presented at the start of the session.
Commands
Several debug commands are associated with WebVPN. For detailed information about these commands, refer to Using WebVPN Debug Commands..
Note: The use of debug commands can adversely impact your Cisco device. Before you use debug commands, refer to Important Information on Debug Commands.
Related Information
Revision History
| Revision | Publish Date | Comments |
|---|---|---|
1.0 |
07-Jul-2006 |
Initial Release |
Contact Cisco
- Open a Support Case

- (Requires a Cisco Service Contract)


 Feedback