SSL VPN Client (SVC) on ASA with ASDM Configuration Example
Available Languages
Contents
Introduction
Secure Socket Layer (SSL) Virtual Private Network (VPN) technology allows you to connect securely from any location to an internal corporate network using one of these methods:
-
Clientless SSL VPN (WebVPN)—Provides a remote client that requires an SSL-enabled Web browser to access HTTP or HTTPS Web servers on a corporate local-area network (LAN). In addition, clientless SSL VPN provides access for Windows file browsing through the Common Internet File System (CIFS) protocol. Outlook Web Access (OWA) is an example of HTTP access.
Refer to Clientless SSL VPN (WebVPN) on ASA Configuration Example in order to learn more about the Clientless SSL VPN.
-
Thin-Client SSL VPN (Port Forwarding)—Provides a remote client that downloads a small Java-based applet and allows secure access for Transmission Control Protocol (TCP) applications that use static port numbers. Post Office Protocol (POP3), Simple Mail Transfer Protocol (SMTP), Internet Message Access Protocol (IMAP), secure shell (ssh), and Telnet are examples of secure access. Because files on the local machine change, users must have local administrative privileges to use this method. This method of SSL VPN does not work with applications that use dynamic port assignments, such as some file transfer protocol (FTP) applications.
Refer to Thin-Client SSL VPN (WebVPN) on ASA with ASDM Configuration Example in order to learn more about the Thin-Client SSL VPN.
Note: User Datagram Protocol (UDP) is not supported.
-
SSL VPN Client (Tunnel Mode)—Downloads a small client to the remote workstation and allows full secure access to resources on an internal corporate network. You can download the SSL VPN Client (SVC) to a remote workstation permanently, or you can remove the client once the secure session is closed.
This document describes how to configure the SVC on an Adaptive Security Appliance (ASA) using the Adaptive Security Device Manager (ASDM). The command lines that result from this configuration are listed in the Results section.
Prerequisites
Requirements
Before you attempt this configuration, ensure that you meet these requirements:
-
SVC starts support from Cisco Adaptive Security Appliance Software Version 7.1 and later
-
Local administrative privileges on all remote workstations
-
Java and ActiveX controls on the remote workstation
-
Port 443 is not blocked anywhere along the connection path
Components Used
The information in this document is based on these software and hardware versions:
-
Cisco Adaptive Security Appliance Software Version 7.2(1)
-
Cisco Adaptive Security Device Manager 5.2(1)
-
Cisco Adaptive Security Appliance 5510 series
-
Microsoft Windows XP Professional SP 2
The information in this document was developed in a lab environment. All devices used in this document started were reset to their default configuration. If your network is live, make sure you understand the potential impact of any command. All IP addresses used in this configuration were selected from RFC 1918 addresses in a lab environment; these IP addresses are not routable on the Internet and are for test purposes only.
Network Diagram
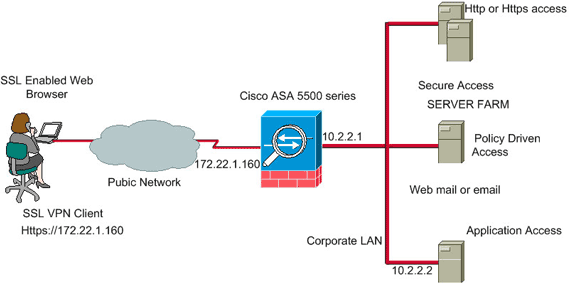
This document uses the network configuration described in this section.
A remote user connects to the IP address of the ASA with an SSL-enabled Web browser. After successful authentication, the SVC is downloaded to the client computer, and the user can use an encrypted secure session for full access to all the permitted resources on the corporate network.
Preconfiguration Tasks
Before you begin, complete these tasks:
-
Refer to Allowing HTTPS Access for ASDM in order to allow the ASA to be configured by the ASDM.
To access the ASDM application, from your management station, use an SSL-enabled Web browser and enter the IP address of the ASA device. For example: https://inside_ip_address, where inside_ip_address is the address of the ASA. Once ASDM is loaded, you can begin configuration of the SVC.
-
Download the SSL VPN Client package (sslclient-win*.pkg) from the Cisco Software Download (registered customers only) website to the local hard drive of the management station from which you access the ASDM application.
WebVPN and ASDM cannot be enabled on the same ASA interface unless you change the port numbers. If you want the two technologies to use the same port (port 443) on the same device, you can enable ASDM on the inside interface and enable WebVPN on the outside interface.
Conventions
For more information about document conventions, refer to the Cisco Technical Tips Conventions.
Configure the SSL VPN Client on an ASA
To configure the SSL VPN Client on an ASA, complete these steps:
Step 1. Enable WebVPN Access on the ASA
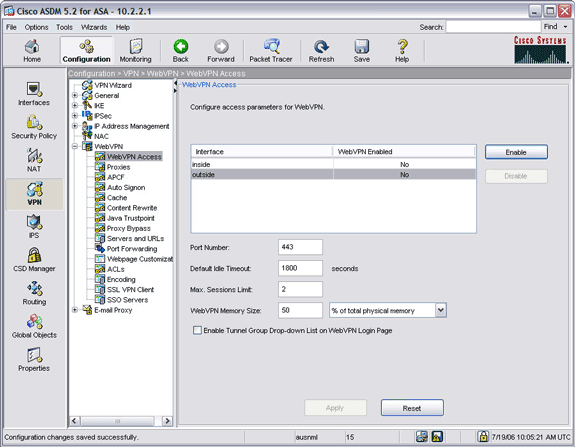
To enable WebVPN access on the ASA, complete these steps:
-
Within the ASDM application, click Configuration, and then click VPN.
-
Expand WebVPN, and choose WebVPN Access.
-
Select the interface for which you want to enable WebVPN, and click Enable.
Step 2. Install and Enable the SSL VPN Client on the ASA
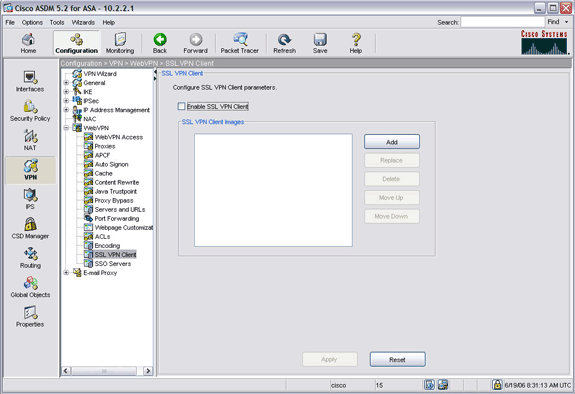
To install and enable the SSL VPN Client on the ASA, complete these steps:
-
Click Configuration, and then click VPN.
-
In the navigation pane, expand WebVPN, and choose SSL VPN Client.
-
Click Add.
The Add SSL VPN Client Image dialog box appears.

-
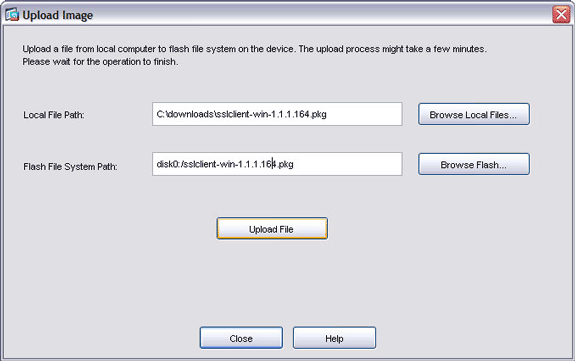
Click the Upload button.
The Upload Image dialog box appears.
-
Click the Browse Local Files button to locate a file on your local computer, or click the Browse Flash button to locate a file on the flash file system.
-
Locate the client image file to upload, and click OK.
-
Click Upload File, and then click Close.
-
Once the client image is loaded to flash, check the Enable SSL VPN Client check box, and then click Apply.
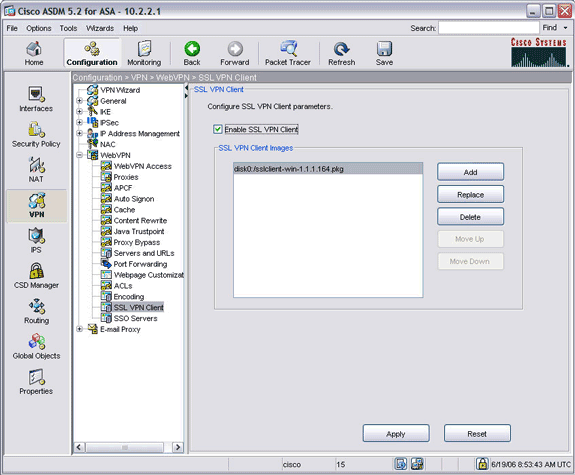
Note: If you receive an error message, verify that WebVPN access is enabled. In the navigation pane, expand WebVPN, and choose WebVPN Access. Select the interface for which you want to configure access, and click Enable.
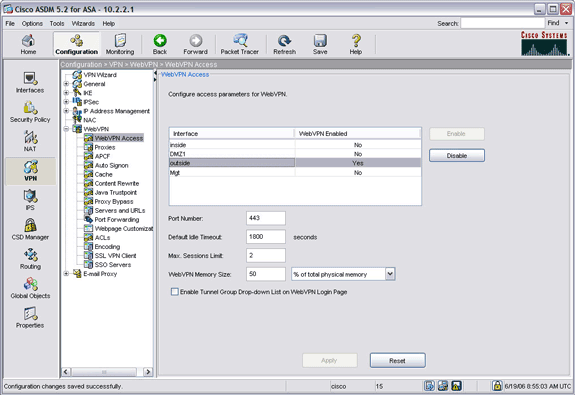
-
Click Save, and then click Yes to accept the changes.
Step 3. Enable SVC Installation on Clients
To enable SVC installation on clients, complete these steps:
-
In the navigation pane, expand IP Address Management, and choose IP Pools.
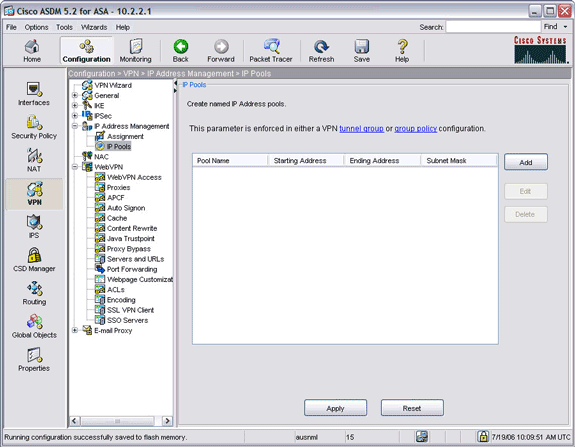
-
Click Add, enter values in the Name, Starting IP Address, Ending IP Address, and Subnet Mask fields. The IP addresses that you enter for the Starting IP Address and Ending IP Address fields must come from subnets on your internal network.
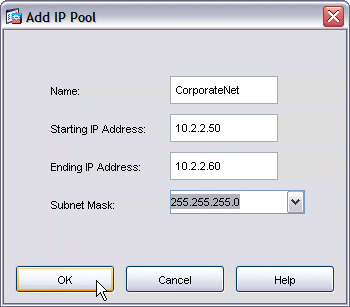
-
Click OK, and then click Apply.
-
Click Save, and then click Yes to accept the changes.
-
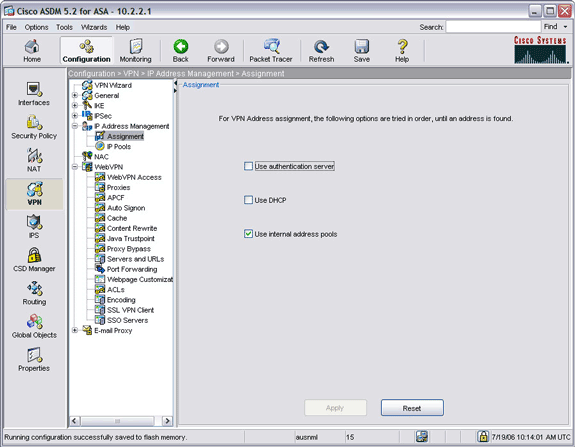
In the navigation pane, expand IP Address Management, and choose Assignment.
-
Check the Use internal address pools check box, and then uncheck the Use authentication server and Use DHCP check boxes.
-
Click Apply.
-
Click Save, and then click Yes to accept the changes.
-
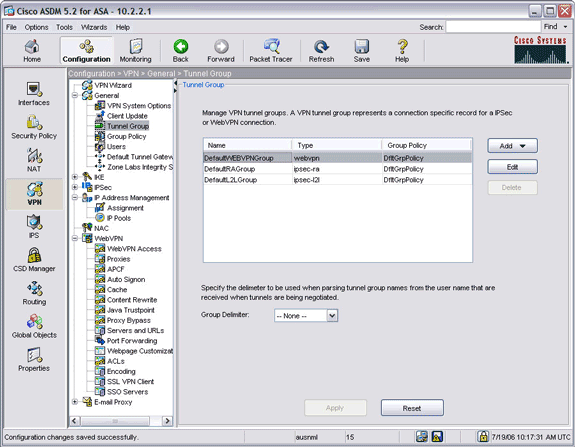
In the navigation pane, expand General, and choose Tunnel Group.
-
Select the tunnel group you want to manage, and click Edit.
-
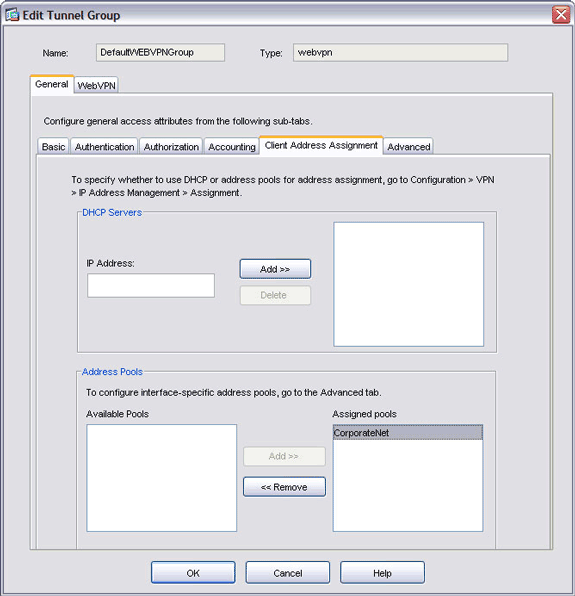
Click the Client Address Assignment tab, and select the newly created IP address pool from the Available Pools list.
-
Click Add, and then click OK.
-
In the ASDM application window, click Apply.
-
Click Save, and then click Yes to accept the changes.
Step 4. Enable Rekey Parameter
To enable rekey parameters:
-
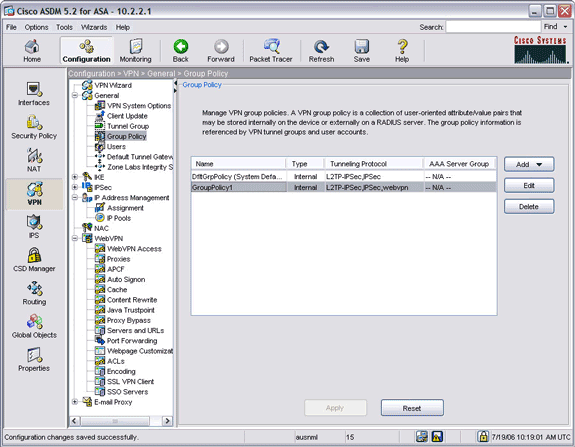
In the navigation pane, expand General, and choose Group Policy.
-
Select the policy you want to apply to this group of clients, and click Edit.
-
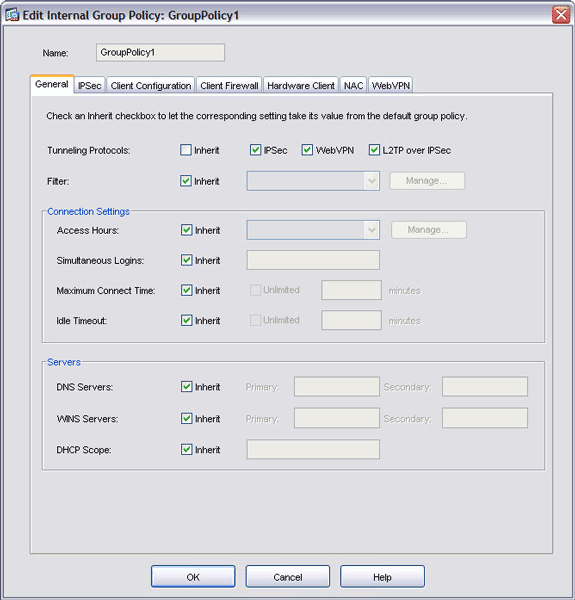
Under the General tab, uncheck the Tunneling Protocols Inherit check box, and check the WebVPN check box.
-
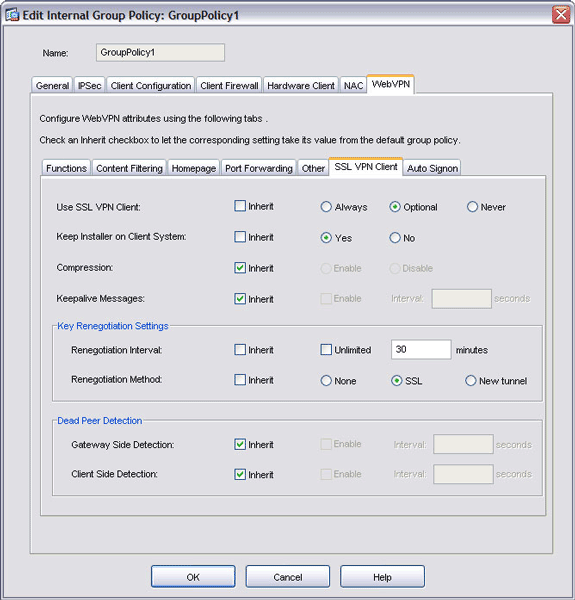
Click the WebVPN tab, click the SSLVPN Client tab, and choose these options:
-
For the Use SSL VPN Client option, uncheck the Inherit check box, and click the Optional radio button.
This choice allows the remote client to choose whether or not to download the SVC. The Always choice ensures that the SVC is downloaded to the remote workstation during each SSL VPN connection.
-
For the Keep Installer on Client System option, uncheck the Inherit check box, and click the Yes radio button.
This action allows the SVC software to remain on the client machine; therefore, the ASA is not required to download the SVC software to the client each time a connection is made. This option is a good choice for remote users who often access the corporate network.
-
For the Renegotiation Interval option, uncheck the Inherit box, uncheck the Unlimited check box, and enter the number of minutes until rekey.
Security is enhanced by setting limits on the length of time a key is valid.
-
For the Renegotiation Method option, uncheck the Inherit check box, and click the SSL radio button. Renegotiation can use the present SSL tunnel or a new tunnel created expressly for renegotiation.
Your SSL VPN Client attributes should be configured as shown in this image:
-
-
Click OK, and then click Apply.
-
Click Save, and then click Yes to accept the changes.
Results
The ASDM creates these command-line configurations:
| ciscoasa |
|---|
ciscoasa(config)#show run ASA Version 7.2(1) ! hostname ciscoasa domain-name cisco.com enable password 9jNfZuG3TC5tCVH0 encrypted names dns-guard ! interface Ethernet0/0 nameif outside security-level 0 ip address 172.22.1.160 255.255.255.0 ! interface Ethernet0/1 nameif inside security-level 100 ip address 10.2.2.1 255.255.255.0 passwd 2KFQnbNIdI.2KYOU encrypted ftp mode passive dns server-group DefaultDNS domain-name cisco.com no pager logging enable logging asdm informational mtu outside 1500 mtu inside 1500 mtu DMZ1 1500 mtu Mgt 1500 ip local pool CorporateNet 10.2.2.50-10.2.2.60 mask 255.255.255.0 icmp permit any outside asdm image disk0:/asdm521.bin no asdm history enable arp timeout 14400 global (outside) 1 interface nat (inside) 1 0 0 route outside 0.0.0.0 0.0.0.0 172.22.1.1 1 timeout xlate 3:00:00 timeout conn 1:00:00 half-closed 0:10:00 udp 0:02:00 icmp 0:00:02 timeout sunrpc 0:10:00 h323 0:05:00 h225 1:00:00 mgcp 0:05:00 mgcp-pat 0:05:00 timeout sip 0:30:00 sip_media 0:02:00 sip-invite 0:03:00 sip-disconnect 0:02:00 timeout uauth 0:05:00 absolute ! !--- Group Policy Statements group-policy GroupPolicy1 internal group-policy GroupPolicy1 attributes vpn-tunnel-protocol IPSec l2tp-ipsec webvpn !--- Enable the SVC for WebVPN webvpn svc enable svc keep-installer installed svc rekey time 30 svc rekey method ssl ! username cisco password 53QNetqK.Kqqfshe encrypted privilege 15 ! http server enable http 10.2.2.0 255.255.255.0 inside ! no snmp-server location no snmp-server contact snmp-server enable traps snmp authentication linkup linkdown coldstart !--- Tunnel Group and Group Policy using the defaults here tunnel-group DefaultWEBVPNGroup general-attributes address-pool CorporateNet default-group-policy GroupPolicy1 ! no vpn-addr-assign aaa no vpn-addr-assign dhcp ! telnet timeout 5 ssh 172.22.1.0 255.255.255.0 outside ssh timeout 5 console timeout 0 ! class-map inspection_default match default-inspection-traffic ! policy-map type inspect dns preset_dns_map parameters message-length maximum 512 policy-map global_policy class inspection_default inspect dns preset_dns_map inspect ftp inspect h323 h225 inspect h323 ras inspect rsh inspect rtsp inspect esmtp inspect sqlnet inspect skinny inspect sunrpc inspect xdmcp inspect sip inspect netbios inspect tftp ! service-policy global_policy global !--- Enable webvpn and the select the SVC client webvpn enable outside svc image disk0:/sslclient-win-1.1.1.164.pkg 1 svc enable !--- Provide list for access to resources url-list ServerList "E-Commerce Server1" http://10.2.2.2 1 url-list ServerList "BrowseServer" cifs://10.2.2.2 2 tunnel-group-list enable prompt hostname context Cryptochecksum:80a1890a95580dca11e3aee200173f5f : end |
Customize Your Configuration
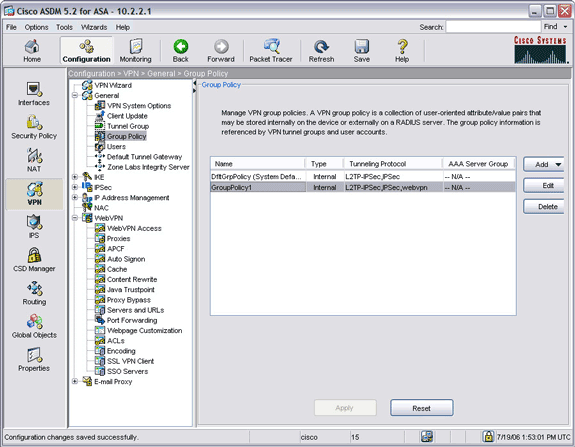
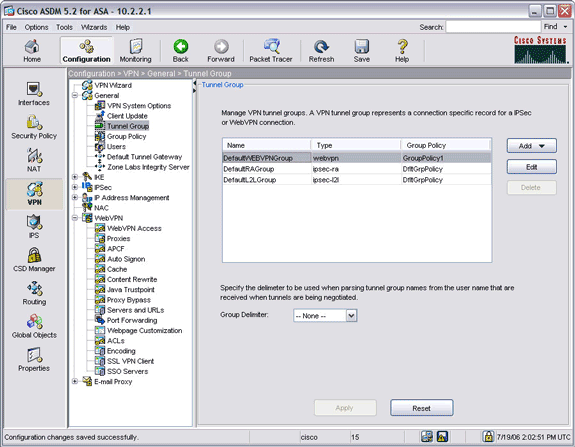
The procedures described in Configure the SSL VPN Client on an ASA use the ASA default names for group policy (GroupPolicy1) and tunnel group (DefaultWebVPNGroup) as shown in this image:
This procedure describes how to create your own custom group policies and tunnel groups and link them together in accordance with the security policies of your organization.
To customize your configuration, complete these steps:
Step 1. Create a Custom Group Policy
To create a custom group policy, complete these steps:
-
Click Configuration, and then click VPN.
-
Expand General, and choose Group Policy.
-
Click Add, and choose Internal Group Policy.
-
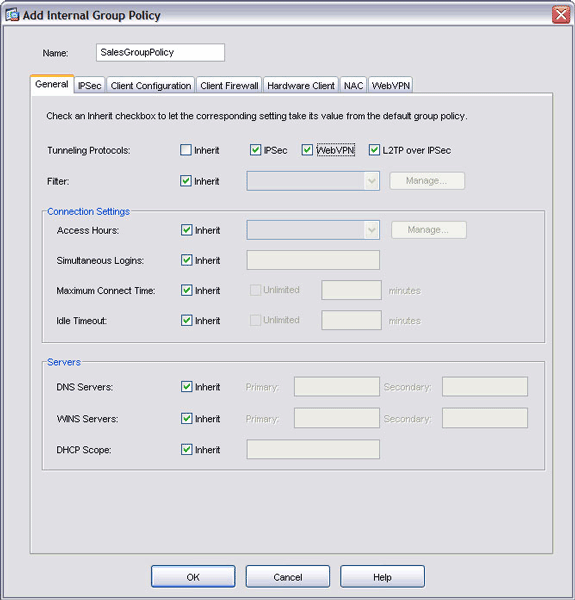
In the Name field, enter a name for your group policy.
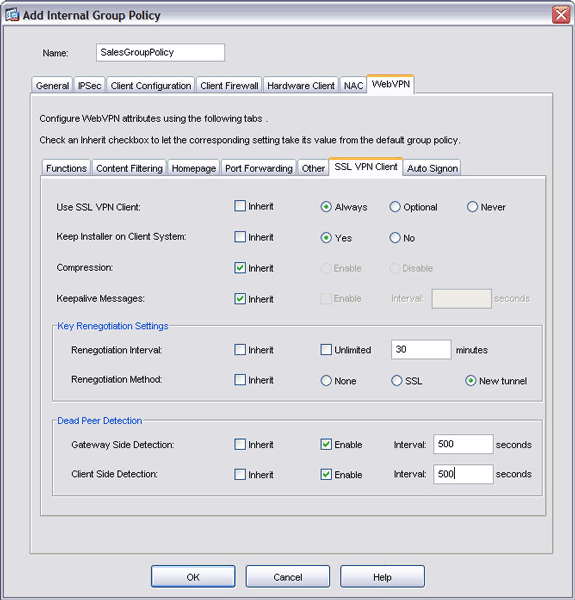
In this example, the group policy name has been changed to SalesGroupPolicy.
-
Under the General tab, uncheck the Tunneling Protocols Inherit check box, and check the WebVPN check box.
-
Click the WebVPN tab, and then click the SSLVPN Client tab.
In this dialog box, you can also make choices for the behavior of the SSL VPN Client.
-
Click OK, and then click Apply.
-
Click Save, and then click Yes to accept the changes.
Step 2. Create a Custom Tunnel Group
To create a custom tunnel group, complete these steps:
-
Click the Configuration button, and then click VPN.
-
Expand General, and choose Tunnel Group.
-
Click Add, and choose WebVPN Access.
-
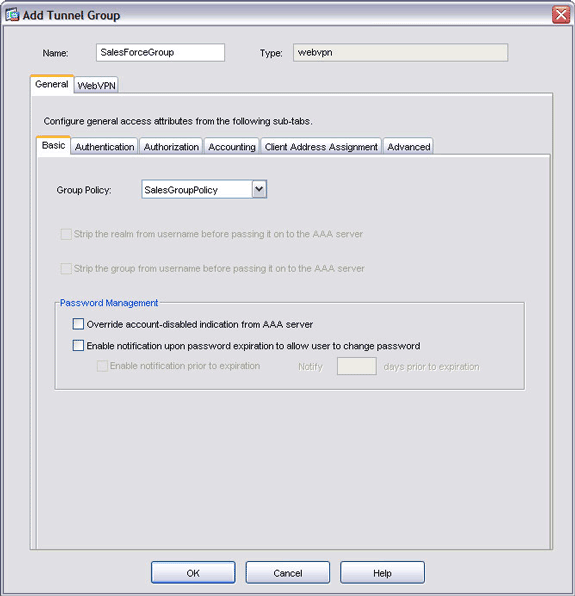
In the Name field, enter a name for your tunnel group.
In this example, the tunnel group name has been changed to SalesForceGroup.
-
Click the Group Policy drop-down arrow, and choose your newly created group policy.
Your group policy and tunnel group are now linked.
-
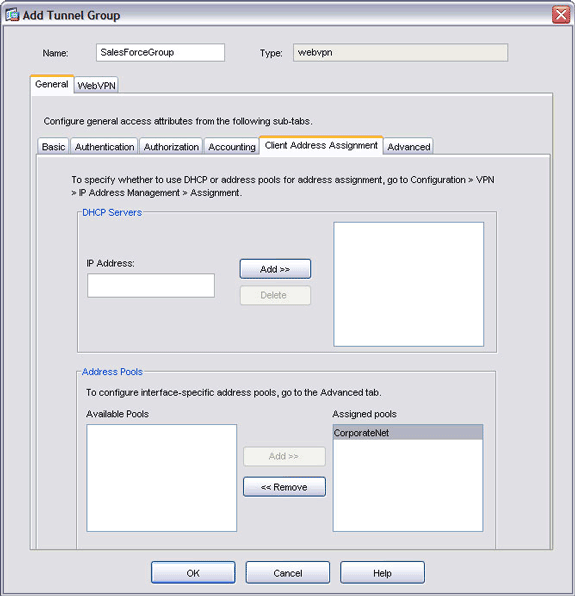
Click the Client Address Assignment tab, and enter DHCP Server information or select from a locally created IP pool.
-
Click OK, and then click Apply.
-
Click Save, and then click Yes to accept the changes.
Step 3. Create a User and Add That User to Your Custom Group Policy
To create a user and add that user to your custom group policy, complete these steps:
-
Click Configuration, and then click VPN.
-
Expand General, and choose Users.
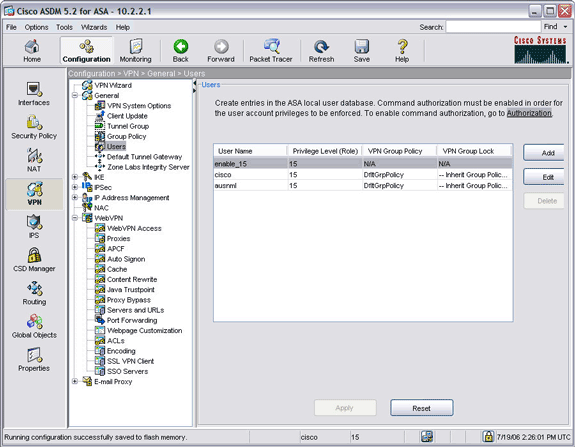
-
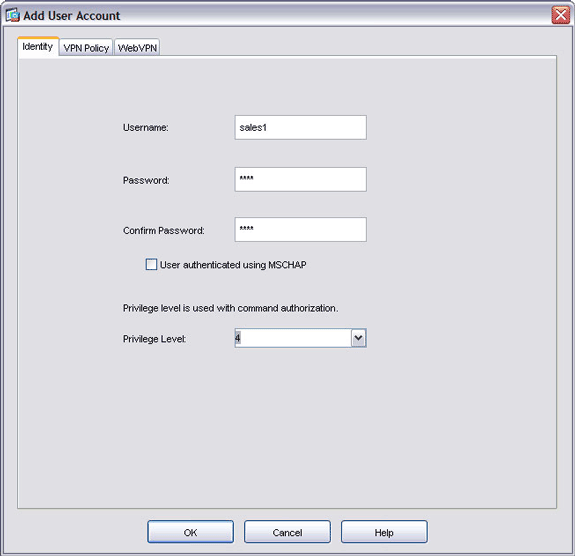
Click Add, and enter user name and password information.
-
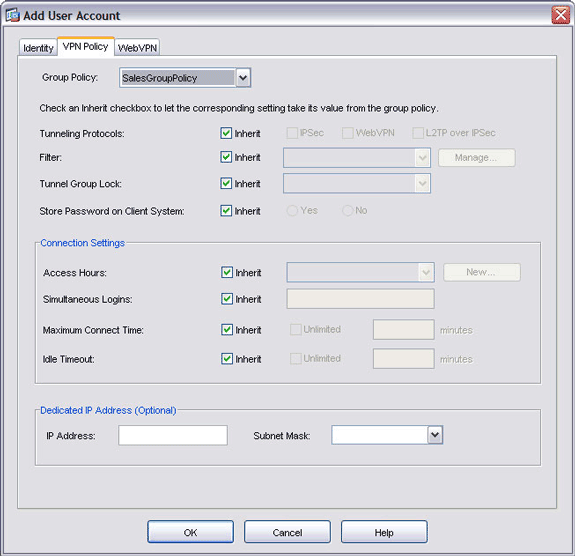
Click the VPN Policy tab. Ensure that your newly created group policy displays in the Group Policy field.
This user inherits all the characteristics of the new group policy.
-
Click OK, and then click Apply.
-
Click Save, and then click Yes to accept the changes.
Verify
Use this section to confirm that your configuration works properly.
Authentication
Authentication for SSL VPN clients is accomplished using one of these methods:
-
Cisco Secure ACS Server (Radius)
-
NT Domain
-
Active Directory
-
One-Time Passwords
-
Digital Certificates
-
Smartcards
-
Local AAA Authentication
This documentation uses a local account created on the ASA device.
Note: If an Adaptive Security Appliance has multiple trustpoints that share the same CA, only one of these trustpoints that share the CA can be used to validate user certificates.
Configuration
To connect to the ASA with a remote client, enter https://ASA_outside_address into the address field of an SSL-enabled Web browser. ASA_outside_address is the outside IP address of your ASA. If your configuration is successful, the Cisco Systems SSL VPN Client window appears.
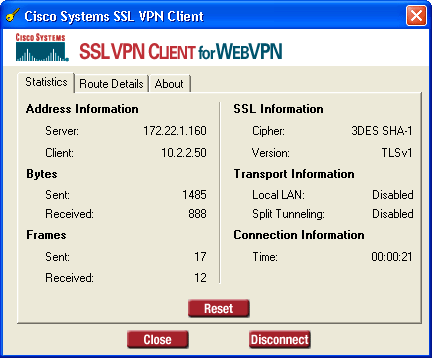
Note: The Cisco Systems SSL VPN Client window appears only after you accept the certificate from the ASA and after the SSL VPN Client is downloaded to the remote station. If the window does not appear, make sure it is not minimized.
Commands
Several show commands are associated with WebVPN. You can execute these commands at the command-line interface (CLI) to show statistics and other information. For detailed information about show commands, refer to Verifying WebVPN Configurations.
Note: The Output Interpreter Tool (registered customers only) (OIT) supports certain show commands. Use the OIT to view an analysis of show command output.
Troubleshoot
Use this section to troubleshoot your configuration.
SVC Error
Problem
You might receive this error message during the authentication:
"The SSl VPN connection to the remote peer was disrupted
and could not be automatically re-estabilished. A new connection requires
re-authentication and must be restarted manually. Close all sensitive networked
applications."
Solution
If a firewall service is running on your PC, it can disrupt the authentication. Stop the service and reconnect the client.
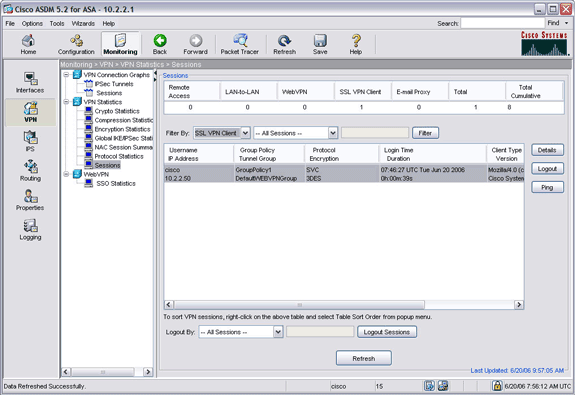
Has the SVC established a secure session with the ASA?
To ensure the SSL VPN Client has established a secure session with the ASA:
-
Click Monitoring.
-
Expand VPN Statistics, and choose Sessions.
-
From the Filter By drop-down menu, choose SSL VPN Client, and click the Filter button.
Your configuration should appear in the sessions list.
Are secure sessions being established and terminated successfully?
You can view the real-time logs to ensure sessions are being established and terminated successfully. To view session logs:
-
Click Monitoring, and then click Logging.
-
Choose the Real-time Log Viewer or Log Buffer, and then click View.
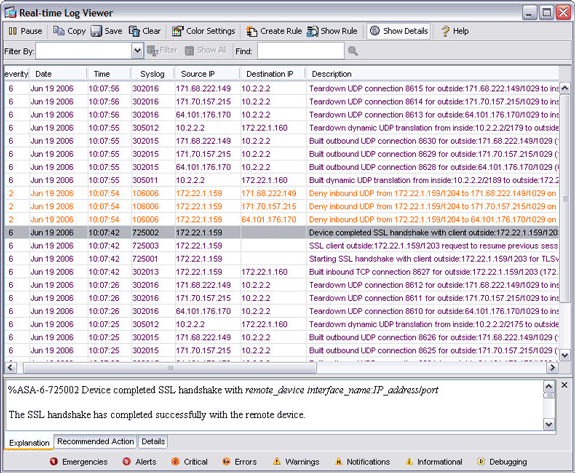
Note: To display only sessions from a specific address, filter by address.
Check the IP Pool in WebVPN Profile
%ASA-3-722020: Group group User user-name IP IP_address  No address
available for SVC connection
No addresses are available to assign to the SVC connection. Therefore, assign the IP pool address in the profile.
If you create the new connection profile, then configure an alias or group-url in order to access this connection profile. If not, all the SSL attempts will hit the default WebVPN connection profile that did not have an IP pool tied to it. Set this up to use the default connection profile and put an IP pool on it.
Tips
-
Make sure routing works properly with the IP address pool that you assign to your remote clients. This IP address pool should come from a subnet on your LAN. You can also use a DHCP server or Authentication Server to assign IP addresses.
-
The ASA creates a default tunnel group (DefaultWebVPNGroup) and a default group policy (GroupPolicy1). If you create new groups and policies, make sure you apply values in accordance with the security policies of your network.
-
If you want to enable Windows file browsing through CIFS, enter a WINS (NBNS) server under Configuration > VPN > WebVPN > Servers and URLs. This technology uses the CIFS selection.
Commands
Several debug commands are associated with WebVPN. For detailed information about these commands, refer to Using WebVPN Debug Commands.
Note: The use of debug commands can adversely impact your Cisco device. Before you use debug commands, refer to Important Information on Debug Commands.
Related Information
- Clientless SSL VPN (WebVPN) on ASA Configuration Example
- Thin-Client SSL VPN (WebVPN) on ASA with ASDM Configuration Example
- ASA with WebVPN and Single Sign-on using ASDM and NTLMv1 Configuration Example
- Cisco ASA 5500 Series Adaptive Security Appliances
- Technical Support & Documentation - Cisco Systems
Revision History
| Revision | Publish Date | Comments |
|---|---|---|
1.0 |
20-Jun-2006 |
Initial Release |
Contact Cisco
- Open a Support Case

- (Requires a Cisco Service Contract)


 Feedback