PIX/ASA - Upgrade a Software Image using ASDM or CLI
Available Languages
Contents
Introduction
This document describes how to upgrade a software image on the Cisco ASA 5500 Series Adaptive Security Appliances using the Cisco Adaptive Security Device Manager (ASDM).
ASDM does not work if you upgrade (or downgrade) the security appliance software from 7.0 to 7.2 directly or upgrade (or downgrade) the ASDM software from 5.0 to 5.2 directly. You need to do it in incremental order.
Example: In order to perform the ASDM software upgrade from 5.0 to 5.2, first upgrade from 5.0 to 5.1 and then upgrade from 5.1 to 5.2. Likewise, for the security appliance, first upgrade from 7.0 to 7.1 and then upgrade from 7.1 to 7.2.
Note: If you want to upgrade or downgrade from version 7.1.(x) to 7.2(x) and vice versa, you must follow the steps in this procedure since older versions of the security appliance images do not recognize new ASDM images and new security appliance images do not recognize old ASDM images. Refer to the Upgrading to a New Software Version section of Cisco PIX Security Appliance Release Notes, Version 7.2(2) in order to learn more about the upgrade procedures.
Note: You cannot downgrade the ASA 5550 to a software version earlier than 7.1(2). Similarly, you cannot downgrade the ASA 5505 to a software version earlier than 7.2. Refer to Cisco ASA 5500 Series and PIX 500 Series Security Appliance Hardware and Software Compatibility for more information.
Note: In Multicontext mode, you cannot use the copy tftp flash command to upgrade or downgrade the PIX/ASA image in all contexts; it is supported only in the System Exec mode.
Prerequisites
Requirements
There are no specific requirements for this document.
Components Used
The information in this document is based on these software and hardware versions:
-
Cisco ASA 5500 7.0 and later
-
Cisco ASDM 5.0 and later
The information in this document was created from the devices in a specific lab environment. All of the devices used in this document started with a cleared (default) configuration. If your network is live, make sure that you understand the potential impact of any command.
Related Products
This configuration can also be used with Cisco PIX 500 Series Security Appliance Software Version 7.0 and later.
Conventions
Refer to the Cisco Technical Tips Conventions for more information on document conventions.
Download Software
You can download your required release version of ASA Software images and ASDM Software images using these links:
-
Cisco ASA Software Release Download (registered customers only)
-
Cisco ASDM Software Release Download (registered customers only)
Note: You need to have valid Cisco user credentials in order to download this software from Cisco.com.
Upgrade a Software Image using ASDM 5.x
Complete these steps to upgrade a software image on the ASA 5500 using ASDM.
-
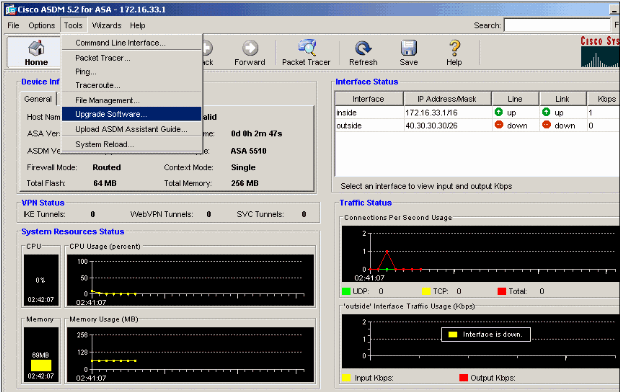
Select Tools > Upgrade Software... from the Home window of the ASDM.
-
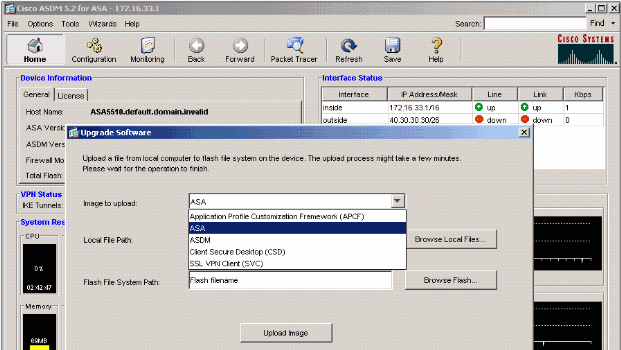
Select the type of image to upload from the drop-down menu.
-
Click Browse Local Files... or type the path in the Local File Path field to specify the location of the software image on your PC.
-
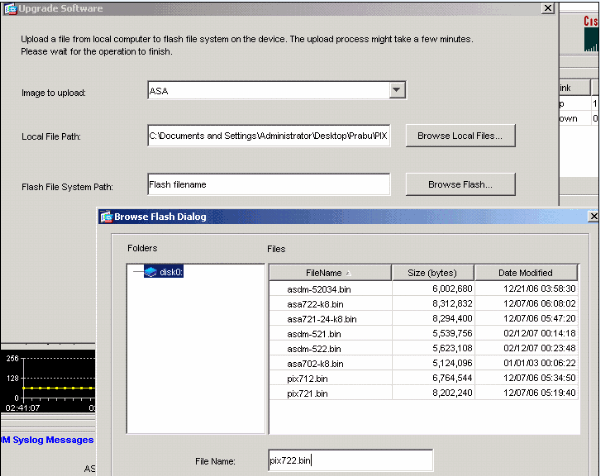
Click Browse Flash....
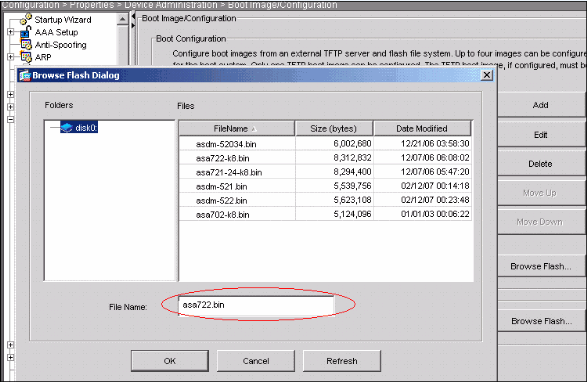
A Browse Flash Dialog window appears with the file name entered automatically. If the file name does not appear, enter it manually in the File Name field. Click OK when you are done.
-
Once both the local and remote file names are specified, click Upload Image.
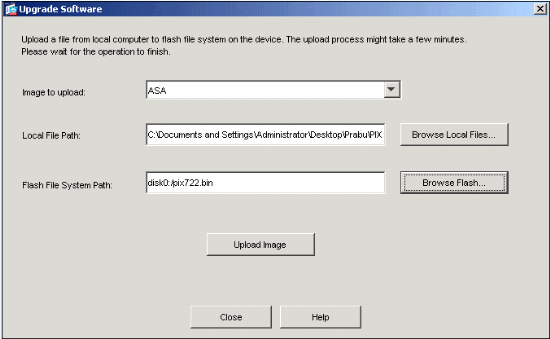
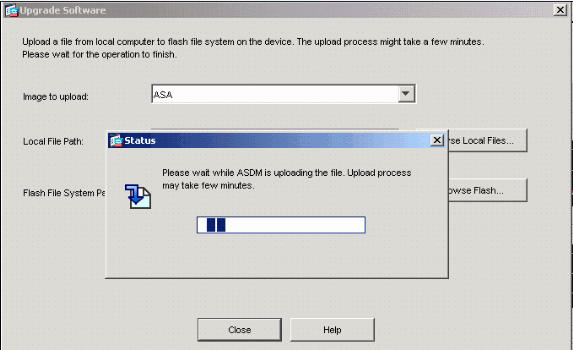
A Status window appears while ASDM writes the image to Flash.
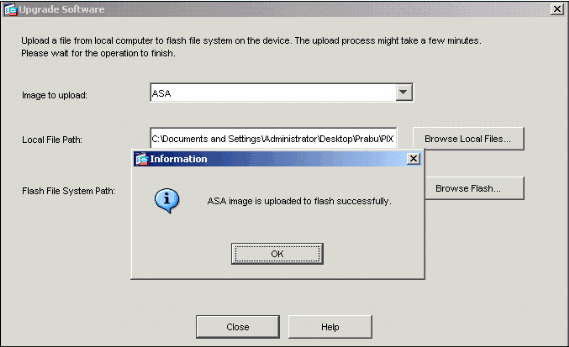
Once completed, an Information window appears that indicates a successful upload.
-
Click OK in the Information window and then Close in the Upload Image from Local PC window.
-
Choose Configuration > Properties > Device Administration > Boot Image/Configuration > Edit in order to change the boot image location.
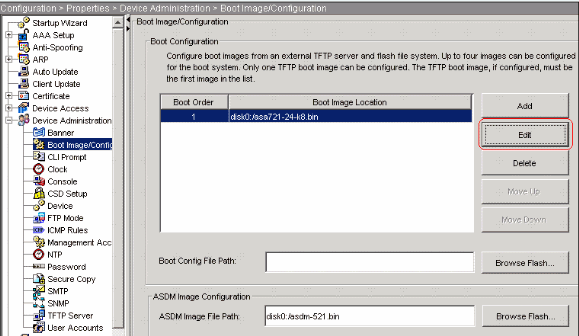
Click Browse Flash in order to choose or specify the ASA image file. Then click OK.
-
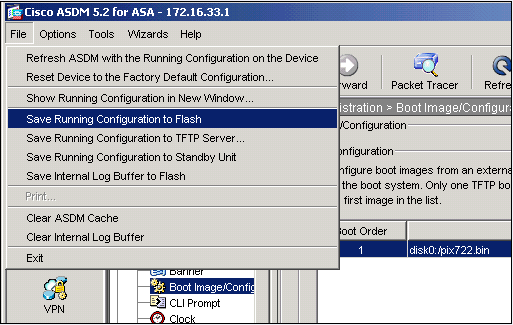
Choose File > Save Running Configuration to Flash in order to store the configuration to Flash memory.
-
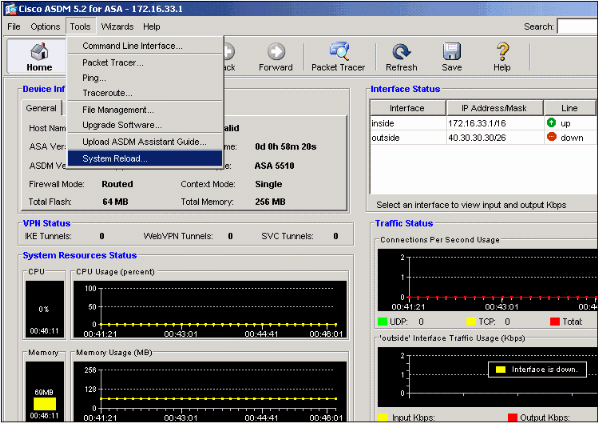
Choose Tools > System Reload from the Home window to reload the device.
-
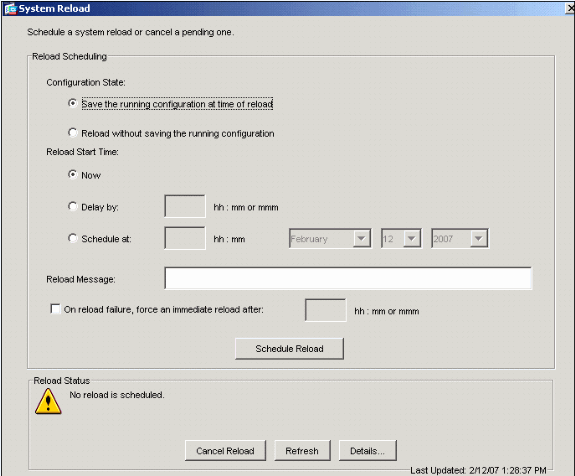
A new window appears that asks you to verify the details of the reload. Select Save the running configuration at the time of reload and then choose a time to reload.
-
Now—Reboot the device immediately.
-
Delay By—Specify in how many minutes or hours from now to reload the device.
-
Schedule at—Specify a time and date to reload the device.
You can also specify whether or not the device should force a reload immediately if a scheduled reload fails. Check On Reload failure, force an immediate reload after and then specify a maximum hold time. This is the amount of time that the security appliance waits to notify other subsystems before a shutdown or reboot. After this time elapses, a quick (forced) shutdown/reboot occurs. Click Schedule Reload.
-
-
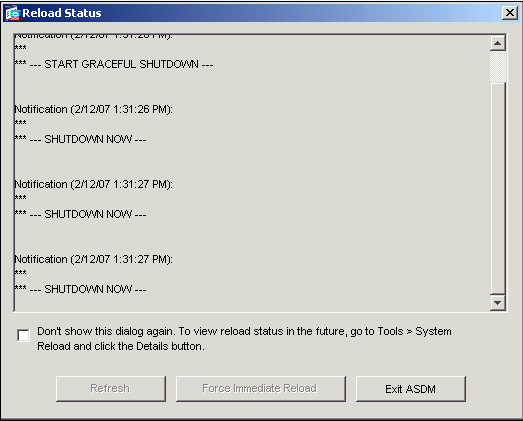
Once the reload is in progress, a Reload Status window appears that indicates that a reload is being performed. An option to exit ASDM is also provided.
Note: Start ASDM again after the ASA reloads.
Upgrade an ASDM Image using ASDM 5.x
Complete these steps to upgrade an ASDM image on the ASA 5500 using ASDM.
-
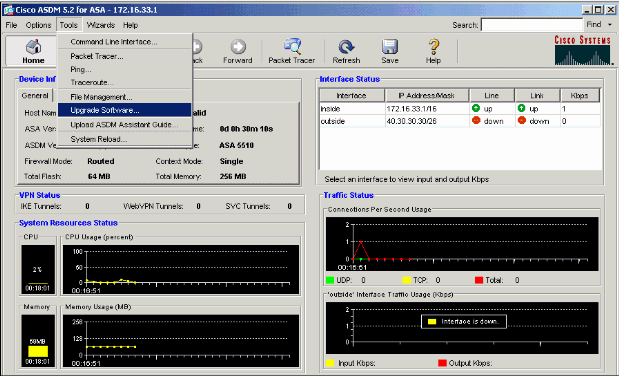
Choose Tools > Upgrade Software... from the Home window of the ASDM.
-
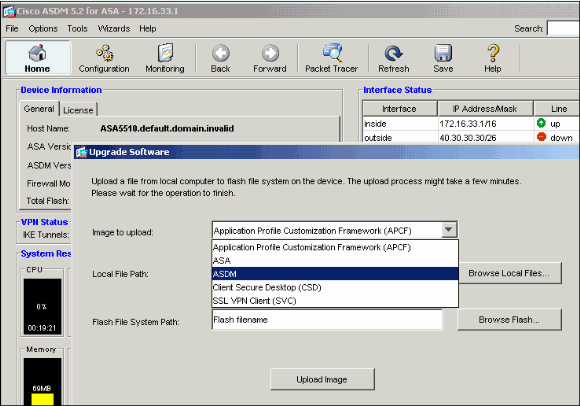
Select the type of image to upload from the drop-down menu.
-
Click Browse Local... or type the path in the Local File Path field to specify the location of the ASDM image on your PC.
-
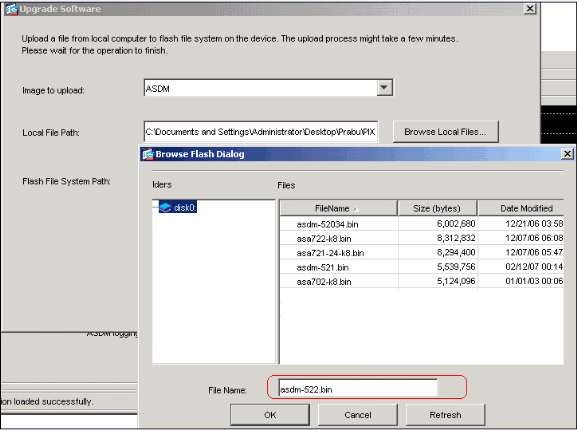
Click Browse Flash....
A Browse Flash Dialog window appears with the file name entered automatically. If the file name does not appear, enter it manually in the File Name field. Click OK when you are done.
-
Once both the local and remote file names are specified, click Upload Image.
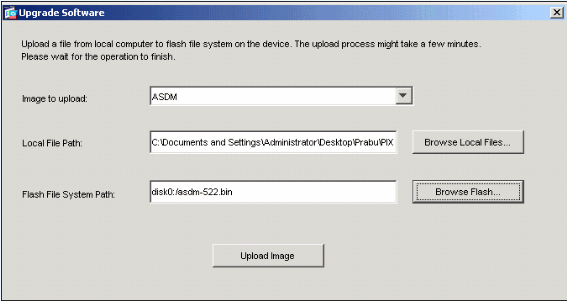
A Status window appears while ASDM writes the image to Flash.
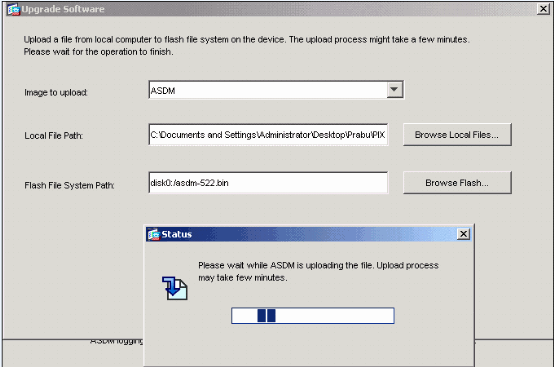
Once completed, an Information window appears that indicates a successful upload.
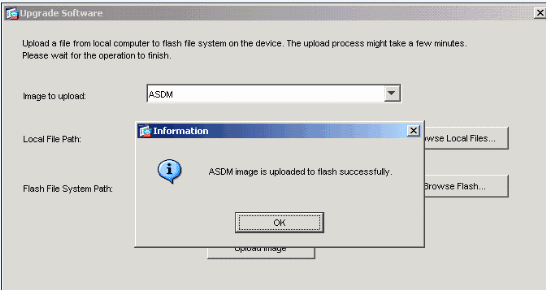
-
Click OK in the Information window and then Close in the Upload Image from Local PC window.
-
Choose Configuration > Properties > Device Administration > Boot Image/Configuration in order to change the ASDM image file name in the configuration.
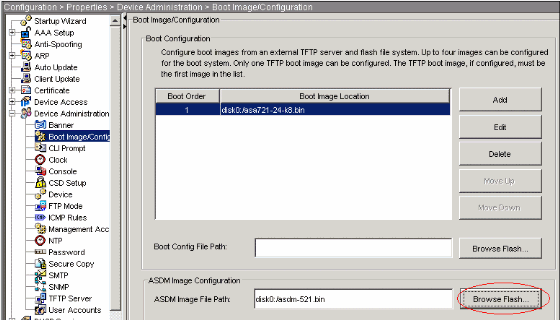
Click Browse Flash in order to choose or specify the ASDM image file. Then click OK.
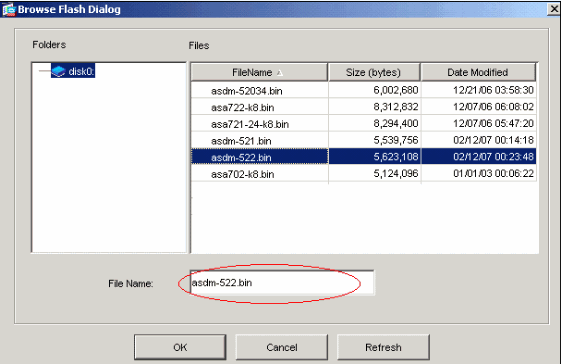
-
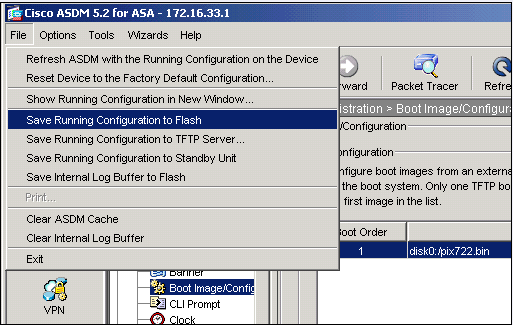
Choose File > Save Running Configuration to Flash in order to store the configuration to Flash memory.
-
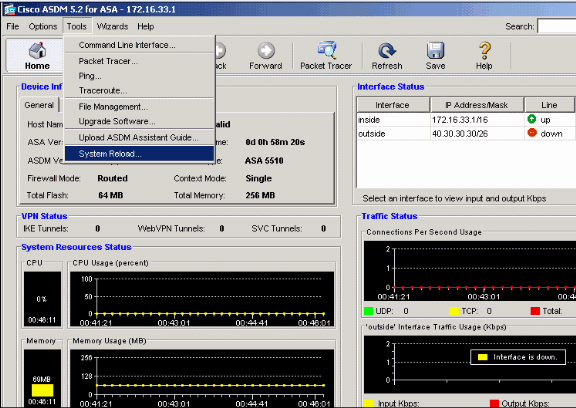
Choose Tools > System Reload from the Home window to reload the device.
-
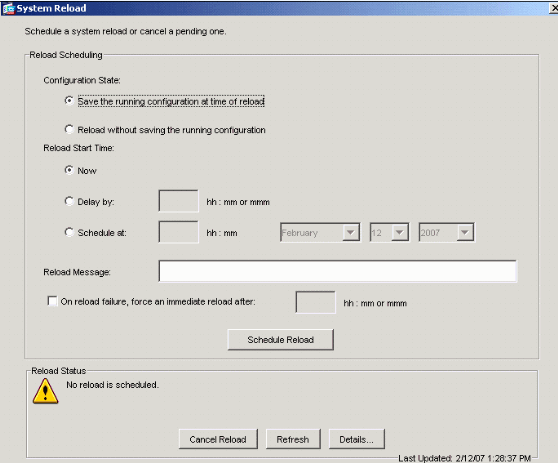
A new window appears that asks you to verify the details of the reload. Click Save the running configuration at the time of reload and then choose a time to reload.
-
Now—Reboot the device immediately.
-
Delay By—Specify in how many minutes or hours from now to reload the device.
-
Schedule at—Specify a time and date to reload the device.
You can also specify whether or not the device should force a reload immediately if a scheduled reload fails. Check On Reload failure, force an immediate reload after and then specify a maximum hold time. This is the amount of time that the security appliance waits to notify other subsystems before a shutdown or reboot. After this time elapses, a quick (forced) shutdown/reboot occurs. Click Schedule Reload.
-
-
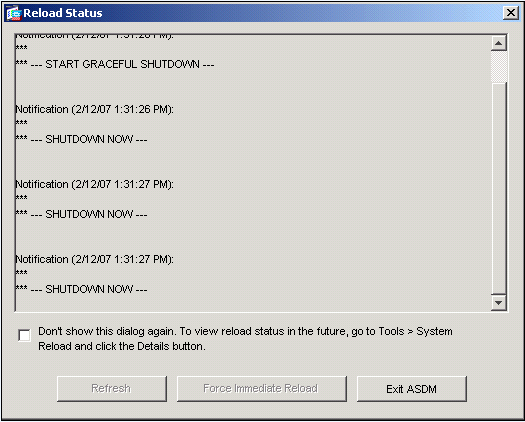
Once the reload is in progress, a Reload Status window appears that indicates that a reload is being performed. An option to exit ASDM is also provided.
Note: Start ASDM again after the ASA reloads.
Upgrade a Software Image with ASDM 6.x
Note: ASDM 6.x is supported only on ASA software image 8.x and later.
Complete these steps to upgrade a software image on the ASA 5500 with ASDM:
-
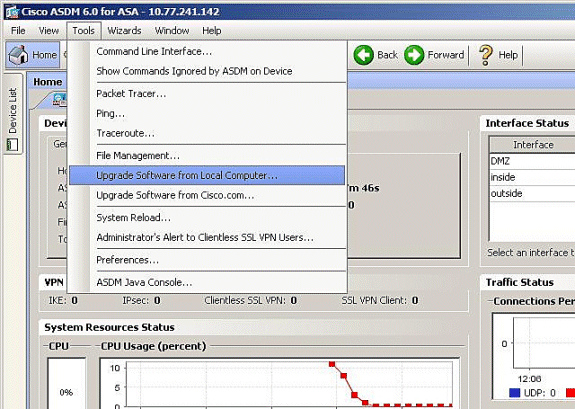
Choose Tools > Upgrade Software from Local computer... from the Home window of the ASDM.
-
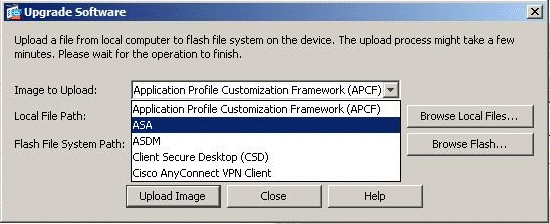
Choose the type of image to upload from the drop-down menu.
-
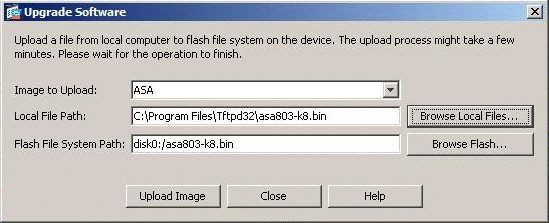
Click Browse Local Files... or type the path in the Local File Path field to specify the location of the software image on your PC. The file path in Flash File System is automatically determined and shown. If the file path in Flash File System is not shown, you can type it manually or click Browse Flash and choose the path.
-
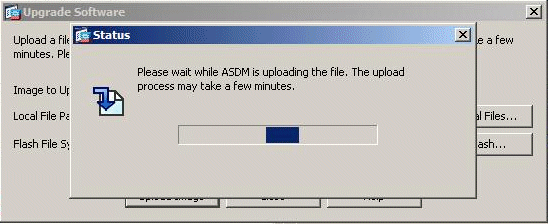
Once both of the file paths are specified, click Upload Image. A Status window appears while ASDM writes the image to Flash.
-
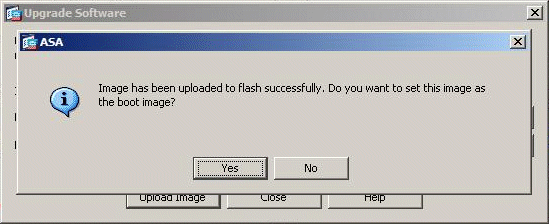
Once completed, an Information window appears that indicates a successful upload and asks to set this image as boot image. Click Yes if you want the new image to be set as boot image; otherwise click No.
-
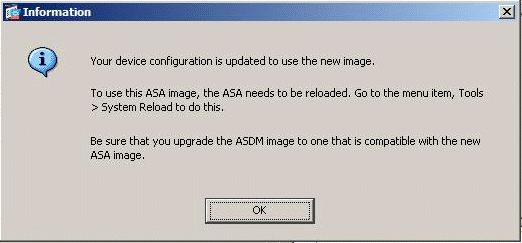
If you click Yes, it sets the new image as the boot image, and a Information box appears. Click OK.
-
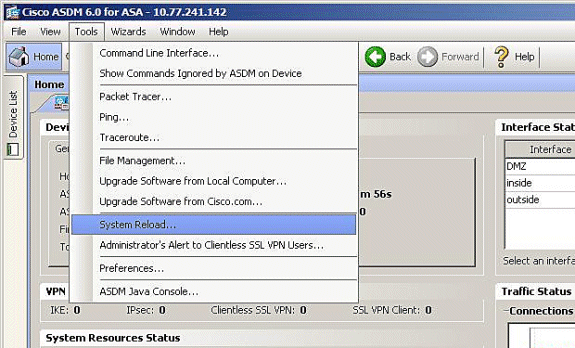
Choose Tools > System Reload from the Home window to reload the device.
-
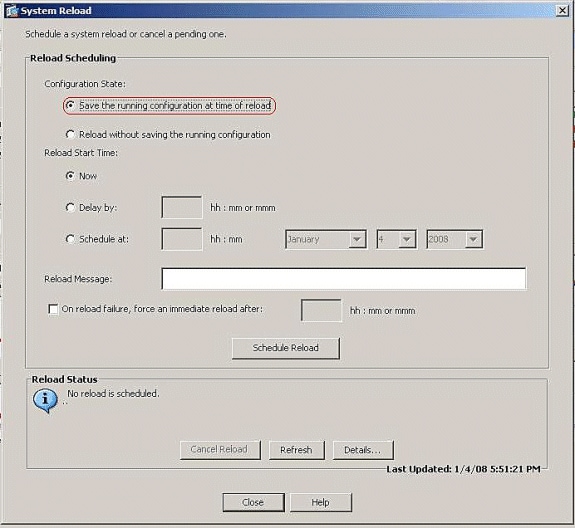
A new window appears that asks you to verify the details of the reload. Choose Save the running configuration at the time of reload, and then choose a time to reload.
-
Now—Reboot the device immediately.
-
Delay By—Specify in how many minutes or hours from now to reload the device.
-
Schedule at—Specify a time and date to reload the device.
You can also specify whether or not the device must force a reload immediately if a scheduled reload fails. Check On Reload failure, force an immediate reload after, and then specify a maximum hold time. This is the amount of time that the security appliance waits to notify other subsystems before a shutdown or reboot. After this time elapses, a quick (forced) shutdown/reboot occurs. Click Schedule Reload.
-
-
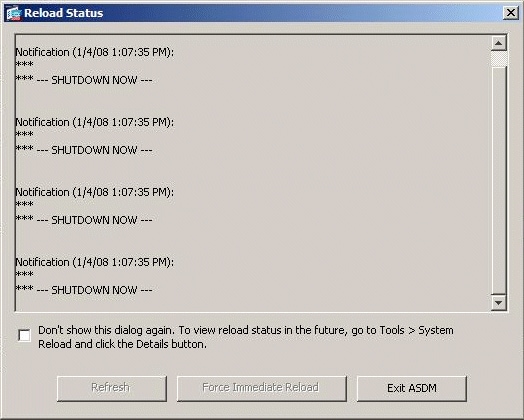
Once the reload is in progress, a Reload Status window appears that indicates that a reload is being performed. An option to exit ASDM is also provided. Click Exit ASDM, and restart ASDM after the device reloads.
Upgrade an ASDM Image with ASDM 6.x
Note: ASDM 6.x is supported only on ASA software image 8.x and later.
Complete these steps to upgrade an ASDM image on the ASA 5500 with ASDM:
-
Choose Tools > Upgrade Software from Local Computer... from the Home window of the ASDM.

-
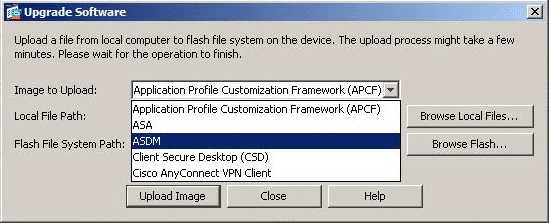
Choose the type of image to upload from the drop-down menu.
-
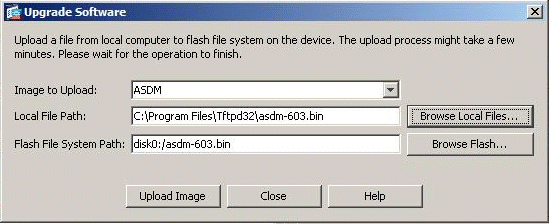
Click Browse Local Files... or type the path in the Local File Path field to specify the location of the ASDM image on your PC. The file path in Flash File System is automatically determined and shown. If the file path in Flash File System is not shown, you can type it manually or click Browse Flash and choose the path.
-
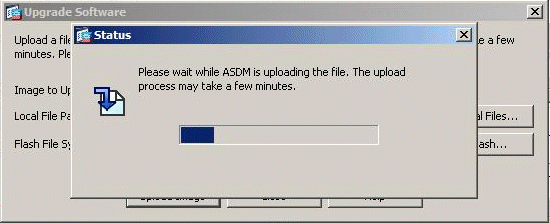
Once both of the file paths are specified, click Upload Image. A Status window appears while ASDM writes the image to Flash.
-
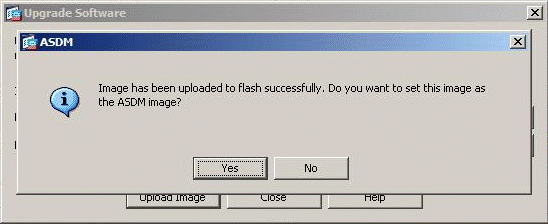
Once completed, an Information window appears that indicates a successful upload and asks to set this image as the default an ASDM image. Click Yes if you want the new image to be set as the ASDM image; otherwise click No.
-
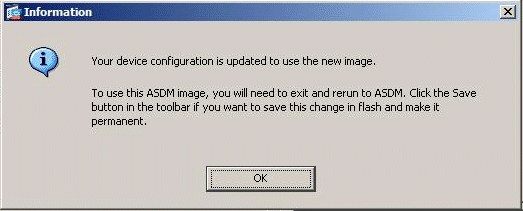
If you chose Yes to use the new image as the ASDM image, an Information box appears. Click OK.
-
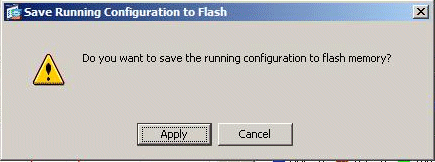
Click Save on top of the window to save the running configuration to Flash.

-
A dialog box appears for your confirmation. Click Apply.
-
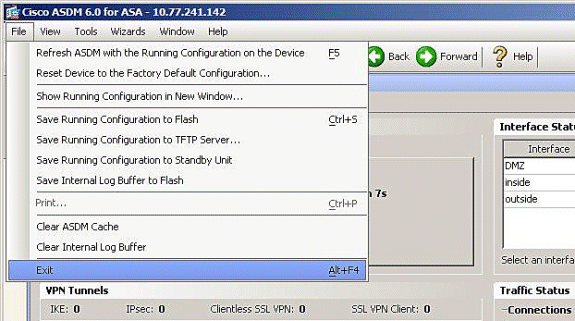
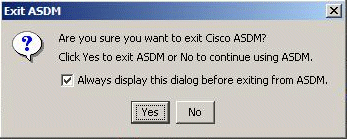
Click File on top of window, and choose Exit to close ASDM.
-
A dialog box can appear that asks for your confirmation. Click Yes.
-
Run ASDM again to load the new ASDM image.
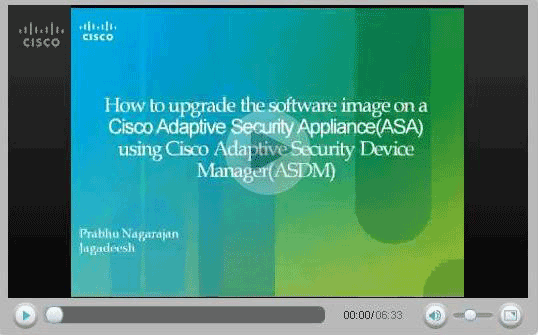
Refer to this video for more information: How to upgrade the software image on a Cisco Adaptive Security Appliance(ASA) using Cisco Adaptive Security Device Manager (ASDM)
This video posted to the Cisco Support Community ![]() describes how to upgrade the software image on Cisco ASA using ASDM: How to upgrade the software image on a Cisco Adaptive Security Appliance(ASA) using Cisco Adaptive Security Device Manager(ASDM)
describes how to upgrade the software image on Cisco ASA using ASDM: How to upgrade the software image on a Cisco Adaptive Security Appliance(ASA) using Cisco Adaptive Security Device Manager(ASDM) ![]()
Upgrade a Software Image and ASDM Image using CLI
A TFTP server is required to upgrade or downgrade a software image as well as an ASDM image for a PIX/ASA. Refer to TFTP Server Selection and Use in order to learn more about TFTP server selection.
The copy tftp flash command enables you to download a software image into the Flash memory of the firewall via TFTP. You can use the copy tftp flash command with any security appliance model. The image you download is made available to the security appliance on the next reload (reboot).
This is the output from the copy tftp flash command:
copy tftp[:[[//location] [/tftp_pathname]]] [[flash/disk0][:[image | asdm]]]
Note: For ASA, keyword disk0 replaces flash in the copy command.
If the command is used without the location or pathname optional parameters, then the location and filename are obtained from the user interactively via a series of questions similar to those presented by Cisco IOS® software. If you only enter a colon, parameters are taken from the tftp-server command settings. If other optional parameters are supplied, then these values are used in place of the corresponding tftp-server command setting. If any of the optional parameters, such as a colon and anything after it are supplied, the command runs without a prompt for user input.
The location is either an IP address or a name that resolves to an IP address via the security appliance naming resolution mechanism, which is currently static mappings via the name and names commands. The security appliance must know how to reach this location via its routing table information. This information is determined by the IP address, the route, or the RIP commands. This depends on your configuration.
The pathname can include any directory names besides the actual last component of the path to the file on the server. The pathname cannot contain spaces. If a directory name has spaces set to the directory in the TFTP server instead of in the copy tftp flash command, and if your TFTP server is configured to point to a directory on the system from which you download the image, you only need to use the IP address of the system and the image filename. The TFTP server receives the command and determines the actual file location from its root directory information. The server then downloads the TFTP image to the security appliance.
These commands are needed to upgrade the software image as well as the ASDM image and make it as a boot image at the next reload.
ASA#copy tftp [[flash:/disk0:][software image name/asdm image name]]

!--- Command to set an image as bootup or specify the !--- ASDM image file.

ASA(config)#boot system [flash:/disk0:]/[software image name]

!--- Save active configuration to the Flash.

ASA#write memory

!--- Reboot the security appliance and load !--- with the new boot image as per the configuration file.

ASA#reload
Example:
ASA5510#copy tftp disk0:

Address or name of remote host []? 172.16.31.1
Source filename []? asa722-k8.bin
Destination filename [asa722-k8.bin]?
Accessing tftp://172.16.31.1/asa722-k8.bin...!!!!!!!!!!!!!!!!!!!!!!!!!!!!!
!!!!!!!!!!!!!!!!!!!!!!!!!!!!!!!!!!!!!!!!!!!!!!!!!!!!!!!!!!!!!!!!!!!!!!!!!!
!!!!!!!!!!!!!!!!!!!!!!!!!!!!!!!!!!!!!!!!!!!!!!!!!!!!!!!!!!!!!!!!!!!!!!!!!!
Writing file disk0:/asa722-k8.bin...
!!!!!!!!!!!!!!!!!!!!!!!!!!!!!!!!!!!!!!!!!!!!!!!!!!!!!!!!!!!!!!!!!!!!!!!!!!
!!!!!!!!!!!!!!!!!!!!!!!!!!!!!!!!!!!!!!!!!!!!!!!!!!!!!!!!!!!!!!!!!!!!!!!!!!
!!!!!!!!!!!!!!!!!!!!!!!!!!!!!!!!!!!!!!!!!!!!!!!!!!!!!!!!!!!!!!!!!!!!!!!!!!
8312832 bytes copied in 163.350 secs (50998 bytes/sec)

ASA5510#show disk0:
-#- --length-- -----date/time------ path
  6 5124096    Jan 01 2003 00:06:22 asa702-k8.bin
  7 5623108    Feb 12 2007 00:23:48 asdm-522.bin
 10 5539756    Feb 12 2007 00:14:18 asdm-521.bin
 11 8294400    Dec 07 2006 05:47:20 asa721-24-k8.bin
 12 6002680    Dec 21 2006 03:58:30 asdm-52034.bin
 13 8312832    Feb 12 2007 22:46:30 asa722-k8.bin

23949312 bytes available (38932480 bytes used)

!--- Command to set "asa722-k8.bin" as the boot image.

ASA5510(config)# boot system disk0:/asa722-k8.bin

!--- Command to set "asdm-522.bin" as the ASDM image.

ASA5510(config)# asdm image disk0:/asdm-522.bin
ASA5510# write memory
ASA5510# reload
Note: When you try to upgrade the image on the ASA from an FTP server, you can use the copy ftp flash command. This command allows you to specify parameters, such as remote IP address and source file name. This procedure is similar to TFTP. However, one limitation with is that you can not modify the remote IP/source interface (like you can with TFTP). In TFTP mode, options specified with the tftp-server command can be pulled and executed. But with FTP, there is no such option. The source interface should always be the outside by default, which cannot be modified. That is, the FTP server should be reachable from the outside interface.
Verify
Use this section to confirm that your software upgrade was successful.
The Output Interpreter Tool (registered customers only) (OIT) supports certain show commands. Use the OIT to view an analysis of show command output.
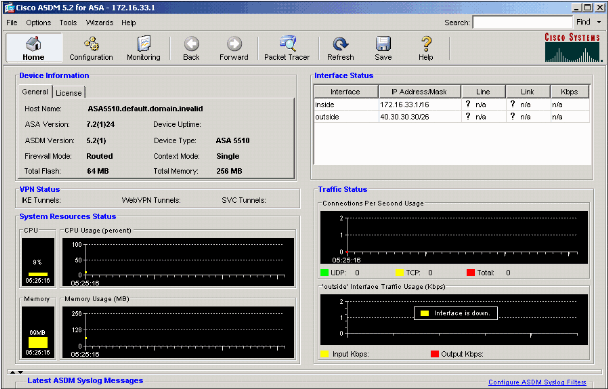
After the ASA reloads and you have successfully logged into ASDM again, you can verify the version of the image that runs on the device. See the General tab on the Home window for this information.
These CLI commands are used in order to verify the upgrade:
-
Show version—This shows the current image with which the ASA is booted.
-
Show bootvar—This shows the priority of the image to be used after reload.
-
Show asdm image—This shows the current asdm image used by ASA.
Troubleshoot
There is currently no specific troubleshooting information available for this configuration.
Related Information
- Downloading Software or Configuration Files to Flash Memory, Cisco Security Appliance Command Line Configuration Guide
- Cisco ASA 5500 Series Adaptive Security Appliances Product Support
- Cisco Adaptive Security Device Manager Product Support
- Cisco PIX Firewall Software
- Cisco Secure PIX Firewall Command References
- Security Product Field Notices (including PIX)
- TFTP Server Selection and Use
- Backup and Restore PIX Configuration Files
- Requests for Comments (RFCs)

- ASA 8.3 Upgrade - What You Need to Know

- Technical Support & Documentation - Cisco Systems
Revision History
| Revision | Publish Date | Comments |
|---|---|---|
1.0 |
21-Aug-2007 |
Initial Release |
Contact Cisco
- Open a Support Case

- (Requires a Cisco Service Contract)


 Feedback