PIX/ASA 7.x and FWSM: NAT and PAT Statements
Available Languages
Contents
Introduction
This document provides examples of basic Network Address Translation (NAT) and Port Address Translation (PAT) configurations on the Cisco PIX/ASA Security Appliances. Simplified network diagrams are provided. Consult the PIX/ASA documentation for your PIX/ASA software version for detailed information.
Refer to Using nat, global, static, conduit, and access-list Commands and Port Redirection (Forwarding) on PIX in order to learn more about the nat, global, static, conduit, and access-list commands and Port Redirection (Forwarding) on PIX 5.x and later.
Refer to Using NAT and PAT Statements on the Cisco Secure PIX Firewall in order to learn more about the examples of basic NAT and PAT configurations on the Cisco Secure PIX Firewall.
For more information on NAT configuration in ASA version 8.3 and later, refer to Information About NAT.
Note: NAT in transparent mode is supported from PIX/ASA version 8.x. Refer to NAT in Transparent Mode for more information.
Prerequisites
Requirements
Readers of this document should be knowledgeable about the Cisco PIX/ASA Security Appliance.
Components Used
The information in this document is based on Cisco PIX 500 Series Security Appliance Software version 7.0 and later.
Note: This document has been recertified with PIX/ASA version 8.x.
Note: The commands used in these document are applicable to Firewall Service Module (FWSM).
The information in this document was created from the devices in a specific lab environment. All of the devices used in this document started with a cleared (default) configuration. If your network is live, make sure that you understand the potential impact of any command.
Conventions
Refer to the Cisco Technical Tips Conventions for more information on document conventions.
The nat-control Command
The nat-control command on the PIX/ASA specifies that all traffic through the firewall must have a specific translation entry (nat statement with a matching global or a static statement) for that traffic to pass through the firewall. The nat-control command ensures that the translation behavior is the same as PIX Firewall versions earlier than 7.0. The default configuration of PIX/ASA version 7.0 and later is the specification of the no nat-control command. With PIX/ASA version 7.0 and later, you can change this behavior when you issue the nat-control command.
With nat-control disabled, the PIX/ASA forwards packets from a higher-security interface to a lower one without a specific translation entry in the configuration. In order to pass traffic from a lower security interface to a higher one, use access lists to permit the traffic. The PIX/ASA then forwards the traffic. This document focuses on the PIX/ASA security appliance behavior with nat-control enabled.
Note: If you want to remove or disable the nat-control statement in the PIX/ASA, you need to remove all NAT statements from the security appliance. In general, you need to remove the NAT before you turn off NAT control. You have to reconfigure the NAT statement in PIX/ASA to work as expected.
Multiple NAT Statements with NAT 0
Network Diagram
Note: The IP addressing schemes used in this configuration are not legally routable on the Internet. They are RFC 1918 ![]() addresses that have been used in a lab environment.
addresses that have been used in a lab environment.
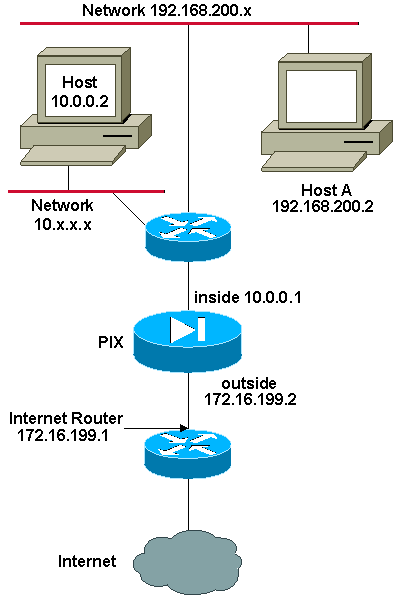
In this example, the ISP provides the network manager with a range of addresses from 172.16.199.1 to 172.16.199.63. The network manager decides to assign 172.16.199.1 to the the inside interface on the Internet router and 172.16.199.2 to the outside interface of the PIX/ASA.
The network administrator already had a Class C address assigned to the network, 192.168.200.0/24, and has some workstations that use these addresses in order to access the Internet. These workstations are not to be address translated. However, new workstations are assigned addresses in the 10.0.0.0/8 network, and they need to be translated.
In order to accommodate this network design, the network administrator must use two NAT statements and one global pool in the PIX/ASA configuration as this output shows:
global (outside) 1 172.16.199.3-172.16.199.62 netmask 255.255.255.192

nat (inside) 0 192.168.200.0 255.255.255.0 0 0

nat (inside) 1 10.0.0.0 255.0.0.0 0 0
This configuration does not translate the source address of any outbound traffic from the 192.168.200.0/24 network. It translates a source address in the 10.0.0.0/8 network into an address from the range 172.16.199.3 to 172.16.199.62.
These steps provide an explanation of how to apply this same configuration with the use of Adaptive Security Device Manager (ASDM).
Note: Perform all configuration changes through either the CLI or ASDM. The use of both CLI and ASDM for configuration changes causes very erratic behavior in terms of what gets applied by ASDM. This is not a bug, but occurs due to how ASDM works.
Note: When you open ASDM, it imports the current configuration from the PIX/ASA and works from that configuration when you make and apply changes. If a change is made on the PIX/ASA while the ASDM session is open, then ASDM no longer works with what it "thinks" is the current configuration of the PIX/ASA. Be sure to close any ASDM sessions if you make configuration changes via CLI. Open again the ASDM when you want to work via GUI.
-
Launch ASDM, browse to the Configuration tab, and click NAT.
-
Click Add in order to create a new rule.
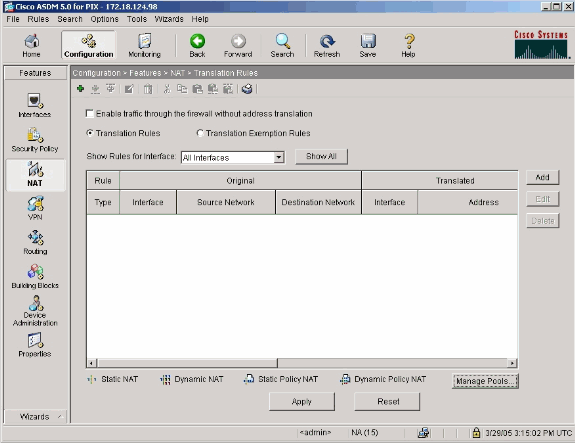
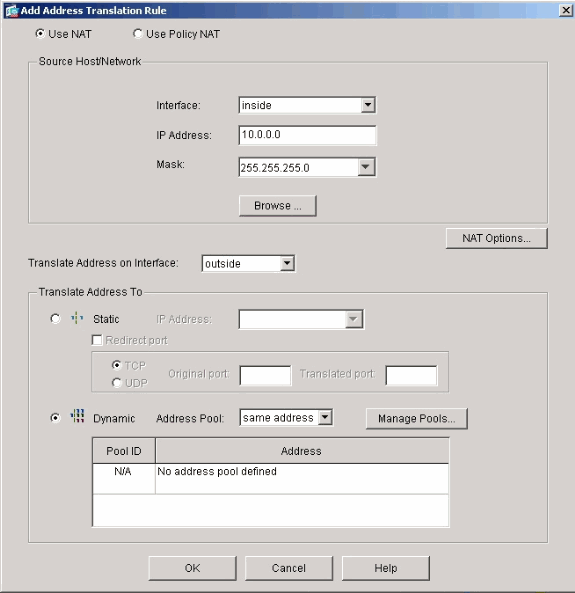
A new window appears that allows the user to change NAT options for this NAT entry. For this example, perform NAT on packets that arrive on the inside interface that are sourced from the specific 10.0.0.0/24 network.
The PIX/ASA translates these packets to a Dynamic IP pool on the outside interface. After you enter the information that describes what traffic to NAT, define a pool of IP addresses for the translated traffic.
-
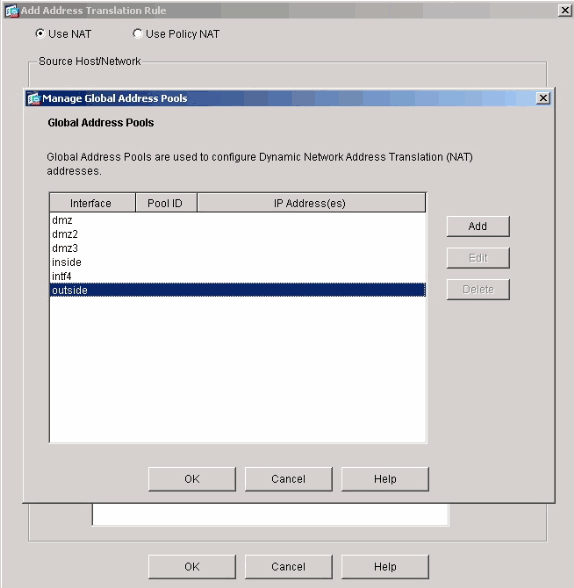
Click Manage Pools in order to add a new IP pool.
-
Choose outside, and click Add.
-
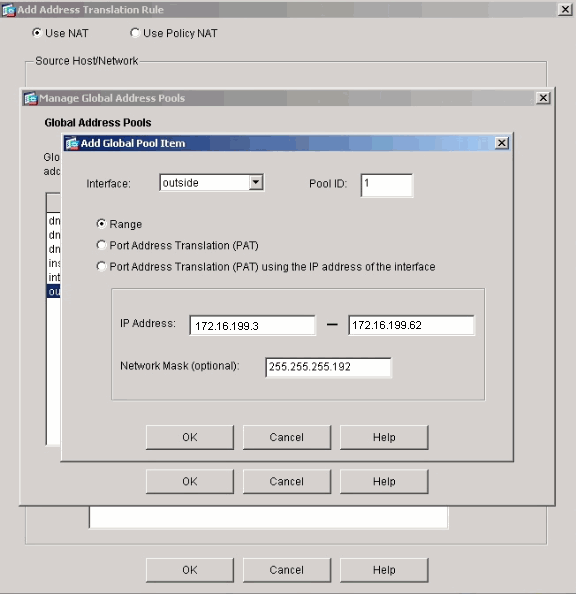
Specify the IP range for the pool, and give the pool a unique integer id number.
-
Enter the appropriate values, and click OK.
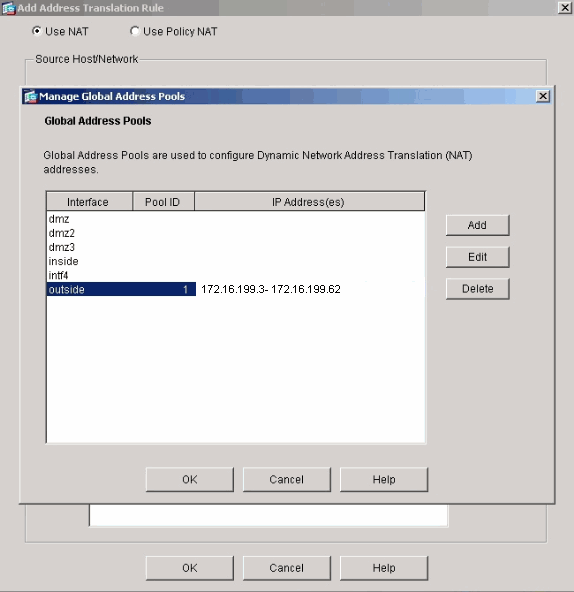
The new pool is defined for the outside interface.
-
After you define the pool, click OK in order to return to the NAT Rule configuration window.
Make sure to choose the correct pool that you just created under the Address Pool drop-down list.
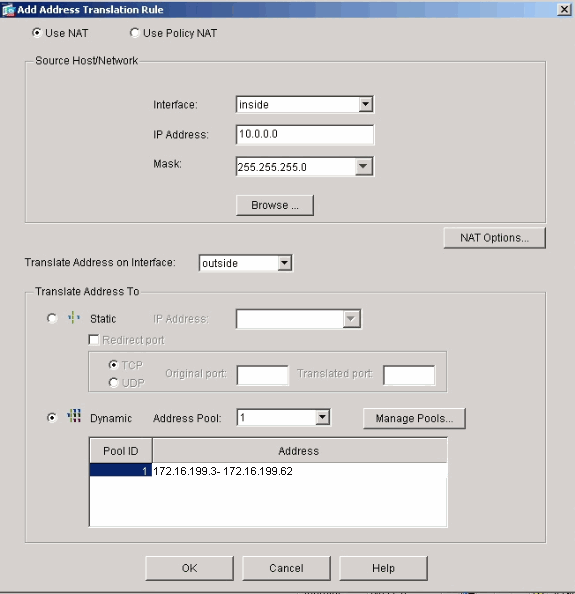
You have now created a NAT translation through the security appliance. However, you still need to create the NAT entry that specifies what traffic not to NAT.
-
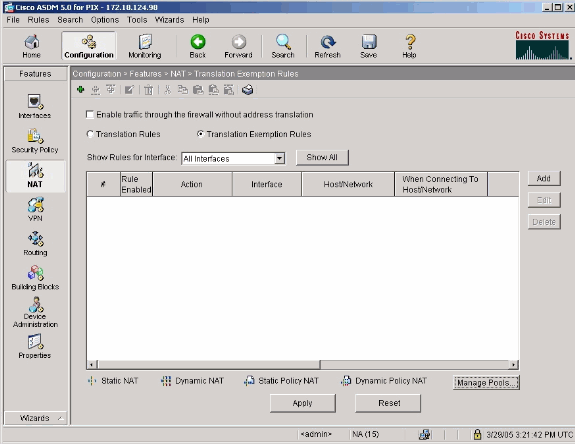
Click Translation Exemption Rules located at the top of the window, and then click Add in order to create a new rule.
-
Choose the inside interface as the source, and specify the 192.168.200.0/24 subnet. Leave the "When connecting" values as the defaults.
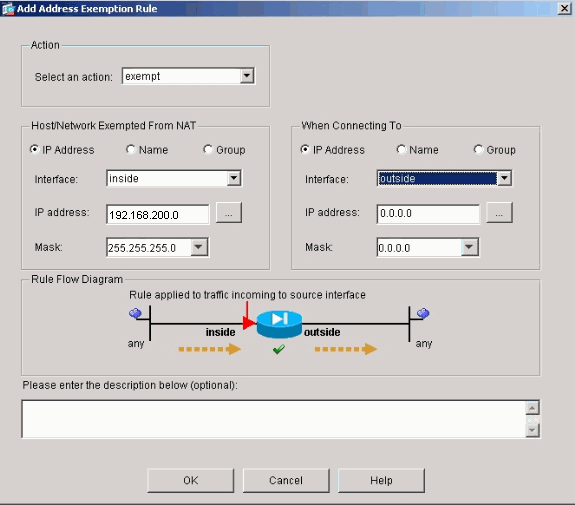
The NAT rules are now defined.
-
Click Apply in order to apply the changes to the current running configuration of the security appliance.
This output shows the actual additions that are applied to the PIX/ASA configuration. They are slightly different from the commands entered from the manual method, but they are equal.
access-list inside_nat0_outbound extended permit
ip 192.168.200.0 255.255.255.0 any

global (outside) 1 172.16.199.3-172.16.199.62 netmask 255.255.255.192

nat (inside) 0 access-list inside_nat0_outbound
nat (inside) 1 10.0.0.0 255.255.255.0
Multiple Global Pools
Network Diagram
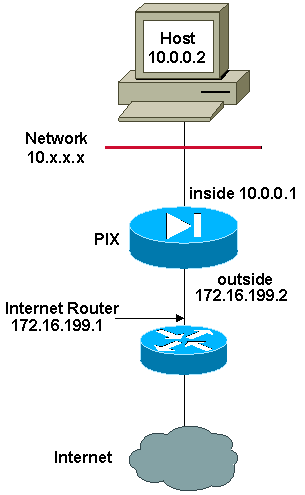
Note: The IP addressing schemes used in this configuration are not legally routable on the Internet. They are RFC 1918 ![]() addresses that have been used in a lab environment.
addresses that have been used in a lab environment.
In this example, the network manager has two ranges of IP addresses that register on the Internet. The network manager must convert all of the internal addresses, which are in the 10.0.0.0/8 range, into registered addresses. The ranges of IP addresses that the network manager must use are 172.16.199.1 through 172.16.199.62 and 192.168.150.1 through 192.168.150.254. The network manager can do this with:
global (outside) 1 172.16.199.3-172.16.199.62 netmask 255.255.255.192

global (outside) 1 192.168.150.1-192.168.150.254 netmask 255.255.255.0

nat (inside) 1 0.0.0.0 0.0.0.0 0 0
In dynamic NAT, the more specific statement is the one that takes precedence when you use the same interface on global.
nat (inside) 1 10.0.0.0 255.0.0.0
nat (inside) 2 10.1.0.0 255.255.0.0
global (outside) 1 172.16.1.1
global (outside) 2 192.168.1.1
If you have the inside network as 10.1.0.0, the NAT global 2 takes precedence over 1 as it is more specific for translation.
Note: A wildcard addressing scheme is used in the NAT statement. This statement tells the PIX/ASA to translate any internal source address when it goes out to the Internet. The address in this command can be more specific if desired.
Mix NAT and PAT Global Statements
Network Diagram
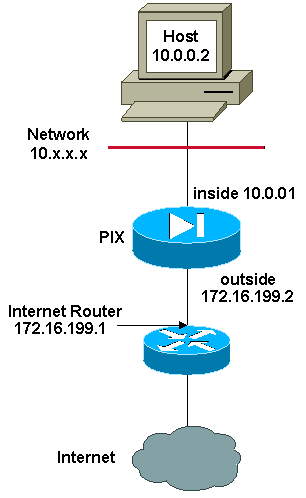
Note: The IP addressing schemes used in this configuration are not legally routable on the Internet. They are RFC 1918 ![]() addresses that have been used in a lab environment.
addresses that have been used in a lab environment.
In this example, the ISP provides the network manager with a range of addresses from 172.16.199.1 through 172.16.199.63 for the use of the company. The network manager decides to use 172.16.199.1 for the inside interface on the Internet router and 172.16.199.2 for the outside interface on the PIX/ASA. You are left with 172.16.199.3 through 172.16.199.62 to use for the NAT pool. However, the network manager knows that, at any one time, there can be more than sixty people who attempt to go out of the PIX/ASA. Therefore, the network manager decides to take 172.16.199.62 and make it a PAT address so that multiple users can share one address at the same time.
global (outside) 1 172.16.199.3-172.16.199.61 netmask 255.255.255.192

global (outside) 1 172.16.199.62 netmask 255.255.255.192

nat (inside) 1 0.0.0.0 0.0.0.0 0 0
These commands instruct the PIX/ASA to translate the source address to 172.16.199.3 through 172.16.199.61 for the first fifty-nine internal users to pass across the PIX/ASA. After these addresses are exhausted, the PIX then translates all subsequent source addresses to 172.16.199.62 until one of the addresses in the NAT pool becomes free.
Note: A wildcard addressing scheme is used in the NAT statement. This statement tells the PIX/ASA to translate any internal source address when it goes out to the Internet. The address in this command can be more specific if you desire.
Multiple NAT Statements with NAT 0 Access-List
Network Diagram
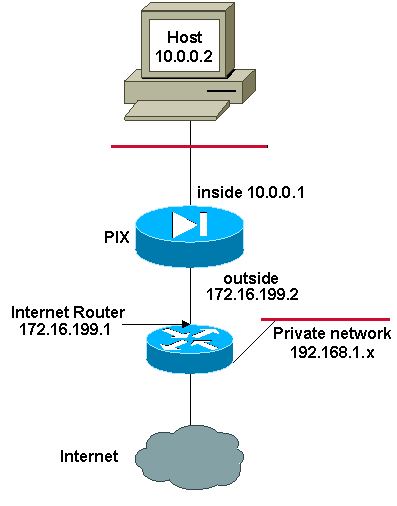
Note: The IP addressing schemes used in this configuration are not legally routable on the Internet. They are RFC 1918 ![]() addresses that have been used in a lab environment.
addresses that have been used in a lab environment.
In this example, the ISP provides the network manager with a range of addresses from 172.16.199.1 through 172.16.199.63. The network manager decides to assign 172.16.199.1 to the inside interface on the Internet router and 172.16.199.2 to the outside interface of the PIX/ASA.
However, in this scenario another private LAN segment is placed off of the Internet router. The network manager would rather not waste addresses from the global pool when hosts in these two networks talk to each other. The network manager still needs to translate the source address for all of the internal users (10.0.0.0/8) when they go out to the Internet.
access-list 101 permit ip 10.0.0.0 255.0.0.0 192.168.1.0 255.255.255.0

global (outside) 1 172.16.199.3-172.16.199.62 netmask 255.255.255.192

nat (inside) 0 access-list 101

nat (inside) 1 10.0.0.0 255.0.0.0 0 0
This configuration does not translate those addresses with a source address of 10.0.0.0/8 and a destination address of 192.168.1.0/24. It translates the source address from any traffic initiated from within the 10.0.0.0/8 network and destined for anywhere other than 192.168.1.0/24 into an address from the range 172.16.199.3 through 172.16.199.62.
If you have the output of a write terminal command from your Cisco device, you can use the Output Interpreter Tool (registered customers only) .
Use Policy NAT
Network Diagram

Note: The IP addressing schemes used in this configuration are not legally routable on the Internet. They are RFC 1918 ![]() addresses which that been used in a lab environment.
addresses which that been used in a lab environment.
When you use an access list with the nat command for any NAT ID other than 0, then you enable policy NAT.
Note: Policy NAT was introduced in version 6.3.2.
Policy NAT allows you to identify local traffic for address translation when you specify the source and destination addresses (or ports) in an access list. Regular NAT uses source addresses/ports only, whereas policy NAT uses both source and destination addresses/ports.
Note: All types of NAT support policy NAT except for NAT exemption (nat 0 access-list). NAT exemption uses an access control list in order to identify the local addresses, but differs from policy NAT in that the ports are not considered.
With policy NAT, you can create multiple NAT or static statements that identify the same local address as long as the source/port and destination/port combination is unique for each statement. You can then match different global addresses to each source/port and destination/port pair.
In this example, the network manager provides access for destination IP address 192.168.201.11 for port 80 (web) and port 23 (Telnet), but must use two different IP addresses as a source address. IP address 172.16.199.3 is used as the source address for web. IP address 172.16.199.4 is used for Telnet, and must convert all of the internal addresses, which are in the 10.0.0.0/8 range. The network manager can do this with:
access-list WEB permit tcp 10.0.0.0 255.0.0.0 192.168.201.11
255.255.255.255 eq 80

access-list TELNET permit tcp 10.0.0.0 255.0.0.0 192.168.201.11
255.255.255.255 eq 23

nat (inside) 1 access-list WEB

nat (inside) 2 access-list TELNET

global (outside) 1 172.16.199.3 netmask 255.255.255.192

global (outside) 2 172.16.199.4 netmask 255.255.255.192
You can use Output Interpreter Tool (registered customers only) in order to display potential issues and fixes.
Static NAT
Network Diagram
Note: The IP addressing schemes used in this configuration are not legally routable on the Internet. They are RFC 1918 ![]() addresses that have been used in a lab environment.
addresses that have been used in a lab environment.
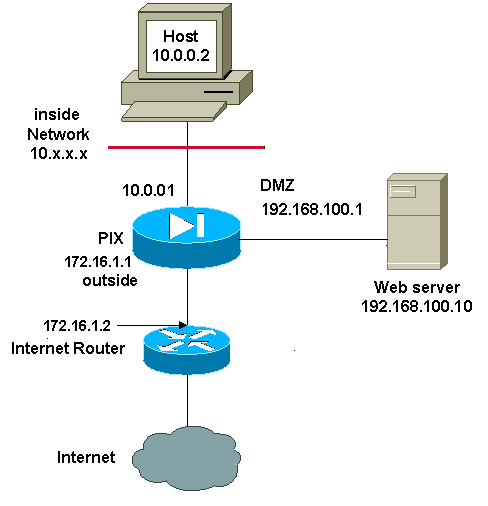
A static NAT configuration creates a one-to-one mapping and translates a specific address to another address. This type of configuration creates a permanent entry in the NAT table as long as the configuration is present and enables both inside and outside hosts to initiate a connection. This is mostly useful for hosts that provide application services like mail, web, FTP and others. In this example, static NAT statements are configured to allow users on the inside and users on the outside to access the web server on the DMZ.
This output shows how a static statement is constructed. Note the order of the mapped and real IP addresses.
static (real_interface,mapped_interface) mapped_ip real_ip netmask mask
Here is the static translation created to give users on the inside interface access to the server on the DMZ. It creates a mapping between an address on the inside and the address of the server on the DMZ. Users on the inside can then access the server on the DMZ via the inside address.
static (DMZ,inside) 10.0.0.10 192.168.100.10 netmask 255.255.255.255
Here is the static translation created to give users on the outside interface access to the server on the DMZ. It creates a mapping between an address on the outside and the address of the server on the DMZ. Users on the outside can then access the server on the DMZ via the outside address.
static (DMZ,outside) 172.16.1.5 192.168.100.10 netmask 255.255.255.255
Note: Because the outside interface has a lower security level than the DMZ, an access list must also be created in order to permit users on the outside access to the server on the DMZ. The access list must grant users access to the mapped address in the static translation. It is recommended that this access list be made as specific as possible. In this case, any host is permitted access to only ports 80 (www/http) and 443 (https) on the web server.
access-list OUTSIDE extended permit tcp any host 172.16.1.5 eq www
access-list OUTSIDE extended permit tcp any host 172.16.1.5 eq https
The access list must then be applied to the outside interface.
access-group OUTSIDE in interface outside
Refer to access-list extended and access-group for more information on the access-list and access-group commands.
How to Bypass NAT
This section describes how to bypass NAT. You might want to bypass NAT when you enable NAT control. You can use Identity NAT, Static Identity NAT, or NAT exemption in order to bypass NAT.
Configure Identity NAT
Identity NAT translates the real IP address to the same IP address. Only "translated" hosts can create NAT translations, and responding traffic is allowed back.
Note: If you change the NAT configuration, and you do not want to wait for existing translations to time out before the new NAT information is used, you use the clear xlate command in order to clear the translation table. However, all current connections that use translations are disconnected when you clear the translation table.
In order to configure identity NAT, enter this command:
hostname(config)#nat (real_interface) 0 real_ip
	 [mask [dns] [outside] [norandomseq] [[tcp] tcp_max_conns [emb_limit]] [udp
	 udp_max_conns]
For example, in order to use identity NAT for the inside 10.1.1.0/24 network, enter this command:
hostname(config)#nat (inside) 0 10.1.1.0
	 255.255.255.0
Refer to Cisco Security Appliance Command Reference, Version 7.2 for more information on the nat command.
Configure Static Identity NAT
Static identity NAT translates the real IP address to the same IP address. The translation is always active, and both "translated" and remote hosts can originate connections. Static identity NAT lets you use regular NAT or policy NAT. Policy NAT lets you identify the real and destination addresses when determining the real addresses to translate (see Use Policy NAT section for more information about policy NAT). For example, you can use policy static identity NAT for an inside address when it accesses the outside interface and the destination is server A, but use a normal translation when accessing the outside server B.
Note: If you remove a static command, current connections that use the translation are not affected. In order to remove these connections, enter the clear local-host command. You cannot clear static translations from the translation table with the clear xlate command; you must remove the static command instead. Only dynamic translations created by the nat and global commands can be removed with the clear xlate command.
To configure policy static identity NAT, enter this command:
hostname(config)#static
	 (real_interface,mapped_interface) real_ip access-list acl_id [dns]
	 [norandomseq] [[tcp] tcp_max_conns [emb_limit]] [udp udp_max_conns]
Use the access-list extended command in order to create the extended access list. This access list should include only permit ACEs. Make sure the source address in the access list matches the real_ip in this command. Policy NAT does not consider the inactive or time-range keywords; all ACEs are considered to be active for policy NAT configuration. See Use Policy NAT section for more information.
In order to configure regular static identity NAT, enter this command:
hostname(config)#static
	 (real_interface,mapped_interface) real_ip real_ip [netmask mask] [dns]
	 [norandomseq] [[tcp] tcp_max_conns [emb_limit]] [udp
	 udp_max_conns]
Specify the same IP address for both real_ip arguments.
Network Diagram
Note: The IP addressing schemes used in this configuration are not legally routable on the Internet. They are RFC 1918 ![]() addresses that have been used in a lab environment.
addresses that have been used in a lab environment.
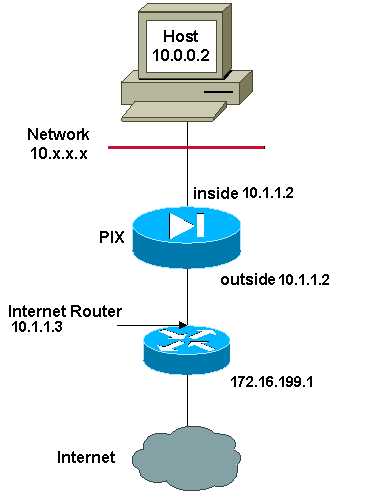
For example, this command uses static identity NAT for an inside IP address (10.1.1.2) when accessed by the outside:
hostname(config)#static (inside,outside) 10.1.1.2
	 10.1.1.2 netmask 255.255.255.255
Refer to Cisco Security Appliance Command Reference, Version 7.2 for more information on the static command.
This command uses static identity NAT for an outside address (172.16.199.1) when accessed by the inside:
hostname(config)#static (outside,inside) 172.16.199.1
	 172.16.199.1 netmask 255.255.255.255
This command statically maps an entire subnet:
 hostname(config)#static (inside,dmz) 10.1.1.2 10.1.1.2
	 netmask 255.255.255.0
This static identity policy NAT example shows a single real address that uses identity NAT when accessing one destination address and a translation when accessing another:
hostname(config)#access-list NET1 permit ip host
	 10.1.1.3 172.16.199.0 255.255.255.224
hostname(config)#access-list NET2 permit ip host
	 10.1.1.3 172.16.199.224 255.255.255.224
hostname(config)#static (inside,outside) 10.1.1.3
	 access-list NET1
hostname(config)#static (inside,outside) 172.16.199.1
	 access-list NET2
Note: For more information about the static command, refer Cisco ASA 5580 Adaptive Security Appliance Command Reference, Version 8.1.
Note: For more information about access-lists, refer Cisco ASA 5580 Adaptive Security Appliance Command Line Configuration Guide, Version 8.1.
Configuring NAT Exemption
NAT exemption exempts addresses from translation and allows both real and remote hosts to originate connections. NAT exemption lets you specify the real and destination addresses when determining the real traffic to exempt (similar to policy NAT), so you have greater control using NAT exemption than identity NAT. However unlike policy NAT, NAT exemption does not consider the ports in the access list. Use static identity NAT to consider ports in the access list.
Note: If you remove a NAT exemption configuration, existing connections that use NAT exemption are not affected. To remove these connections, enter the clear local-host command.
In order to configure NAT exemption, enter this command:
hostname(config)#nat (real_interface) 0 access-list
	 acl_name [outside]
Create the extended access list using the access-list extended command . This access list can include both permit ACEs and deny ACEs. Do not specify the real and destination ports in the access list; NAT exemption does not consider the ports. NAT exemption also does not consider the inactive or time-range keywords; all ACEs are considered to be active for NAT exemption configuration.
By default, this command exempts traffic from inside to outside. If you want traffic from outside to inside to bypass NAT, then add an additional nat command and enter outside to identify the NAT instance as outside NAT. You might want to use outside NAT exemption if you configure dynamic NAT for the outside interface and want to exempt other traffic.
For example, in order to exempt an inside network when accessing any destination address, enter this command:
 hostname(config)#access-list EXEMPT permit ip 10.1.1.0
	 255.255.255.0 any
hostname(config)# nat (inside) 0 access-list
	 EXEMPT
In order to use dynamic outside NAT for a DMZ network, and exempt another DMZ network, enter this command:
 hostname(config)#nat (dmz) 1 10.1.1.0 255.255.255.0
	 outside dns
hostname(config)#global (inside) 1
	 10.1.1.2
hostname(config)#access-list EXEMPT permit ip 10.1.1.0
	 255.255.255.0 any
hostname(config)#nat (dmz) 0 access-list
	 EXEMPT
In order to exempt an inside address when accessing two different destination addresses, enter this commands:
hostname(config)#access-list NET1 permit ip 10.1.1.0
	 255.255.255.0 172.16.199.0 255.255.255.224
hostname(config)#access-list NET1 permit ip 10.1.1.0
	 255.255.255.0 172.16.199.224 255.255.255.224
hostname(config)#nat (inside) 0 access-list NET1
Verify
Traffic that flows through the security appliance most likely undergoes NAT. Refer to PIX/ASA: Monitor and Troubleshoot Performance Issues in order to verify the translations that are in use on the security appliance.
The show xlate count command displays the current and maximum number of translations through the PIX. A translation is a mapping of an internal address to an external address and can be a one-to-one mapping, such as NAT, or a many-to-one mapping, such as PAT. This command is a subset of the show xlate command, which outputs each translation through the PIX. Command output shows translations "in use," which refers to the number of active translations in the PIX when the command is issued; "most used" refers to the maximum translations that have ever been seen on the PIX since it was powered on.
Troubleshoot
Error Message Received When Adding a Static PAT for Port 443
Problem
You receive this error message when you add a static PAT for port 443:
[ERROR] static (INSIDE,OUTSIDE) tcp interface 443 192.168.1.87 443 netmask 255.255.255.255 tcp 0 0 udp 0
unable to reserve port 443 for static PAT
ERROR: unable to download policy
Solution
This error message occurs when either ASDM or WEBVPN is running on the 443 port. In order to resolve this issue, log in to the firewall, and complete one of these steps:
-
In order to change the ASDM port to anything other than 443, run these commands:
ASA(config)#no http server enable
ASA(config)#http server enable 8080
-
In order to change the WEBVPN port to anything other than 443, run these commands:
ASA(config)#webvpn
ASA(config-webvpn)#enable outside
ASA(config-webvpn)#port 65010
After you run these commands, you should be able to add a NAT/PAT on port 443 to another server. When you attempt to use ASDM to manage the ASA in the future, specify the new port as 8080.
ERROR: mapped-address conflict with existing static
Problem
You receive this error when you add a static statement on the ASA:
ERROR: mapped-address conflict with existing static
Solution
Verify that an entry does not already exist for the static source you want to add.
Related Information
Revision History
| Revision | Publish Date | Comments |
|---|---|---|
1.0 |
03-May-2005 |
Initial Release |
Contact Cisco
- Open a Support Case

- (Requires a Cisco Service Contract)


 Feedback