ASA 8.3: TACACS Authentication using ACS 5.X
Available Languages
Contents
Introduction
This document provides information on how to configure the security appliance to authenticate users for network access.
Prerequisites
Requirements
This document assumes that the Adaptive Security Appliance (ASA) is fully operational and configured to allow the Cisco Adaptive Security Device Manager (ASDM) or CLI to make configuration changes.
Note: Refer to Allowing HTTPS Access for ASDM for more information on how to allow the device to be remotely configured by the ASDM.
Components Used
The information in this document is based on these software and hardware versions:
-
Cisco Adaptive Security Appliance Software Version 8.3 and later
-
Cisco Adaptive Security Device Manager Version 6.3 and later
-
Cisco Secure Access Control Server 5.x
The information in this document was created from the devices in a specific lab environment. All of the devices used in this document started with a cleared (default) configuration. If your network is live, make sure that you understand the potential impact of any command.
Conventions
Refer to Cisco Technical Tips Conventions for more information on document conventions.
Configure
In this section, you are presented with the information to configure the features described in this document.
Note: Use the Command Lookup Tool (registered customers only) in order to obtain more information on the commands used in this section.
Network Diagram
This document uses this network setup:
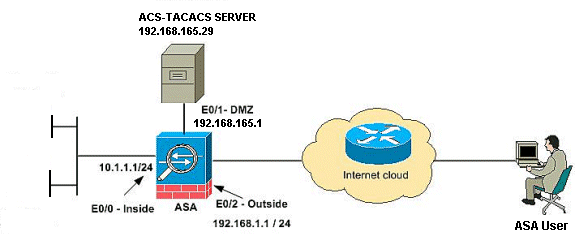
Note: The IP addressing schemes used in this configuration are not legally routable on the Internet. They are RFC 1918 addresses which were used in a lab environment.
Configure the ASA for Authentication from ACS Server using CLI
Perform these configurations for the ASA to authenticate from the ACS server:
!--- configuring the ASA for TACACS server

ASA(config)# aaa-server cisco protocol tacacs+
ASA(config-aaa-server-group)# exit

!--- Define the host and the interface the ACS server is on.

ASA(config)# aaa-server cisco (DMZ) host 192.168.165.29
ASA(config-aaa-server-host)# key cisco

!--- Configuring the ASA for HTTP and SSH access using ACS and fallback method as LOCAL authentication.

ASA(config)#aaa authentication ssh console cisco LOCAL
ASA(config)#aaa authentication http console cisco LOCAL
Note: Create a local user on the ASA using the username cisco password cisco privilege 15 command to access the ASDM with local authentication when the ACS is not available.
Configure ASA for Authentication from ACS Server using ASDM
ASDM Procedure
Complete these steps in order to configure the ASA for authentication from the ACS server:
-
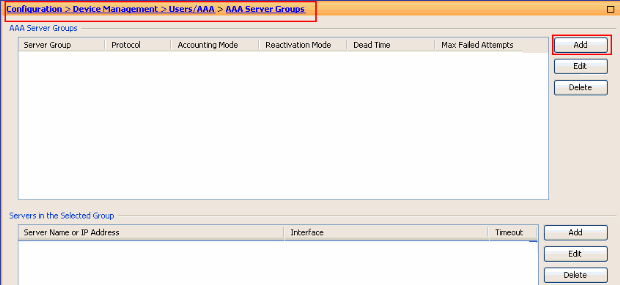
Choose Configuration > Device Management > Users/AAA > AAA Server Groups > Add in order to create an AAA Server Group.
-
Provide the AAA Server Group details in the Add AAA Server Group window as shown. The protocol used is TACACS+ and the server group created is cisco.
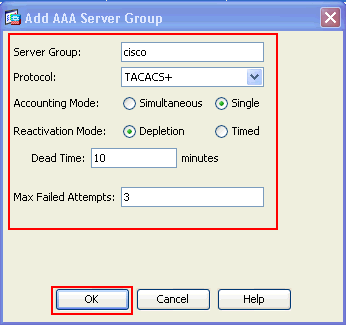
Click OK.
-
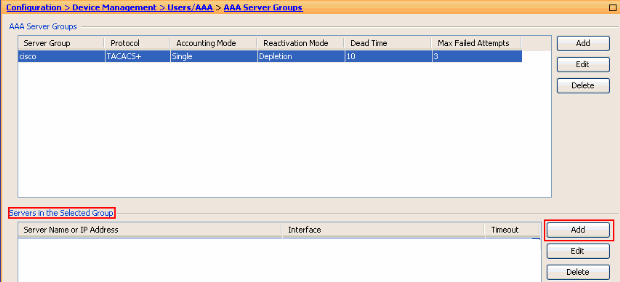
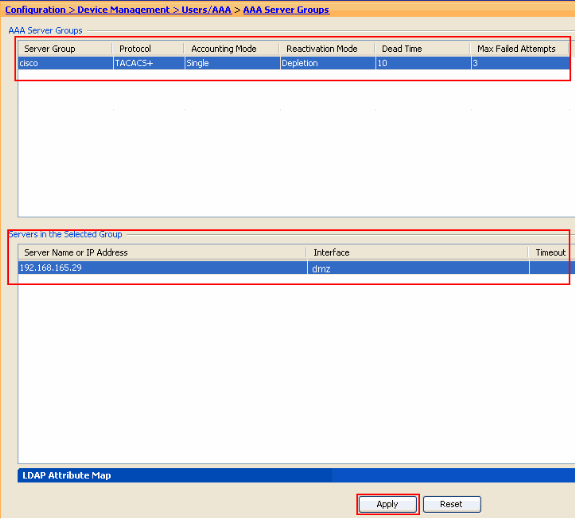
Choose Configuration > Device Management > Users/AAA > AAA Server Groups and click Add under Servers in the Selected Group in order to add the AAA server.
-
Provide the AAA Server details in the Add AAA Server window as shown. The server group used is cisco.
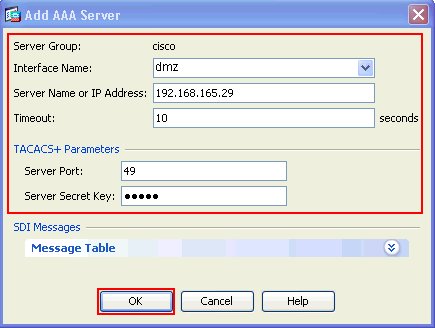
Click OK, then click Apply.
You will see the AAA Server Group and the AAA Server configured on the ASA.
-
Click Apply.
-
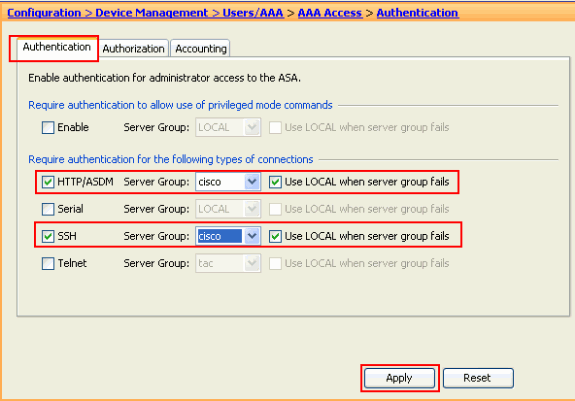
Choose Configuration > Device Management > Users/AAA > AAA Access > Authentication and click the check boxes next to HTTP/ASDM and SSH. Then, choose cisco as the server group and click Apply.
Configure ACS as a TACACS Server
Complete this procedure in order to configure the ACS as a TACACS server:
-
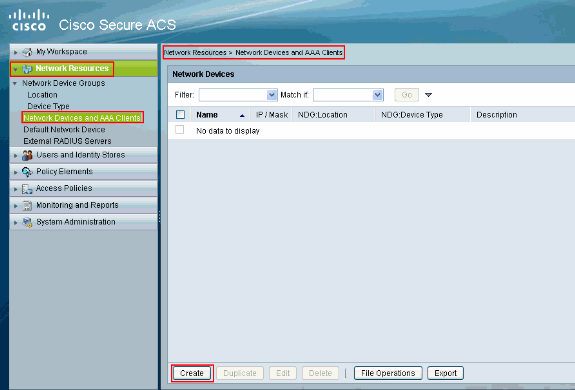
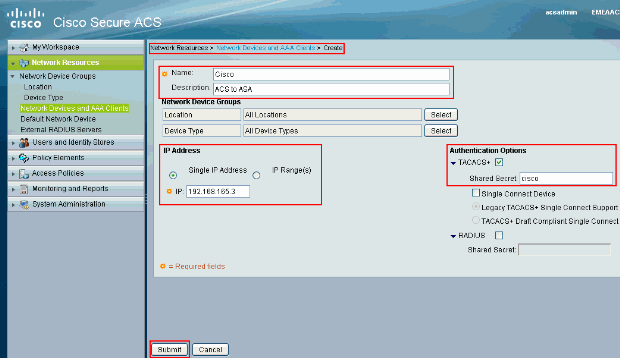
Choose Network Resources > Network Devices and AAA Clients and click Create in order to add the ASA to the ACS server.
-
Provide the required information about the client (ASA is the client here) and click Submit. This enablesthe ASA to get added to the ACS server. The details include the IP Address of the ASA and the TACACS server details.
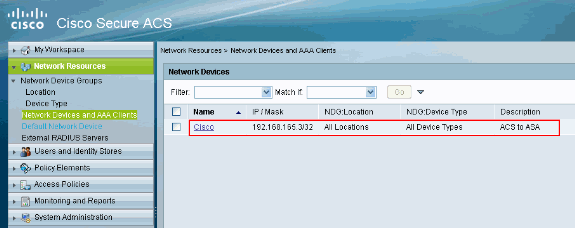
You will see the client Cisco being added to the ACS server.
-
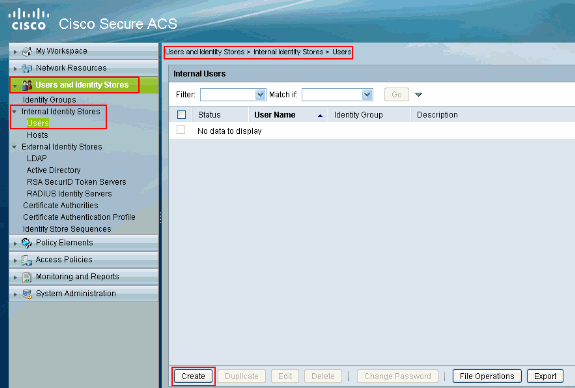
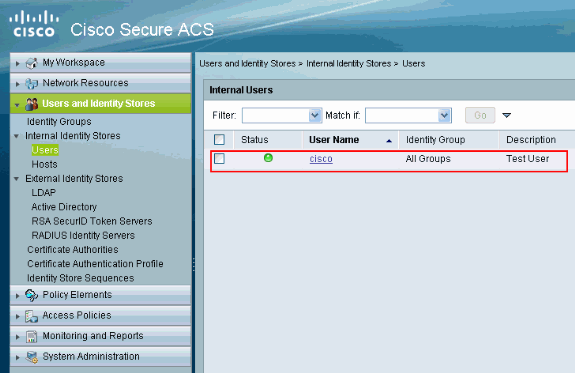
Choose Users and Identity stores > Internal Identity Stores > Users and click Create in order to create a new user.
-
Provide the Name, Password, and Enable Password information. Enable Password is optional. When you finish, click Submit.
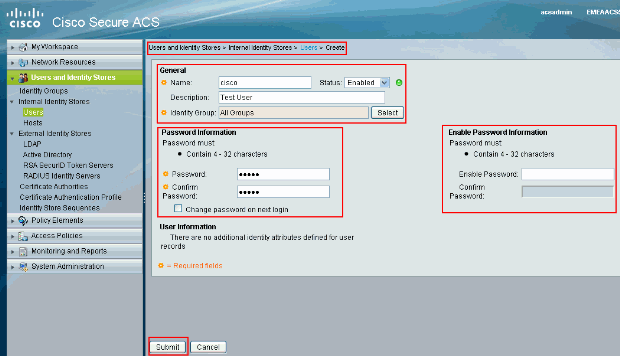
You will see the user cisco being added to the ACS server.
Verify
Use this section to confirm that your configuration works properly.
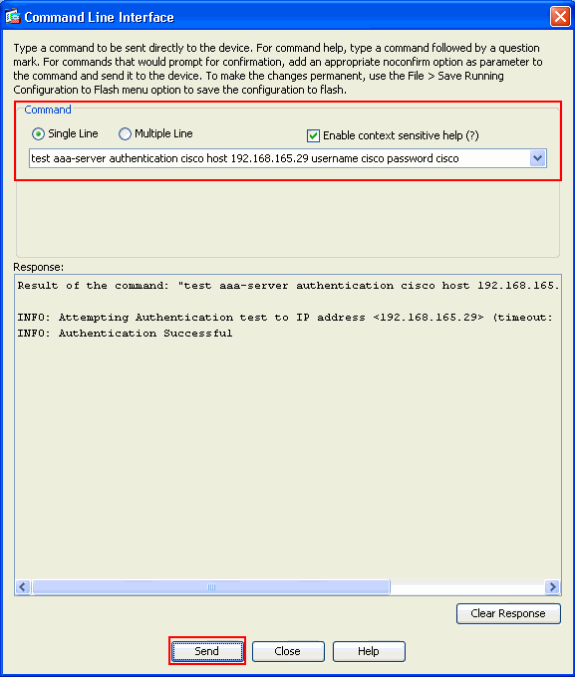
Use thetest aaa-server authentication cisco host 192.168.165.29 username cisco password cisco command to check if the configuration works properly. This image shows that the authentication is successful and the user connecting to the ASA has been authenticated by the ACS server.
The Output Interpreter Tool (registered customers only) (OIT) supports certain show commands. Use the OIT to view an analysis of show command output.
Troubleshoot
Error: AAA Marking TACACS+ server x.x.x.x in aaa-server group tacacs as FAILED
This message means that Cisco ASA lost the connectivity with the x.x.x.x server. Make sure you have a valid connectivity on tcp 49 to server x.x.x.x from the ASA. You can also increase the timeout on the ASA for TACACS+ server from 5 to the desired number of seconds in case there is a network latency. The ASA would not send an authentication request to the FAILED server x.x.x.x. However, it will use the next server in the aaa-server group tacacs.
Related Information
- Cisco ASA 5500 Series Adaptive Security Appliances Support Page
- Cisco ASA 5500 Series Adaptive Security Appliances Command References
- Cisco Adaptive Security Device Manager
- IPsec Negotiation/IKE Protocols Support Page
- Cisco Secure Access Control Server for Windows
- Requests for Comments (RFCs)

- Technical Support & Documentation - Cisco Systems
Revision History
| Revision | Publish Date | Comments |
|---|---|---|
1.0 |
25-Apr-2011 |
Initial Release |
Contact Cisco
- Open a Support Case

- (Requires a Cisco Service Contract)


 Feedback