ASA 8.X: AnyConnect SCEP Enrollment Configuration Example
Available Languages
Contents
Introduction
SCEP enrollment functionality is introduced in AnyConnect standalone client 2.4. In this process, you modify the AnyConnect XML profile to include an SCEP-related configuration and create a specific group policy and connection profile for certificate enrollment. When an AnyConnect user connects to this specific group, AnyConnect sends a certificate enrollment request to the CA server, and the CA server automatically accepts or denies the request.
Prerequisites
Requirements
There are no specific requirements for this document.
Components Used
The information in this document is based on these software and hardware versions:
-
Cisco ASA 5500 Series Adaptive Security Appliances that run software version 8.x
-
Cisco AnyConnect VPN version 2.4
The information in this document was created from the devices in a specific lab environment. All of the devices used in this document started with a cleared (default) configuration. If your network is live, make sure that you understand the potential impact of any command.
Conventions
Refer to the Cisco Technical Tips Conventions for more information on document conventions.
Background Information
The goal of Automatic SCEP enrollment for AnyConnect is to issue a certificate to the client in a secure and scalable manner. For example, users do not need to request a certificate from a CA server. This functionality is integrated in the AnyConnect client. The certificates are issued to the clients based on the certificate parameters mentioned in the XML profile file.
Overview of Changes Required
AnyConnect SCEP enrollment feature requires certain certificate parameters to be defined in the XML profile. A Group Policy and Connection Profile is created on the ASA for certificate enrollment, and the XML profile is associated with that policy. The AnyConnect client connects to the Connection Profile that uses this specific policy and sends a request for a certificate with the parameters that are defined in the XML file. Certificate authority (CA) automatically accepts or denies the request. The AnyConnect client retrieves certificates with the SCEP protocol if the <CertificateSCEP> element is defined in a client profile.
Client certificate authentication must fail before AnyConnect tries to automatically retrieve the new certificates, so if you already have a valid certificate installed, enrollment does not occur.
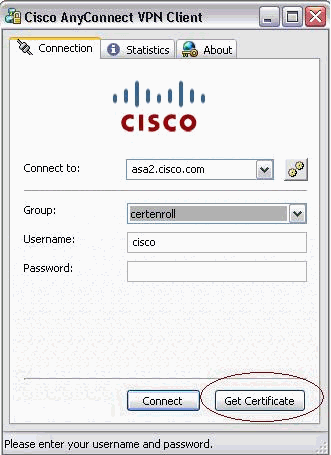
When users log in to the specific group, they are automatically enrolled. There is also a manual method available for certificate retrieval in which users are presented with a Get Certificate button. This only works when the client has direct access to the CA server, not through the tunnel.
Refer to Cisco AnyConnect VPN Client Administrator Guide, Release 2.4 for more information.
XML Settings to Enable the Anyconnect SCEP Feature
These are the important elements that need to be defined in the AnyConnect XML file. Refer to Cisco AnyConnect VPN Client Administrator Guide, Release 2.4 for more information.
-
<AutomaticSCEPHost>—Specifies the ASA host name and connection profile (tunnel group) for which SCEP certificate retrieval is configured. The value needs to be in the format of the fully qualified domain name of the ASA\connection profile name or IP Address of the ASA\connection profile name.
-
<CAURL>—Identifies the SCEP CA server.
-
<CertificateSCEP>—Defines how the contents of the certificate are requested.
-
<DisplayGetCertButton>—Determines if the AnyConnect GUI displays the Get Certificate button. It enables users to manually request renewal or provisioning of the certificate.
Here is an example profile:
<?xml version="1.0" encoding="UTF-8"?>
<AnyConnectProfile xmlns="http://schemas.xmlsoap.org/encoding/"
xmlns:xsi="http://www.w3.org/2001/XMLSchema-instance"
xsi:schemaLocation="http://schemas.xmlsoap.org/encoding/AnyConnectProfile.xsd">
	<ClientInitialization>
		<UseStartBeforeLogon UserControllable="true">false</UseStartBeforeLogon>
		<AutomaticCertSelection UserControllable="true">true</AutomaticCertSelection>
		<ShowPreConnectMessage>false</ShowPreConnectMessage>
		<CertificateStore>All</CertificateStore>
		<CertificateStoreOverride>false</CertificateStoreOverride>
		<ProxySettings>Native</ProxySettings>
		<AutoConnectOnStart UserControllable="true">true</AutoConnectOnStart>
		<MinimizeOnConnect UserControllable="true">true</MinimizeOnConnect>
		<LocalLanAccess UserControllable="true">false</LocalLanAccess>
		<AutoReconnect UserControllable="false">true
			<AutoReconnectBehavior UserControllable="false">
     ReconnectAfterResume
   </AutoReconnectBehavior>
		</AutoReconnect>
		<AutoUpdate UserControllable="false">true</AutoUpdate>
		<RSASecurIDIntegration UserControllable="false">
    Automatic
  </RSASecurIDIntegration>
		<WindowsLogonEnforcement>SingleLocalLogon</WindowsLogonEnforcement>
		<WindowsVPNEstablishment>AllowRemoteUsers</WindowsVPNEstablishment>
		<AutomaticVPNPolicy>false</AutomaticVPNPolicy>
		<PPPExclusion UserControllable="false">Automatic
			<PPPExclusionServerIP UserControllable="false"></PPPExclusionServerIP>
		</PPPExclusion>
		<EnableScripting UserControllable="false">false</EnableScripting>
		<CertificateEnrollment>
			<AutomaticSCEPHost>asa2.cisco.com/certenroll</AutomaticSCEPHost>
			<CAURL PromptForChallengePW="false">
     http://10.11.11.1/certsrv/mscep/mscep.dll
   </CAURL>
			<CertificateSCEP>
				<Name_CN>cisco</Name_CN>
				<Company_O>Cisco</Company_O>
				<DisplayGetCertButton>true</DisplayGetCertButton>
			</CertificateSCEP>
		</CertificateEnrollment>
	</ClientInitialization>
	<ServerList>
		<HostEntry>
			<HostName>asa2.cisco.com</HostName>
		</HostEntry>
	</ServerList>
</AnyConnectProfile>
Configure the ASA to Support SCEP Protocol for AnyConnect
In order to provide access to a private Registration Authority (RA), the ASA administrator must create an alias that has an ACL that restricts private side network connectivity to the desired RA. In order to automatically retrieve a certificate, users connect and authenticate to this alias.
Complete these steps:
-
Create an alias on the ASA to point to the specific configured group.
-
Specify the alias in the <AutomaticSCEPHost> element in the client profile of the user.
-
Attach the client profile that contains the <CertificateEnrollment> section to the specific configured group.
-
Set an ACL for the specific configured group to restrict traffic to the private side RA.
Complete these steps:
-
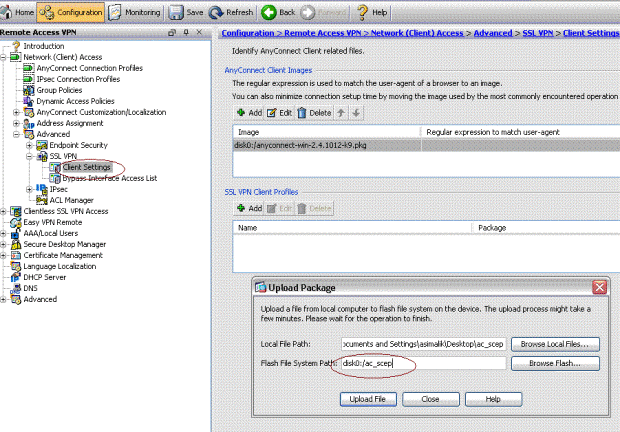
Upload the XML profile to ASA.
-
Choose Remote Access VPN > Network (client ) access > Advanced > SSL VPN > Client settings.
-
Under SSL VPN Client profiles, click Add.
-
Click Browse Local Files in order to select the profile file, and click Browse Flash in order to specify the flash file name.
-
Click Upload File.
-
-
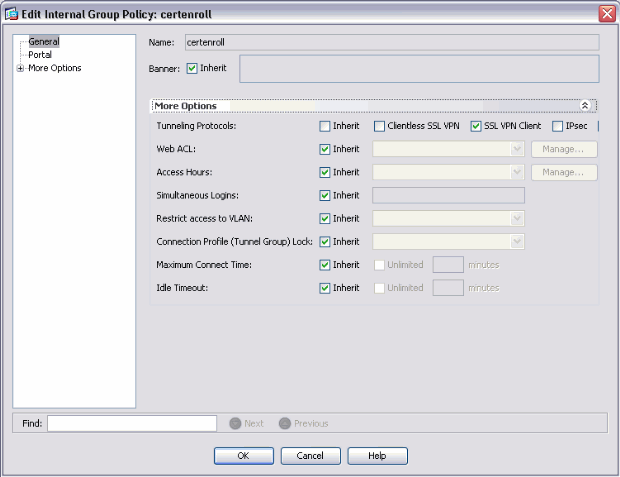
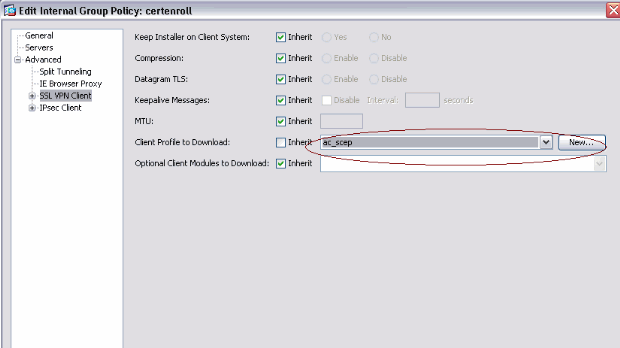
Set up a certenroll group policy for certificate enrollment.
-
Choose Remote access VPN > Network client access > Group Policy, and click Add.
-
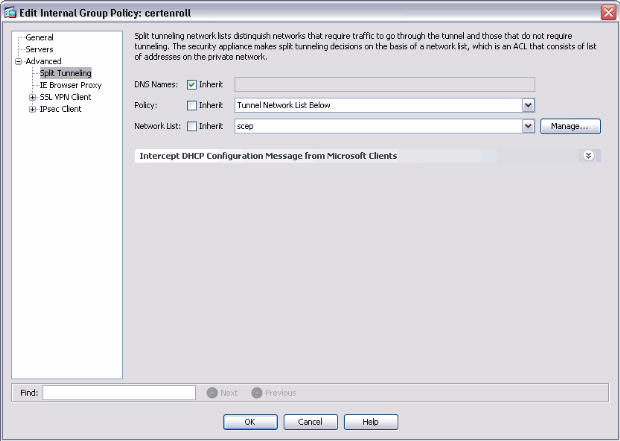
Add a split tunnel for CA server.
-
Expand Advanced, and then select Split Tunneling.
-
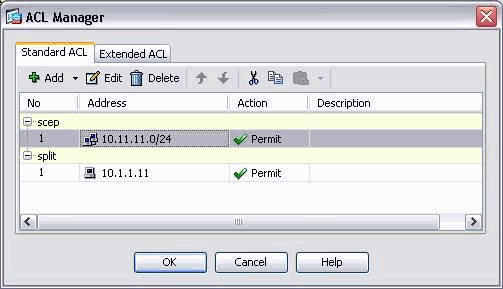
Choose Tunnel Network List Below from the Policy menu, and click Manage in order to add the access control list.
-
-
Select SSL VPN Client, and choose the profile for certenroll from the Client Profile to Download menu.
-
-
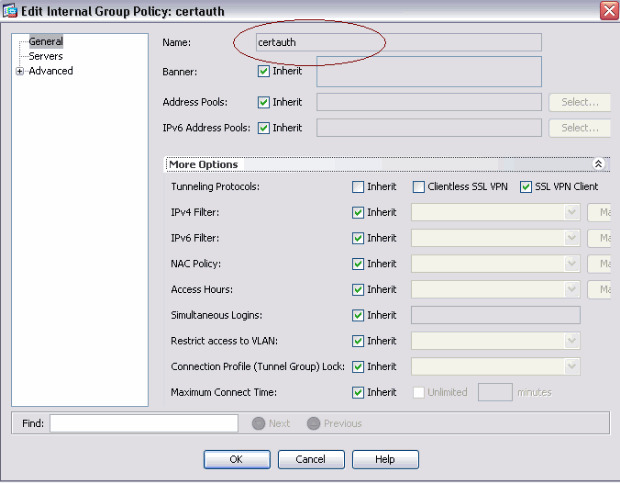
Create another group called certauth for certificate authentication.
-
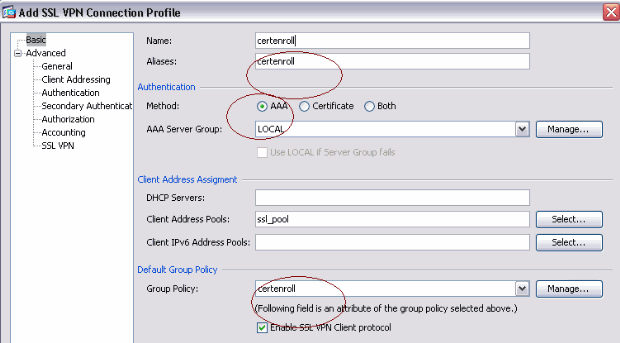
Create a certenroll connection profile.
-
Choose Remote access VPN > Network client access > AnyConnect connection profiles, and click Add.
-
Enter the certenroll group in the Aliases field.
Note: The alias name must match the value used in the AnyConnect profile under AutomaticSCEPHost.
-
-
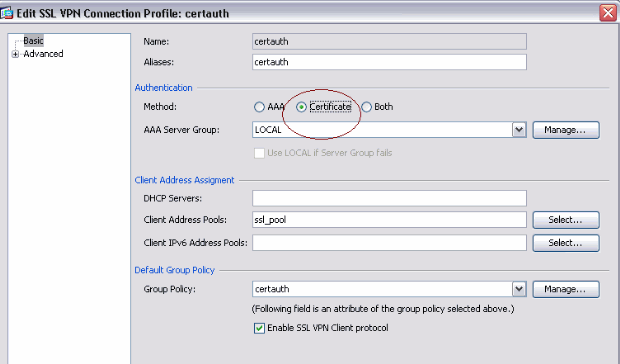
Make another connection profile called certauth with certificate authentication. This is the actual connection profile that is used after enrollment.
-
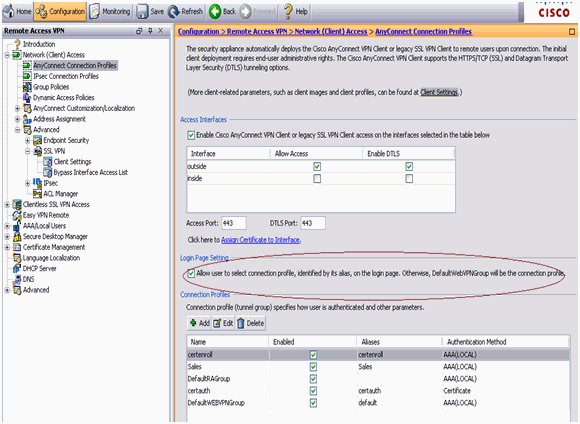
In order to make sure use of alias is enabled, check Allow user to select connection profile, identified by its alias, on the login page. Otherwise, DefaultWebVPNGroup is the connection profile.
Test AnyConnect SCEP
Use this section in order to confirm that your configuration works properly.
-
Launch the AnyConnect client, and connect to the certenroll profile.
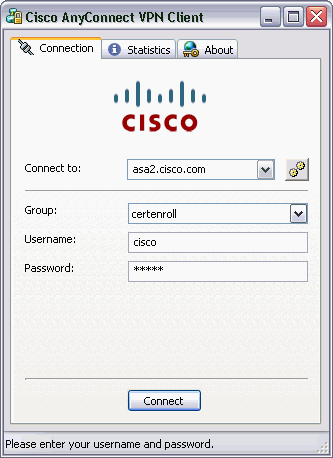
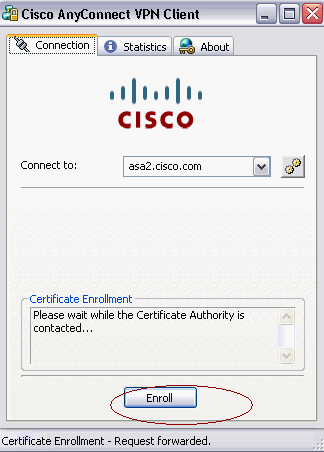
AnyConnect passes the enrollment request to the CA server through SCEP.
AnyConnect passes the enrollment request directly and does not go through the tunnel, if the Get Certificate button is used.
-
This warning appears. Click Yes to install the use user and root certificate

-
Once the certificate is enrolled, connect to the certauth profile.
Certificate Storage on Microsoft Windows after SCEP Request
Complete these steps:
-
Click Start > run > mmc.
-
Click Add/remove snap in.
-
Click Add, and choose certificates.
-
Add the My user account and computer account certificates.
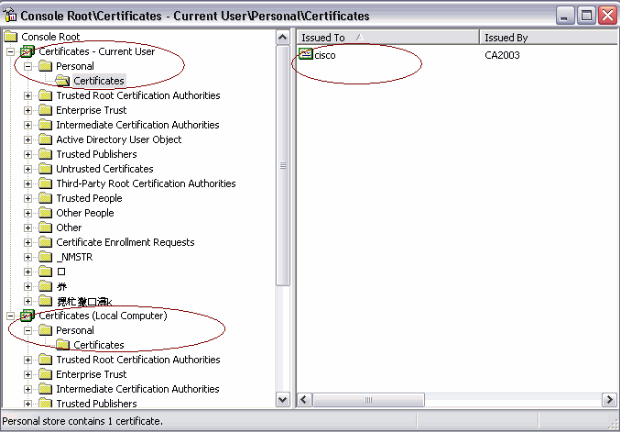
This image shows the user certificate installed in the Windows certificate store:
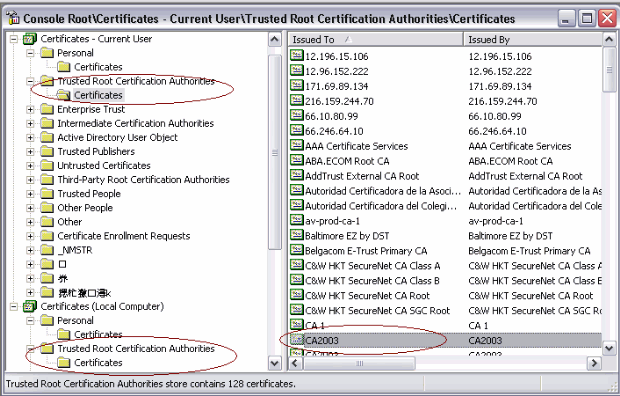
This image shows the CA certificate installed in the Windows certificate store:
Troubleshoot
This section provides information you can use to troubleshoot your configuration.
-
AnyConnect SCEP enrollment only works when certificate authentication fails. If it is not enrolling, check the certificate store. If certificates are already installed, delete them and test again.
-
SCEP enrollment does not work unless the ssl certificate-authentication interface outside port 443 command is used.
Refer to these Cisco Bug IDs for more information:
-
Cisco Bug ID CSCtf06778 (registered customers only) —AnyConnect SCEP enroll doesn't work with Per Group Cert Auth 2
-
Cisco Bug ID CSCtf06844 (registered customers only) —AnyConnect SCEP enrollment not working with ASA Per Group Cert Auth
-
-
If the CA server is on the outside of ASA, make sure to allow the hair-pinning with the same-security-traffic permit intra-interface command. Also add the nat outside and access-list commands as shown in this example:
nat (outside) 1
access-list natoutside extended permit ip 172.16.1.0 255.255.255.0 host 171.69.89.87
Where 172.16.1.0 is the AnyConnect pool and 171.69.89.87 is the CA server IP address.
-
If the CA server is on the inside, make sure to include it in the split tunnel access list for certenroll group policy. In this document, it is assumed that the CA server is on the inside.
group-policy certenroll attributes
split-tunnel-policy tunnelspecified
 split-tunnel-network-list value scep

access-list scep standard permit 171.69.89.0 255.255.255.0
Related Information
Revision History
| Revision | Publish Date | Comments |
|---|---|---|
1.0 |
10-Mar-2010 |
Initial Release |
Contact Cisco
- Open a Support Case

- (Requires a Cisco Service Contract)


 Feedback