ASA/PIX 8.x: Site-to-Site IPSec VPN Authentication Using Digital Certificates with Microsoft CA Configuration Example
Available Languages
Contents
Introduction
This document describes how to manually install a third party vendor digital certificate on the Cisco Security Appliance (ASA/PIX) 8.x in Site-to-Site VPN in order to authenticate the IPSec peers with the Microsoft Certificate Authority (CA) server.
Prerequisites
Requirements
This document requires that you have access to a certificate authority (CA) for certificate enrollment. Supported third party CA vendors are Baltimore, Cisco, Entrust, iPlanet/Netscape, Microsoft, RSA, and VeriSign.
This document assumes that there is no pre-existing VPN configuration in the ASA/PIX.
Note: This document uses a Windows 2003 server as the CA server for the scenario.
Components Used
The information in this document is based on these software and hardware versions:
-
Cisco ASA 5510 Adaptive Security Appliance that runs software version 8.0(2) and ASDM version 6.0(2)
The information in this document was created from the devices in a specific lab environment. All of the devices used in this document started with a cleared (default) configuration. If your network is live, make sure that you understand the potential impact of any command.
Related Products
The ASA configuration can also be used with the Cisco 500 Series PIX that runs software version 8.x.
Conventions
Refer to the Cisco Technical Tips Conventions for more information on document conventions.
Configure
In this section, you are presented with the information to configure the features described in this document.
Note: Use the Command Lookup Tool (registered customers only) in order to obtain more information on the commands used in this section.
Network Diagram
This document uses this network setup:
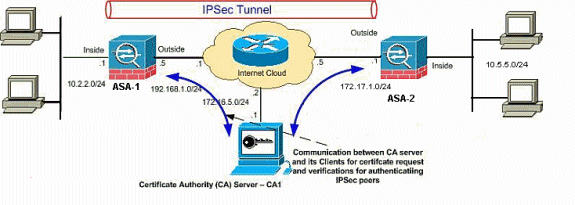
Note: The IP addressing schemes used in this configuration are not legally routable on the Internet. They are RFC 1918 addresses that were used in a lab environment.
Configurations
This document uses these configurations:
ASA-1 Configuration
In order to install a third party vendor digital certificate on the ASA, complete these steps:
-
Step 1. Verify that the Date, Time, and Time Zone Values are Accurate
-
Step 5. Configure Site-to-Site VPN (IPSec) to Use the Newly Installed Certificate
Step 1. Verify that the Date, Time, and Time Zone Values are Accurate
ASDM Procedure
-
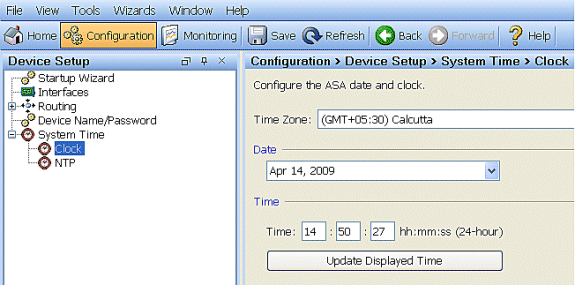
Click Configuration, and then click Device Setup.
-
Expand System Time, and choose Clock.
-
Verify that the information listed is accurate.
The values for Date, Time, and Time Zone must be accurate in order for the proper certificate validation to occur.
Command Line Example
| ASA-1 | |
|---|---|
ASA-1# sh clock 14:53:15.943 IST Tue Apr 14 2009 |
Step 2. Generate a Certificate Signing Request
A certificate signing request (CSR) is required in order for the third party CA to issue an identity certificate. The CSR contains the distinguished name (DN) string of your ASA along with its generated public key. The ASA uses the generated private key to digitally sign the CSR.
ASDM Procedure
-
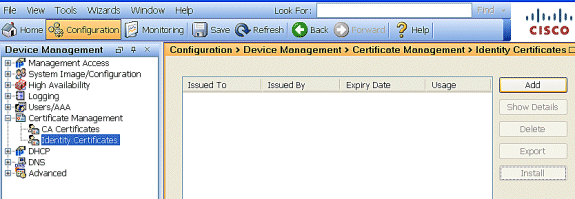
Go toConfiguration > Device Management > Certificate Management > Identity Certificates, and then click Add.
-
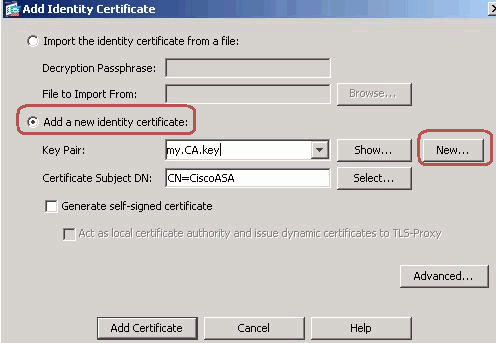
Click the Add a new identity certificate radio button.
-
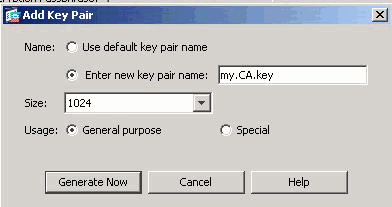
For the Key Pair, click New.
-
Click the Enter new key pair name radio button. You must distinctly identify the key pair name for recognition purposes.
-
Click Generate Now.
The key pair must now be created.
-
In order to define the Certificate Subject DN, click Select, and configure the attributes listed in this table:
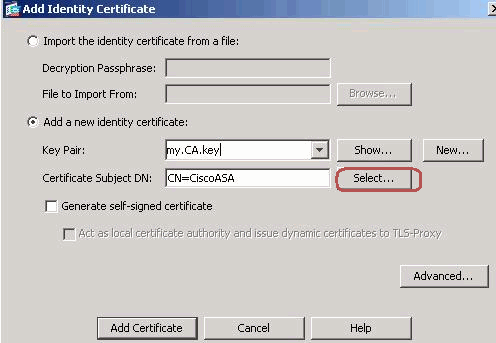
Attribute Description CN Full Qualified Domain Name (FQDN) to be used for connections to your firewall. EX: CiscoASA.cisco.com OU Department Name O Company Name (Avoid using Special Characters) C Country Code (2 Letter Code without Punctuation) St State (Must be spelled out completely EX: North Carolina) L City In order to configure these values, choose a value from the Attribute drop-down list, enter the value, and click Add.
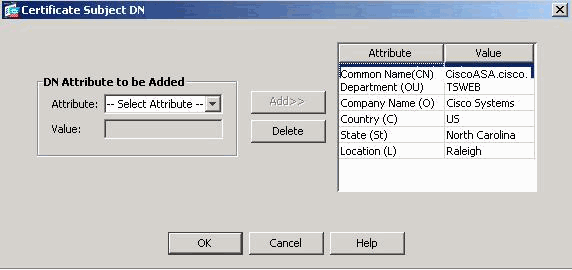
Note: Some third party vendors require particular attributes to be included before an identity certificate is issued. If you are unsure of the required attributes, check with your vendor for details.
-
Once the appropriate values are added, click OK.
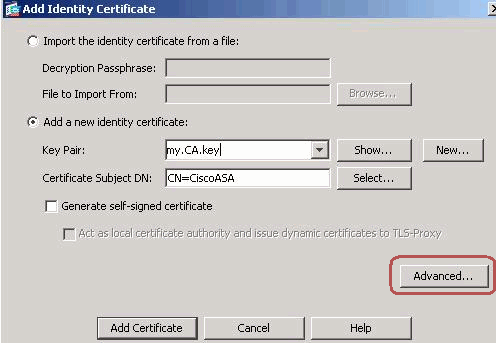
The Add Identity Certificate dialog box appears with the Certificate Subject DN field populated.
-
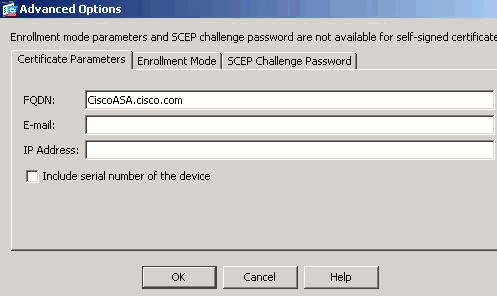
Click Advanced.
-
In the FQDN field, enter the FQDN to be used to access the device from the Internet.
This value must be the same FQDN you used for the Common Name (CN).
-
Click OK, and then click Add Certificate.
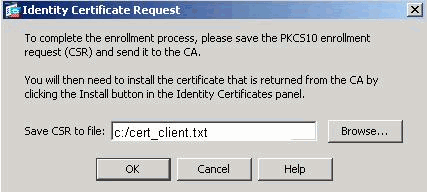
You are prompted to save the CSR to a file on your local machine.
-
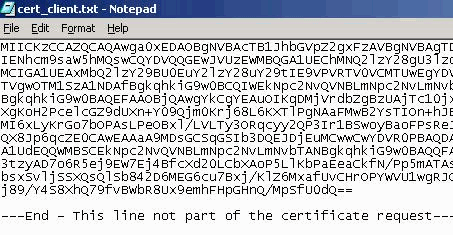
Click Browse, choose a location in which to save the CSR, and save the file with the .txt extension.
Note: When you save the file with a .txt extension, you can open the file with a text editor (such as Notepad) and view the PKCS#10 request.
-
Submit the saved CSR to your third party vendor, such as Microsoft CA, as shown.
-
Perform the web login into the CA Server 172.16.5.1 with the help of the user credentials supplied for the VPN server.
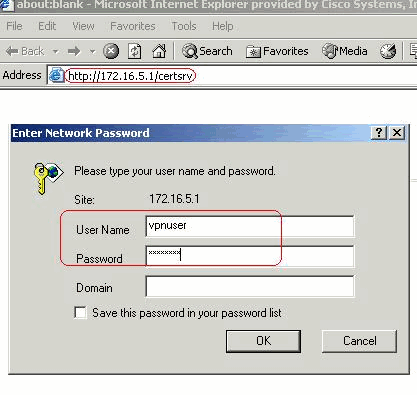
Note: Make sure that you have a user account for the ASA (VPN server) with the CA server.
-
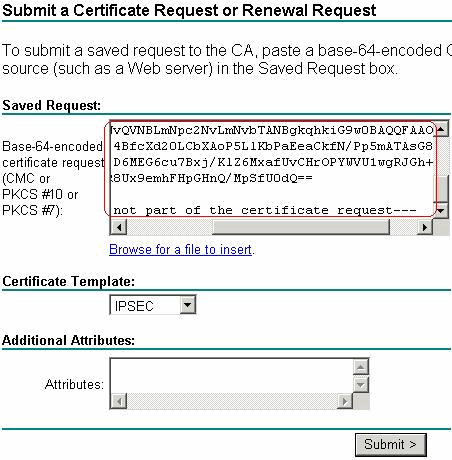
Click Request a certificate > advanced certificate request in order to choose Submit a certificate request by using a base-64-encoded CMC or PKCS#10 file or submit a renewal request by using a base-64-encoded PKCS#7 file.

-
Copy and paste the encoded information into the Saved Request box, and then click Submit.
-
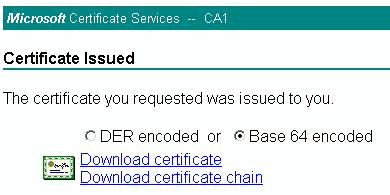
Click the Base 64 encoded radio button, and click Download certificate.
-
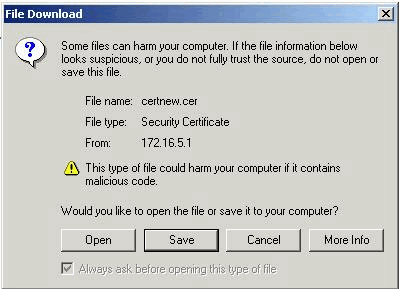
The File Download window appears. Save it with the cert_client_id.cer name, which is the identity certificate to be installed on the ASA.
-
Command Line Example
| ASA-1 | |
|---|---|
ASA-1# configure terminal ASA-1(config)#crypto key generate rsa label my.ca.key modulus 1024 !--- Generates 1024 bit RSA key pair. "label" defines the name of the Key Pair. INFO: The name for the keys will be: my.CA.key Keypair generation process begin. Please wait... ASA-1(config)#crypto ca trustpoint CA1 ASA-1(config-ca-trustpoint)# subject-name CN=CiscoASA.cisco.com,OU=TSWEB, O=Cisco Systems,C=US,St=North Carolina,L=Raleigh !--- Defines x.500 distinguished name. Use the attributes defined in table as a guide. ASA-1(config-ca-trustpoint)#keypair my.CA.key !--- Specifies key pair generated in Step 3 ASA-1(config-ca-trustpoint)#fqdn CiscoASA.cisco.com !--- Specifies the FQDN (DNS:) to be used as the subject alternative name ASA-1(config-ca-trustpoint)#enrollment terminal !--- Specifies manual enrollment. ASA-1(config-ca-trustpoint)#exit ASA-1(config)#crypto ca enroll CA1 !--- Initiates certificate signing request. This is the request to be !--- submitted via Web or Email to the third party vendor. % Start certificate enrollment .. % The subject name in the certificate will be: cn=CiscoASA.cisco.com OU=TSWEB, O=Cisco Systems, C=US,St=North Carolina,L=Raleigh % The fully-qualified domain name in the certificate will be: CiscoASA.cisco.com % Include the device serial number in the subject name? [yes/no]: no !--- Do not include the device's serial number in the subject. Display Certificate Request to terminal? [yes/no]: y !--- Displays the PKCS#10 enrollment request to the terminal. You will need to !--- copy this from the terminal to a text file or web text field to submit to !--- the third party CA. Certificate Request follows: MIICKzCCAZQCAQAwga0xEDAOBgNVBAcTB1JhbGVpZ2gxFzAVBgNVBAgTDk5vcnRo IENhcm9saW5hMQswCQYDVQQGEwJVUzEWMBQGA1UEChMNQ2lzY28gU3lzdGVtczEk MCIGA1UEAxMbQ2lzY29BU0EuY2lzY28uY29tIE9VPVRTV0VCMTUwEgYDVQQFEwtK TVgwOTM1SzA1NDAfBgkqhkiG9w0BCQIWEkNpc2NvQVNBLmNpc2NvLmNvbTCBnzAN BgkqhkiG9w0BAQEFAAOBjQAwgYkCgYEAuOIKqDMjVrdbZgBzUAjTc10jxSlbkkcr XgKoH2PcelcGZ9dUXn+Y09Qjm0Krj68L6KXTlPgNAaFMwB2YsTIOn+hJBVq5Sxjv MI6xLyKrGo7bOPAsLPeOBxl/LVLTy3ORqcyy2QP3Ir1BSwoyBaoFPsReJGSAYG+O QX8Jp6qcZE0CAwEAAaA9MDsGCSqGSIb3DQEJDjEuMCwwCwYDVR0PBAQDAgWgMB0G A1UdEQQWMBSCEkNpc2NvQVNBLmNpc2NvLmNvbTANBgkqhkiG9w0BAQQFAAOBgQBM 3tzyAD7o6R5ej9EW7Ej4BfcXd20LCbXAoP5LlKbPaEeaCkfN/Pp5mATAsG832TBm bsxSvljSSXQsQlSb842D6MEG6cu7Bxj/KlZ6MxafUvCHrOPYWVU1wgRJGh+ndCZK j89/Y4S8XhQ79fvBWbR8Ux9emhFHpGHnQ/MpSfU0dQ== ---End - This line not part of the certificate request--- Redisplay enrollment request? [yes/no]: n ASA-1(config)# |
Step 3. Authenticate the Trustpoint
Once you receive the identity certificate from the third party vendor, you can proceed with this step.
ASDM Procedure
-
Save the identity certificate to your local computer.
-
If you were provided a base 64-encoded certificate that did not come as a file, you must copy the base 64 message and paste it into a text file.
-
Rename the file with a .cer extension
Note: Once the file is renamed with the .cer extension, the file icon displays as a certificate, as shown.

-
Double-click the certificate file.
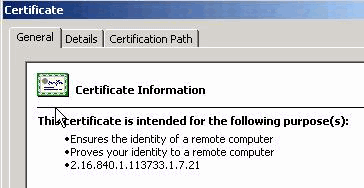
Note: If the Windows does not have enough information to verify this certificate message appears in the General tab, you must obtain the third party vendor root CA or intermediate CA certificate before you continue with this procedure. Contact your third party vendor or CA administrator in order to obtain the issuing root CA or intermediate CA certificate.
-
Click the Certificate Path tab.
-
Click the CA certificate associated with your issued identity certificate, and click View Certificate.
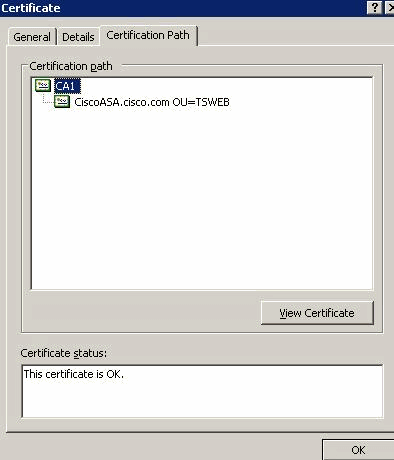
Detailed information about the CA certificate appears.
-
Click Details in order to know more information about the identity certificate.
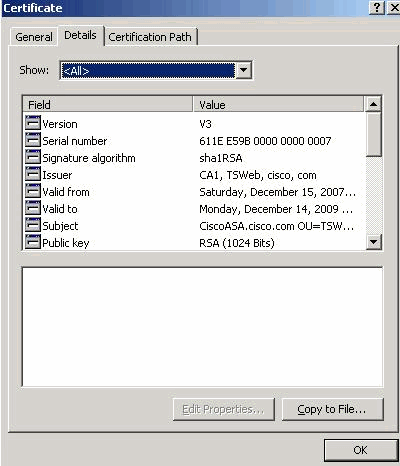
-
Before you install the identity certificate, the CA certificate must be downloaded from the CA server and installed in the ASA, as shown.
Complete these steps in order to download the CA certificate from the CA server named CA1.
-
Perform the web login into the CA server 172.16.5.1 with the help of the credentials supplied to the VPN server.
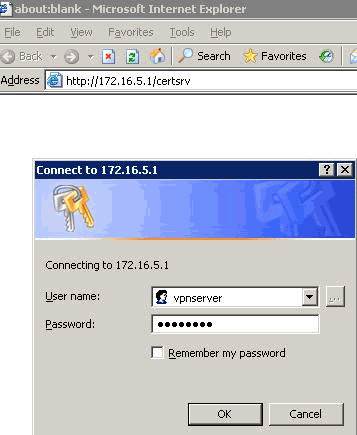
-
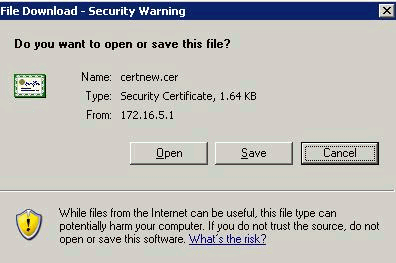
Click Download a CA certificate, certificate chain or CRL in order to open the window, as shown. Click the Base 64 radio button as the encoding method, and click Download CA certificate.
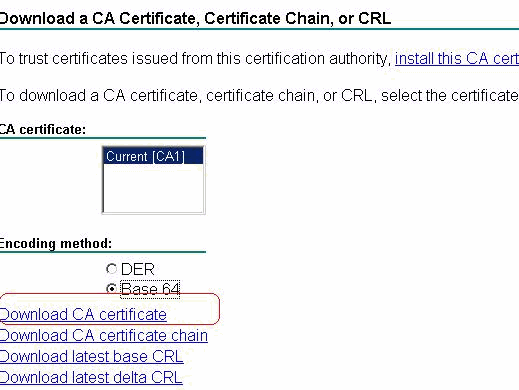
-
Save the CA certificate with the certnew.cer name on your computer.
-
-
Browse to the location where you saved the CA certificate.
-
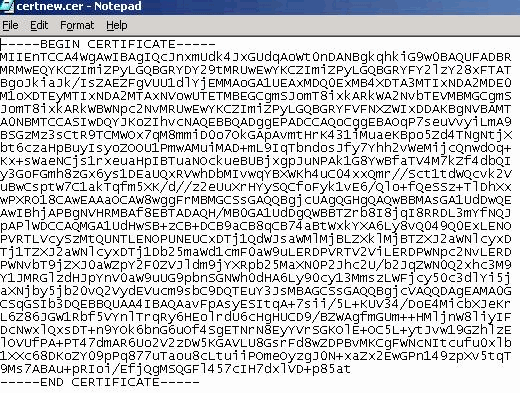
Open the file with a text editor, such as Notepad. Right-click the file, and choose Send To > Notepad.
-
The base 64-encoded message similar to the certificate in this image appears:
-
Within ASDM, click Configuration, and then click Device Management.
-
Expand Certificate Management, and choose CA Certificates.
-
Click Add.
-
Click the Paste certificate in PEM Format radio button, and paste the base 64 CA certificate provided by the third party vendor into the text field.
-
Click Install Certificate.
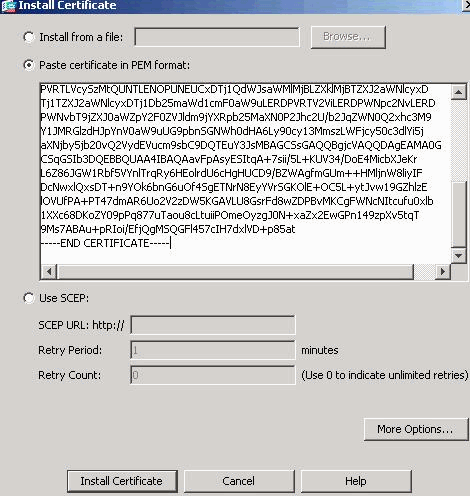
A dialog box appears that confirms the installation is successful.
Command Line Example
| ASA-1 | |
|---|---|
ASA-1(config)#crypto ca authenticate CA1 !--- Initiates the prompt for paste-in of base64 CA intermediate certificate. ! This should be provided by the third party vendor. Enter the base 64 encoded CA certificate. End with the word "quit" on a line by itself -----BEGIN CERTIFICATE----- MIIEnTCCA4WgAwIBAgIQcJnxmUdk4JxGUdqAoWt0nDANBgkqhkiG9w0BAQUFADBR MRMwEQYKCZImiZPyLGQBGRYDY29tMRUwEwYKCZImiZPyLGQBGRYFY2lzY28xFTAT BgoJkiaJk/IsZAEZFgVUU1dlYjEMMAoGA1UEAxMDQ0ExMB4XDTA3MTIxNDA2MDE0 M1oXDTEyMTIxNDA2MTAxNVowUTETMBEGCgmSJomT8ixkARkWA2NvbTEVMBMGCgmS JomT8ixkARkWBWNpc2NvMRUwEwYKCZImiZPyLGQBGRYFVFNXZWIxDDAKBgNVBAMT A0NBMTCCASIwDQYJKoZIhvcNAQEBBQADggEPADCCAQoCggEBAOqP7seuVvyiLmA9 BSGzMz3sCtR9TCMWOx7qM8mmiD0o7OkGApAvmtHrK431iMuaeKBpo5Zd4TNgNtjX bt6czaHpBuyIsyoZOOU1PmwAMuiMAD+mL9IqTbndosJfy7Yhh2vWeMijcQnwdOq+ Kx+sWaeNCjs1rxeuaHpIBTuaNOckueBUBjxgpJuNPAk1G8YwBfaTV4M7kZf4dbQI y3GoFGmh8zGx6ys1DEaUQxRVwhDbMIvwqYBXWKh4uC04xxQmr//Sct1tdWQcvk2V uBwCsptW7C1akTqfm5XK/d//z2eUuXrHYySQCfoFyk1vE6/Qlo+fQeSSz+TlDhXx wPXRO18CAwEAAaOCAW8wggFrMBMGCSsGAQQBgjcUAgQGHgQAQwBBMAsGA1UdDwQE AwIBhjAPBgNVHRMBAf8EBTADAQH/MB0GA1UdDgQWBBTZrb8I8jqI8RRDL3mYfNQJ pAPlWDCCAQMGA1UdHwSB+zCB+DCB9aCB8qCB74aBtWxkYXA6Ly8vQ049Q0ExLENO PVRTLVcySzMtQUNTLENOPUNEUCxDTj1QdWJsaWMlMjBLZXklMjBTZXJ2aWNlcyxD Tj1TZXJ2aWNlcyxDTj1Db25maWd1cmF0aW9uLERDPVRTV2ViLERDPWNpc2NvLERD PWNvbT9jZXJ0aWZpY2F0ZVJldm9jYXRpb25MaXN0P2Jhc2U/b2JqZWN0Q2xhc3M9 Y1JMRGlzdHJpYnV0aW9uUG9pbnSGNWh0dHA6Ly90cy13MmszLWFjcy50c3dlYi5j aXNjby5jb20vQ2VydEVucm9sbC9DQTEuY3JsMBAGCSsGAQQBgjcVAQQDAgEAMA0G CSqGSIb3DQEBBQUAA4IBAQAavFpAsyESItqA+7sii/5L+KUV34/DoE4MicbXJeKr L6Z86JGW1Rbf5VYnlTrqRy6HEolrdU6cHgHUCD9/BZWAgfmGUm++HMljnW8liyIF DcNwxlQxsDT+n9YOk6bnG6uOf4SgETNrN8EyYVrSGKOlE+OC5L+ytJvw19GZhlzE lOVUfPA+PT47dmAR6Uo2V2zDW5KGAVLU8GsrFd8wZDPBvMKCgFWNcNItcufu0xlb 1XXc68DKoZY09pPq877uTaou8cLtuiiPOmeOyzgJ0N+xaZx2EwGPn149zpXv5tqT 9Ms7ABAu+pRIoi/EfjQgMSQGFl457cIH7dxlVD+p85at -----END CERTIFICATE----- quit !--- Manually pasted certificate into CLI. INFO: Certificate has the following attributes: Fingerprint: 98d66001 f65d98a2 b455fbce d672c24a Do you accept this certificate? [yes/no]: yes Trustpoint CA certificate accepted. % Certificate successfully imported ASA-1(config)# |
Step 4. Install the Certificate
ASDM Procedure
Use the identity certificate provided by the third party vendor in order to complete these steps:
-
Click Configuration, and then click Device Management.
-
Expand Certificate Management, and then choose Identity Certificates.
-
Choose the identity certificate that you created in Step 2.
Note: The Expiry Date displays Pending.
-
Click Install.
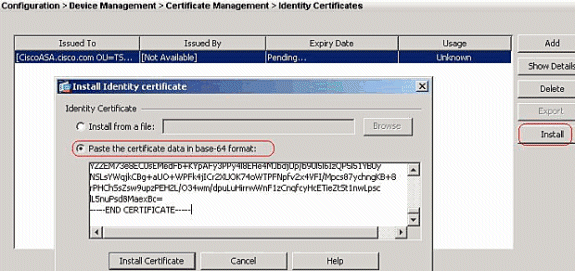
Click the Paste the certificate data in base-64 format radio button, and paste the identity certificate provided by the third party vendor into the text field.
-
Click Install Certificate.
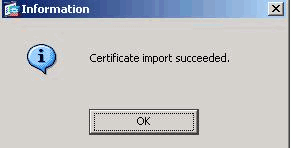
A dialog box appears in order to confirm the import is successful.
Command Line Example
| ASA-1 | |
|---|---|
ASA-1(config)#crypto ca import CA1 certificate !--- Initiates prompt to paste the base64 identity !--- certificate provided by the third party vendor. %The fully-qualified domain name in the certificate will be: CiscoASA.cisco.com Enter the base 64 encoded certificate. End with the word "quit" on a line by itself !--- Paste the base 64 certificate provided by the third party vendor. -----BEGIN CERTIFICATE----- MIIFpzCCBI+gAwIBAgIKYR7lmwAAAAAABzANBgkqhkiG9w0BAQUFADBRMRMwEQYK CZImiZPyLGQBGRYDY29tMRUwEwYKCZImiZPyLGQBGRYFY2lzY28xFTATBgoJkiaJ k/IsZAEZFgVUU1dlYjEMMAoGA1UEAxMDQ0ExMB4XDTA3MTIxNTA4MzUzOVoXDTA5 MTIxNDA4MzUzOVowdjELMAkGA1UEBhMCVVMxFzAVBgNVBAgTDk5vcnRoIENhcm9s aW5hMRAwDgYDVQQHEwdSYWxlaWdoMRYwFAYDVQQKEw1DaXNjbyBTeXN0ZW1zMSQw IgYDVQQDExtDaXNjb0FTQS5jaXNjby5jb20gT1U9VFNXRUIwgZ8wDQYJKoZIhvcN AQEBBQADgY0AMIGJAoGBALjiCqgzI1a3W2YAc1AI03NdI8UpW5JHK14CqB9j3HpX BmfXVF5/mNPUI5tCq4+vC+il05T4DQGhTMAdmLEyDp/oSQVauUsY7zCOsS8iqxqO 2zjwLCz3jgcZfy1S08tzkanMstkD9yK9QUsKMgWqBT7EXiRkgGBvjkF/CaeqnGRN AgMBAAGjggLeMIIC2jALBgNVHQ8EBAMCBaAwHQYDVR0RBBYwFIISQ2lzY29BU0Eu Y2lzY28uY29tMB0GA1UdDgQWBBQsJC3bSQzeGv4tY+MeH7KMl0xCFjAfBgNVHSME GDAWgBTZrb8I8jqI8RRDL3mYfNQJpAPlWDCCAQMGA1UdHwSB+zCB+DCB9aCB8qCB 74aBtWxkYXA6Ly8vQ049Q0ExLENOPVRTLVcySzMtQUNTLENOPUNEUCxDTj1QdWJs aWMlMjBLZXklMjBTZXJ2aWNlcyxDTj1TZXJ2aWNlcyxDTj1Db25maWd1cmF0aW9u LERDPVRTV2ViLERDPWNpc2NvLERDPWNvbT9jZXJ0aWZpY2F0ZVJldm9jYXRpb25M aXN0P2Jhc2U/b2JqZWN0Q2xhc3M9Y1JMRGlzdHJpYnV0aW9uUG9pbnSGNWh0dHA6 Ly90cy13MmszLWFjcy50c3dlYi5jaXNjby5jb20vQ2VydEVucm9sbC9DQTEuY3Js MIIBHQYIKwYBBQUHAQEEggEPMIIBCzCBqQYIKwYBBQUHMAKGgZxsZGFwOi8vL0NO PUNBMSxDTj1BSUEsQ049UHVibGljJTIwS2V5JTIwU2VydmljZXMsQ049U2Vydmlj ZXMsQ049Q29uZmlndXJhdGlvbixEQz1UU1dlYixEQz1jaXNjbyxEQz1jb20/Y0FD ZXJ0aWZpY2F0ZT9iYXNlP29iamVjdENsYXNzPWNlcnRpZmljYXRpb25BdXRob3Jp dHkwXQYIKwYBBQUHMAKGUWh0dHA6Ly90cy13MmszLWFjcy50c3dlYi5jaXNjby5j b20vQ2VydEVucm9sbC9UUy1XMkszLUFDUy5UU1dlYi5jaXNjby5jb21fQ0ExLmNy dDAhBgkrBgEEAYI3FAIEFB4SAFcAZQBiAFMAZQByAHYAZQByMAwGA1UdEwEB/wQC MAAwEwYDVR0lBAwwCgYIKwYBBQUHAwEwDQYJKoZIhvcNAQEFBQADggEBAIqCaA9G +8h+3IS8RfVAGzcWAEVRXCyBlx0NpR/jlocGJ7QbQxkjKEswXq/O2xDB7wXQaGph zRq4dxALll1JkIjhfeQY+7VSkZlGEpuBnENTohdhthz5vBjGlcROXIs8+3Ghg8hy YZZEM73e8EC0sEMedFb+KYpAFy3PPy4l8EHe4MJbdjUp/b90l5l6IzQP5l51YB0y NSLsYWqjkCBg+aUO+WPFk4jICr2XUOK74oWTPFNpfv2x4VFI/Mpcs87ychngKB+8 rPHChSsZsw9upzPEH2L/O34wm/dpuLuHirrwWnF1zCnqfcyHcETieZtSt1nwLpsc lL5nuPsd8MaexBc= -----END CERTIFICATE----- quit INFO: Certificate successfully imported ASA-1(config)# |
Step 5. Configure Site-to-Site VPN (IPSec) to Use the Newly Installed Certificate
Complete this procedure in order to create the VPN tunnel:
-
Open your browser and enter https://<IP_Address of the interface of ASA that has been configured for ASDM Access> to access the ASDM on the ASA.
-
Click Download ASDM Launcher and Start ASDM in order to download the installer for the ASDM application.
-
Once the ASDM Launcher downloads, complete the steps directed by the prompts in order to install the software and run the Cisco ASDM Launcher.
-
Enter the IP address for the interface you configured with the http - command, as well as a username and password if you specified one.
-
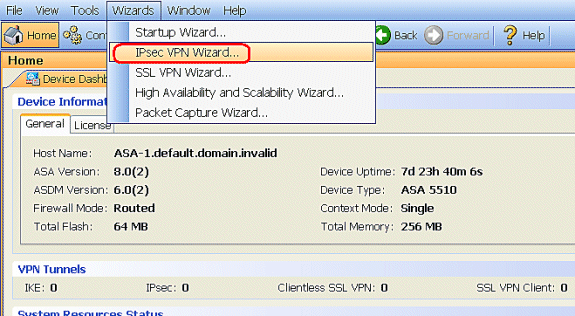
Run the IPsec VPN Wizard once the ASDM application connects to the ASA.
-
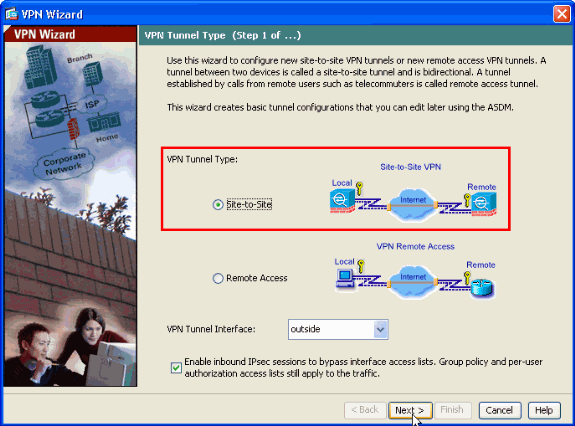
Choose the Site-to-Site IPSec VPN tunnel type and click Next as shown.
-
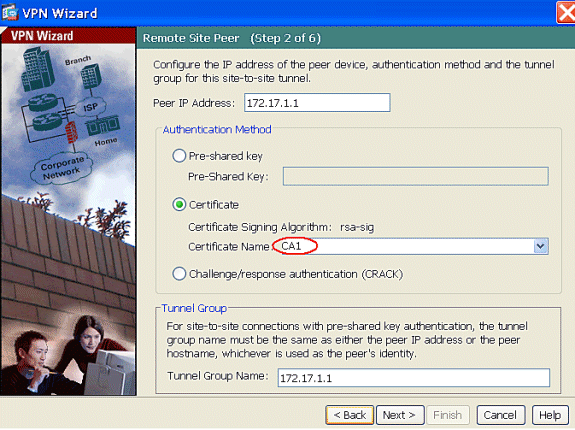
Specify the outside IP address of the remote peer. Enter the authentication information to use, which is the pre-shared key in this example. The pre-shared key used in this example is cisco123. The Tunnel Group Name is your outside IP address by default if you configure L2L VPN. Click Next.
-
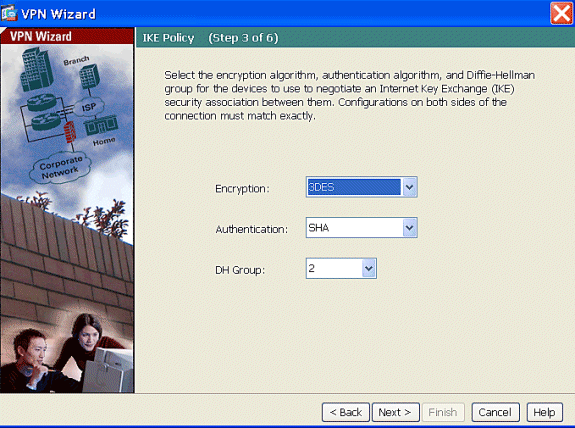
Specify the attributes to use for IKE, also known as Phase 1. These attributes must be the same on both the ASA and the IOS Router. Click Next.
-
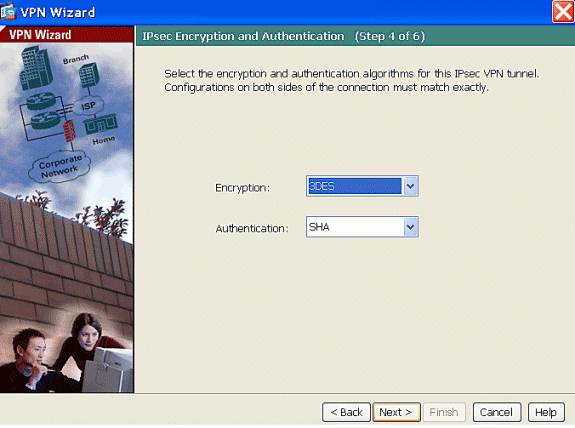
Specify the attributes to use for IPSec, also known as Phase 2. These attributes must match on both the ASA and the IOS Router. Click Next.
-
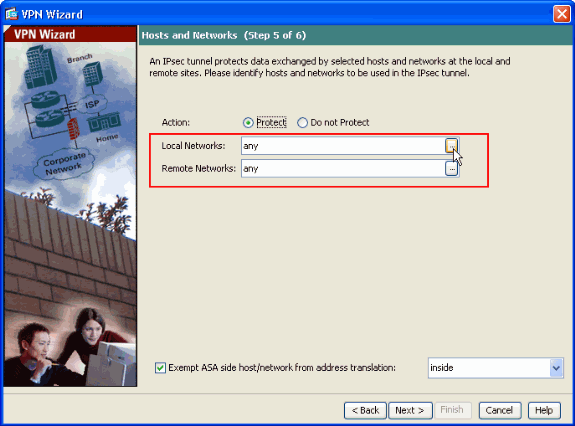
Specify the hosts whose traffic must be allowed to pass through the VPN tunnel. In this step, you have to provide the Local and Remote Networks for the VPN Tunnel. Click the button next to Local Networks as shown here to choose the local network address from the drop-down list.
-
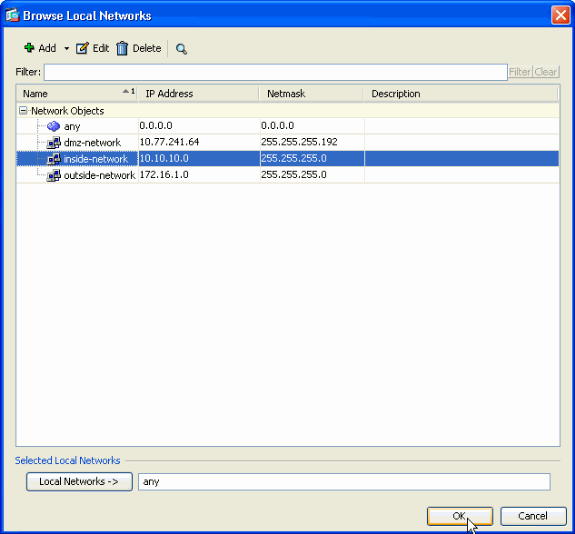
Choose the Local Network address, and then click OK, as shown.
-
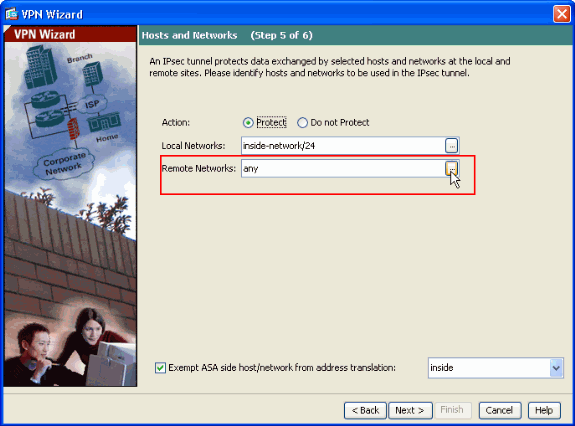
Click the button next to Remote Networks as shown to choose the remote network address from the drop-down list.
-
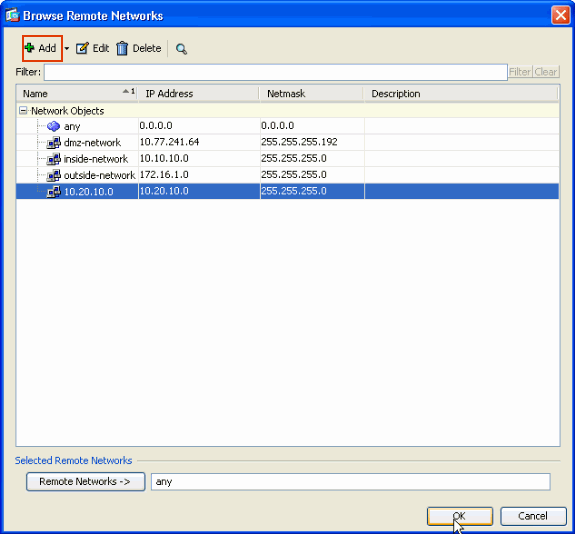
Choose the Remote Network address, and then click OK, as shown.
Note: If you do not have the Remote Network in the list, the network has to be added to the list; click Add.
-
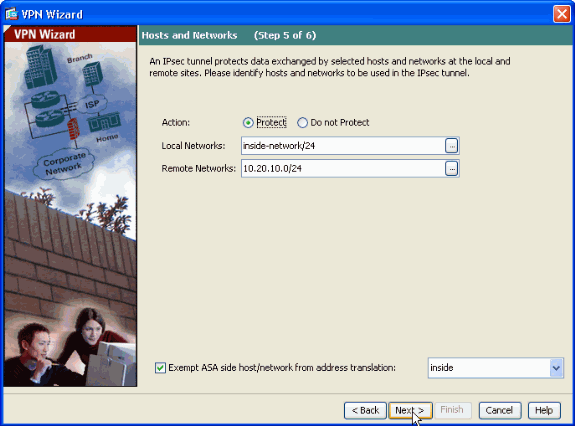
Check the Exempt ASA side host/network from address translation check box, so the tunnel traffic does not undergo Network Address Translation. Click Next.
-
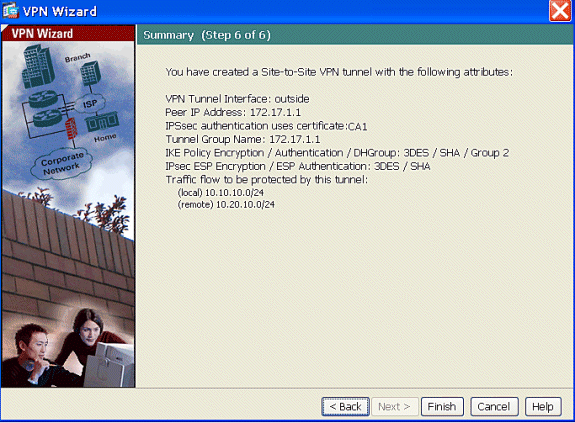
The attributes defined by the VPN Wizard are displayed in this summary. Double check the configuration and click Finish when you are satisfied that the settings are correct.
ASA-1 Configuration Summary
| ASA-1 | |
|---|---|
ASA-1#show running-config
: Saved
:
ASA Version 8.0(2)
!
hostname ASA-1
domain-name cisco.comenable password 8Ry2YjIyt7RRXU24 encrypted
names
!
interface Ethernet0/0
 nameif outside
 security-level 0
 ip address 192.168.1.5 255.255.255.0!
interface Ethernet0/1
 nameif inside
 security-level 100
 ip address 10.2.2.1 255.255.255.0!
interface Ethernet0/2
 nameif DMZ
 security-level 50
 ip address 10.77.241.142 255.255.255.192

 !-- Output suppressed !

passwd 2KFQnbNIdI.2KYOU encryptedftp mode passive
dns server-group DefaultDNS
 domain-name cisco.com
access-list inside_nat0_outbound extended permit ip
   10.2.2.0 255.255.255.0 10.5.5.0 255.255.255.0
access-list outside_1_cryptomap extended permit ip
   10.2.2.0 255.255.255.0 10.5.5.0 255.255.255.0
pager lines 24
mtu inside 1500
mtu outside 1500
no failover
asdm image disk0:/asdm-613.bin
asdm history enable
arp timeout 14400
global (outside) 1 interface
nat (inside) 1 10.2.2.0 255.255.255.0
nat (inside) 0 access-list inside_nat0_outbound
route outside 0.0.0.0 0.0.0.0 192.168.1.3 1
timeout xlate 3:00:00
timeout conn 1:00:00 half-closed 0:10:00 udp 0:02:00 icmp 0:00:02
timeout sunrpc 0:10:00 h323 0:05:00 h225 1:00:00 mgcp 0:05:00
timeout mgcp-pat 0:05:00 sip 0:30:00 sip_media 0:02:00
timeout uauth 0:05:00 absolute
http server enable
http 0.0.0.0 0.0.0.0 dmz
no snmp-server location
no snmp-server contact
!
crypto ipsec transform-set ESP-3DES-SHA esp-3des esp-sha-hmac
crypto map outside_map 1 match address outside_1_cryptomap
crypto map outside_map 1 set peer 172.17.1.1
crypto map outside_map 1 set transform-set ESP-3DES-SHA
crypto map outside_map interface outside
!
crypto ca trustpoint CA1
 enrollment terminal
 subject-name cn=CiscoASA.cisco.com OU=TSWEB, O=Cisco Systems, C=US,
 St=North Carolina,L=Rale
 serial-number
 keypair my.CA.key
 crl configure
crypto ca certificate chain CA1
 certificate 611ee59b000000000007
    308205a7 3082048f a0030201 02020a61 1ee59b00 00000000 07300d06 092a8648
    86f70d01 01050500 30513113 3011060a 09922689 93f22c64 01191603 636f6d31
    15301306 0a099226 8993f22c 64011916 05636973 636f3115 3013060a 09922689
    93f22c64 01191605 54535765 62310c30 0a060355 04031303 43413130 1e170d30
    37313231 35303833 3533395a 170d3039 31323134 30383335 33395a30 76310b30
    09060355 04061302 55533117 30150603 55040813 0e4e6f72 74682043 61726f6c
    696e6131 10300e06 03550407 13075261 6c656967 68311630 14060355 040a130d
    43697363 6f205379 7374656d 73312430 22060355 0403131b 43697363 6f415341
    2e636973 636f2e63 6f6d204f 553d5453 57454230 819f300d 06092a86 4886f70d
    01010105 0003818d 00308189 02818100 b8e20aa8 332356b7 5b660073 5008d373
    5d23c529 5b92472b 5e02a81f 63dc7a57 0667d754 5e7f98d3 d4239b42 ab8faf0b
    e8a5d394 f80d01a1 4cc01d98 b1320e9f e849055a b94b18ef 308eb12f 22ab1a8e
    db38f02c 2cf78e07 197f2d52 d3cb7391 a9ccb2d9 03f722bd 414b0a32 05aa053e
    c45e2464 80606f8e 417f09a7 aa9c644d 02030100 01a38202 de308202 da300b06
    03551d0f 04040302 05a0301d 0603551d 11041630 14821243 6973636f 4153412e
    63697363 6f2e636f 6d301d06 03551d0e 04160414 2c242ddb 490cde1a fe2d63e3
    1e1fb28c 974c4216 301f0603 551d2304 18301680 14d9adbf 08f23a88 f114432f
    79987cd4 09a403e5 58308201 03060355 1d1f0481 fb3081f8 3081f5a0 81f2a081
    ef8681b5 6c646170 3a2f2f2f 434e3d43 41312c43 4e3d5453 2d57324b 332d4143
    532c434e 3d434450 2c434e3d 5075626c 69632532 304b6579 25323053 65727669
    6365732c 434e3d53 65727669 6365732c 434e3d43 6f6e6669 67757261 74696f6e
    2c44433d 54535765 622c4443 3d636973 636f2c44 433d636f 6d3f6365 72746966
    69636174 65526576 6f636174 696f6e4c 6973743f 62617365 3f6f626a 65637443
    6c617373 3d63524c 44697374 72696275 74696f6e 506f696e 74863568 7474703a
    2f2f7473 2d77326b 332d6163 732e7473 7765622e 63697363 6f2e636f 6d2f4365
    7274456e 726f6c6c 2f434131 2e63726c 3082011d 06082b06 01050507 01010482
    010f3082 010b3081 a906082b 06010505 07300286 819c6c64 61703a2f 2f2f434e
    3d434131 2c434e3d 4149412c 434e3d50 75626c69 63253230 4b657925 32305365
    72766963 65732c43 4e3d5365 72766963 65732c43 4e3d436f 6e666967 75726174
    696f6e2c 44433d54 53576562 2c44433d 63697363 6f2c4443 3d636f6d 3f634143
    65727469 66696361 74653f62 6173653f 6f626a65 6374436c 6173733d 63657274
    69666963 6174696f 6e417574 686f7269 7479305d 06082b06 01050507 30028651
    68747470 3a2f2f74 732d7732 6b332d61 63732e74 73776562 2e636973 636f2e63
    6f6d2f43 65727445 6e726f6c 6c2f5453 2d57324b 332d4143 532e5453 5765622e
    63697363 6f2e636f 6d5f4341 312e6372 74302106 092b0601 04018237 14020414
    1e120057 00650062 00530065 00720076 00650072 300c0603 551d1301 01ff0402
    30003013 0603551d 25040c30 0a06082b 06010505 07030130 0d06092a 864886f7
    0d010105 05000382 0101008a 82680f46 fbc87edc 84bc45f5 401b3716 0045515c
    2c81971d 0da51fe3 96870627 b41b4319 23284b30 5eafcedb 10c1ef05 d0686a61
    cd1ab877 100b965d 499088e1 7de418fb b5529199 46129b81 9c4353a2 1761b61c
    f9bc18c6 95c44e5c 8b3cfb71 a183c872 61964433 bddef040 b4b0431e 7456fe29
    8a40172d cf3f2e25 f041dee0 c25b7635 29fdbf74 97997a23 340fe65e 75601d32
    3522ec61 6aa39020 60f9a50e f963c593 88c80abd 9750e2bb e285933c 53697efd
    b1e15148 fcca5cb3 cef27219 e0281fbc acf1c285 2b19b30f 6ea733c4 1f62ff3b
    7e309bf7 69b8bb87 8abaf05a 7175cc29 ea7dcc87 7044e279 9b52b759 f02e9b1c
    94be67b8 fb1df0c6 9ec417
  quit
 certificate ca 7099f1994764e09c4651da80a16b749c
    3082049d 30820385 a0030201 02021070 99f19947 64e09c46 51da80a1 6b749c30
    0d06092a 864886f7 0d010105 05003051 31133011 060a0992 268993f2 2c640119
    1603636f 6d311530 13060a09 92268993 f22c6401 19160563 6973636f 31153013
    060a0992 268993f2 2c640119 16055453 57656231 0c300a06 03550403 13034341
    31301e17 0d303731 32313430 36303134 335a170d 31323132 31343036 31303135
    5a305131 13301106 0a099226 8993f22c 64011916 03636f6d 31153013 060a0992
    268993f2 2c640119 16056369 73636f31 15301306 0a099226 8993f22c 64011916
    05545357 6562310c 300a0603 55040313 03434131 30820122 300d0609 2a864886
    f70d0101 01050003 82010f00 3082010a 02820101 00ea8fee c7ae56fc a22e603d
    0521b333 3dec0ad4 7d4c2316 3b1eea33 c9a6883d 28ece906 02902f9a d1eb2b8d
    f588cb9a 78a069a3 965de133 6036d8d7 6ede9ccd a1e906ec 88b32a19 38e5353e
    6c0032e8 8c003fa6 2fd22a4d b9dda2c2 5fcbb621 876bd678 c8a37109 f074eabe
    2b1fac59 a78d0a3b 35af17ae 687a4805 3b9a34e7 24b9e054 063c60a4 9b8d3c09
    351bc630 05f69357 833b9197 f875b408 cb71a814 69a1f331 b1eb2b35 0c469443
    1455c210 db308bf0 a9805758 a878b82d 38c71426 afffd272 dd6d7564 1cbe4d95
    b81c02b2 9b56ec2d 5a913a9f 9b95cafd dfffcf67 94b97ac7 63249009 fa05ca4d
    6f13afd0 968f9f41 e492cfe4 e50e15f1 c0f5d13b 5f020301 0001a382 016f3082
    016b3013 06092b06 01040182 37140204 061e0400 43004130 0b060355 1d0f0404
    03020186 300f0603 551d1301 01ff0405 30030101 ff301d06 03551d0e 04160414
    d9adbf08 f23a88f1 14432f79 987cd409 a403e558 30820103 0603551d 1f0481fb
    3081f830 81f5a081 f2a081ef 8681b56c 6461703a 2f2f2f43 4e3d4341 312c434e
    3d54532d 57324b33 2d414353 2c434e3d 4344502c 434e3d50 75626c69 63253230
    4b657925 32305365 72766963 65732c43 4e3d5365 72766963 65732c43 4e3d436f
    6e666967 75726174 696f6e2c 44433d54 53576562 2c44433d 63697363 6f2c4443
    3d636f6d 3f636572 74696669 63617465 5265766f 63617469 6f6e4c69 73743f62
    6173653f 6f626a65 6374436c 6173733d 63524c44 69737472 69627574 696f6e50
    6f696e74 86356874 74703a2f 2f74732d 77326b33 2d616373 2e747377 65622e63
    6973636f 2e636f6d 2f436572 74456e72 6f6c6c2f 4341312e 63726c30 1006092b
    06010401 82371501 04030201 00300d06 092a8648 86f70d01 01050500 03820101
    001abc5a 40b32112 22da80fb bb228bfe 4bf8a515 df8fc3a0 4e0c89c6 d725e2ab
    2fa67ce8 9196d516 dfe55627 953aea47 2e871289 6b754e9c 1e01d408 3f7f0595
    8081f986 526fbe1c c9639d6f 258b2205 0dc370c6 5431b034 fe9fd60e 93a6e71b
    ab8e7f84 a011336b 37c13261 5ad218a3 a513e382 e4bfb2b4 9bf0d7d1 99865cc4
    94e5547c f03e3d3e 3b766011 e94a3657 6cc35b92 860152d4 f06b2b15 df306433
    c1bcc282 80558d70 d22d72e7 eed3195b d575dceb c0caa196 34f693ea f3beee4d
    aa2ef1c2 edba288f 3a678ecb 3809d0df b1699c76 13018f9f 5e3dce95 efe6da93
    f4cb3b00 102efa94 48a22fc4 7e342031 2406165e 39edc207 eddc6554 3fa9f396 ad
  quit
!
crypto isakmp enable outside
crypto isakmp policy 10
 authentication rsa-sig
 encryption 3des
 hash sha
 group 1
 lifetime 86400
telnet timeout 5
ssh timeout 5
console timeout 0
threat-detection basic-threat
threat-detection statistics access-list
!
class-map inspection_default
 match default-inspection-traffic
!

!-- Output suppressed!

tunnel-group 172.17.1.1 type ipsec-l2l
tunnel-group 172.17.1.1 ipsec-attributes
 trust-point CA1

Cryptochecksum:be38dfaef777a339b9e1c89202572a7d
: end |
ASA-2 Configuration
Follow a similar configuration for the ASA-2 Security appliance.
Verify
On the ASA, you can issue several show commands at the command line in order to verify the status of a certificate.
Use this section to confirm that your configuration works properly.
-
The show crypto ca trustpoint command displays configured trustpoints.
ASA-1#show crypto ca trustpoints Trustpoint CA1: Subject Name: cn=CA1 dc=TSWeb dc=cisco dc=com Serial Number: 7099f1994764e09c4651da80a16b749c Certificate configured. -
The show crypto ca certificate command displays all the certificates installed on the system.
ASA-1# show crypto ca certificate Certificate Status: Available Certificate Serial Number: 3f14b70b00000000001f Certificate Usage: Encryption Public Key Type: RSA (1024 bits) Issuer Name: cn=CA1 dc=TSWeb dc=cisco dc=com Subject Name: cn=vpnserver cn=Users dc=TSWeb dc=cisco dc=com PrincipalName: vpnserver@TSWeb.cisco.com CRL Distribution Points: [1] ldap:///CN=CA1,CN=TS-W2K3-ACS,CN=CDP,CN=Public%20Key%20Services, CN=Services,CN=Configuration,DC=TSWeb,DC=cisco, DC=com?certificateRevocationList?base?objectClass=cRLDistributionPoint [2] http://ts-w2k3-acs.tsweb.cisco.com/CertEnroll/CA1.crl Validity Date: start date: 14:00:36 IST Apr 14 2009 end date: 14:00:36 IST Apr 15 2010 Associated Trustpoints: CA1 CA Certificate Status: Available Certificate Serial Number: 7099f1994764e09c4651da80a16b749c Certificate Usage: Signature Public Key Type: RSA (2048 bits) Issuer Name: cn=CA1 dc=TSWeb dc=cisco dc=com Subject Name: cn=CA1 dc=TSWeb dc=cisco dc=com CRL Distribution Points: [1] ldap:///CN=CA1,CN=TS-W2K3-ACS,CN=CDP,CN=Public%20Key%20Services, CN=Services,CN=Configuration,DC=TSWeb,DC=cisco, DC=com?certificateRevocationList?base?objectClass=cRLDistributionPoint [2] http://ts-w2k3-acs.tsweb.cisco.com/CertEnroll/CA1.crl Validity Date: start date: 06:01:43 IST Apr 14 2009 end date: 06:10:15 IST Apr 14 2014 Associated Trustpoints: CA1 Certificate Subject Name: Name: CiscoASA.cisco.com Status: Pending terminal enrollment Key Usage: General Purpose Fingerprint: 1a022cf2 9771e335 12c3a530 1f9a0345 Associated Trustpoint: CA1 -
The show crypto ca crls command displays cached certificate revocation lists (CRL).
-
The show crypto key mypubkey rsa command displays all generated crypto key pairs.
ASA-1# show crypto key mypubkey rsa
Key pair was generated at: 01:43:45 IST Apr 14 2009
Key name: <Default-RSA-Key>
 Usage: General Purpose Key
 Modulus Size (bits): 1024
 Key Data:

  30819f30 0d06092a 864886f7 0d010101
   05000381 8d003081 89028181 00d4a509
  99e95d6c b5bdaa25 777aebbe 6ee42c86
   23c49f9a bea53224 0234b843 1c0c8541
  f5a66eb1 6d337c70 29031b76 e58c3c6f
   36229b14 fefd3298 69f9123c 37f6c43b
  4f8384c4 a736426d 45765cca 7f04cba1
   29a95890 84d2c5d4 adeeb248 a10b1f68
  2fe4b9b1 5fa12d0e 7789ce45 55190e79
   1364aba4 7b2b21ca de3af74d b7020301 0001
Key pair was generated at: 06:36:00 IST Apr 15 2009
Key name: my.CA.key
 Usage: General Purpose Key
 Modulus Size (bits): 1024
 Key Data:

  30819f30 0d06092a 864886f7 0d010101
   05000381 8d003081 89028181 00b8e20a
  a8332356 b75b6600 735008d3 735d23c5
   295b9247 2b5e02a8 1f63dc7a 570667d7
  545e7f98 d3d4239b 42ab8faf 0be8a5d3
   94f80d01 a14cc01d 98b1320e 9fe84905
  5ab94b18 ef308eb1 2f22ab1a 8edb38f0
   2c2cf78e 07197f2d 52d3cb73 91a9ccb2
  d903f722 bd414b0a 3205aa05 3ec45e24
   6480606f 8e417f09 a7aa9c64 4d020301 0001
Key pair was generated at: 07:35:18 IST Apr 16 2009
ASA-1#
-
The show crypto isakmp sa command shows all current IKE SAs at a peer.
ASA#show crypto isakmp sa Active SA: 1 Rekey SA: 0 (A tunnel will report 1 Active and 1 Rekey SA during rekey) Total IKE SA: 1 1 IKE Peer: 172.17.1.1 Type : L2L Role : initiator Rekey : no State : MM_ACTIVE -
The show crypto ipsec sa command shows all current IPSec SAs at a peer.
ASA#show crypto ipsec sa
			interface: outside
    Crypto map tag: outside_map, seq num: 1,
   local addr: 192.168.1.1

      local ident (addr/mask/prot/port):
   (10.2.2.0/255.255.255.0/0/0)
      remote ident (addr/mask/prot/port):
   (10.5.5.0/255.255.255.0/0/0)
      current_peer: 172.17.1.1

     #pkts encaps: 9, #pkts encrypt: 9, #pkts digest: 9
      #pkts decaps: 9, #pkts decrypt: 9, #pkts verify: 9
      #pkts compressed: 0, #pkts decompressed: 0
      #pkts not compressed: 9, #pkts comp failed:
   0, #pkts decomp failed: 0
      #pre-frag successes: 0, #pre-frag failures:
   0, #fragments created: 0
      #PMTUs sent: 0, #PMTUs rcvd: 0,
   #decapsulated frgs needing reassembly: 0
      #send errors: 0, #recv errors: 0

      local crypto endpt.: 192.168.1.1,
   remote crypto endpt.: 172.17.1.1

      path mtu 1500, ipsec overhead 58, media mtu 1500
      current outbound spi: 434C4A7F

    inbound esp sas:
      spi: 0xB7C1948E (3082917006)
         transform: esp-3des esp-sha-hmac none
         in use settings ={L2L, Tunnel, PFS Group 2, }
         slot: 0, conn_id: 12288, crypto-map: outside_map
         sa timing: remaining key lifetime (kB/sec): (4274999/3588)
         IV size: 8 bytes
         replay detection support: Y
    outbound esp sas:
      spi: 0x434C4A7F (1129073279)
         transform: esp-3des esp-sha-hmac none
         in use settings ={L2L, Tunnel, PFS Group 2, }
         slot: 0, conn_id: 12288, crypto-map: outside_map
         sa timing: remaining key lifetime (kB/sec): (4274999/3588)
         IV size: 8 bytes
         replay detection support: Y
The Output Interpreter Tool (registered customers only) (OIT) supports certain show commands. Use the OIT in order to view an analysis of show command output.
Troubleshoot
This section provides information you can use to troubleshoot your configuration.
The Output Interpreter Tool (registered customers only) (OIT) supports certain show commands. Use the OIT to view an analysis of show command output.
Note: Refer to Important Information on Debug Commands and IP Security Troubleshooting - Understanding and Using debug Commands before you use debug commands.
-
debug crypto ipsec 7—Displays the IPSec negotiations of phase 2.
debug crypto isakmp 7—Displays the ISAKMP negotiations of phase 1.
Refer to Most Common L2L and Remote Access IPSec VPN Troubleshooting Solutions for more information on how to troubleshoot Site-to-Site VPN.
Related Information
Revision History
| Revision | Publish Date | Comments |
|---|---|---|
1.0 |
14-Apr-2009 |
Initial Release |
Contact Cisco
- Open a Support Case

- (Requires a Cisco Service Contract)


 Feedback