ASA/PIX 8.x: Radius Authorization (ACS 4.x) for VPN Access using Downloadable ACL with CLI and ASDM Configuration Example
Available Languages
Contents
Introduction
This document describes how to configure the security appliance to authenticate users for network access. Since you can implicitly enable RADIUS authorizations, this section contains no information about the configuration of RADIUS authorization on the security appliance. It does provide information about how the security appliance handles access list information received from RADIUS servers.
You can configure a RADIUS server to download an access list to the security appliance or an access list name at the time of authentication. The user is authorized to do only what is permitted in the user-specific access list.
Downloadable access lists are the most scalable means when you use Cisco Secure ACS to provide the appropriate access lists for each user. For more information on Downloadable Access List Features and the Cisco Secure ACS, refer to Configuring a RADIUS Server to Send Downloadable Access Control Lists and Downloadable IP ACLs.
Refer to ASA 8.3 and Later: Radius Authorization (ACS 5.x) for VPN Access Using Downloadable ACL with CLI and ASDM Configuration Example for the identical configuration on Cisco ASA with versions 8.3 and later.
Prerequisites
Requirements
This document assumes that the ASA is fully operational and configured to allow the Cisco ASDM or CLI to make configuration changes.
Note: Refer to Allowing HTTPS Access for ASDM or PIX/ASA 7.x: SSH on the Inside and Outside Interface Configuration Example to allow the device to be remotely configured by the ASDM or Secure Shell (SSH).
Components Used
The information in this document is based on these software and hardware versions:
-
Cisco Adaptive Security Appliance Software Version 7.x and later
-
Cisco Adaptive Security Device Manager Version 5.x and later
-
Cisco VPN Client Version 4.x and later
-
Cisco Secure Access Control Server 4.x
The information in this document was created from the devices in a specific lab environment. All of the devices used in this document started with a cleared (default) configuration. If your network is live, make sure that you understand the potential impact of any command.
Related Products
This configuration can also be used with Cisco PIX Security Appliance Version 7.x and later.
Conventions
Refer to Cisco Technical Tips Conventions for more information on document conventions.
Background Information
You can use downloadable IP ACLs to create sets of ACL definitions that you can apply to many users or user groups. These sets of ACL definitions are called ACL contents. Also, when you incorporate NAFs, you control the ACL contents that are sent to the AAA client from which a user seeks access. That is, a downloadable IP ACL comprises one or more ACL content definitions, each of which is associated with a NAF or (by default) associated to all AAA clients. The NAF controls the applicability of specified ACL contents in accordance with the IP address of the AAA client. For more information on NAFs and how they regulate downloadable IP ACLs, see About Network Access Filters.
Downloadable IP ACLs operate this way:
-
When ACS grants a user access to the network, ACS determines whether a downloadable IP ACL is assigned to that user or the group of the user.
-
If ACS locates a downloadable IP ACL that is assigned to the user or the group of the user, it determines whether an ACL content entry is associated with the AAA client that sent the RADIUS authentication request.
-
ACS sends, as part of the user session, a RADIUS access-accept packet, an attribute that specifies the named ACL, and the version of the named ACL.
-
If the AAA client responds that it does not have the current version of the ACL in its cache, that is, the ACL is new or has changed, ACS sends the ACL (new or updated) to the device.
Downloadable IP ACLs are an alternative to the configuration of ACLs in the RADIUS Cisco cisco-av-pair attribute [26/9/1] of each user or user group. You can create a downloadable IP ACL once, give it a name, and then assign the downloadable IP ACL to each applicable user or user group if you reference its name. This method is more efficient than if you configure the RADIUS Cisco cisco-av-pair attribute for each user or user group.
Further, when you employ NAFs, you can apply different ACL contents to the same user or group of users in regard to the AAA client that they use. No additional configuration of the AAA client is necessary after you have configured the AAA client to use downloadable IP ACLs from ACS. Downloadable ACLs are protected by the backup or replication regimen that you have established.
When you enter the ACL definitions in the ACS web interface, do not use keyword or name entries; in all other respects, use standard ACL command syntax and semantics for the AAA client on which you intend to apply the downloadable IP ACL. The ACL definitions that you enter into ACS comprise one or more ACL commands. Each ACL command must be on a separate line.
You can add one or more named ACL contents to a downloadable IP ACL. By default, each ACL content applies to all AAA clients, but, if you have defined NAFs, you can limit the applicability of each ACL content to the AAA clients that are listed in the NAF that you associate to it. That is, when you employ NAFs, you can make each ACL content, within a single downloadable IP ACL, applicable to multiple different network devices or network device groups in accordance with your network security strategy.
Also, you can change the order of the ACL contents in a downloadable IP ACL. ACS examines ACL contents, starting from the top of the table, and downloads the first ACL content that it finds with a NAF that includes the AAA client that is used. When you set the order, you can ensure system efficiency if you position the most widely applicable ACL contents higher on the list. You must realize that, if your NAFs include populations of AAA clients that overlap, you must proceed from the more specific to the more general. For example, ACS downloads any ACL contents with the All-AAA-Clients NAF setting and does not consider any that are lower on the list.
In order to use a downloadable IP ACL on a particular AAA client, the AAA client must follow these directions:
-
Use RADIUS for authentication
-
Support downloadable IP ACLs
These are examples of Cisco devices that support downloadable IP ACLs:
-
ASA and PIX devices
-
VPN 3000-series concentrators
-
Cisco devices that run IOS version 12.3(8)T or later
This is an example of the format that you must use to enter VPN 3000/ASA/PIX 7.x+ ACLs in the ACL Definitions box:
permit ip 10.153.0.0 0.0.255.255 host 10.158.9.1
permit ip 10.154.0.0 0.0.255.255 10.158.10.0 0.0.0.255
permit 0 any host 10.159.1.22
deny ip 10.155.10.0 0.0.0.255 10.159.2.0 0.0.0.255 log
permit TCP any host 10.160.0.1 eq 80 log
permit TCP any host 10.160.0.2 eq 23 log
permit TCP any host 10.160.0.3 range 20 30
permit 6 any host HOSTNAME1
permit UDP any host HOSTNAME2 neq 53
deny 17 any host HOSTNAME3 lt 137 log
deny 17 any host HOSTNAME4 gt 138
deny ICMP any 10.161.0.0 0.0.255.255 log
permit TCP any host HOSTNAME5 neq 80
Configure
In this section, you are presented with the information to configure the features described in this document.
Note: Use the Command Lookup Tool (registered customers only) in order to obtain more information on the commands used in this section.
Network Diagram
This document uses this network setup:
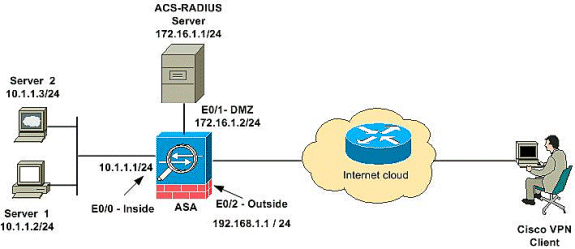
Note: The IP addressing schemes used in this configuration are not legally routable on the Internet. They are RFC 1918 addresses which were used in a lab environment.
Configure Remote Access VPN (IPSec)
ASDM Procedure
Complete these steps in order to configure the remote access VPN:
-
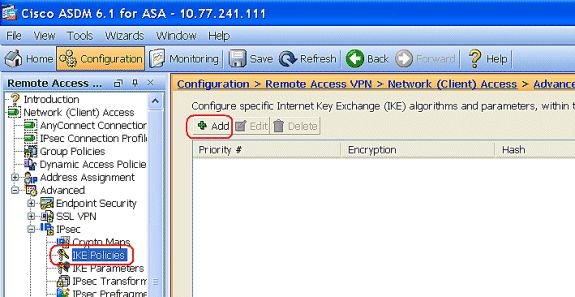
Choose Configuration > Remote Access VPN > Network (Client) Access > Advanced > IPSec > IKE Policies> Add in order to create an ISAKMP policy.
-
Provide the ISAKMP policy details as shown.
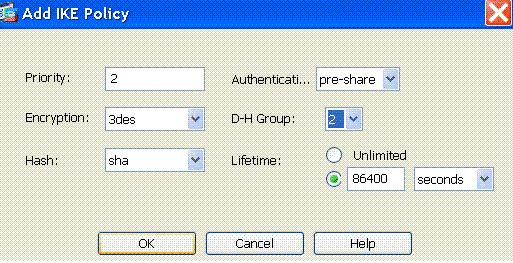
Click OK and Apply.
-
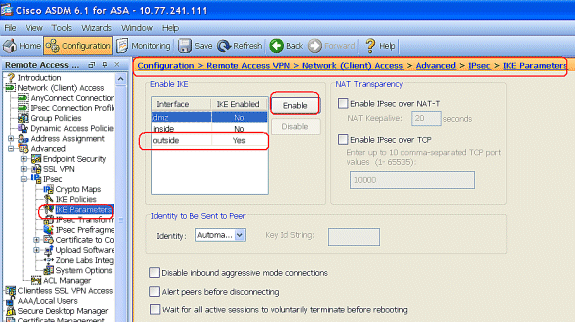
Choose Configuration > Remote Access VPN > Network (Client) Access > Advanced > IPSec > IKE Parameters to enable the IKE on Outside Interface.
-
Choose Configuration > Remote Access VPN > Network (Client) Access > Advanced > IPSec > IPSec Transform Sets > Add in order to create the ESP-3DES-SHA transform set, as shown.
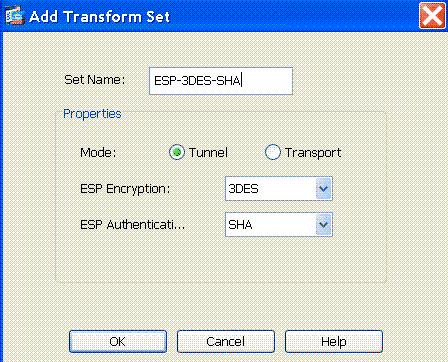
Click OK and Apply.
-
Choose Configuration > Remote Access VPN > Network (Client) Access > Advanced > IPSec > Crypto Maps > Add in order to create a crypto map with dynamic policy of priority 1, as shown.
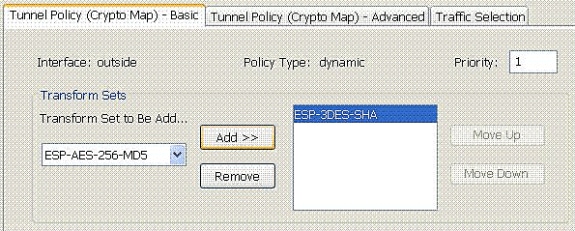
Click OK and Apply.
-
Choose Configuration > Remote Access VPN > Network (Client) Access > Address Assignment > Address Pools and click Add to add the VPN Client for the VPN Client users.
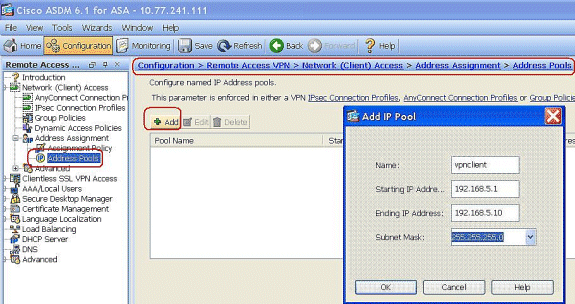
-
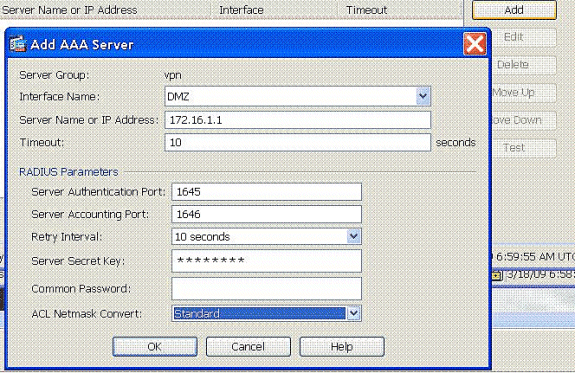
Choose Configuration > Remote Access VPN > AAA Setup > AAA Server Groups and click Add to add the AAA Server Group name and Protocol .
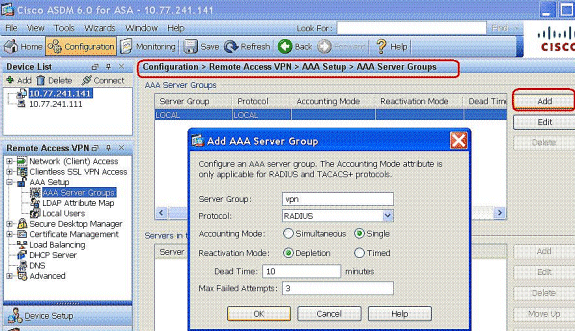
Add the AAA server IP address (ACS) and the interface that it connects. Also add the Server Secret key in the RADIUS Parameters area. Click OK.
-
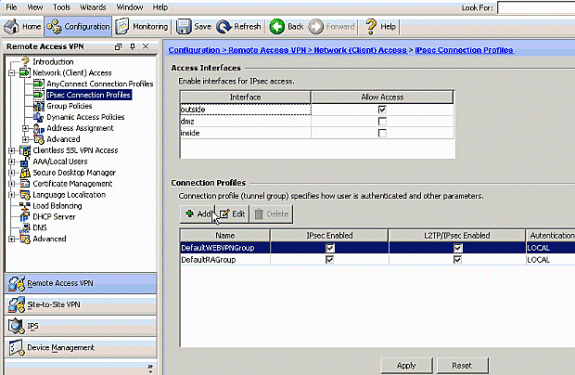
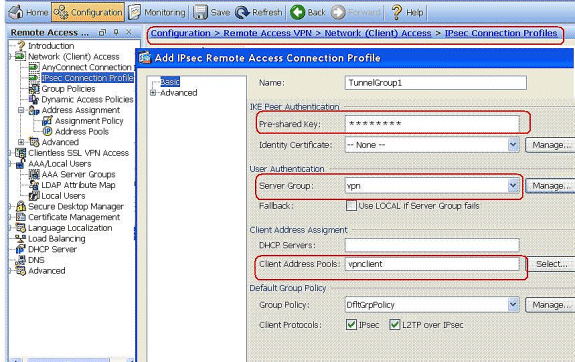
Choose Configuration > Remote Access VPN > Network (Client) Access > IPSec Connection Profiles > Add in order to add a tunnel group, for example, TunnelGroup1 and the Preshared key as cisco123, as shown.
-
Under the Basic tab, choose the server group as vpn for the User Authentication field.
-
Choose vpnclient as the Client Address Pools for the VPN Client users.
Click OK.
-
-
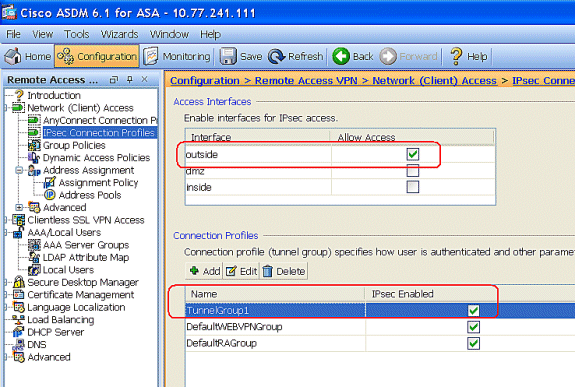
Enable the Outside interface for IPSec Access. Click Apply to proceed.
Configure the ASA/PIX with CLI
Complete these steps in order to configure the DHCP server to provide IP addresses to the VPN clients from the command line. Refer to Configuring Remote Access VPNs or Cisco ASA 5500 Series Adaptive Security Appliances-Command References for more information on each command that is used.
| Running Configuration on the ASA Device |
|---|
ASA# sh run ASA Version 8.0(2) ! !--- Specify the hostname for the Security Appliance. hostname ASA enable password 8Ry2YjIyt7RRXU24 encrypted names ! !--- Configure the outside and inside interfaces. interface Ethernet0/0 nameif inside security-level 100 ip address 10.1.1.1 255.255.255.0 ! interface Ethernet0/1 nameif DMZ security-level 100 ip address 172.16.1.2 255.255.255.0 ! interface Ethernet0/2 nameif outside security-level 0 ip address 192.168.1.1 255.255.255.0 !--- Output is suppressed. passwd 2KFQnbNIdI.2KYOU encrypted boot system disk0:/asa802-k8.bin ftp mode passive access-list 101 extended permit ip 10.1.1.0 255.255.255.0 192.168.5.0 255.255.255.0 !--- Radius Attribute Filter access-list new extended deny ip any host 10.1.1.2 access-list new extended permit ip any any pager lines 24 logging enable logging asdm informational mtu inside 1500 mtu outside 1500 mtu dmz 1500 ip local pool vpnclient1 192.168.5.1-192.168.5.10 mask 255.255.255.0 no failover icmp unreachable rate-limit 1 burst-size 1 !--- Specify the location of the ASDM image for ASA to fetch the image for ASDM access. asdm image disk0:/asdm-613.bin no asdm history enable arp timeout 14400 global (outside) 1 192.168.1.5 nat (inside) 0 access-list 101 nat (inside) 1 0.0.0.0 0.0.0.0 route outside 0.0.0.0 0.0.0.0 192.168.1.2 1 timeout xlate 3:00:00 timeout conn 1:00:00 half-closed 0:10:00 udp 0:02:00 icmp 0:00:02 timeout sunrpc 0:10:00 h323 0:05:00 h225 1:00:00 mgcp 0:05:00 mgcp-pat 0:05:00 timeout sip 0:30:00 sip_media 0:02:00 sip-invite 0:03:00 sip-disconnect 0:02:00 timeout uauth 0:05:00 absolute dynamic-access-policy-record DfltAccessPolicy !--- Create the AAA server group "vpn" and specify the protocol as RADIUS. !--- Specify the CSACS server as a member of the "vpn" group and provide the !--- location and key. aaa-server vpn protocol radius max-failed-attempts 5 aaa-server vpn (DMZ) host 172.16.1.1 retry-interval 1 timeout 30 key cisco123 http server enable http 0.0.0.0 0.0.0.0 inside no snmp-server location no snmp-server contact snmp-server enable traps snmp authentication linkup linkdown coldstart !--- PHASE 2 CONFIGURATION ---! !--- The encryption types for Phase 2 are defined here. !--- A Triple DES encryption with !--- the sha hash algorithm is used. crypto ipsec transform-set ESP-3DES-SHA esp-3des esp-sha-hmac !--- Defines a dynamic crypto map with !--- the specified encryption settings. crypto dynamic-map outside_dyn_map 1 set transform-set ESP-3DES-SHA !--- Binds the dynamic map to the IPsec/ISAKMP process. crypto map outside_map 1 ipsec-isakmp dynamic outside_dyn_map !--- Specifies the interface to be used with !--- the settings defined in this configuration. crypto map outside_map interface outside !--- PHASE 1 CONFIGURATION ---! !--- This configuration uses ISAKMP policy 2. !--- The configuration commands here define the Phase !--- 1 policy parameters that are used. crypto isakmp enable outside crypto isakmp policy 2 authentication pre-share encryption 3des hash sha group 2 lifetime 86400 no crypto isakmp nat-traversal telnet timeout 5 ssh timeout 5 console timeout 0 threat-detection basic-threat threat-detection statistics access-list ! class-map inspection_default match default-inspection-traffic ! ! policy-map type inspect dns preset_dns_map parameters message-length maximum 512 policy-map global_policy class inspection_default inspect dns preset_dns_map inspect ftp inspect h323 h225 inspect h323 ras inspect netbios inspect rsh inspect rtsp inspect skinny inspect esmtp inspect sqlnet inspect sunrpc inspect tftp inspect sip inspect xdmcp ! service-policy global_policy global ! group-policy DfltGrpPolicy attributes vpn-tunnel-protocol IPSec webvpn group-policy GroupPolicy1 internal !--- Associate the vpnclient pool to the tunnel group using the address pool. !--- Associate the AAA server group (VPN) with the tunnel group. tunnel-group TunnelGroup1 type remote-access tunnel-group TunnelGroup1 general-attributes address-pool vpnclient authentication-server-group vpn !--- Enter the pre-shared-key to configure the authentication method. tunnel-group TunnelGroup1 ipsec-attributes pre-shared-key * prompt hostname context Cryptochecksum:e0725ca9ccc28af488ded9ee36b7822d : end ASA# |
Cisco VPN Client Configuration
Attempt to connect to the Cisco ASA with the Cisco VPN Client in order to verify that the ASA is successfully configured.
-
Choose Start > Programs > Cisco Systems VPN Client > VPN Client.
-
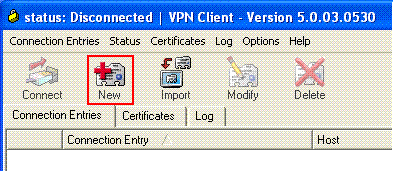
Click New to launch the Create New VPN Connection Entry window.
-
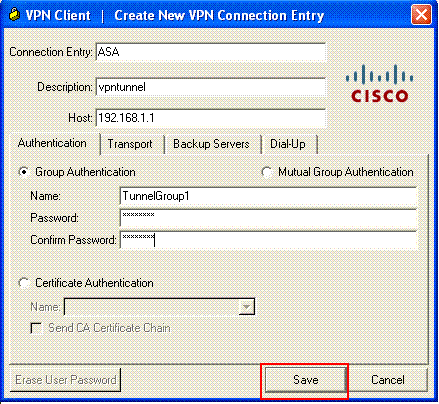
Fill in the details of your new connection.
Enter the name of the Connection Entry along with a description. Enter the outside IP address of the ASA in the Host box. Then enter the VPN Tunnel Group name (TunnelGroup1) and password (Pre-shared Key - cisco123) as configured in ASA. Click Save.
-
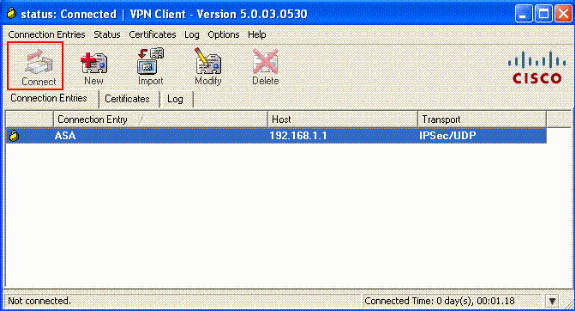
Click the connection that you want to use, and click Connect from the VPN Client main window.
-
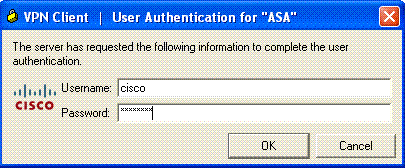
When prompted, enter the Username : cisco and Password : password1 as configured in the ASA for xauth, and click OK to connect to the remote network.
-
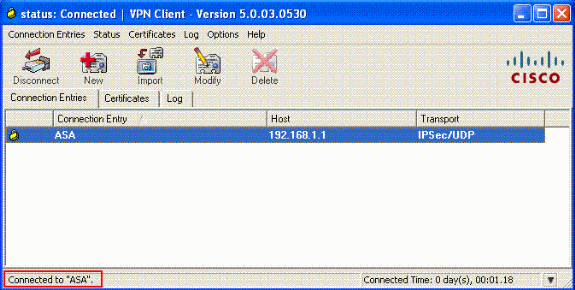
The VPN Client is connected with the ASA at the central site.
-
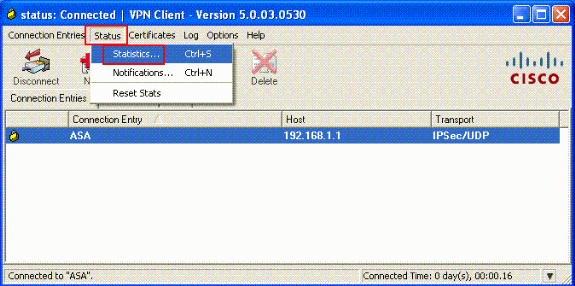
Once the connection is successfully established, choose Statistics from the Status menu to verify the details of the tunnel.
Configure ACS for Downloadable ACL for Individual User
You can configure downloadable access lists on Cisco Secure ACS as a shared profile component and then assign the access list to a group or an individual user.
In order to implement dynamic access lists, you must configure the RADIUS server to support it. When the user authenticates, the RADIUS server sends a downloadable access list or access list name to the security appliance. Access to a given service is either permitted or denied by the access list. The security appliance deletes the access list when the authentication session expires.
In this example, the IPSec VPN user "cisco" authenticates successfully, and the RADIUS server sends a downloadable access list to the security appliance. The user "cisco" can access only the 10.1.1.2 server and denies all other access. In order to verify the ACL, see the Downloadable ACL for User/Group section.
Complete these steps in order to configure RADIUS in a Cisco Secure ACS.
-
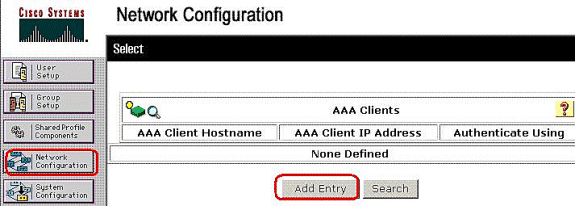
Choose Network Configuration on the left, and click Add Entry to add an entry for the ASA in the RADIUS server database.
-
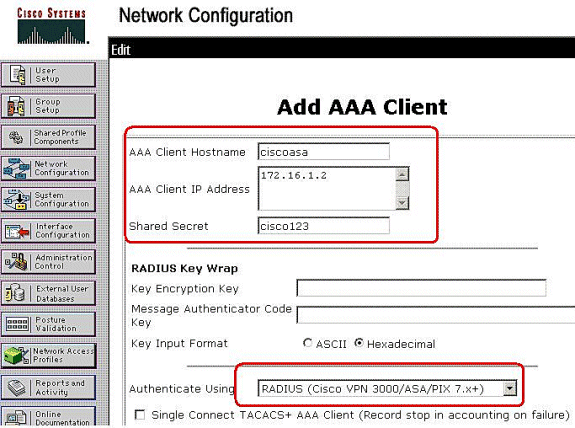
Enter 172.16.1.2 in the Client IP address field, and enter "cisco123" for the shared secret Key field. Choose RADIUS (Cisco VPN 3000/ASA/PIX 7.x+) in the Authenticate Using drop-down box. Click Submit. .
-
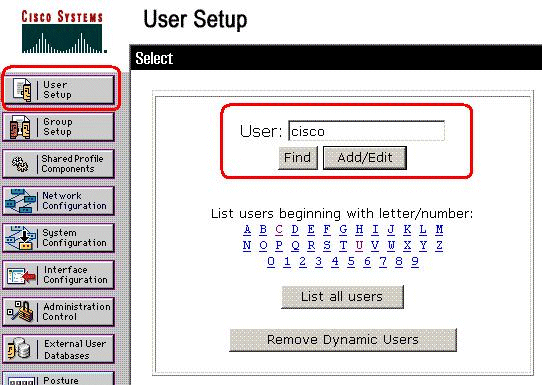
Enter the username in the User field in the Cisco Secure database, and click Add/Edit.
In this example, the username is cisco.
-
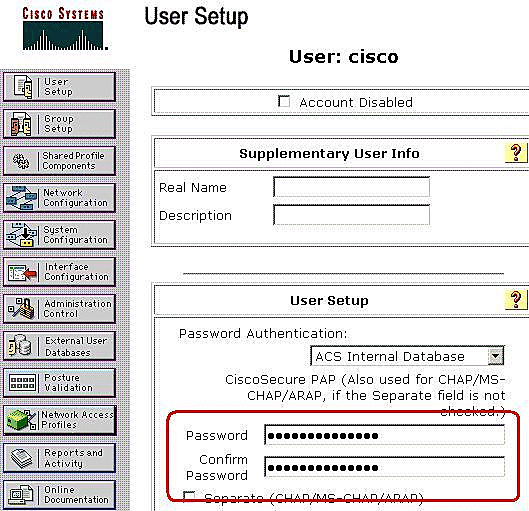
In the next window, enter the password for "cisco". In this example, the password is also password1. When you finish, click Submit.
-
You use the Advanced Options page to determine which advanced options the ACS displays. You can simplify the pages that appear in other areas of the ACS web interface if you hide the advanced options that you do not use. Click Interface Configuration, and then click Advanced Options to open the Advanced Options page.
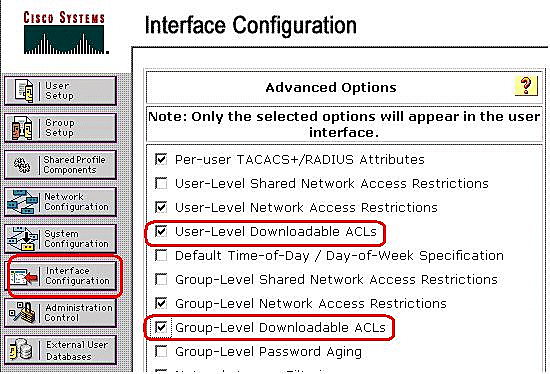
Check the box for User-Level Downloadable ACLs and Group-Level Downloadable ACLs.
User-Level Downloadable ACLs - When chosen, this option enables the Downloadable ACLs (access-control lists) section on the User Setup page.
Group-Level Downloadable ACLs - When chosen, this option enables the Downloadable ACLs section on the Group Setup page.
-
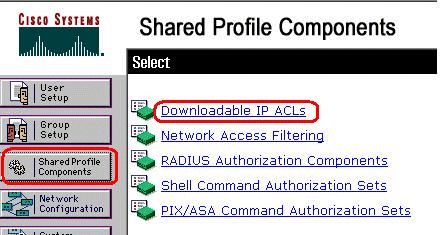
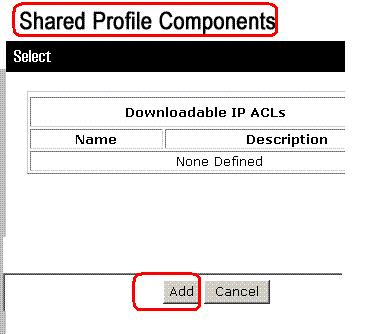
In the navigation bar, click Shared Profile Components, and click Downloadable IP ACLs.
Note: If Downloadable IP ACLs does not appear on the Shared Profile Components page, you must enable the User-Level Downloadable ACLs, Group-Level Downloadable ACLs option, or both on the Advanced Options page of the Interface Configuration section.
-
Click Add. The Downloadable IP ACLs page appears.
-
In the Name box, type the name of the new IP ACL.
Note: The name of an IP ACL can contain up to 27 characters. The name must not contain spaces or any of these characters: hyphen (-), left bracket ([), right bracket (]), slash (/), backslash (\), quotes ("), left angle bracket (<), right angle bracket (>), or dash (-).
In the Description box, type a description of the new IP ACL. The description can be up to 1,000 characters.
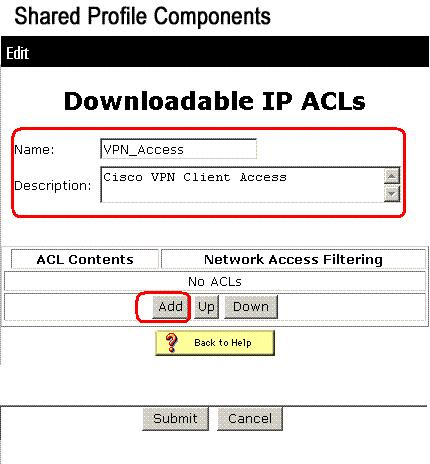
In order to add an ACL content to the new IP ACL, click Add.
-
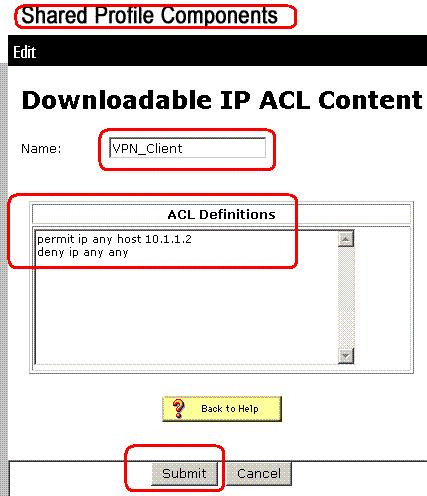
In the Name box, type the name of the new ACL content.
Note: The name of an ACL content can contain up to 27 characters. The name must not contain spaces or any of these characters: hyphen (-), left bracket ([), right bracket (]), slash (/), backslash (\), quotes ("), left angle bracket (<), right angle bracket (>), or dash (-).
In the ACL Definitions box, type the new ACL definition.
Note: When you enter the ACL definitions in the ACS web interface, do not use keyword or name entries; rather, begin with a permit or deny keyword.
In order to save the ACL content, click Submit.
-
The Downloadable IP ACLs page appears with the new ACL content listed by name in the ACL Contents column. In order to associate a NAF to the ACL content, choose a NAF from the Network Access Filtering box to the right of the new ACL content. By default, NAF is (All-AAA-Clients). If you do not assign a NAF, ACS associates the ACL content to all network devices, which is the default.
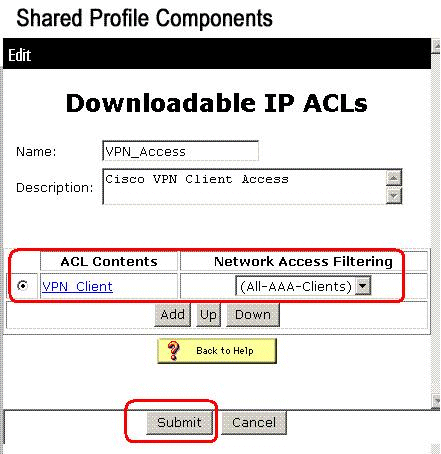
In order to set the order of the ACL contents, click the radio button for an ACL definition, and then click Up or Down to reposition it in the list.
In order to save the IP ACL, click Submit.
Note: The order of ACL contents is significant. From top to bottom, ACS downloads only the first ACL definition that has an applicable NAF setting, which includes the All-AAA-Clients default setting, if used. Typically, your list of ACL contents proceeds from the one with the most specific (narrowest) NAF to the one with the most general (All-AAA-Clients) NAF.
Note: ACS enters the new IP ACL, which takes effect immediately. For example, if the IP ACL is for use with PIX Firewalls, it is available to be sent to any PIX Firewall that attempts authentication of a user who has that downloadable IP ACL assigned to his or her user or group profile.
-
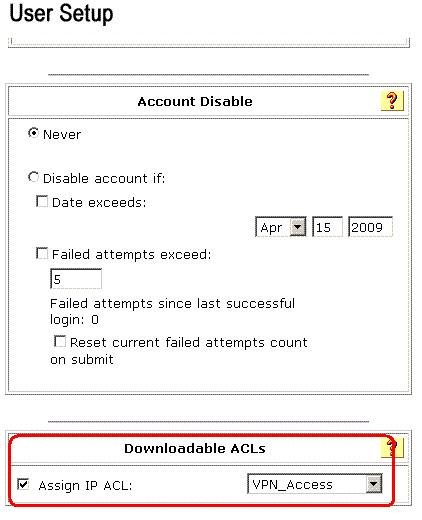
Go to the User Setup page and edit the User page. Under the Downloadable ACLs section, click the Assign IP ACL: check box. Choose an IP ACL from the list. If you finished the configuration of the user account options, click Submit to record the options.
Configure ACS for Downloadable ACL for Group
Complete Steps 1 through 9 of the Configure ACS for Downloadable ACL for Individual User and follow these steps in order to configure Downloadable ACL for Group in a Cisco Secure ACS.
In this example, the IPSec VPN user "cisco" belongs to the VPN Groups. The VPN group policies are applied for all the users in the group.
The VPN group user"cisco" authenticates successfully, and the RADIUS server sends a downloadable access list to the security appliance. The user "cisco" can access only the 10.1.1.2 server and denies all other access. In order to verify the ACL, refer to the Downloadable ACL for User/Group section.
-
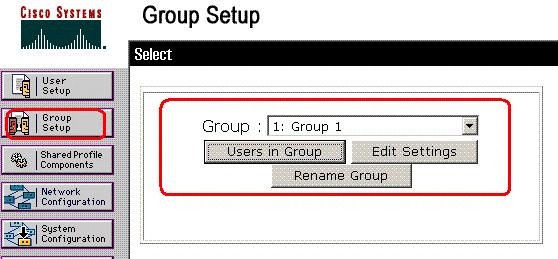
In the navigation bar, click Group Setup. The Group Setup Select page opens.
-
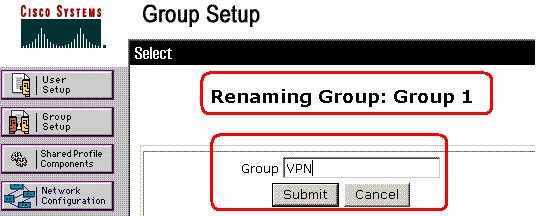
Rename Group 1 to VPN, and click Submit.
-
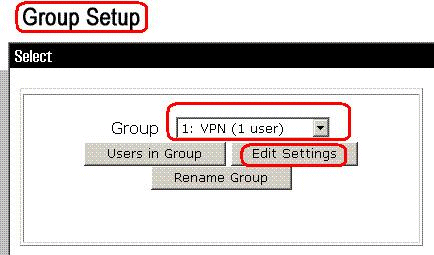
From the Group list, choose a group, and then click Edit Settings.
-
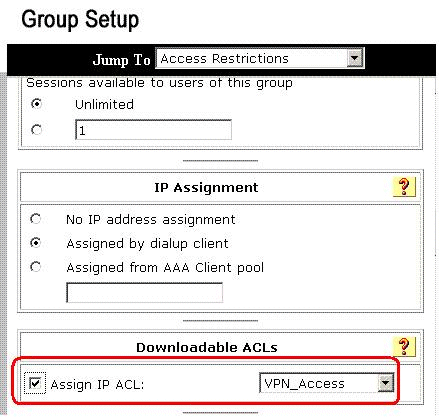
Under the Downloadable ACLs section, click the Assign IP ACL check box. Choose an IP ACL from the list.
-
In order to save the group settings that you have just made, click Submit.
-
Go to the User Setup and edit the User that you would like to add in to the group: VPN. When you finish, click Submit.
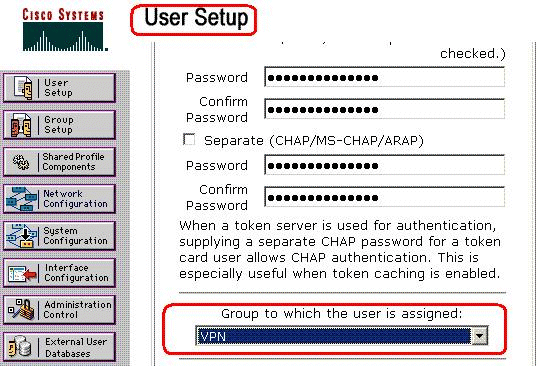
Now the Downloadable ACL configured for the VPN group is applied for this user.
-
In order to continue to specify other group settings, perform other procedures in this chapter, as applicable
Configure IETF RADIUS Settings for a User Group
In order to download a name for an access list that you have already created on the security appliance from the RADIUS server when a user authenticates, configure the IETF RADIUS filter-id attribute (attribute number 11) as follows:
filter-id=acl_name
The VPN group user"cisco" authenticates successfully, and the RADIUS server downloads an ACL name (new) for an access list that you have already created on the security appliance . The user "cisco" can access all devices that are inside network of the ASA except the 10.1.1.2 server. In order to verify the ACL, see the Filter-Id ACL section.
As per the example, the ACL named new is configured for filtering in ASA.
access-list new extended deny ip any host 10.1.1.2
access-list new extended permit ip any any
These parameters appear only when these are true. You have configured
-
AAA client to use one of the RADIUS protocols in Network Configuration
-
Group-level RADIUS attributes on the RADIUS (IETF) page in the Interface Configuration section of the web interface
RADIUS attributes are sent as a profile for each user from ACS to the requesting AAA client.
In order to configure IETF RADIUS attribute settings to apply as an authorization for each user in the current group, perform these actions:
-
In the navigation bar, click Group Setup.
The Group Setup Select page opens.
-
From the Group list, choose a group, and then click Edit Settings.
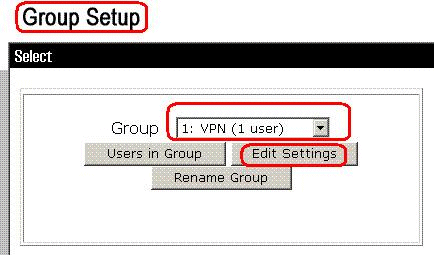
The name of the group appears at the top of the Group Settings page.
-
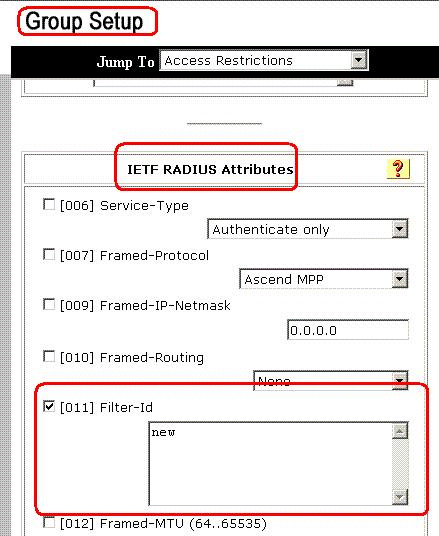
Scroll to the IEFT RADIUS Attributes. For each IETF RADIUS attribute, you must authorize the current group. Check the check box of the [011] Filter-Id attribute, and then add the ASA defined ACL name(new) in the authorization for the attribute in the field. Refer to the ASA show running configuration output.
-
In order to save the group settings that you have just made and apply them immediately, click Submit and Apply.
Note: In order to save your group settings and apply them later, click Submit. When you are ready to implement the changes, choose System Configuration > Service Control. Then choose Restart.
Verify
Use this section to confirm that your configuration works properly.
The Output Interpreter Tool (registered customers only) (OIT) supports certain show commands. Use the OIT to view an analysis of show command output.
Show Crypto Commands
-
show crypto isakmp sa—Shows all current IKE Security Associations (SAs) at a peer.
ciscoasa# sh crypto isakmp sa Active SA: 1 Rekey SA: 0 (A tunnel will report 1 Active and 1 Rekey SA during rekey) Total IKE SA: 1 1 IKE Peer: 192.168.10.2 Type : user Role : responder Rekey : no State : AM_ACTIVE ciscoasa# -
show crypto ipsec sa—Shows the settings used by current SAs.
ciscoasa# sh crypto ipsec sa
interface: outside
    Crypto map tag: outside_dyn_map, seq num: 1,
   local addr: 192.168.1.1

      local ident (addr/mask/prot/port):
   (0.0.0.0/0.0.0.0/0/0)
      remote ident (addr/mask/prot/port):
   (192.168.5.1/255.255.255.255/0/0)
      current_peer: 192.168.10.2, username: cisco
      dynamic allocated peer ip: 192.168.5.1

      #pkts encaps: 65, #pkts encrypt:
   65, #pkts digest: 65
      #pkts decaps: 65, #pkts decrypt:
   65, #pkts verify: 65
      #pkts compressed: 0, #pkts decompressed: 0
      #pkts not compressed: 4, #pkts comp failed:
   0, #pkts decomp failed: 0
      #pre-frag successes: 0, #pre-frag failures:
   0, #fragments created: 0
      #PMTUs sent: 0, #PMTUs rcvd: 0,
   #decapsulated frgs needing reassembly: 0
      #send errors: 0, #recv errors: 0

      local crypto endpt.: 192.168.1.1,
   remote crypto endpt.: 192.168.10.2

      path mtu 1500, ipsec overhead 58,
   media mtu 1500
      current outbound spi: EEF0EC32

    inbound esp sas:
      spi: 0xA6F92298 (2801345176)
         transform: esp-3des esp-sha-hmac none
         in use settings ={RA, Tunnel, }
         slot: 0, conn_id: 86016, crypto-map:
   outside_dyn_map
         sa timing: remaining key lifetime (sec):
   28647
         IV size: 8 bytes
         replay detection support: Y
    outbound esp sas:
      spi: 0xEEF0EC32 (4008766514)
         transform: esp-3des esp-sha-hmac none
         in use settings ={RA, Tunnel, }
         slot: 0, conn_id: 86016, crypto-map:
   outside_dyn_map
         sa timing: remaining key lifetime (sec): 28647
         IV size: 8 bytes
         replay detection support: Y
Downloadable ACL for User/Group
Verify the Downloadable ACL for the user Cisco. ACLs gets downloaded from the CSACS.
ciscoasa(config)# sh access-list
access-list cached ACL log flows: total 0,
   denied 0 (deny-flow-max 4096)
            alert-interval 300
access-list 101; 1 elements
access-list 101 line 1 extended permit ip 10.1.1.0 255.255.255.0
   192.168.5.0 255.255.255.0 (hitcnt=0) 0x8719a411

access-list #ACSACL#-IP-VPN_Access-49bf68ad; 2 elements (dynamic)
access-list #ACSACL#-IP-VPN_Access-49bf68ad line 1 extended permit
   ip any host 10.1.1.2 (hitcnt=2) 0x334915fe
access-list #ACSACL#-IP-VPN_Access-49bf68ad line 2 extended deny
   ip any any (hitcnt=40) 0x7c718bd1
Filter-Id ACL
The [011] Filter-Id has applied for the Group - VPN, and users of the group are filtered as per the ACL (new) defined in the ASA.
ciscoasa# sh access-list
access-list cached ACL log flows: total 0,
   denied 0 (deny-flow-max 4096)
            alert-interval 300
access-list 101; 1 elements
access-list 101 line 1 extended permit ip 10.1.1.0
   255.255.255.0 192.168.5.0 255.255.255.0
   (hitcnt=0) 0x8719a411
access-list new; 2 elements
access-list new line 1 extended deny ip
   any host 10.1.1.2 (hitcnt=4) 0xb247fec8
access-list new line 2 extended permit ip any any
   (hitcnt=39) 0x40e5d57c
Troubleshoot
This section provides information you can use to troubleshoot your configuration. Sample debug output is also shown.
Note: For more information on troubleshooting Remote Access IPSec VPN, refer to Most Common L2L and Remote Access IPSec VPN Troubleshooting Solutions.
Clear Security Associations
When you troubleshoot, make sure to clear existent Security Associations after you make a change. In the privileged mode of the PIX, use these commands:
-
clear [crypto] ipsec sa—Deletes the active IPSec SAs. The keyword crypto is optional.
-
clear [crypto] isakmp sa—Deletes the active IKE SAs. The keyword crypto is optional.
Troubleshooting Commands
The Output Interpreter Tool (registered customers only) (OIT) supports certain show commands. Use the OIT to view an analysis of show command output.
Note: Refer to Important Information on Debug Commands before you use debug commands.
-
debug crypto ipsec 7—Displays the IPSec negotiations of Phase 2.
-
debug crypto isakmp 7—Displays the ISAKMP negotiations of Phase 1.
Related Information
- Cisco ASA 5500 Series Adaptive Security Appliances Support Page
- Cisco ASA 5500 Series Adaptive Security Appliances Command References
- Cisco PIX 500 Series Security Appliances Support Page
- Cisco Adaptive Security Device Manager
- IPsec Negotiation/IKE Protocols Support Page
- Cisco VPN Client Support Page
- Cisco Secure Access Control Server for Windows
- Requests for Comments (RFCs)

- Technical Support & Documentation - Cisco Systems
Revision History
| Revision | Publish Date | Comments |
|---|---|---|
1.0 |
18-Mar-2009 |
Initial Release |
Contact Cisco
- Open a Support Case

- (Requires a Cisco Service Contract)


 Feedback