Introduction
This document describes an example of the implementation of certificate-based authentication on mobile devices.
Prerequisites
The tools and devices used in the guide are:
- Cisco Firepower Threat Defense (FTD)
- Firepower Management Center (FMC)
- Apple iOS device (iPhone, iPad)
- Certificate Authority (CA)
- Cisco Anyconnect Client Software
Requirements
Cisco recommends that you have knowledge of these topics:
- Basic VPN
- SSL/TLS
- Public Key Infrastucture
- Experience with FMC
- OpenSSL
- Cisco Anyconnect
Components Used
The information in this document is based on these software and hardware versions:
- Cisco FTD
- Cisco FMC
- Microsoft CA Server
- XCA
- Cisco Anyconnect
- Apple ipad
The information in this document was created from the devices in a specific lab environment. All of the devices used in this document started with a cleared (default) configuration. If your network is live, ensure that you understand the potential impact of any command.
Configure Cisco Anyconnect on FTD
This section describes the steps to configure Anyconnect via FMC. Before you begin, be sure to deploy all configurations.
Network Diagram
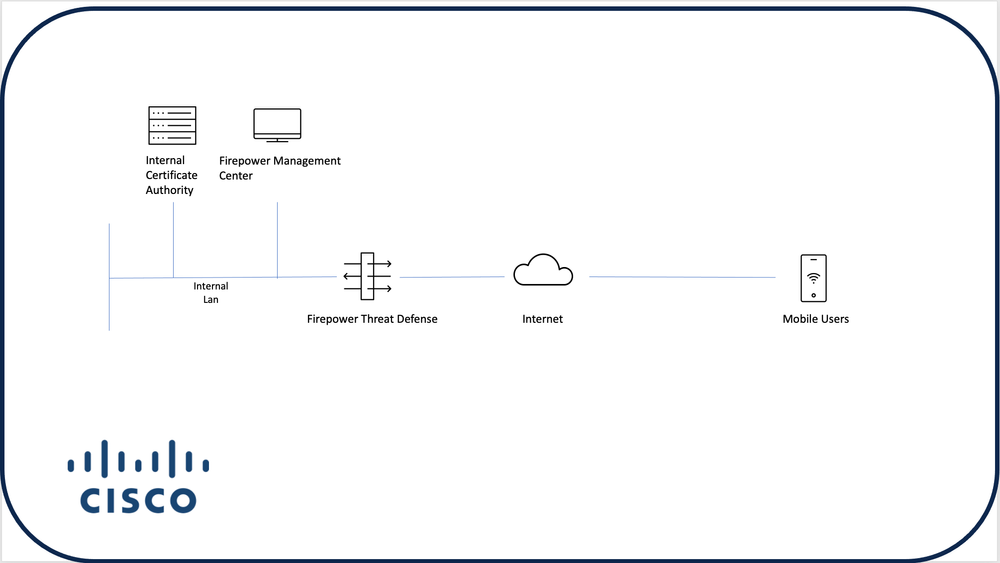
Add Certificate to FTD
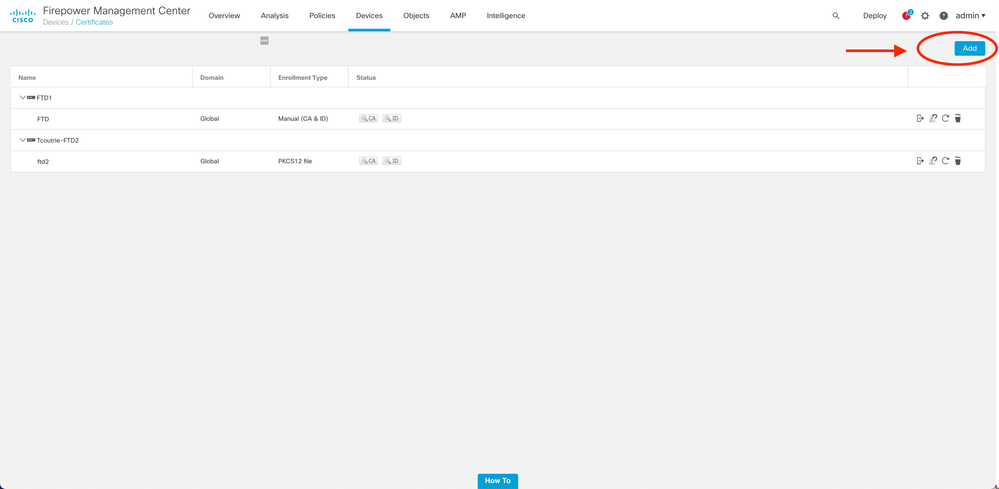
Step 1. Create a certificate for the FTD on the FMC appliance. Navigate to Devices > Certificate and choose Add, as shown in this image:
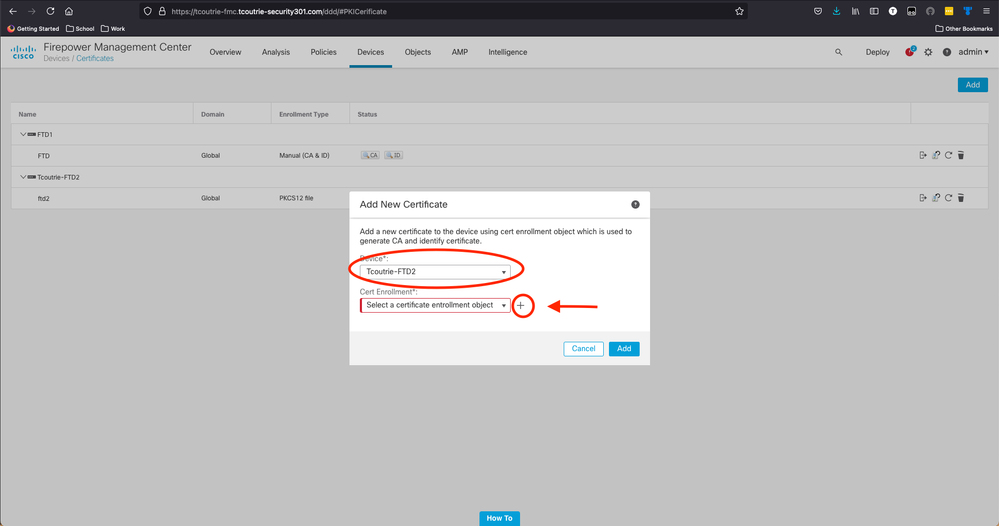
Step 2. Choose the FTD desired for the VPN connection. Choose the FTD appliance from the devices dropdown. Click the + icon to add a new certificate enrollment method, as shown in this image:
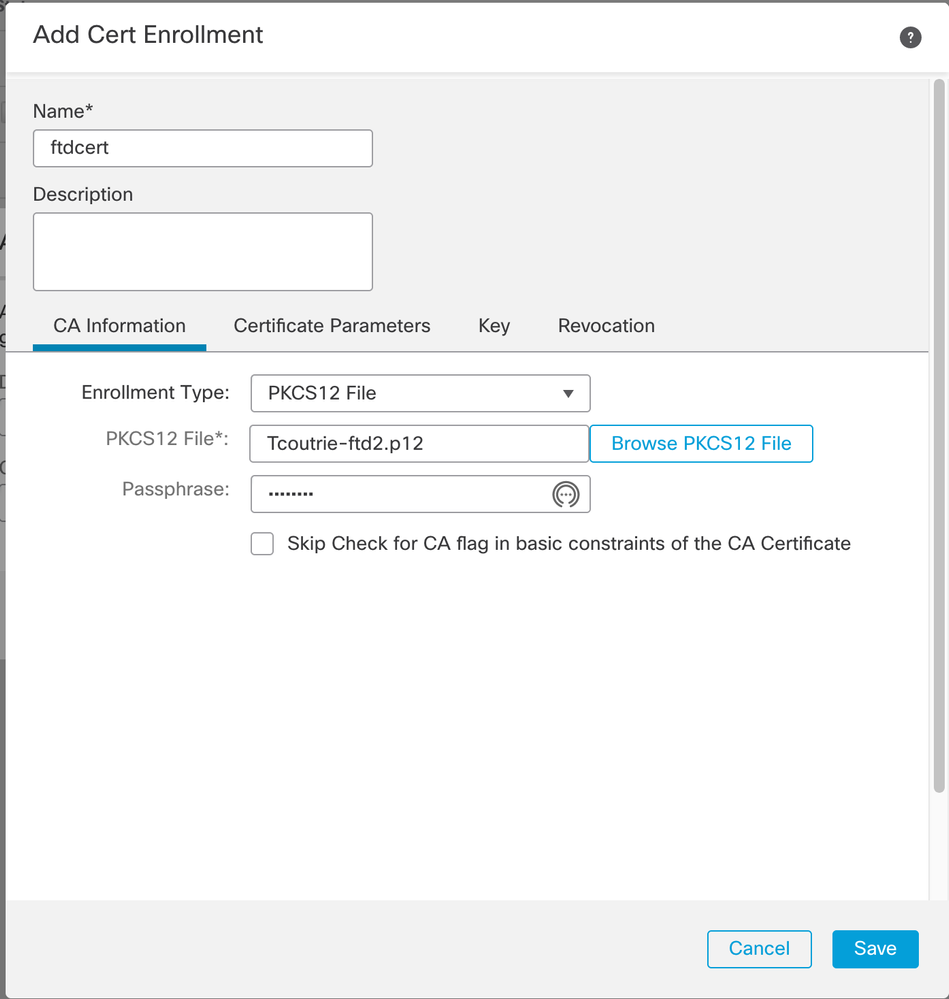
Step 3. Add the certificates to the device. Choose the option that is the preferred method to obtain certificates in the environment.
Tip: The available options are: Self Signed Certificate - Generate a new certificate locally, SCEP - Use Simple Certificate Enrollment Protocol to obtain a certificate from a CA, Manual- Manually install the Root and Identity certificate, PKCS12 - Upload encrypted certificate bundle with root, identity, and private key.
Step 4. Upload the certificate to the FTD device. Enter the passcode (PKCS12 only) and click Save, as shown in this image:
Note: Once you have saved the file, the deployment of the certificates occurs immediately. To see certificate details, choose the ID.
Configure Cisco Anyconnect
Configure Anyconnect via FMC with the remote access wizard.
Step 1. Start the Remote Access VPN policy wizard to configure Anyconnect.
Navigate to Devices > Remote Access and choose Add.
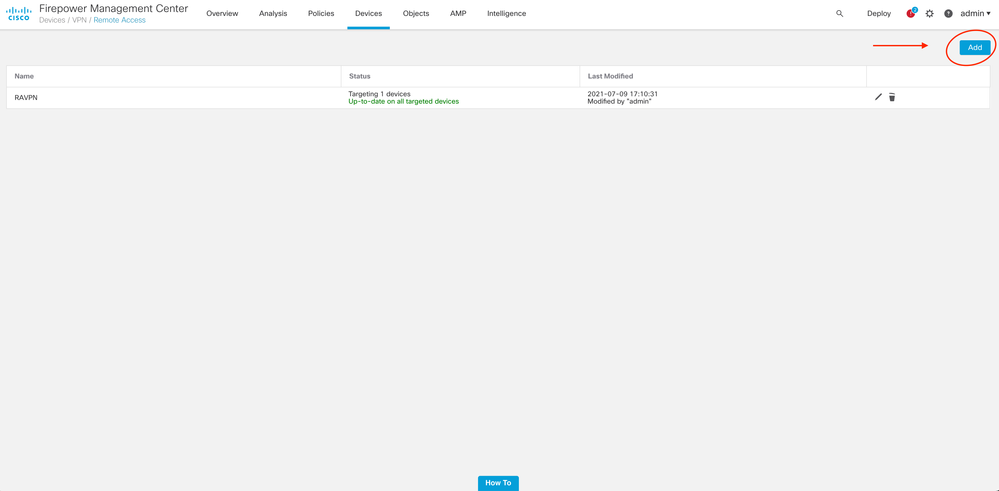
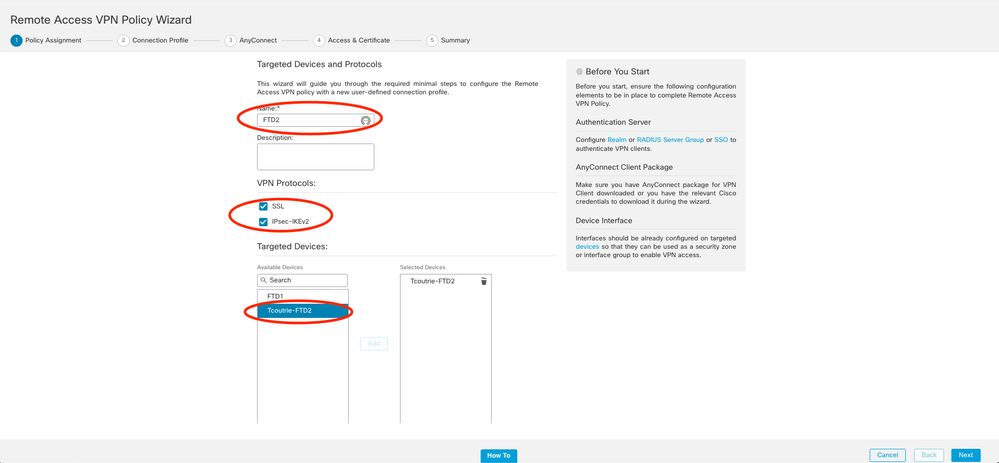
Step 2. Policy Assignment.
Complete the policy assignment:
a. Name the policy.
b. Choose the VPN protocols desired.
c. Choose the targeted device to apply the configuration.
Step 3. Connection Profile.
a. Name the Connection Profile.
b. Set the authentication method to Client Certificate Only.
c. Assign an IP address pool, and if needed, create a new Group Policy.
d. Click Next.
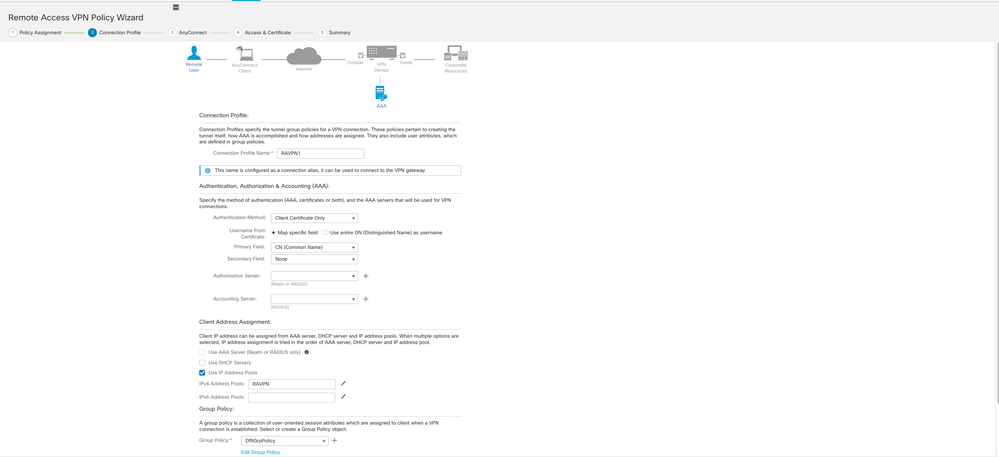
Note: Choose the Primary Field to be used to enter the user name for authentication sessions. The CN of the certificate is used in this guide.
Step 4. Anyconnect.
Add an Anyconnect image to the appliance. Upload the preferred version of Anyconnect and click Next.
Note: Cisco Anyconnect packages can be downloaded from Software.Cisco.com.
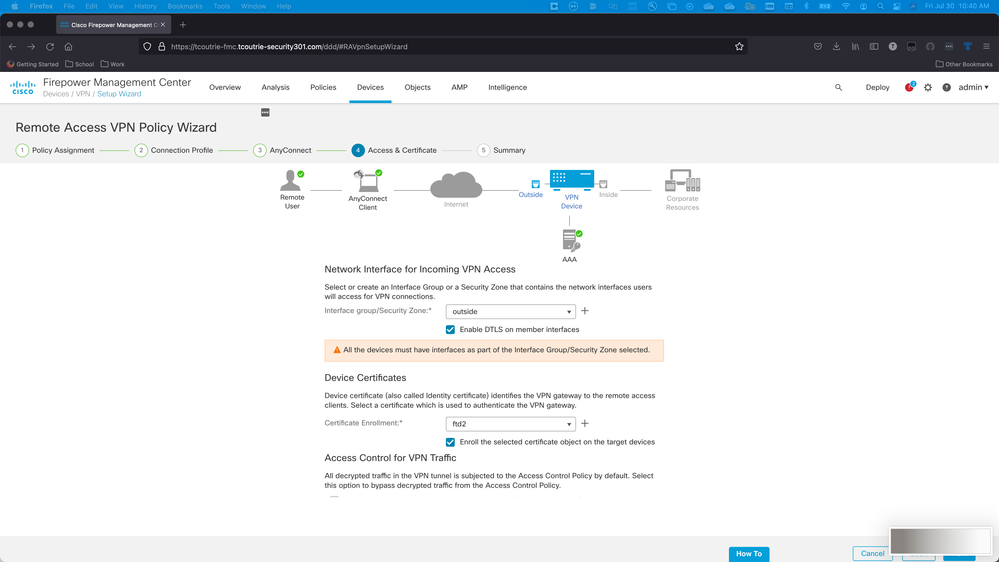
Step 5. Access and Certificate.
Apply the Certificate to an Interface and enable Anyconnect on Interface Level, as shown in this image, and click Next.
Step 6. Summary.
Review the configurations. If all checks out, click finish and then deploy.
Create Certificate for Mobile Users
Create a certificate to be added to the mobile device used in the connection.
Step 1. XCA.
a. Open XCA
b. Start a new Database
Step 2. Create CSR.
a. Choose Certificate Signing Request (CSR)
b. Choose New Request
c. Enter the value with all information needed for the certificate
d. Generate a new key
e. When finished, click OK
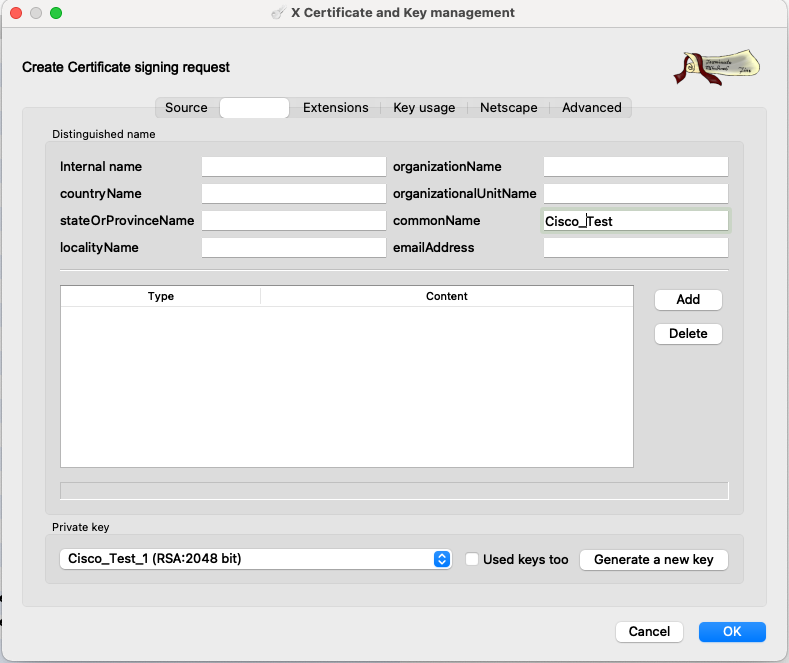
Note: This document uses the CN of the certificate.
Step 3. Submit CSR.
a. Export the CSR
b. Submit CSR to CA to obtain a new Certificate
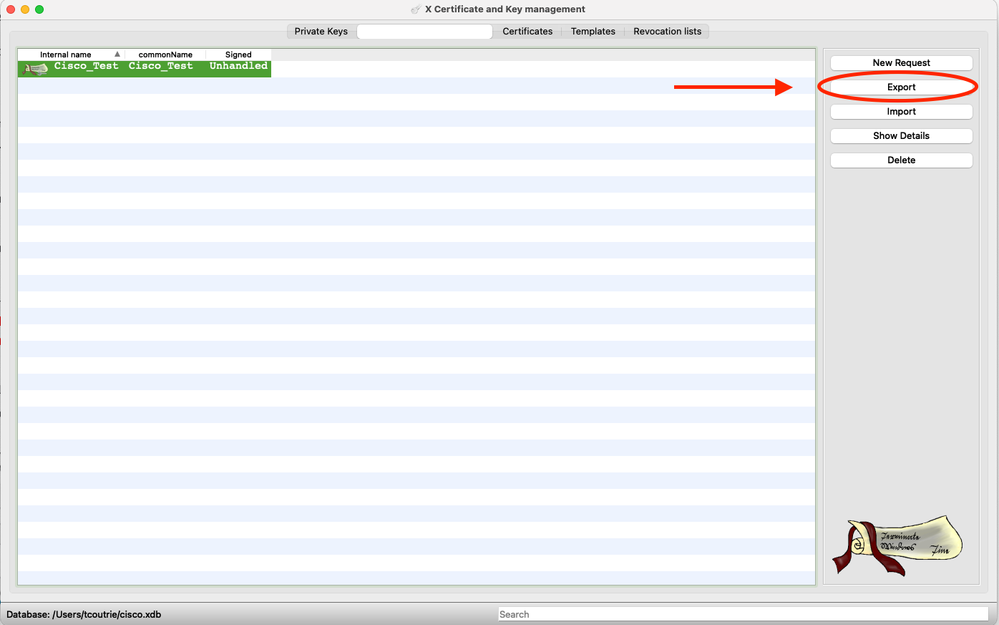
Note: Use the PEM format of the CSR.
Install on Mobile Device
Step 1. Add the device certificate to the mobile device.
Step 2. Share the certificate with the Anyconnect application to add the new certificate application.
Caution: Manual installation requires the user to share the certificate with the application. This does not apply to certificates pushed via MDMs.
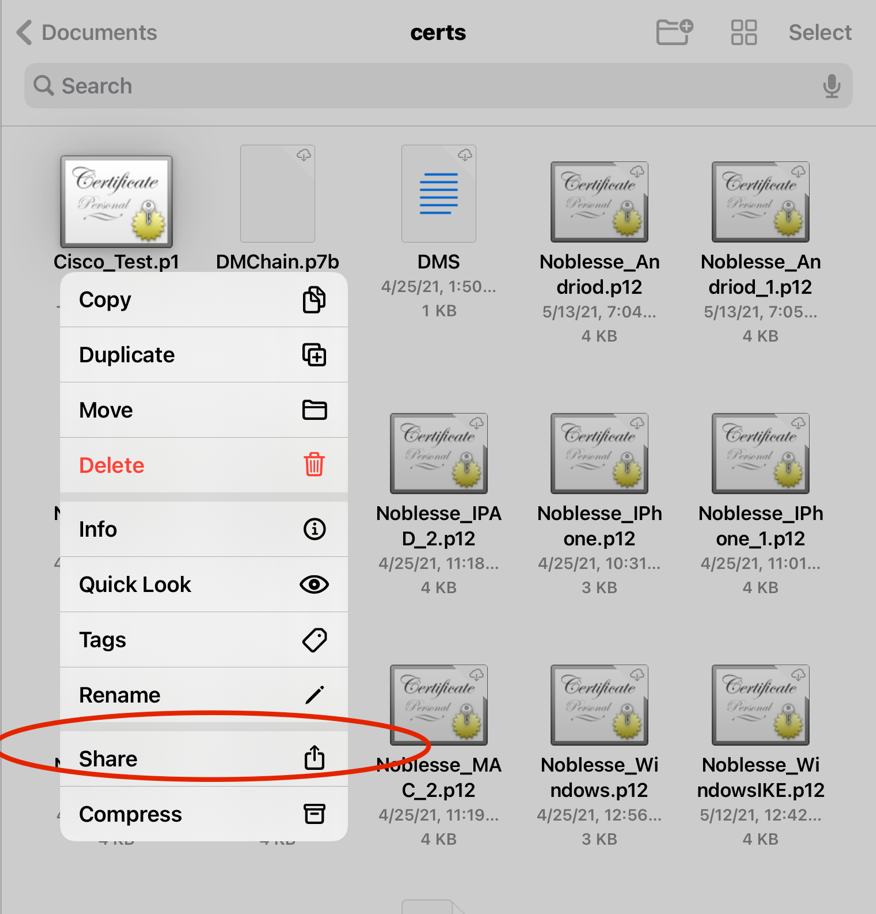
Step 3. Enter certificate password for PKCS12 File.
Step 4. Create a New connect on Anyconnect.
Step 5. Navigate to new connections; Connections > Add VPN Connection.
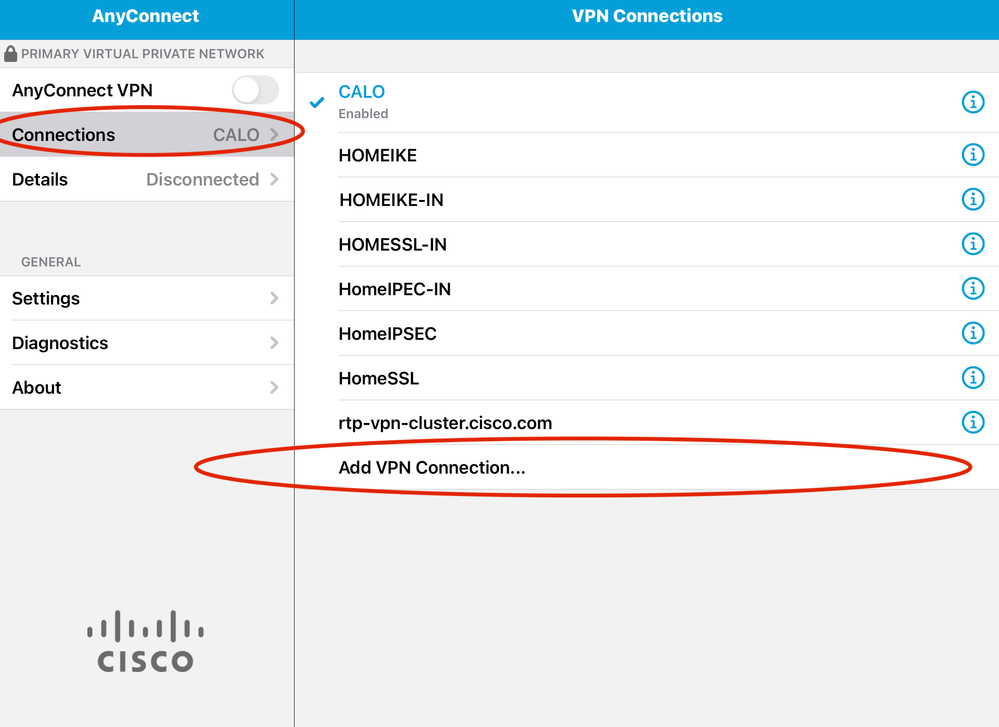
Step 6. Enter the information for the new connection.
Description: Name the connect
Server Address: IP address or FQDN of FTD
Advanced: Additional configurations
Step 7. Choose Advanced.
Step 8. Choose Certificate and choose your newly added certificate.
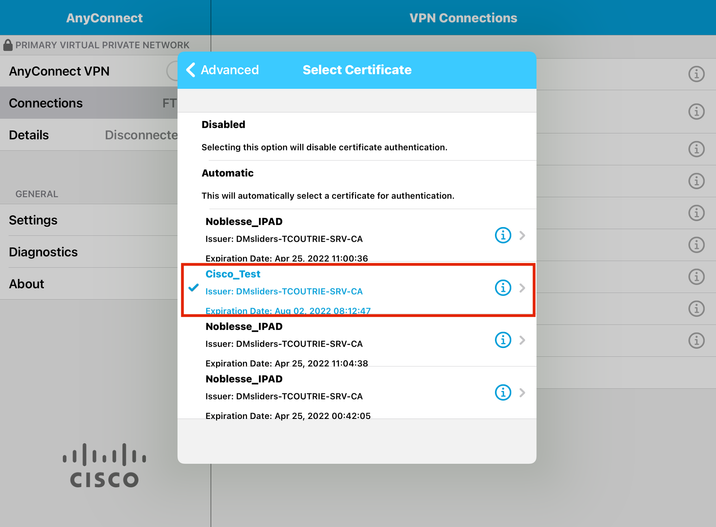
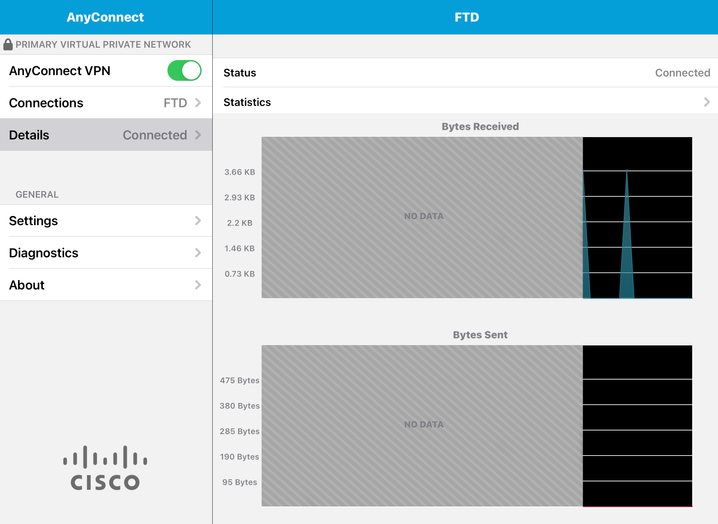
Step 9. Navigate back to Connections and test.
Once successful, the toggle stays on and details show connected in the status.
Verify
The command show vpn-sessiondb detail Anyconnect shows all information about the connected host.
Tip: The option to further filter this command is the 'filter' or 'sort' keywords added to the command.
For example:
Tcoutrie-FTD3# show vpn-sessiondb detail Anyconnect


Username : Cisco_Test Index : 23
Assigned IP : 10.71.1.2 Public IP : 10.118.18.168
Protocol : Anyconnect-Parent SSL-Tunnel DTLS-Tunnel
License : Anyconnect Premium, Anyconnect for Mobile
Encryption : Anyconnect-Parent: (1)none SSL-Tunnel: (1)AES-GCM-256 DTLS-Tunnel: (1)AES-GCM-256
Hash : Anyconnect-Parent: (1)none SSL-Tunnel: (1)SHA384 DTLS-Tunnel: (1)SHA384
Bytes Tx : 8627 Bytes Rx : 220
Pkts Tx : 4 Pkts Rx : 0
Pkts Tx Drop : 0 Pkts Rx Drop : 0
Group Policy : SSL Tunnel Group : SSL
Login Time : 13:03:28 UTC Mon Aug 2 2021
Duration : 0h:01m:49s
Inactivity : 0h:00m:00s
VLAN Mapping : N/A VLAN : none
Audt Sess ID : 0a7aa95d000170006107ed20
Security Grp : none Tunnel Zone : 0

Anyconnect-Parent Tunnels: 1
SSL-Tunnel Tunnels: 1
DTLS-Tunnel Tunnels: 1

Anyconnect-Parent:
Tunnel ID : 23.1
Public IP : 10.118.18.168
Encryption : none Hashing : none
TCP Src Port : 64983 TCP Dst Port : 443
Auth Mode : Certificate
Idle Time Out: 30 Minutes Idle TO Left : 28 Minutes
Client OS : apple-ios
Client OS Ver: 14.6
Client Type : Anyconnect
Client Ver : Cisco Anyconnect VPN Agent for Apple iPad 4.10.01099
Bytes Tx : 6299 Bytes Rx : 220
Pkts Tx : 2 Pkts Rx : 0
Pkts Tx Drop : 0 Pkts Rx Drop : 0

SSL-Tunnel:
Tunnel ID : 23.2
Assigned IP : 10.71.1.2 Public IP : 10.118.18.168
Encryption : AES-GCM-256 Hashing : SHA384
Ciphersuite : ECDHE-RSA-AES256-GCM-SHA384
Encapsulation: TLSv1.2 TCP Src Port : 64985
TCP Dst Port : 443 Auth Mode : Certificate
Idle Time Out: 30 Minutes Idle TO Left : 28 Minutes
Client OS : Apple iOS
Client Type : SSL VPN Client
Client Ver : Cisco Anyconnect VPN Agent for Apple iPad 4.10.01099
Bytes Tx : 2328 Bytes Rx : 0
Pkts Tx : 2 Pkts Rx : 0
Pkts Tx Drop : 0 Pkts Rx Drop : 0

DTLS-Tunnel:
Tunnel ID : 23.3
Assigned IP : 10.71.1.2 Public IP : 10.118.18.168
Encryption : AES-GCM-256 Hashing : SHA384
Ciphersuite : ECDHE-ECDSA-AES256-GCM-SHA384
Encapsulation: DTLSv1.2 UDP Src Port : 51003
UDP Dst Port : 443 Auth Mode : Certificate
Idle Time Out: 30 Minutes Idle TO Left : 28 Minutes
Client OS : Apple iOS
Client Type : DTLS VPN Client
Client Ver : Cisco Anyconnect VPN Agent for Apple iPad 4.10.01099
Bytes Tx : 0 Bytes Rx : 0
Pkts Tx : 0 Pkts Rx : 0
Pkts Tx Drop : 0 Pkts Rx Drop : 0
Troubleshoot
Debugs
Debugs that are be required to troubleshoot this issue is:
Debug crypto ca 14

Debug webvpn 255

Debug webvpn Anyconnect 255
If the connection is IPSEC and not SSL:
Debug crypto ikev2 platform 255

Debug crypto ikev2 protocol 255

debug crypto CA 14
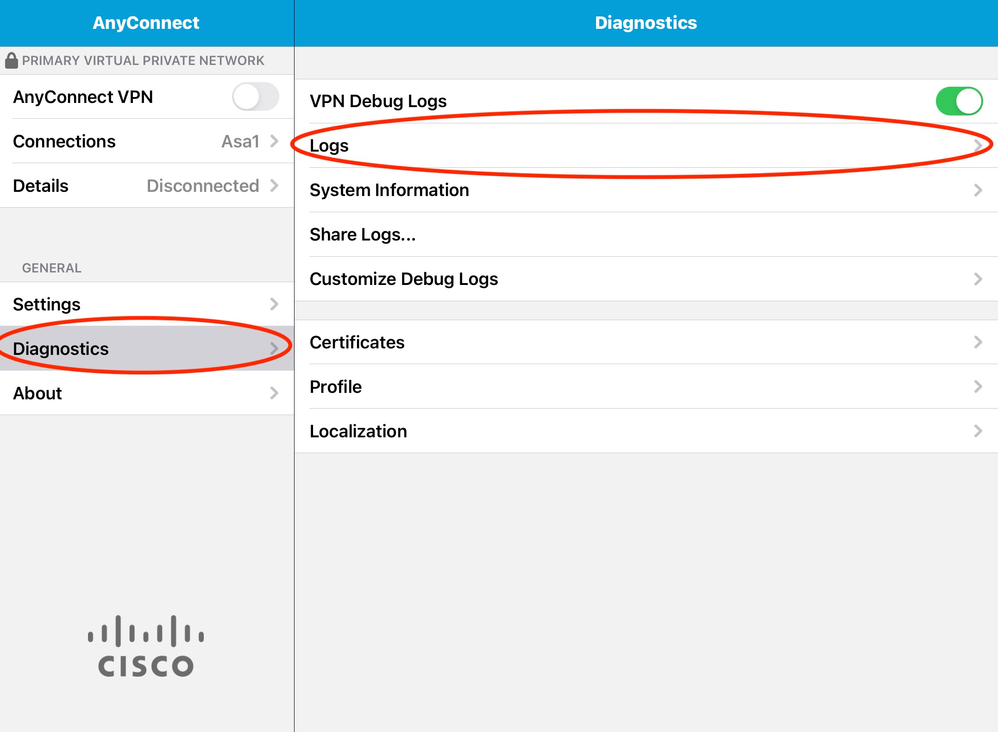
Logs from the Anyconnect mobile application:
Navigate to Diagnostic > VPN Debug Logs > Share logs.
Enter in the information:
- Problem
- Steps to reproduce
Then navigate to Send > Share with.
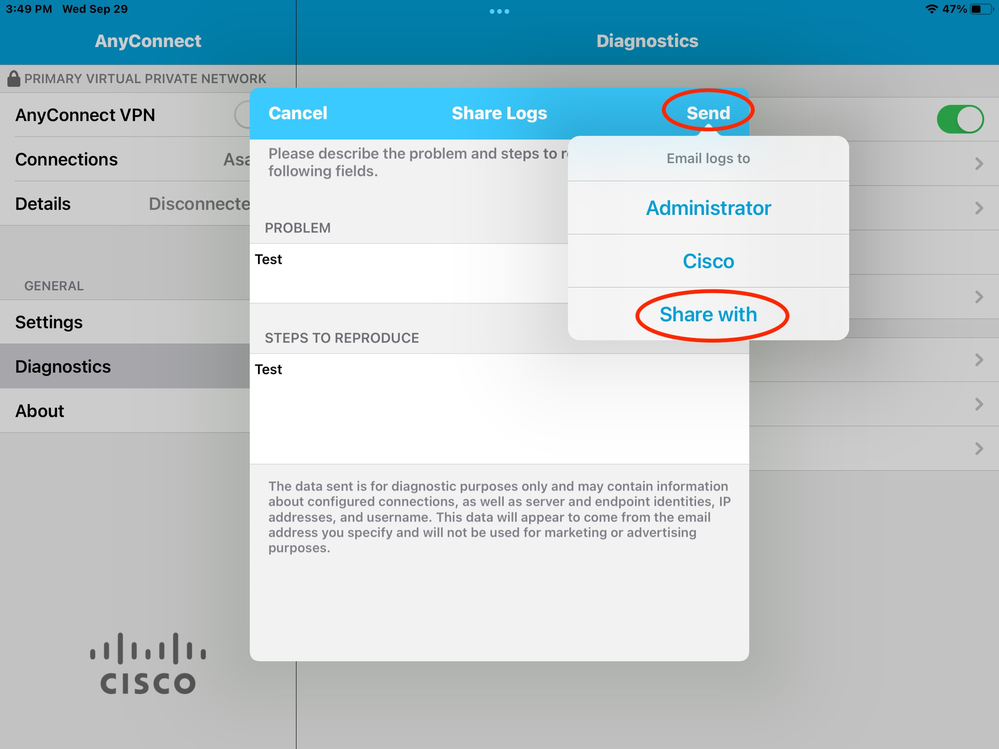
This presents the option to use an email client to send the logs.


 Feedback