Configure AnyConnect Lockdown And Hide AnyConnect From The Add/Remove Program List For Windows
Available Languages
Download Options
Bias-Free Language
The documentation set for this product strives to use bias-free language. For the purposes of this documentation set, bias-free is defined as language that does not imply discrimination based on age, disability, gender, racial identity, ethnic identity, sexual orientation, socioeconomic status, and intersectionality. Exceptions may be present in the documentation due to language that is hardcoded in the user interfaces of the product software, language used based on RFP documentation, or language that is used by a referenced third-party product. Learn more about how Cisco is using Inclusive Language.
Contents
Table of Contents
Introduction
This document describes the steps required to enable the AnyConnect Lockdown and the Hide AnyConnect from the Add/Remove program list for Windows machines.
Contributed by Christian G. Hernandez R, Cisco TAC Engineer.
Prerequisites
Requirements
Cisco recommends that you have knowledge of these topics:
-
Cisco Adaptive Security Appliance (ASA) configuration
- Cisco AnyConnect configuration
- Windows basic knowledge
Components Used
The information in this document is based on the software and hardware versions below:
- Cisco ASA version 9.14.2.13
- Cisco Adaptive Security Device Manager (ASDM) version 7.14.1
- Cisco AnyConnect versions 4.9.04053 and 4.9.06037
The information in this document was created from the devices in a specific lab environment. All of the devices used in this document started with a cleared (default) configuration. If your network is live, ensure that you understand the potential impact of any command.
Background Information
AnyConnect Lockdown for Windows: Cisco recommends that end-users be given limited rights to the Cisco AnyConnect Secure Mobility Client on their device. If end-user warrant additional rights, installers can provide a lockdown capability that prevents users and local administrators to turn off or stop the AnyConnect services.
You have three different options to enable the AnyConnect Lockdown feature:
1. MSI installers from the Windows command prompt terminal.
2. Lockdown option from the AnyConnect pre-deployment package installation wizard.
3. ASDM - Import a sample installer lockdown transforms file to the ASA.
Hide AnyConnect from the Add/Remove program list for Windows: You can hide the installed AnyConnect modules from the Add/Remove Programs list in the Windows Control Panel Uninstall a Program.
You have two options to enable the Hide AnyConnect from the Add/Remove program list feature:
1. MSI installers from the Windows command prompt terminal.
2. ASDM - Import a sample installer hide-addremove transforms file to the ASA.
Configure
Network Diagram

Configure AnyConnect Lockdown
MSI installers from the Windows command prompt terminal.
Configuration Steps
Step 1. Download the AnyConnect pre-deployment package file for Windows.
Step 1.1 Navigate to the Cisco software download page and download the AnyConnect version to install on the Windows machine.
For this example, download the Windows AnyConnect pre-deployment package that includes the individual MSI files for version 4.9.04053 (anyconnect-win-4.9.04053-predeploy-k9.zip).


msiexec -i anyconnect-win-4.9.04053-xxxxxxx-predeploy-k9.msi TRANSFORMS=_anyconnect-win-lockdown.mst LOCKDOWN=1 -lvx* install.logNote:The LOCKDOWN value setup as "1", enables the lockdown feature for the AnyConnect module to install.
Note: Cisco recommends that you use the sample transforms file provided to set this property, apply the transform to each MSI installer for each module you want to be locked down. You can download the sample transforms from the Cisco AnyConnect Secure Mobility Client software download page.
Note:If you deploy the core client plus one or more optional modules, you must apply the LOCKDOWN property to each of the installers. This operation is one way only and cannot be removed unless you re-install the product.
msiexec -i anyconnect-win-4.9.04053-core-vpn-predeploy-k9.msi TRANSFORMS=_anyconnect-win-lockdown.mst LOCKDOWN=1 -lvx* install.log


msiexec -i anyconnect-win-4.9.04053-umbrella-predeploy-k9.msi TRANSFORMS=_anyconnect-win-lockdown.mst LOCKDOWN=1 -lvx* install.log
Lockdown option from the AnyConnect pre-deployment package installation wizard.
Configuration Steps
Step 1. Download the Anyconnect pre-deployment package file for Windows.
Step 1.1 Navigate to the Cisco software download page and download the AnyConnect version to install on the Windows machine.
For this example, download the Windows AnyConnect pre-deployment package that includes the individual MSI files for version 4.9.04053 (anyconnect-win-4.9.04053-predeploy-k9.zip).


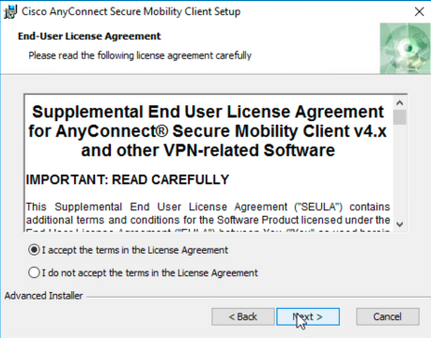
Step 3. Work with the AnyConnect installation wizard.
Step 3.1 Select the AnyConnect modules you would like to install from the options displayed.
For this example, select the AnyConnect CORE & VPN and the Umbrella Roaming Security modules.

Step 4. Enable the AnyConnect lockdown feature.
Step 4.1 In order to enable the lockdown feature for both the CORE & VPN and the Umbrella Roaming Security modules, select the Lock Down Component Services option and proceed with the installation.

Step 5. Confirm the installation of the AnyConnect modules.
Step 5.1 The installation of the AnyConnect modules is completed at 100% once the next message is displayed.

Configure Hide AnyConnect from the Add/Remove Program List
MSI installers from the Windows command prompt terminal.
Configuration Steps
Step 1. Download the AnyConnect pre-deployment package file for Windows.
Step 1.1 Navigate to the Cisco software download page and download the AnyConnect version to install on the Windows machine.
For this example, download the Windows AnyConnect pre-deployment package that includes the individual MSI files for version 4.9.04053 (anyconnect-win-4.9.04053-predeploy-k9.zip).


msiexec -i anyconnect-win-4.9.04053-xxxxxxx-predeploy-k9.msi TRANSFORMS=_anyconnect-win-hide-addremove-display.mst ARPSYSTEMCOMPONENT=1 -lvx* install.logNote: The ARPSYSTEMCOMPONENT value setup as "1", enables the Hide AnyConnect from the Add/Remove Program List feature for the AnyConnect module to install.
Note: Cisco recommends that you use the sample transforms file provided to set this property, apply the transform to each MSI installer for each module that you want to hide. You can download the sample transforms from the Cisco AnyConnect Secure Mobility Client software download page.
Note: If you deploy the core client plus one or more optional modules, you must apply the HIDE-AnyConnect property to each of the installers. This operation is one way only and cannot be removed unless you re-install the product.


Configure AnyConnect Lockdown and the Hide AnyConnect from the Add/Remove Program List with ASDM
This procedure applies just to AnyConnect web deployment updates. This example considers an AnyConnect web deployment update from version 4.9.04053 to 4.9.0.6037.
Configuration Steps
Step 1. Confirm the AnyConnect version that runs on the Windows machine.
Step 1.1 The Windows machine in this example has the AnyConnect version 4.9.04053 already installed for both the Core & VPN and the Umbrella Roaming Security modules.

Step 2. Download the AnyConnect headend deployment package file for Windows.
Step 2.1 Navigate to the Cisco software download page and download the AnyConnect headend deployment package file version to install on the Windows machine for the web deployment update.
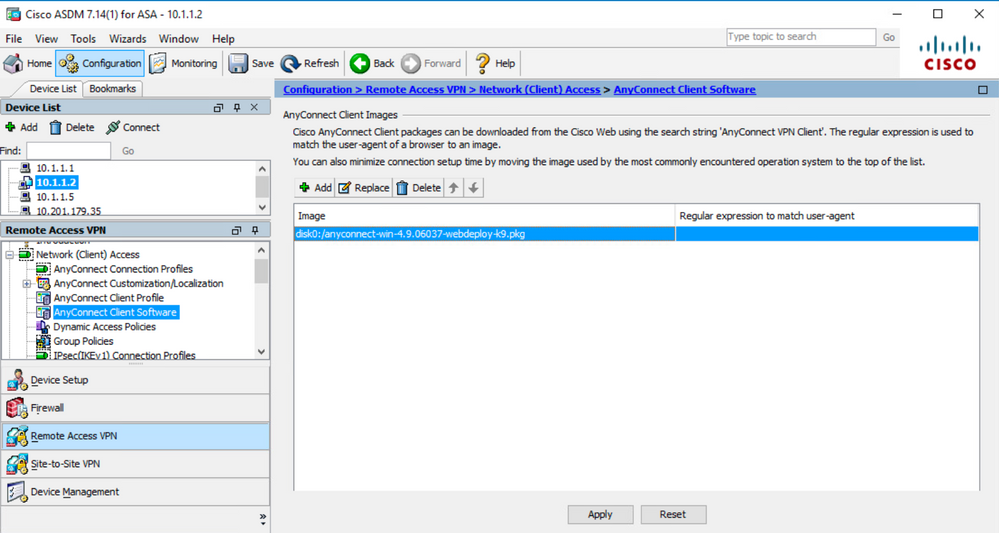
For this example, download the Windows AnyConnect headend deployment package version 4.9.06037 (anyconnect-win-4.9.06037-webdeploy-k9.pkg).


Note: The AnyConnect _anyconnect-win-lockdown.mst sample transforms file works for whatever AnyConnect module required.


Note: The _anyconnect-win-hide-addremove-display.mstsample transforms file works for whatever AnyConnect module required.
Step 8.4 Save the configuration changes and Send them to the ASA.


Note: By the time this article was written, the name used to import the sample transforms files must have an underscore "_" at the start of the name, this forces the sample transforms imported to work for whatever AnyConnect module. If you use a different name without an underscore at the start of the name, then, the sample transforms imported works just for the CORE & VPN Anyconnect module (CSCvy38427).
Step 9. AnyConnect web deployment auto-update.
Step 9.1 Force the AnyConnect web deployment auto-update to happen for the CORE & VPN and the Umbrella Roaming Security modules.
Here the ASA AnyConnect configuration in place in order to allow the CORE & VPN and the Umbrella Roaming Security modules to get auto-updated:
webvpn
 enable outside
 anyconnect image disk0:/anyconnect-win-4.9.06037-webdeploy-k9.pkg 1
 anyconnect enable
 tunnel-group-list enable

group-policy ANYCONNECT_GP1 internal
group-policy ANYCONNECT_GP1 attributes
 vpn-tunnel-protocol ssl-client ssl-clientless
 split-tunnel-policy tunnelspecified
 split-tunnel-network-list value SPLIT_TUNNEL1
 webvpn
  anyconnect modules value umbrella

tunnel-group MY_TUNNEL1 type remote-access
tunnel-group MY_TUNNEL1 general-attributes
 address-pool VPN_POOL1
 default-group-policy ANYCONNECT_GP1
tunnel-group MY_TUNNEL1 webvpn-attributes
 group-alias SSL_TUNNEL1 enable
Step 9.2 Start a connection to the ASA headend from the AnyConnect client that runs version 4.9.04053 on the Windows machine.


Step 9.3 After this, the AnyConnect Core & VPN and the Umbrella Roaming Security modules are updated to version 4.9.06037 with the lockdown and the hide from the add/remove program list features enabled.

Verify
Confirm the Lockdown feature is enabled for the AnyConnect modules installed
Step 1. Open the Windows services (services.msc) as follows.

Step 2. Then, right-click over the CORE & VPN and the Umbrella Roaming Security services.
You can confirm the lockdown feature is enabled as you are not allowed to Start, Stop, Pause, Resume or Restart the services for these AnyConnect modules.


Confirm the Hide from the Add/Remove Program List feature is enabled for the AnyConnect modules installed
Step 1. Open the AnyConnect client as follows.

Step 2. Confirm the AnyConnect version installed.
For this, select the INFO icon under the AnyConnect client as follows:
Step 2.1 For the AnyConnect version 4.9.04053:

Step 2.2 For the AnyConnect version 4.9.06037:

Step 3. Confirm that both the AnyConnect CORE & VPN and the Umbrella Roaming Security modules are hidden from the Add/Remove Windows Program List.
For this, navigate to the Windows Control Panel > Uninstall a Program.

Troubleshoot
There is not troubleshoot procedure to follow for this document.
Related Bugs
CSCvy38427 ASDM: Transforms file name must start with "_" underscore to take effect to multiple AC modules
Related Information
Technical Support & Documentation - Cisco Systems
Cisco AnyConnect Secure Mobility Client Administrator Guide, Release 4.0
Contributed by Cisco Engineers
- Christian G Hernandez R
Contact Cisco
- Open a Support Case

- (Requires a Cisco Service Contract)


 Feedback