Configure AD (LDAP) Authentication and User Identity on FTD Managed by FDM for AnyConnect Clients
Available Languages
Download Options
Bias-Free Language
The documentation set for this product strives to use bias-free language. For the purposes of this documentation set, bias-free is defined as language that does not imply discrimination based on age, disability, gender, racial identity, ethnic identity, sexual orientation, socioeconomic status, and intersectionality. Exceptions may be present in the documentation due to language that is hardcoded in the user interfaces of the product software, language used based on RFP documentation, or language that is used by a referenced third-party product. Learn more about how Cisco is using Inclusive Language.
Contents
Introduction
The purpose of this document is to detail how to configure Active Directory (AD) authentication for AnyConnect clients that connect to a Cisco Firepower Threat Defense (FTD) managed by Firepower Device Management (FDM). User identity will be used in the access policies in order to restrict AnyConnect users to specific IP addresses and ports.
Prerequisites
Requirements
Cisco recommends that you have knowledge of these topics:
- Basic knowledge of RA VPN configuration on FDM
- Basic knowledge of LDAP server configuration on FDM
- Basic knowledge of AD
Components Used
The information in this document is based on these software and hardware versions:
- Microsoft 2016 Server
- FTDv running 6.5.0
The information in this document was created from the devices in a specific lab environment. All of the devices used in this document started with a cleared (default) configuration. If your network is live, ensure that you understand the potential impact of any command.
Configure
Network Diagram and Scenario

Windows server is preconfigured with Internet Information Services (IIS) and Remote Desktop Protocol (RDP) in order to test user identity. In this configuration guide, three user accounts and two groups will be created.
User Accounts:
- FTD Admin: This will be used as the directory account in order to allow the FTD to bind to the AD server.
- IT Admin: A test administrator account used to demonstrate user identity.
- Test User: A test user account used to demonstrate user identity.
Groups:
- AnyConnect Admins: A test group that IT Admin will be added to in order to demonstrate user identity. This group will only have RDP access to the Windows Server
- AnyConnect Users: A test group that Test User will be added to in order to demonstrate user identity. This group will only have HTTP access to the Windows Server
AD Configurations
In order to appropriately configure AD authentication and user identity on FTD, a few values will be required. All of these details must be created or collected on the Microsoft Server before configuration can be done on FDM. The main values are:
- Domain Name: This is the domain name of the server. In this configuration guide, example.com is the domain name.
- Server IP/FQDN Address: The IP address or FQDN used to reach the Microsoft server. If an FQDN is used, a DNS server must be configured within FDM and FTD in order to resolve the FQDN. In this configuration guide, these values are win2016.example.com which resolves to 192.168.1.1.
- Server port: The port used by the LDAP service. By default, LDAP and STARTTLS will use TCP port 389 for LDAP and LDAP over SSL (LDAPS) will use TCP port 636.
- Root CA: If LDAPS or STARTTLS is used, the root CA used to sign the SSL certificate used by LDAPS is required.
- Directory Username and Password: This is the account used by FDM and FTD to bind to the LDAP server and authenticate users and search for users and groups. An account named FTD Admin will be created for this purpose.
- Base Distinguished Name (DN): The Base DN is the starting point FDM and the FTD will tell Active Directory to begin in when searching for users. In this configuration guide, the root domain example.com will be used as the Base DN; however, for a production environment, the use of a Base DN further within the LDAP hierarchy might be better. For example, take this LDAP hierarchy:

If an administrator wants users within the Marketing organizational unit to be able to authenticate the base DN can be set to the root (example.com), however, this will also allow User1 under the Finance organizational unit to also login since the user search will begin at the root and go down to Finance, Marketing, and Research.
Base DN set to example.com.

In order to restrict logins to only users in the Marketing organizational unit and below, the admin can instead set the Base DN to Marketing. Now only User2 and User3 will be able to authenticate because the search will start at Marketing.
Base DN set to Marketing:

Note that for more granular control within the FTD for which users will be allowed to connect or assigning users different authorization based on their AD attributes, an LDAP authorization map will need to be configured.
This simplified LDAP hierarchy is used in this configuration guide and the DN for the root example.com will be used for the Base DN.

Determine LDAP Base DN
1. Open AD Users and Computers.

2. Left-click the root domain (in order to open the container), right-click the root domain, then navigate to View and click Advanced Features.

3. This will enable the view of additional properties under the AD objects. For example, to find the DN for the root example.com, right-click example.com then navigate to Properties.

4. Under Properties, click the Attribute Editor tab. Find distinguishedName under the Attributes, then click View.

5. This will open a new window where the DN can be copied and pasted into FDM later. In this example, the root DN is DC=example, DC=com. Copy the value. Click OK in order to exit the String Attribute Editor window, and click OK again in order to exit the Properties.


This can be done for multiple objects within AD. For example, these steps are used to find the DN of the User container:

6. The Advanced Features view can be removed. Right-click the root DN, navigate to View and click Advanced Features once more.

Create an FTD Account
This user account will allow FDM and the FTD to bind with the AD in order to search for users and groups and authenticate them. The purpose of creating a separate FTD account is to prevent unauthorized access elsewhere within the network if the credentials used for binding are compromised. This account does not need to be within the scope of the Base DN.
1. In Active Directory Users and Computers, right-click the container/organizational the FTD account will be added to. In this configuration, the FTD account will be added under the Users container under the username ftd.admin@example.com. Right-click Users, then click New > User.

2. Navigate through the New Object - User Wizard.


3. Verify that the FTD account has been created. Additionally, two additional accounts have been created, IT Admin and Test User.

Create AD Groups and Add Users to AD Groups (Optional)
While not required for authentication, groups can be used to make it easier to apply access policies to multiple users as well as LDAP authorization. In this configuration guide, groups will be used to apply access control policy settings later through user identity within FDM.
1. In Active Directory Users and Computers, right-click the container/organizational the new group will be added to. In this example, the group AnyConnect Admins will be added under the Users container. Right-click Users, then click New > Group.

2. Navigate through the New Object - Group Wizard as shown in the image.

3. Verify that the group has been created. The AnyConnect Users group has also been created.
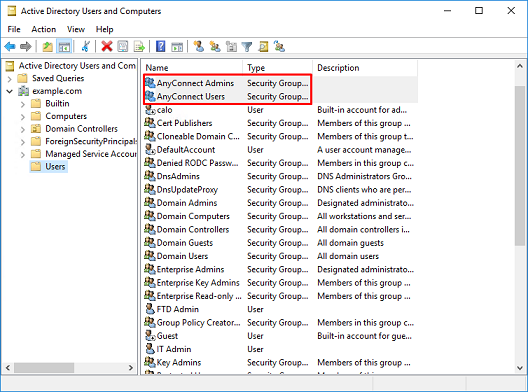
4. Right-click the group the user(s) will be added to, then select Properties. In this configuration, the user IT Admin will be added to the group AnyConnect Admins and the user Test User will be added to the group AnyConnect Users.
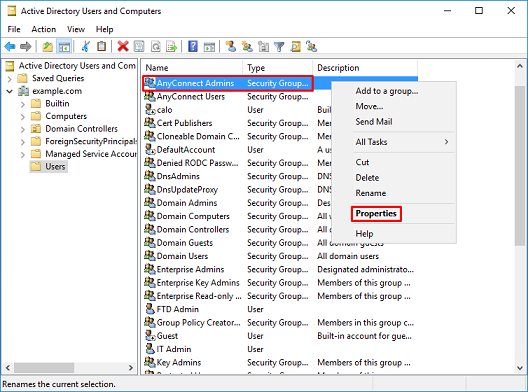
5. Click the Members tab then click Add as shown in the image.

Enter the user in the field and click the Check Names button in order to verify that the user is found. Once verified, click OK.

Verify that the correct user is added, then click the OK button. The user Test User is also added to group AnyConnect Users with the use of the same steps.

Copy the LDAPS SSL Certificate Root (Only Required for LDAPS or STARTTLS)
1. Press Win+R and type mmc.exe. Click OK.

2. Navigate to File > Add/Remove Snap-in... as shown in the image.

3. Under available snap-ins, click Certificates, then click Add.

4. Select Computer account, then click Next as shown in the image.

Click Finish.

5. Click OK.

6. Expand the Personal folder, then click Certificates. The certificate used by LDAPS should be issued to the Fully Qualified Domain Name (FQDN) of the windows server. On this server, there are 3 certificates listed.
- A CA Certificate issued to and by example-WIN2016-CA.
- An identity certificate issued to WIN2016 by example-WIN2016-CA.
- An identity certificate issued to win2016.example.com by example-WIN2016-CA.
In this configuration guide, the FQDN is win2016.example.com and so the first 2 certificates are not valid for use as the LDAPS SSL certificate. The identity certificate issued to win2016.example.com is a certificate that was automatically issued by the Windows Server CA service. Double click the certificate to check the details.

7. In order to be used as the LDAPS SSL Certificate, the certificate must meet these requirements:
- The common name or DNS Subject Alternate Name matches the FQDN of the Windows Server.
- The Certificate has Server Authentication under the Enhanced Key Usage field.
Under the Details tab for the certificate, under the Subject and Subject Alternative Name, the FQDN win2016.example.com is present.


Under Enhanced Key Usage, Server Authentication is present.

8. Once that is confirmed, navigate to the Certification Path tab. Click the top certificate which should be the root CA certificate, then click the View Certificate button.

9. This will open the certificate details for the root CA certificate.

10. Open the Details tab then click Copy to File... as shown in the image.

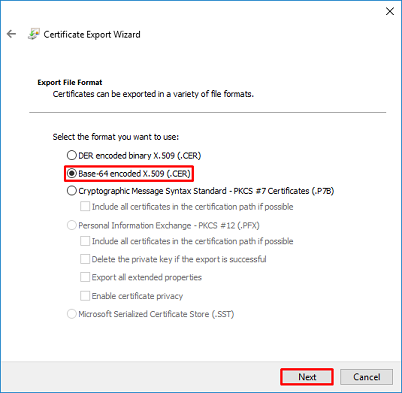
11. Navigate through the Certificate Export Wizard that will export the root CA in PEM format.

12. Select Base-64 encoded X.509.
13. Select the name of the file and where it will be exported to.


14. Click Finish.

15. Now, navigate to the location and open the certificate with a notepad or some other text editor. This will show the PEM format certificate. Save this for later.
-----BEGIN CERTIFICATE-----
MIIDCDCCAfCgAwIBAgIQE4ZG5Z1wT6lONTjooEQyMTANBgkqhkiG9w0BAQsFADAd
MRswGQYDVQQDExJleGFtcGxlLVdJTjIwMTYtQ0EwIBcNMjAwNDI3MTQ1MDU5WhgP
MjA2MDA0MTkxNDUwNTlaMB0xGzAZBgNVBAMTEmV4YW1wbGUtV0lOMjAxNi1DQTCC
ASIwDQYJKoZIhvcNAQEBBQADggEPADCCAQoCggEBAI8ghT719NzSQpoQPh0YT67b
Ya+PngsxMyvkewP33QLTAWw1HW1Tb9Mk5BDWOItTaVsgHwPBfd++M+bLn3AiZnHV
OO+k6dVVY/E5qVkEKSGoY+v940S2316lzdwReMOFhgbc2qMertIoficrRhihonuU
Cjyeub3CO+meJUuKom2R47C0D35TUvo/FEHGgXJFaJS1se2UrpNO7KEMkfA1LPuM
aob4XE/OzxYQpPa18djsNnskfcFqD/HOTFQN4+SrOhHWlRnUIQBUaLdQaabhipD/
sVs5PneYJX8YKma821uYI6j90YuytmsHBtCieyC062a8BKqOL7N86HFPFkMA3u8C
AwEAAaNCMEAwDgYDVR0PAQH/BAQDAgGGMA8GA1UdEwEB/wQFMAMBAf8wHQYDVR0O
BBYEFD2fJjf7ER9EM/HCxCVFN5QzqEdvMA0GCSqGSIb3DQEBCwUAA4IBAQB31ZJo
vzwVD3c5Q1nrNP+6Mq62OFpYH91k4Ch9S5g/CEOemhcwg8MDIoxW2dTsjenAEt7r
phFIHZoCoSyjBjMgK3xybmoSeg8vBjCXseYNGEmOc9KW1oFmTOvdNVIb7Xpl1IVa
6tALTt3ANRNgREtxPA6yQbthKGavW0Anfsojk9IcDr2vp0MTjlBCxsTscbubRl+D
dLEFKQqmMeYvkVf+a7a64mqPZsG3Uxo0rd6cZxAPkq/ylcdwNSJFfQV3DgZg+R96
9WLCR3Obig6xyo9Zu+lixcWpdrbADO6zMhbEYEhkhOOjBrUEBBI6Cy83iTZ9ejsk
KgwBJXEu33PplW6E
-----END CERTIFICATE-----
FDM Configurations
Verify Licensing
In order to configure AnyConnect on FDM, the FTD will need to be registered with the smart licensing server and a valid Plus, Apex, or VPN Only license must be applied to the device.
1. Navigate to Device > Smart License as shown in the image.

2. Verify that the FTD is registered to the smart licensing server and that the AnyConnect Plux, Apex, or VPN Only license is enabled.

Setup AD Identity Source
1. Navigate to Objects > Identity Sources, then click the + symbol and select AD as shown in the image.

2. Fill out the appropriate settings for the Active Directory server with the information collected earlier. If a hostname (FQDN) is used for the Microsoft server instead of an IP address, ensure to create an appropriate DNS Group under Objects > DNS Group. Then apply that DNS group to the FTD by navigating to Device > System Settings > DNS Server, applying the DNS group under the Management Interface and Data Interface, and then specify the appropriate egress interface for DNS queries. Click the Test button in order to verify a successful configuration and reachability from the FTD's management interface. Since these tests are initiated from the FTD's management interface and not through one of the routable interfaces configured on the FTD (such as inside, outside, dmz), a successful (or failed) connection does not guarantee the same result for AnyConnect authentication since AnyConnect LDAP authentication requests will be initiated from one of the FTD's routable interfaces. For more information about testing LDAP connections from the FTD, review the Test AAA and Packet Capture sections in the Troubleshooting area.

If LDAPS or STARTTLS is used, select the appropriate Encryption then select the Trusted CA certificate. If the root CA is not already added added, click Create New Trusted CA Certificate. Provide a Name for the root CA certificate then paste the PEM format root ca certificate collected earlier.


In this configuration, these values were used:
- Name: LAB-AD
- Directory Username: ftd.admin@example.com
- Base DN: DC=example,DC=com
- AD Primary Domain: example.com
- Hostname/IP Address: win2016.example.com
- Port: 389
3. Click the Pending Changes button at the top right as shown in the image.

4. Click the Deploy Now button.

Configure AnyConnect for AD authentication
In order to use the configured AD identity source, it will need to be applied to the AnyConnect configuration.
1. Navigate to Device > Remote Access VPN as shown in the image.

2. Click the + symbol or the Create Connection Profile button as shown in the image.

3. Under the Connection and Client Configuration section, select the AD identity source created earlier. Setup the appropriate values for the other sections including the Connection Profile Name and Client Address Pool Assignment. Click Submit Query when done.


4. Under the Remote User Experience section, select the appropriate group policy. By default, the DfltGrpPolicy will be used; however, a different one can be created.

5. Under the Global Settings section, at minimum, specify the SSL Certificate, Outside Interface, and AnyConnect packages. If a certificate has not been created previously, a default self-signed certificate (DefaultInternalCertificate) can selected however an untrusted server certificate message will be seen. Bypass Access Control policy for decrypted traffic (sysopt permit-vpn) should be unchecked so that User Identity Access Policy rules will take effect later. NAT exempt can be configured here as well. In this configuration all ipv4 traffic from the inside interface going to AnyConnect client IP addresses is except from NAT. For more complex setups such as outside to outside hairpinning, additional NAT rules will need to be created under the NAT policy. AnyConnect packages can be found on the Cisco support site: https://software.cisco.com/download/home. A valid Plus or Apex license is required in order to download the AnyConnect package.


6. Under the Summary section, verify that AnyConnect is set up appropriately, then click Submit Query.

7. Click the Pending Changes button at the top right as shown in the image.

8. Click Deploy Now.

Enable Identity Policy and Configure Security Policies for User Identity
At this point, AnyConnect users should be able to connect successfully, but might not be able to access specific resources. This step will enable user identity so that only users within AnyConnect Admins can connect to inside resources with the use of RDP and only users within the group AnyConnect Users can connect to inside resources with the use of HTTP.
1. Navigate to Policies > Identity and click Enable Identity Policy.

For this configuration, no further configuration is needed and the Default Action is sufficient.

2. Navigate to Policies > NAT and ensure that NAT is configured appropriately. If the NAT exception configured in the AnyConnect settings is sufficient, no additional configuration will be needed here.

3. Navigate to Policies > Access Control. In this section, the Default Action is set to Block and no access rules have been created so once an AnyConnect user connects, they will not be able to access anything. Click the + symbol or Create Access Rule to add a new rule.

4. Fill out the fields with the appropriate values. In this configuration, users within the AnyConnect Admins group should have RDP access to the Windows Server in the inside network. For the source, the zone is configured as outside_zone which is the outside interface the AnyConnect users will be connecting to and the network is configured as the AnyConnect-Pool object which was configured earlier to assign IP addresses to AnyConnect clients. For user identity in FDM, the source must be the zone and network the user will be initiating the connection from. For the destination, the zone is configured as inside_zone which is the inside interface the Windows Server is located, the network is configured as the Inside_Net object which is an object defining the subnet the Windows Server is in, and Ports/Protocols is set to two custom port objects to allow RDP access over TCP 3389 and UDP 3389.

Under the Users section, the group AnyConnect Admins will be added so users apart of this group will be allowed RDP access to the Windows Server. Click the + symbol, click the Groups tab, click the appropriate group, then click OK. Note that individual users and the identity source can be selected as well.

Once the appropriate options have been selected, click OK.

5. Create more access rules if needed. In this configuration, another access rule is created to allow users within the AnyConnect Users group HTTP access to the Windows Server.


6. Verify the access rule configuration then click the Pending Changes button at the top right as shown in the image.

7. Verify the changes, then click Deploy Now.

Verify
Use this section in order to confirm that your configuration works properly.
Final Configuration
AAA Configuration
show running-configuration aaa-server
aaa-server LAB-AD protocol ldap
 realm-id 7
aaa-server LAB-AD host win2016.example.com
 server-port 389
 ldap-base-dn DC=example,DC=com
 ldap-scope subtree
 ldap-login-password *****
 ldap-login-dn ftd.admin@example.com
 server-type auto-detect
Configure AnyConnect
> show running-config webvpn
webvpn
 enable outside
 http-headers
  hsts-server
   enable
   max-age 31536000
   include-sub-domains
   no preload
  hsts-client
   enable
  x-content-type-options
  x-xss-protection
  content-security-policy
 anyconnect image disk0:/anyconnpkgs/anyconnect-linux64-4.7.03052-webdeploy-k9.pkg 1
 anyconnect image disk0:/anyconnpkgs/anyconnect-win-4.7.03052-webdeploy-k9.pkg 2
 anyconnect enable
 tunnel-group-list enable
 cache
  disable
 error-recovery disable

> show running-config tunnel-group
tunnel-group General type remote-access
tunnel-group General general-attributes
 address-pool AnyConnect-Pool
 authentication-server-group LAB-AD
tunnel-group General webvpn-attributes
 group-alias General enable

> show running-config group-policy
group-policy DfltGrpPolicy attributes
 vpn-tunnel-protocol ssl-client
 split-tunnel-policy tunnelspecified
 split-tunnel-network-list value DfltGrpPolicy|splitAcl
 webvpn
  anyconnect ssl dtls none

> show running-config ssl
ssl trust-point FTD-3-Manual outside
Connect with AnyConnect and Verify Access Control Policy Rules


User IT Admin is in the group AnyConnect Admins which has RDP access to the Windows Server, however does not have access to HTTP. Opening an RDP and Firefox session to this server verifies that this user can only access the server via RDP.
If logged in with a Test User who is in the group AnyConnect Users that have HTTP access but not RDP access, you are able to verify that the access control policy rules are taking effect.

Troubleshoot
Use this section in order to confirm that your configuration works properly.
Debugs
This debug can be run in diagnostic CLI in order to troubleshoot LDAP authentication-related issues: debug ldap 255.
In order to troubleshoot user identity Access Control Policy issues, the system support firewall-engine-debug can be run in clish in order to determine why traffic is allowed or blocked unexpectedly.
Working LDAP Debugs
[53] Session Start
[53] New request Session, context 0x00002b1d13f4bbf0, reqType = Authentication
[53] Fiber started
[53] Creating LDAP context with uri=ldap://192.168.1.1:389
[53] Connect to LDAP server: ldap://192.168.1.1:389, status = Successful
[53] supportedLDAPVersion: value = 3
[53] supportedLDAPVersion: value = 2
[53] LDAP server 192.168.1.1 is Active directory
[53] Binding as ftd.admin@example.com
[53] Performing Simple authentication for ftd.admin@example.com to 192.168.1.1
[53] LDAP Search:
        Base DN = [DC=example,DC=com]
        Filter  = [sAMAccountName=it.admin]
        Scope   = [SUBTREE]
[53] User DN = [CN=IT Admin,CN=Users,DC=example,DC=com]
[53] Talking to Active Directory server 192.168.1.1
[53] Reading password policy for it.admin, dn:CN=IT Admin,CN=Users,DC=example,DC=com
[53] Read bad password count 6
[53] Binding as it.admin
[53] Performing Simple authentication for it.admin to 192.168.1.1
[53] Processing LDAP response for user it.admin
[53] Message (it.admin):
[53] Authentication successful for it.admin to 192.168.1.1
[53] Retrieved User Attributes:
[53]    objectClass: value = top
[53]    objectClass: value = person
[53]    objectClass: value = organizationalPerson
[53]    objectClass: value = user
[53]    cn: value = IT Admin
[53]    sn: value = Admin
[53]    givenName: value = IT
[53]    distinguishedName: value = CN=IT Admin,CN=Users,DC=example,DC=com
[53]    instanceType: value = 4
[53]    whenCreated: value = 20200421025811.0Z
[53]    whenChanged: value = 20200421204622.0Z
[53]    displayName: value = IT Admin
[53]    uSNCreated: value = 25896
[53]    memberOf: value = CN=AnyConnect Admins,CN=Users,DC=example,DC=com
[53]    uSNChanged: value = 26119
[53]    name: value = IT Admin
[53]    objectGUID: value = &...J..O..2w...c
[53]    userAccountControl: value = 512
[53]    badPwdCount: value = 6
[53]    codePage: value = 0
[53]    countryCode: value = 0
[53]    badPasswordTime: value = 132320354378176394
[53]    lastLogoff: value = 0
[53]    lastLogon: value = 0
[53]    pwdLastSet: value = 132319114917186142
[53]    primaryGroupID: value = 513
[53]    objectSid: value = .............{I...;.....j...
[53]    accountExpires: value = 9223372036854775807
[53]    logonCount: value = 0
[53]    sAMAccountName: value = it.admin
[53]    sAMAccountType: value = 805306368
[53]    userPrincipalName: value = it.admin@example.com
[53]    objectCategory: value = CN=Person,CN=Schema,CN=Configuration,DC=example,DC=com
[53]    dSCorePropagationData: value = 16010101000000.0Z
[53]    lastLogonTimestamp: value = 132319755825875876
[53] Fiber exit Tx=515 bytes Rx=2659 bytes, status=1
[53] Session End
Unable to Establish Connection with LDAP Server
[-2147483611] Session Start
[-2147483611] New request Session, context 0x00007f9e65ccdc40, reqType = Authentication
[-2147483611] Fiber started
[-2147483611] Creating LDAP context with uri=ldap://171.16.1.1:389
[-2147483611] Connect to LDAP server: ldap://172.16.1.1:389, status = Failed
[-2147483611] Unable to read rootDSE. Can't contact LDAP server.
[-2147483611] Fiber exit Tx=0 bytes Rx=0 bytes, status=-2
[-2147483611] Session End
Potential Solutions:
- Check routing and ensure the FTD receives a response from the LDAP server.
- If LDAPS or STARTTLS is used, ensure that the correct root CA certificate is trusted so that the SSL handshake can complete successfully.
- Verify that the correct IP address and port are used. If a hostname is used, verify that DNS is able to resolve it to the correct IP address
Binding Login DN and/or Password Incorrect
[-2147483615] Session Start
[-2147483615] New request Session, context 0x00007f9e65ccdc40, reqType = Authentication
[-2147483615] Fiber started
[-2147483615] Creating LDAP context with uri=ldap://192.168.1.1:389
[-2147483615] Connect to LDAP server: ldap://192.168.1.1:389, status = Successful
[-2147483615] defaultNamingContext: value = DC=example,DC=com
[-2147483615] supportedLDAPVersion: value = 3
[-2147483615] supportedLDAPVersion: value = 2
[-2147483615] LDAP server 192.168.1.1 is Active directory
[-2147483615] supportedSASLMechanisms: value = GSSAPI
[-2147483615] supportedSASLMechanisms: value = GSS-SPNEGO
[-2147483615] supportedSASLMechanisms: value = EXTERNAL
[-2147483615] supportedSASLMechanisms: value = DIGEST-MD5
[-2147483615] Binding as ftd.admin@example.com
[-2147483615] Performing Simple authentication for ftd.admin@example.com to 192.168.1.1
[-2147483615] Simple authentication for ftd.admin@example.com returned code (49) Invalid credentials
[-2147483615] Failed to bind as administrator returned code (-1) Can't contact LDAP server
[-2147483615] Fiber exit Tx=186 bytes Rx=744 bytes, status=-2
[-2147483615] Session End
Potential Solution: Verify that the login DN and the login password are configured appropriately. This can be verified on the AD server with ldp.exe. In order to verify that an account can successfully bind with the use of ldp, navigate through these steps:
1. On the AD server, press Win+R and search for ldp.exe.

2. Click Connection > Connect... as shown in the image.

3. Specify localhost for the server and the appropriate port, then click OK.
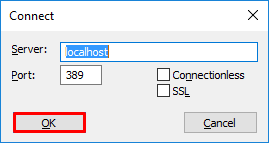
4. The Right column shows the text that indicates a successful connection. Click Connection > Bind... as shown in the image.
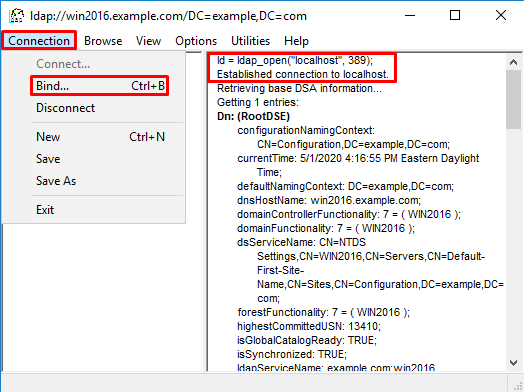
5. Select Simple Bind, then specify the Directory Account Username and Password. Click OK.

With a successful bind, ldp will show Authenticated as DOMAIN\username.

If you attempt a bind with an invalid username or password, it will result in failure like this.

LDAP Server Unable to Find Username
[-2147483612] Session Start
[-2147483612] New request Session, context 0x00007f9e65ccdc40, reqType = Authentication
[-2147483612] Fiber started
[-2147483612] Creating LDAP context with uri=ldap://192.168.1.1:389
[-2147483612] Connect to LDAP server: ldap://192.168.1.1:389, status = Successful
[-2147483612] supportedLDAPVersion: value = 3
[-2147483612] supportedLDAPVersion: value = 2
[-2147483612] LDAP server 192.168.1.1 is Active directory
[-2147483612] Binding as ftd.admin@example.com
[-2147483612] Performing Simple authentication for ftd.admin@example.com to 192.168.1.1
[-2147483612] LDAP Search:
        Base DN = [dc=example,dc=com]
        Filter  = [samaccountname=it.admi]
        Scope   = [SUBTREE]
[-2147483612] Search result parsing returned failure status
[-2147483612] Talking to Active Directory server 192.168.1.1
[-2147483612] Reading password policy for it.admi, dn:
[-2147483612] Binding as ftd.admin@example.com
[-2147483612] Performing Simple authentication for ftd.admin@example.com to 192.168.1.1
[-2147483612] Fiber exit Tx=456 bytes Rx=1082 bytes, status=-1
[-2147483612] Session End
Potential Solution: Verify that AD can find the user with the search done by the FTD. This can be done with ldp.exe as well.
1. After successfully binding, navigate to View > Tree as shown in the image.

2. Specify the Base DN configured on the FTD then click OK.

3. Right-click the Base DN then click Search as shown in the image.

4. Specify the same Base DB, Filter and Scope values as seen in the debugs. In this example, these are:
- Base DN: dc=example,dc=com
- Filter: samaccountname=it.admi
- Scope:SUBTREE
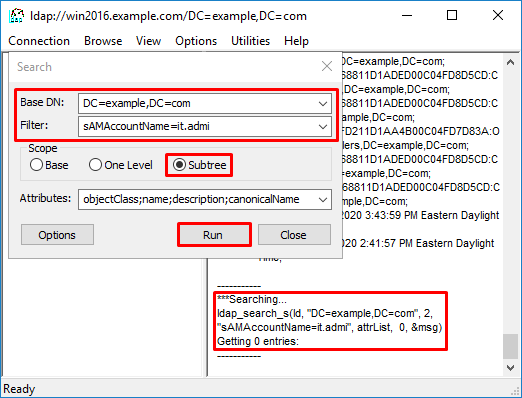
ldp finds 0 entries due to there being no user account with the samaccountname=it.admi under the Base DN dc=example,dc=com.
Attempting again with the correct samaccountname=it.admin shows a different result. ldp finds 1 entry under the Base DN dc=example,dc=com and prints that user's DN.

Incorrect Password for Username
[-2147483613] Session Start
[-2147483613] New request Session, context 0x00007f9e65ccdc40, reqType = Authentication
[-2147483613] Fiber started
[-2147483613] Creating LDAP context with uri=ldap://192.168.1.1:389
[-2147483613] Connect to LDAP server: ldap://192.168.1.1:389, status = Successful
[-2147483613] supportedLDAPVersion: value = 3
[-2147483613] supportedLDAPVersion: value = 2
[-2147483613] LDAP server 192.168.1.1 is Active directory
[-2147483613] Binding as ftd.admin@example.com
[-2147483613] Performing Simple authentication for ftd.admin@example.com to 192.168.1.1
[-2147483613] LDAP Search:
        Base DN = [dc=example,dc=com]
        Filter  = [samaccountname=it.admin]
        Scope   = [SUBTREE]
[-2147483613] User DN = [CN=IT Admin,CN=Users,DC=example,DC=com]
[-2147483613] Talking to Active Directory server 192.168.1.1
[-2147483613] Reading password policy for it.admin, dn:CN=IT Admin,CN=Users,DC=example,DC=com
[-2147483613] Read bad password count 0
[-2147483613] Binding as it.admin
[-2147483613] Performing Simple authentication for it.admin to 192.168.1.1
[-2147483613] Simple authentication for it.admin returned code (49) Invalid credentials
[-2147483613] Message (it.admin): 80090308: LdapErr: DSID-0C09042A, comment: AcceptSecurityContext error, data 52e, v3839
[-2147483613] Invalid password for it.admin
[-2147483613] Fiber exit Tx=514 bytes Rx=2764 bytes, status=-1
[-2147483613] Session End
Potential Solution: Verify that the user's password is configured appropriately and that it isn't expired. Similar to the Login DN, the FTD will do a bind against AD with the user's credentials. This bind can also be done in ldp in order to verify that the AD is able to recognize the same username and password credentials. The steps in ldp are show in section Binding Login DN and/or Password Incorrect. Additionally, the Microsoft server Event Viewer logs can be reviewed for a potential reason.
Test AAA
The test aaa-server command can be used in order to simulate an authentication attempt from the FTD with a specific username and password. This can be used to test for connection or authentication failures. The command is test aaa-server authentication [AAA-server] host [AD IP/hostname].
> show running-configuration aaa-server
aaa-server LAB-AD protocol ldap
 realm-id 7
aaa-server LAB-AD host win2016.example.com
 server-port 389
 ldap-base-dn DC=example,DC=com
 ldap-scope subtree
 ldap-login-password *****
 ldap-login-dn ftd.admin@example.com
 server-type auto-detect

> test aaa-server authentication LAB-AD host win2016.example.com
Username: it.admin
Password: ********
INFO: Attempting Authentication test to IP address (192.168.1.1) (timeout: 12 seconds)
INFO: Authentication Successful
Packet Captures
Packet captures can be used to verify reachability to the AD server. If LDAP packets leave the FTD, but there is no response, this could indicate a routing issue.
Here is a capture done that shows bidirectional LDAP traffic:
> show route 192.168.1.1

Routing entry for 192.168.1.0 255.255.255.0
  Known via "connected", distance 0, metric 0 (connected, via interface)
  Routing Descriptor Blocks:
  * directly connected, via inside
      Route metric is 0, traffic share count is 1

> capture AD interface inside match tcp any host 192.168.1.1 eq 389

> show capture
capture AD type raw-data interface inside [Capturing - 0 bytes]
  match tcp any host 192.168.1.1 eq ldap

> test aaa-server authentication LAB-AD host win2016.example.com username it.admin password ******
INFO: Attempting Authentication test to IP address (192.168.1.1) (timeout: 12 seconds)
INFO: Authentication Successful

> show capture
capture AD type raw-data interface inside [Capturing - 10905 bytes]
  match tcp any host 192.168.1.1 eq ldap

> show capture AD

54 packets captured

   1: 23:02:16.770712       192.168.1.17.61960 > 192.168.1.1.389: S 3681912834:3681912834(0) win 32768 <mss 1460,nop,nop,timestamp 1061373057 0>
   2: 23:02:16.772009       192.168.1.1.389 > 192.168.1.17.61960: S 491521506:491521506(0) ack 3681912835 win 8192 <mss 1460,nop,nop,timestamp 762393884 1061373057>
   3: 23:02:16.772039       192.168.1.17.61960 > 192.168.1.1.389: . ack 491521507 win 32768 <nop,nop,timestamp 1061373058 762393884>
   4: 23:02:16.772482       192.168.1.17.61960 > 192.168.1.1.389: P 3681912835:3681912980(145) ack 491521507 win 32768 <nop,nop,timestamp 1061373059 0>
   5: 23:02:16.772924       192.168.1.1.389 > 192.168.1.17.61960: P 491521507:491522141(634) ack 3681912980 win 65160 <nop,nop,timestamp 762393885 1061373059>
   6: 23:02:16.772955       192.168.1.17.61960 > 192.168.1.1.389: . ack 491522141 win 32768 <nop,nop,timestamp 1061373059 762393885>
   7: 23:02:16.773428       192.168.1.17.61960 > 192.168.1.1.389: P 3681912980:3681913024(44) ack 491522141 win 32768 <nop,nop,timestamp 1061373060 0>
   8: 23:02:16.775030       192.168.1.1.389 > 192.168.1.17.61960: P 491522141:491522163(22) ack 3681913024 win 65116 <nop,nop,timestamp 762393887 1061373060>
   9: 23:02:16.775075       192.168.1.17.61960 > 192.168.1.1.389: . ack 491522163 win 32768 <nop,nop,timestamp 1061373061 762393887>
[...]
54 packets shown
Windows Server Event Viewer Logs
The Event Viewer logs on the AD server van provide more detailed information as to why a failure occurred.
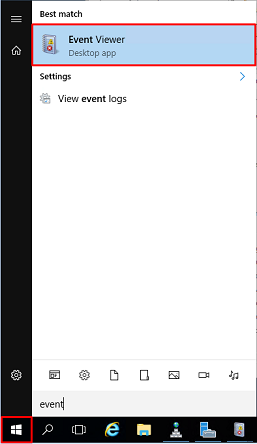
1. Search for and open Event Viewer.
2. Expand Windows Logs and click Security. Search for Audit Failure with the user's Account Name and review the Failure Information as shown in the image.

An account failed to log on.

Subject:
	Security ID:		SYSTEM
	Account Name:		WIN2016$
	Account Domain:		EXAMPLE
	Logon ID:		0x3E7

Logon Type:			3

Account For Which Logon Failed:
	Security ID:		NULL SID
	Account Name:		it.admin
	Account Domain:		EXAMPLE

Failure Information:
	Failure Reason:		The specified user account has expired.
	Status:			0xC0000193
	Sub Status:		0x0

Process Information:
	Caller Process ID:	0x25c
	Caller Process Name:	C:\Windows\System32\lsass.exe

Network Information:
	Workstation Name:	WIN2016
	Source Network Address:	192.168.1.17
	Source Port:		56321
Contributed by Cisco Engineers
- Shannon Wellington
Contact Cisco
- Open a Support Case

- (Requires a Cisco Service Contract)

 Feedback