Introduction
This document describes how to configure Cisco remote access VPN solution (AnyConnect) on Firepower Threat Defense (FTD), v6.3, managed by FMC.
Prerequisites
Requirements
Cisco recommends that you have knowledge of these topics:
- Basic remote access VPN, Secure Sockets Layer (SSL) and Internet Key Exchange (IKEv2) version 2 knowledge
- Basic Authentication, Authorization, and Accounting (AAA) and RADIUS knowledge
- Basic FMC knowledge
- Basic FTD knowledge
Components Used
The information in this document is based on these software and hardware versions:
- Cisco FMC 6.4
- Cisco FTD 6.3
- AnyConnect 4.7
The information in this document was created from the devices in a specific lab environment. All of the devices used in this document started with a cleared (default) configuration. If your network is live, ensure that you understand the potential impact of any command.
Background Information
This document is intended to cover the configuration on FTD devices. If you want the ASA configuration example, please refer to the document: Configure AnyConnect VPN Client U-turn Traffic on ASA 9.X
Limitations:
Currently, these features are unsupported on FTD, but still available on ASA devices:
- Double AAA Authentication (Available on FTD version 6.5)
- Dynamic Access Policy
- Host Scan
- ISE posture
- RADIUS CoA
- VPN load-balancer
- Local authentication (available on Firepower Device Manager 6.3. Cisco bug ID CSCvf92680)
- LDAP attribute map (Available via FlexConfig, Cisco bug ID CSCvd64585)
- AnyConnect customization
- AnyConnect scripts
- AnyConnect localization
- Per-app VPN
- SCEP proxy
- WSA integration
- SAML SSO (Cisco bug ID CSCvq90789)
- Simultaneous IKEv2 dynamic crypto map for RA and L2L VPN
- AnyConnect modules (NAM, Hostscan, AMP Enabler, SBL, Umbrella, Web Security, and so on). DART is the only module installed by default on this version.
- TACACS, Kerberos (KCD Authentication and RSA SDI)
- Browser Proxy
Configure
In order to go through the Remote Access VPN wizard in the FMC, these steps must be completed:
Step 1. Import an SSL Certificate
Certificates are essential when you configure AnyConnect. Only RSA based certificates are supported for SSL and IPSec. Elliptic Curve Digital Signature Algorithm (ECDSA) certificates are supported in IPSec, however, it is not possible to deploy a new AnyConnect package or XML profile when ECDSA based certificate is used. It can be used for IPSec, but you must pre-deploy the AnyConnect packages along with the XML profile, all the XML profile updates must be pushed manually on each client (Cisco bug ID CSCtx42595).
Additionally, the certificate must contain a Common Name (CN) extension with DNS name and/or IP address in order to avoid "Untrusted server certificate" errors in web browsers.
Note: On FTD devices, the Certificate Authority (CA) certificate is needed before the Certificate Signing Request (CSR) is generated.
- If the CSR is generated in an external server (such as Windows Server or OpenSSL), the manual enrollment method is intended to fail, since FTD does not support manual key enrollment.
- A different method must be used such as PKCS12.
In order to get a certificate for the FTD appliance with the manual enrollment method, a CSR needs to be generated. Sign it with a CA and then import the identity certificate.
1. Navigate to Devices > Certificates and select Add as shown in the image.

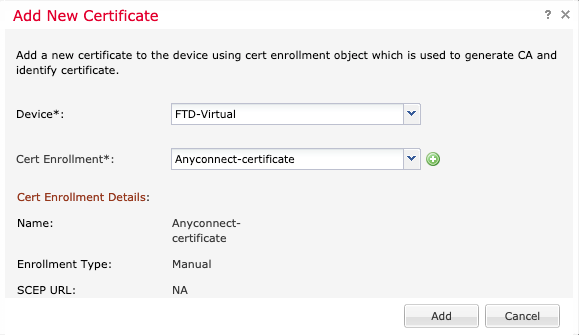
2. Select the Device and add a new Cert Enrollment object as shown in the image.

3. Select manual Enrollment Type and paste the CA certificate (the certificate which is intended to sign the CSR).
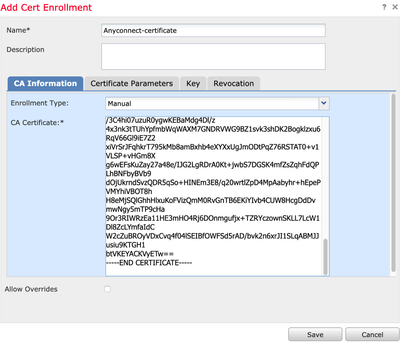
4. Select the Certificate Parameters tab and select Custom FQDN for the Include FQDN field and fill the certificate details a shown in the image.

5. Select the Key tab, and select key type. You can choose name and size. For RSA, 2048 bytes is a minimum requirement.
6. Select save, confirm the Device, and under Cert Enrollment select the trustpoint which was just created. Select Add in order to deploy the certificate.
7. In the Status column, select the ID icon and select Yes to generate the CSR as shown in the image.

8. Copy CSR and sign it with your preferred CA (for example, GoDaddy or DigiCert).
9. Once the identity certificate is received from the CA (which must be in base64 format), select Browse Identity Certificate and locate the certificate in the local computer. Select Import.
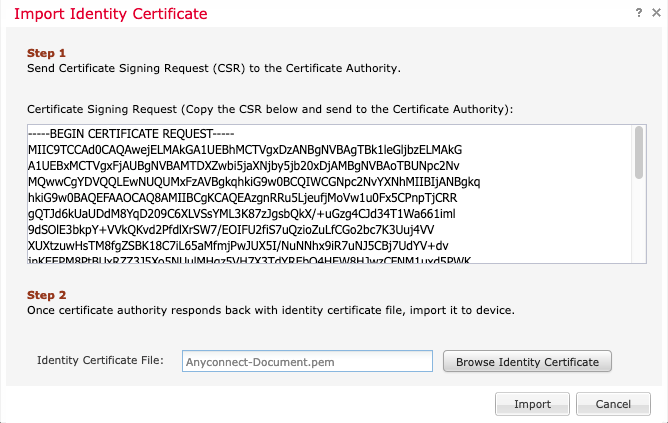
10. Once imported, both CA and ID certificate details are available for display.

Step 2. Configure a RADIUS Server
On FTD devices managed by FMC, the local user database is not supported. Another authentication method must be used, such as RADIUS or LDAP.
1. Navigate to Objects > Object Management > RADIUS Server Group > Add RADIUS Server Group as shown in the image.
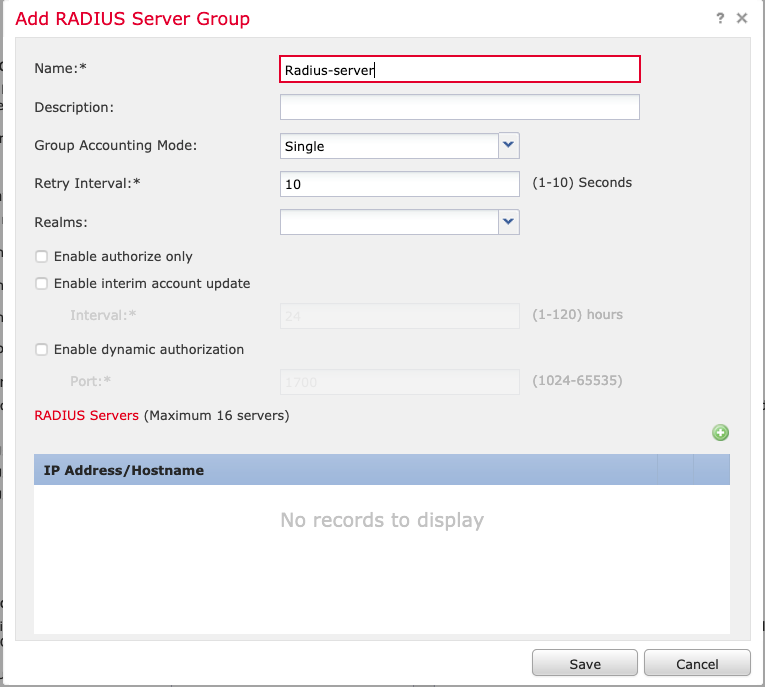
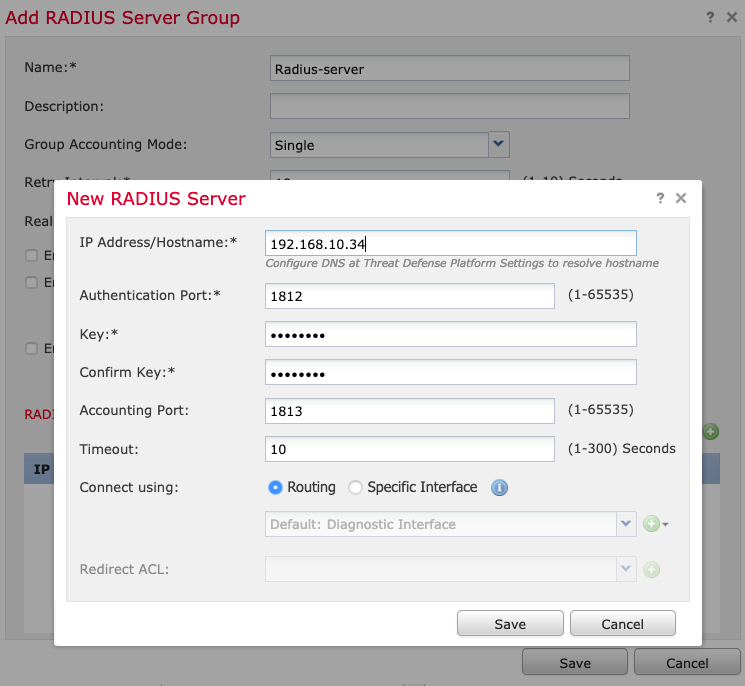
2. Assign a name to the Radius Server Group and add the Radius server IP address along with a shared secret (the shared secret is required to pair the FTD with the Radius server), select Save once this form is completed as shown in the image.
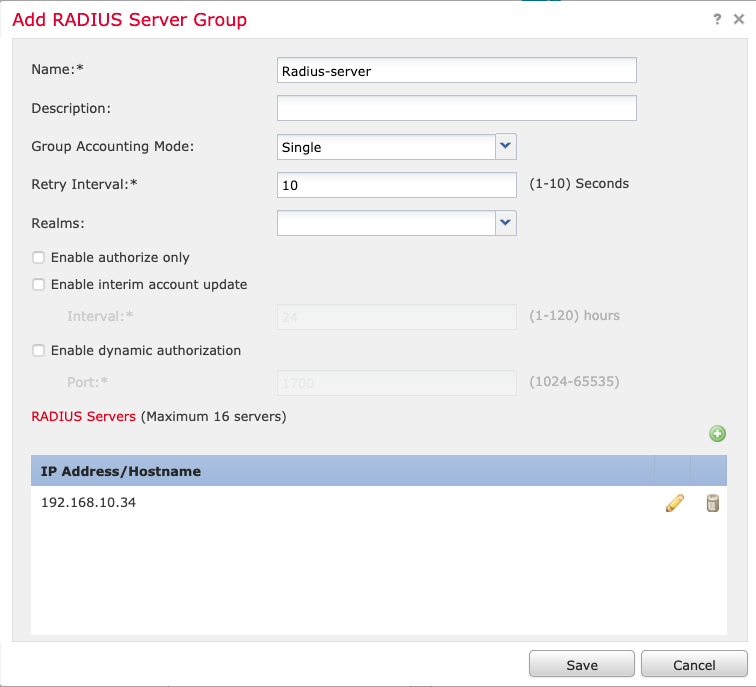
3. The RADIUS server information is now available in the Radius Server list as shown in the image.
Step 3. Create an IP Pool
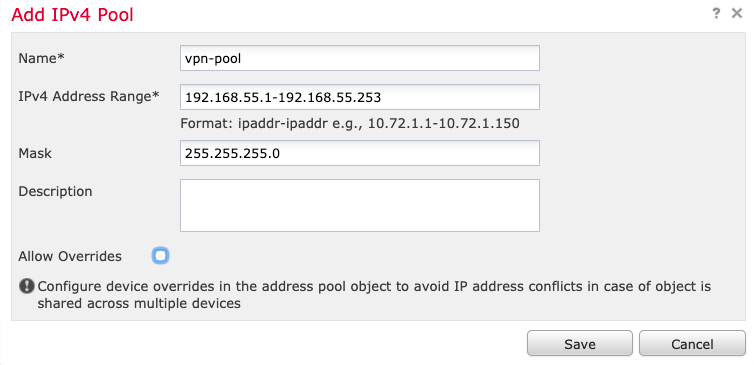
1. Navigate to Objects > Object Management > Address Pools > Add IPv4 Pools.
2. Assign the name and range of IP addresses, Mask field is not required, but it can be specified as shown in the image.
Step 4. Create an XML Profile
1. Download the Profile Editor tool from Cisco.com and run the application.
2. In the Profile Editor application, navigate to Server List and select Add as shown in the image.

3. Assign a Display Name, Fully Qualified Domain Name (FQDN) or IP Address and select OK as shown in the image.
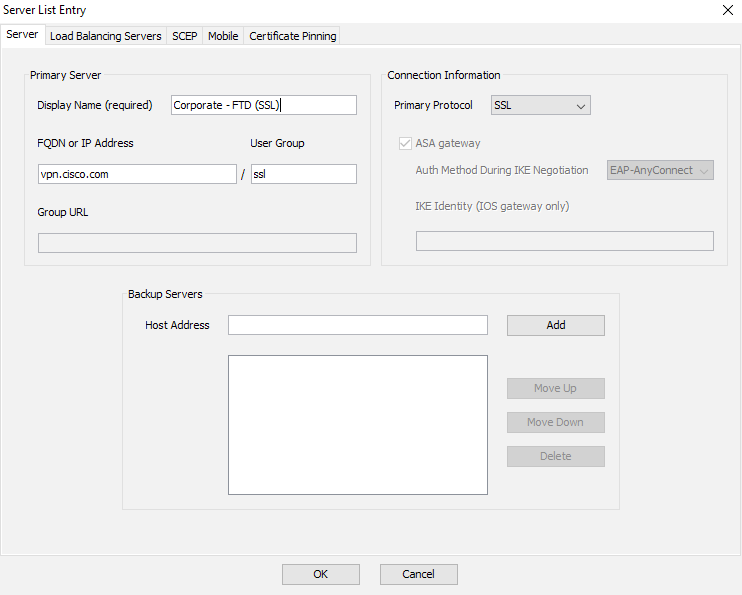
4. The entry is now visible in the Server List menu:

5. Navigate to File > Save as.
Note: Save the profile with an easily identifiable name with an extension.
Step 5. Upload AnyConnect XML Profile
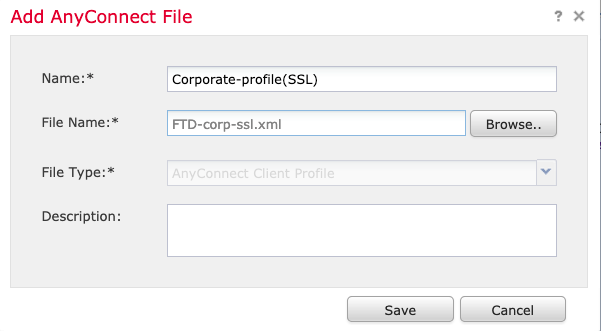
1. In the FMC, navigate to Objects > Object Management > VPN > AnyConnect File > Add AnyConnect File.
2. Assign a name to the object and click Browse. Locate the client profile in your local system and select Save.
Caution: Ensure you select AnyConnect Client Profile as the file type.
Step 6. Upload AnyConnect Images
1. Download the webdeploy (.pkg) images from the Cisco downloads webpage.

2. Navigate to Objects > Object Management > VPN > AnyConnect File > Add AnyConnect File.
3. Assign a name to the AnyConnect package file and select the .pkg file from your local system, once the file is selected.
4. Select Save.
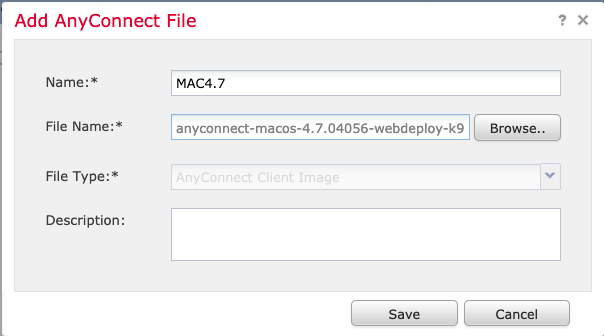
Note: Additional packages can be uploaded based on your requirements (Windows, MAS, Linux).
Step 7. Remote Access VPN Wizard
Based on the previous steps, the Remote Access Wizard can be followed accordingly.
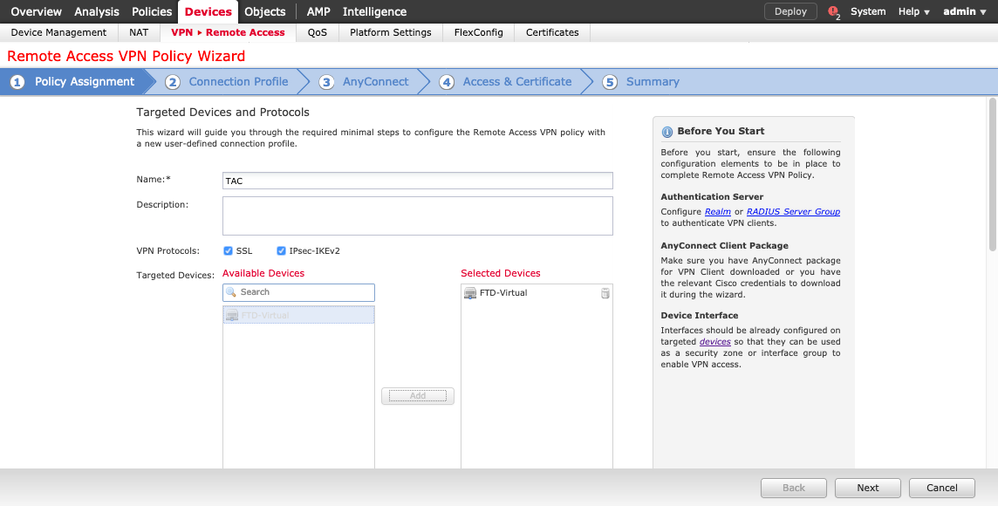
1. Navigate to Devices > VPN > Remote Access.
2. Assign the name of the Remote Access policy and select an FTD device from the Available Devices.
3. Assign the Connection Profile Name (the Connection Profile Name is the tunnel-group name), select Authentication Server and Address Pools as shown in the image.
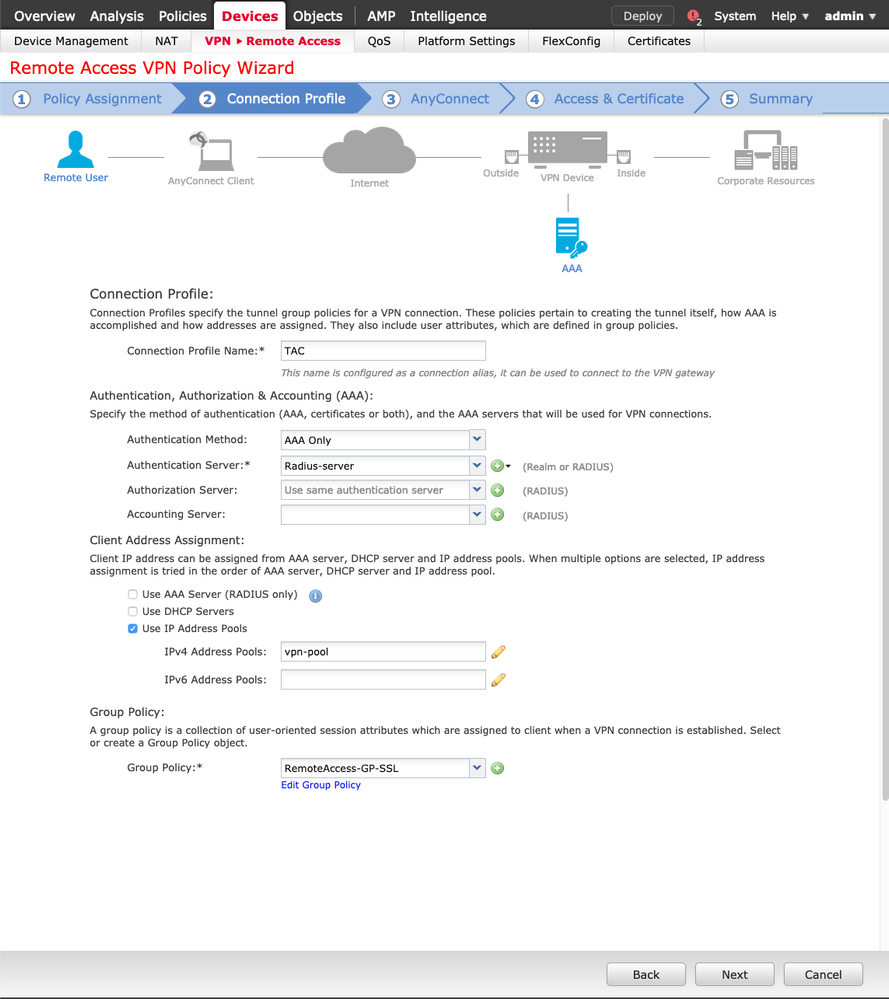
4. Select the + symbol in order to create Group Policy.
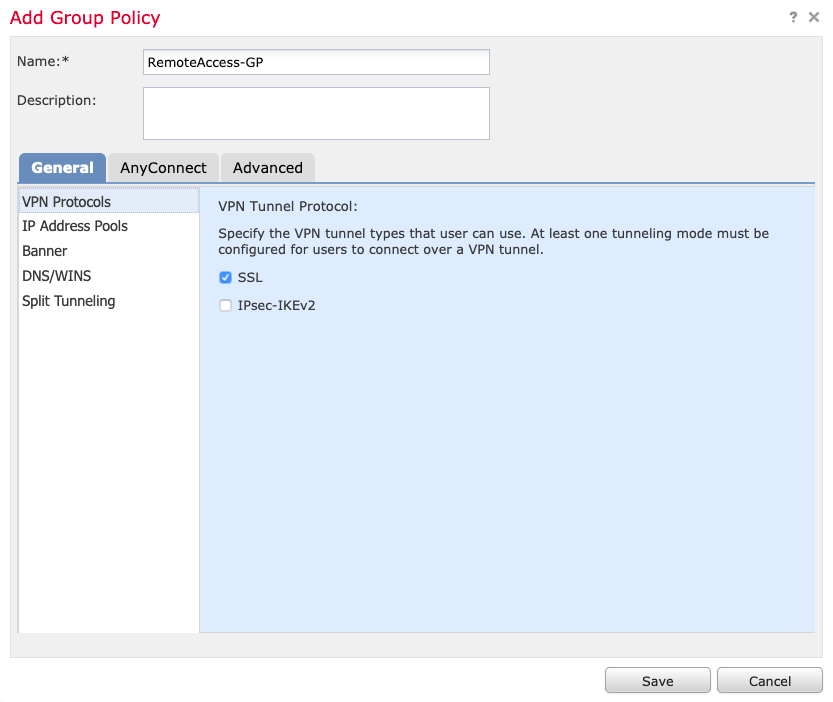
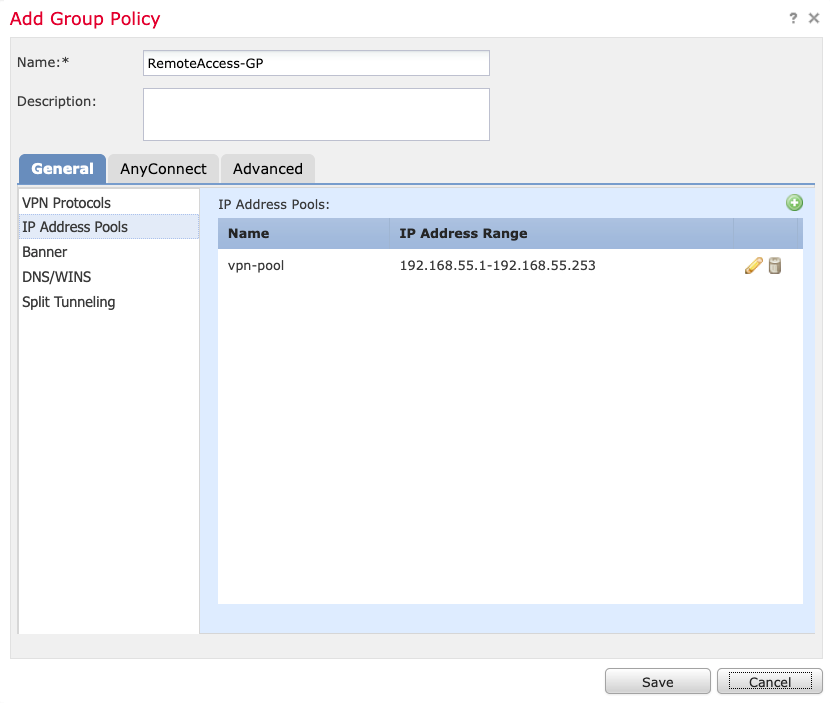
5. (Optional) A local IP address pool can be configured in a group policy basis. If it is not configured, the pool is inherited from the pool configured in the Connection Profile (tunnel-group).
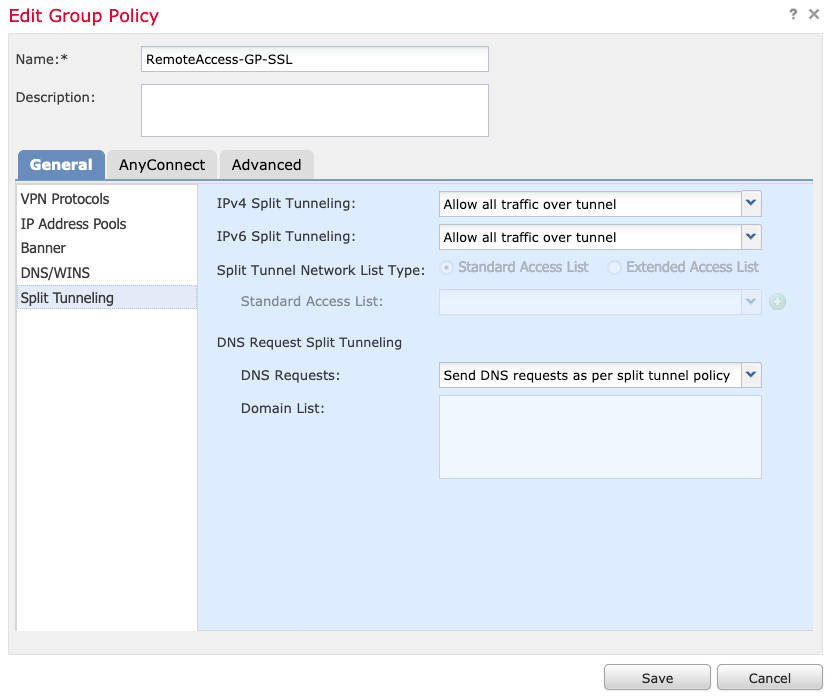
6. For this scenario, all the traffic is routed over the tunnel, IPv4 Split Tunneling policy is set to Allow all traffic over the tunnel as shown in the image.
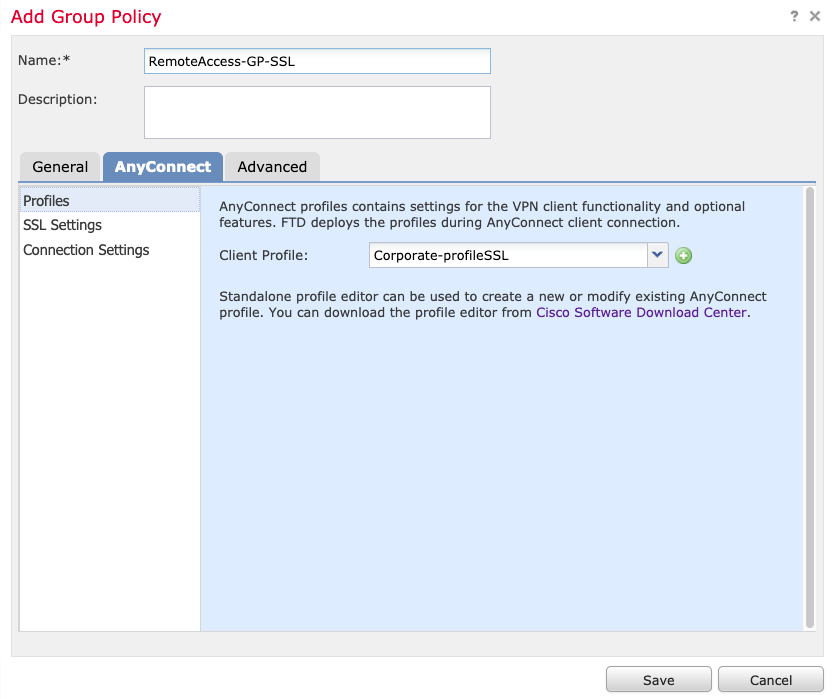
7. Select the .xml profile for AnyConnect profile and select Save as shown in the image.
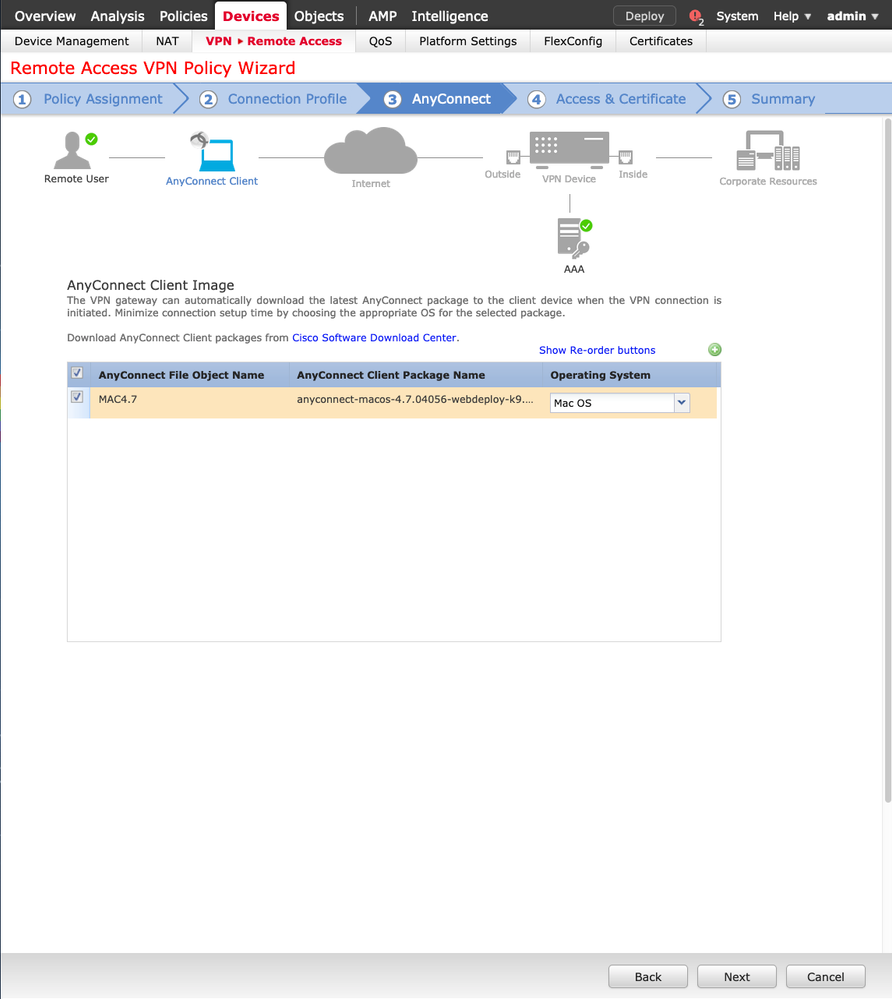
8. Select the desired AnyConnect images based on the operative system requirements, select Next a shown in the image.
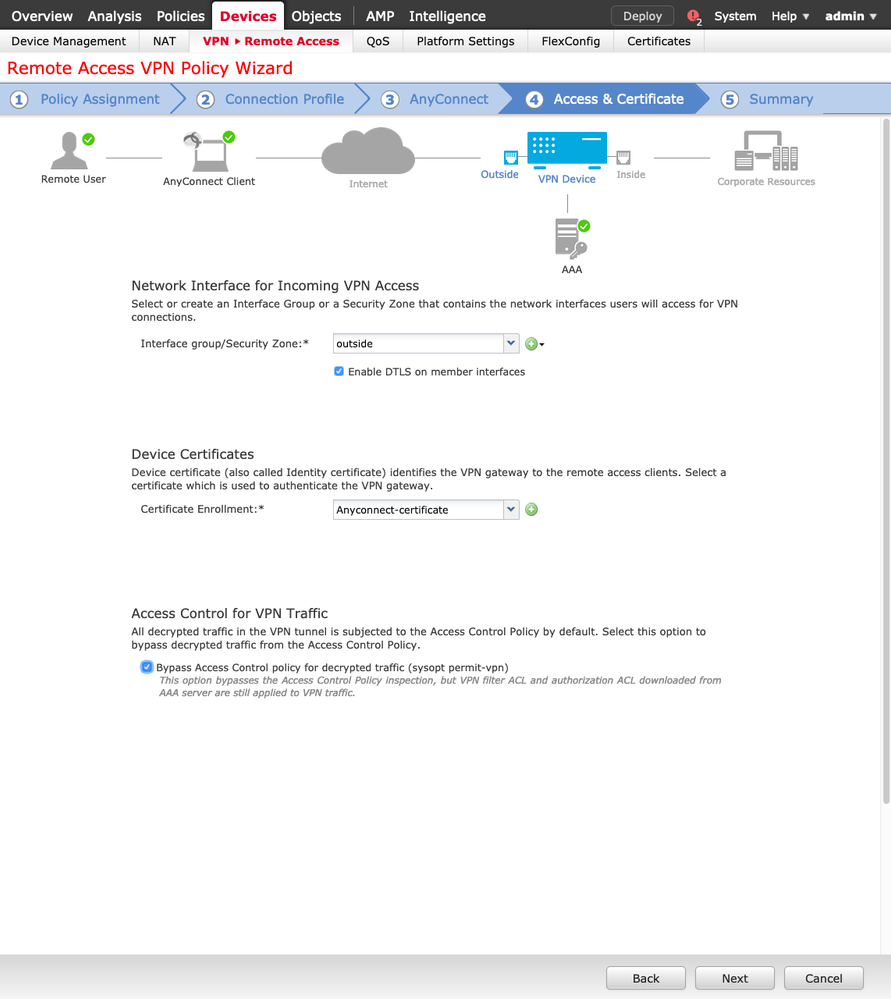
9. Select the Security Zone and DeviceCertificates:
- This configuration defines the interface on which the VPN terminates and the certificate that is presented upon an SSL connection.
Note: In this scenario, the FTD is configured to not inspect any VPN traffic, bypass the Access Control Policies (ACP) option is toggled.
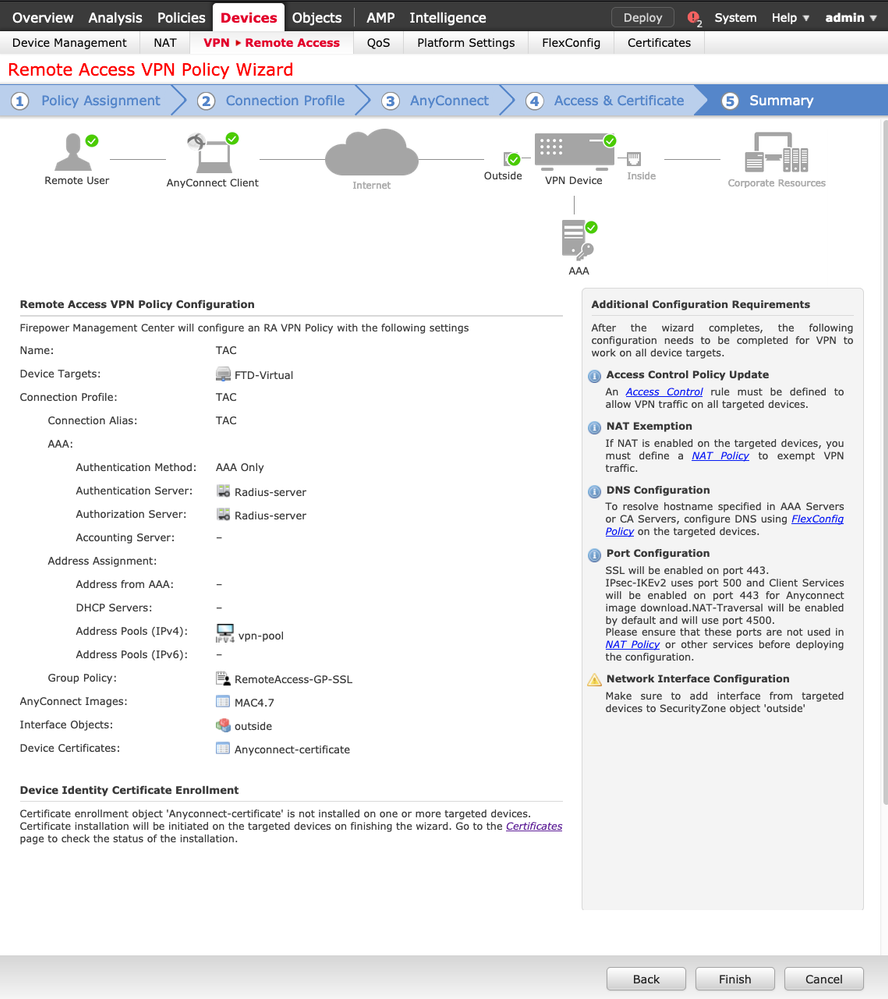
10. Select Finish and Deploy the changes:
- All the configurations related to VPN, SSL certificates and AnyConnect packages are pushed via FMC Deploy as shown in the image.
NAT Exemption and Hairpin
Step 1. NAT Exemption Configuration
The NAT exemption is a preferred translation method used to prevent traffic to be routed to the internet when it is intended to flow over a VPN tunnel (Remote Access or Site-to-Site).
This is needed when the traffic from your internal network is intended to flow over the tunnels without any translation.
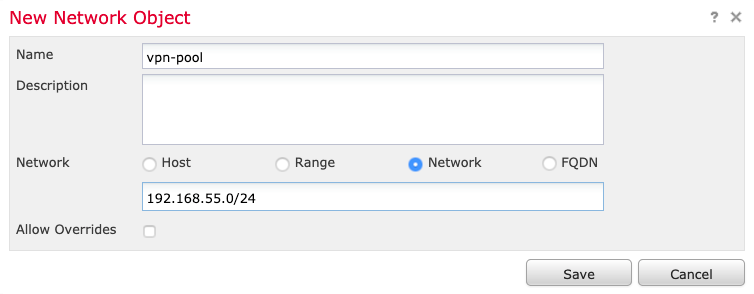
1. Navigate to Objects > Network > Add Network > Add Object as shown in the image.
2. Navigate to Device > NAT, select the NAT policy that is used by the device in question, and create a new statement.
Note: The traffic flow goes from inside to outside.
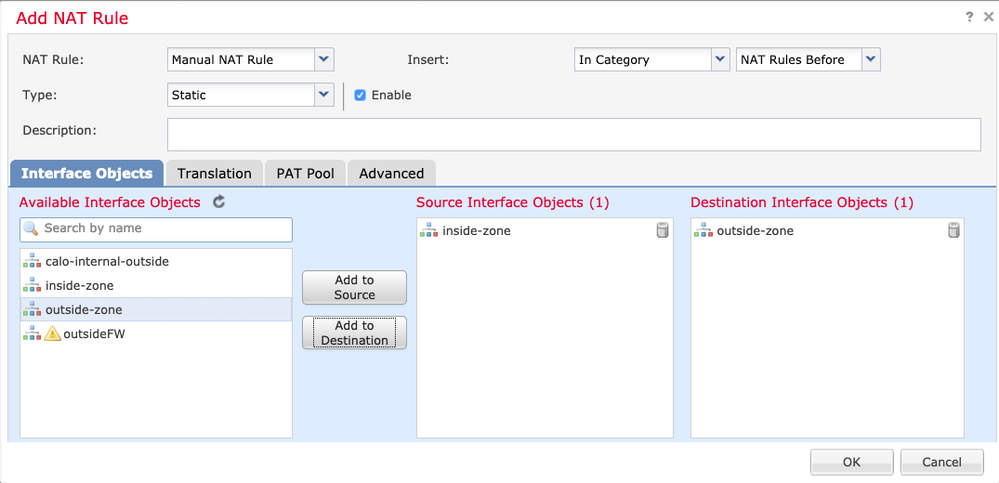
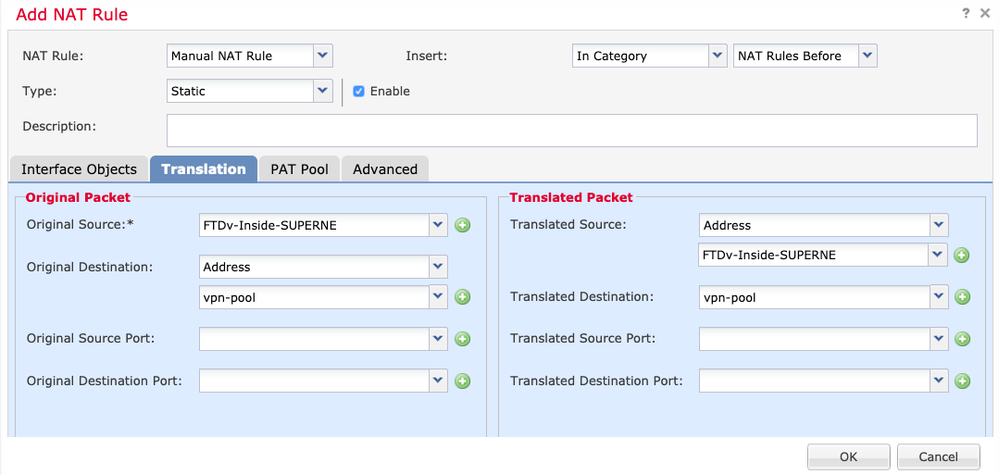
3. Select the internal resources behind the FTD (original source and translated source) and the destination as the ip local pool for the AnyConnect users (Original destination and translated destination) as shown in the image.
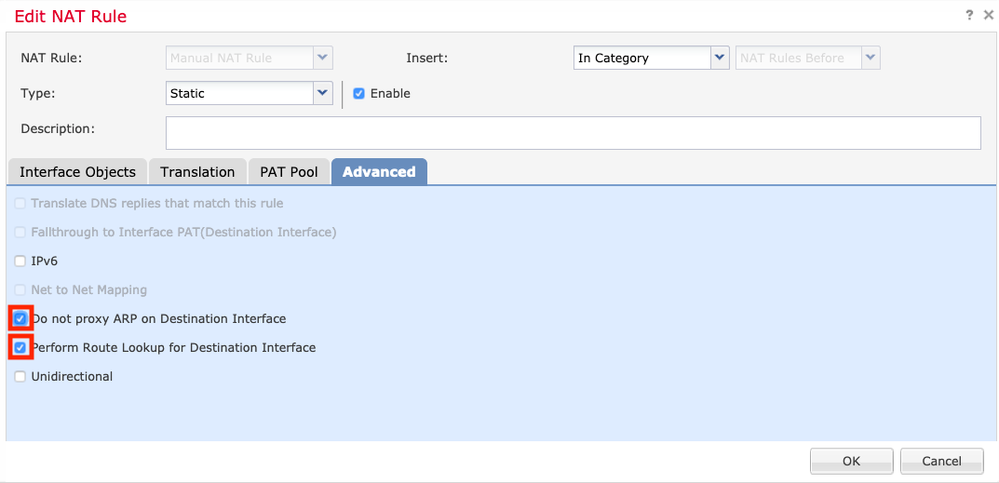
4. Ensure you toggle the options (as shown in the image), in order to enable no-proxy-arp and route-lookup in the NAT rule. Select OK as shown in the image.
5. This is the result of the NAT exemption configuration.

The objects used in the previous section are the ones described below.


Step 2. Hairpin Configuration
Also known as U-turn, this is a translation method that allows the traffic to flow over the same interface the traffic is received on.
For example, when AnyConnect is configured with a Full tunnel split-tunnel policy, the internal resources are accessed as per the NAT Exemption policy. If the AnyConnect client traffic is intended to reach an external site on internet, the hairpin NAT (or U-turn) is responsible to route the traffic from outside to outside.
A VPN pool object must be created before the NAT configuration.
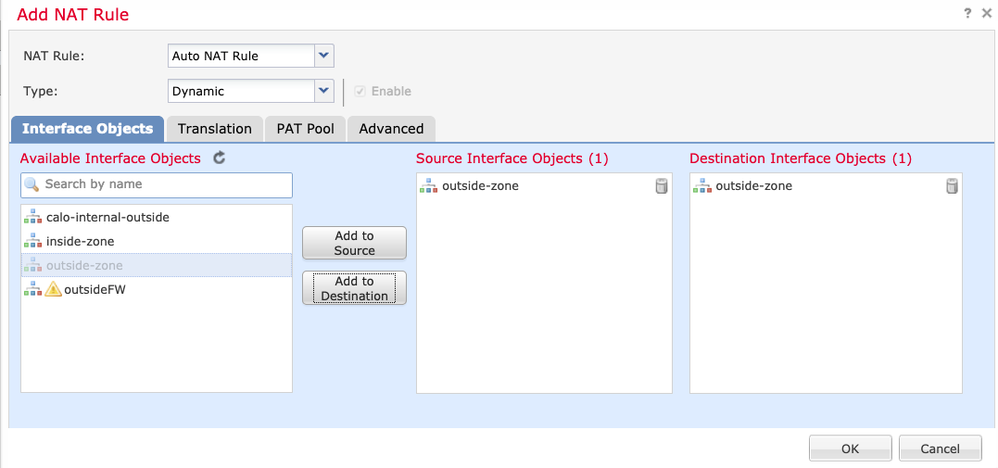
1. Create a new NAT statement, select Auto NAT Rule in the NAT Rule field and select Dynamic as the NAT Type.
2. Select the same interface for the source and destination interface objects (outside):
3. In the Translation tab, select the Original Source, the vpn-pool object, and select Destination Interface IP as the Translated Source. Select OK as shown in the image.
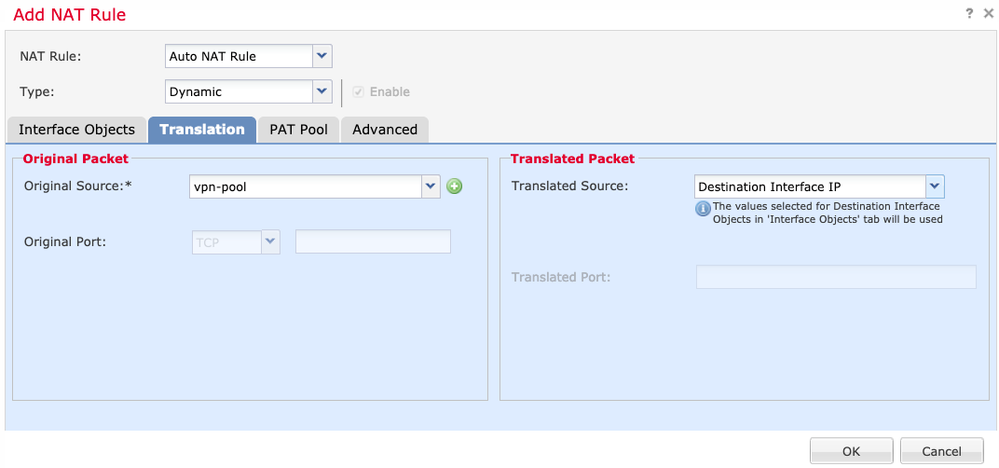
4. This is the summary of the NAT configuration as shown in the image.

5. Click Save and Deploy the changes.
Verify
Use this section to confirm that your configuration works properly.
Run these commands in the FTD command line.
- sh crypto ca certificates
- show running-config ip local pool
- show running-config webvpn
- show running-config tunnel-group
- show running-config group-policy
- show running-config ssl
- show running-config nat
Troubleshoot
There is currently no specific troubleshooting information available for this configuration.


 Feedback