Integrate Duo SAML SSO with Anyconnect Secure Remote Access using ISE Posture
Available Languages
Bias-Free Language
The documentation set for this product strives to use bias-free language. For the purposes of this documentation set, bias-free is defined as language that does not imply discrimination based on age, disability, gender, racial identity, ethnic identity, sexual orientation, socioeconomic status, and intersectionality. Exceptions may be present in the documentation due to language that is hardcoded in the user interfaces of the product software, language used based on RFP documentation, or language that is used by a referenced third-party product. Learn more about how Cisco is using Inclusive Language.
Contents
Introduction
This document describes a configuration example for integrating Duo SAML SSO with Adaptive Security Appliance (ASA) Cisco AnyConnect Secure Mobility Client access that leverages Cisco ISE for a detailed posture assessment. Duo SAML SSO is implemented using Duo Access Gateway (DAG) which communicates to the Active Directory for initial user authentication and then communicates to Duo Security (Cloud) for multi-factor authentication. Cisco ISE is used as an authorization server for providing endpoint verification using posture assessment.
Contributed by Dinesh Moudgil and Pulkit Saxena, Cisco HTTS Engineer.
Prerequisites
Requirements
- Fundamentals of Duo Access Gateway and Duo Security
- Basic knowledge of remote access VPN configuration on the ASA
- Basic knowledge of ISE and posture services
Components Used
- Cisco Adaptive Security Appliance Software Version 9.12(3)12
- Duo Access Gateway
- Duo Security
- Cisco Identity Services Engine version 2.6 and later
- Microsoft Windows 10 with AnyConnect Version 4.8.03052
Note: Anyconnect Embedded Browser, used in this implementation, requires ASA on 9.7(1)24, 9.8(2)28, 9.9(2)1 or higher version of each release, and AnyConnect version 4.6 or later.
Configure
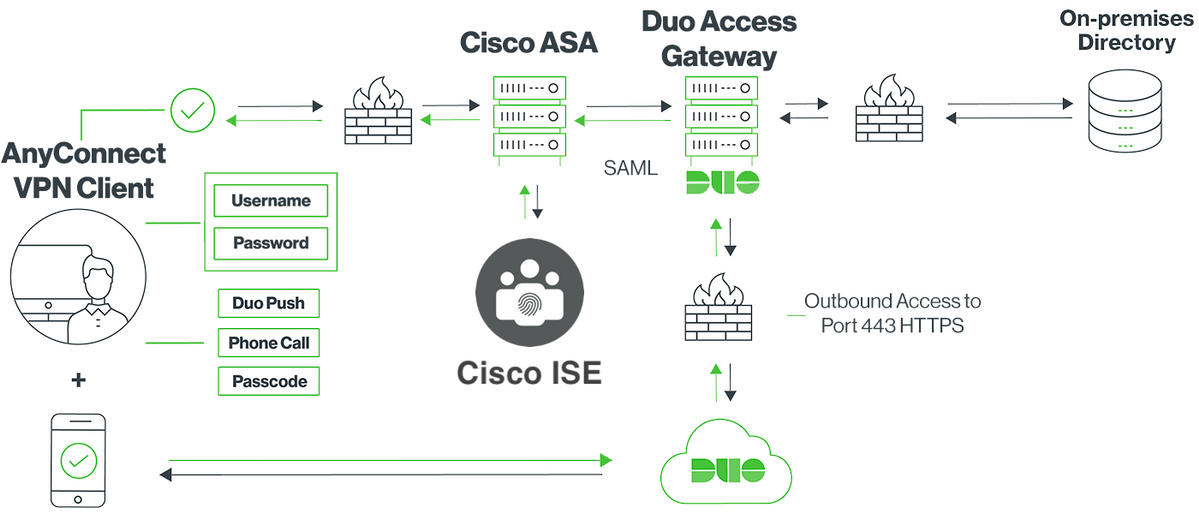
Network Diagram
Traffic Flow
- Anyconnect client initiates an SSL VPN connection to Cisco ASA
- Cisco ASA, configured for primary authentication with Duo Access Gateway (DAG), redirects the embedded browser in Anyconnect client to DAG for SAML authentication
- Anyconnect client is redirected to Duo Access Gateway
- Once the AnyConnect client enters the credentials, a SAML authentication request is built and is issued from Cisco ASA to Duo Access Gateway
- Duo Access Gateway leverages the integration with on-site active directory to perform primary authentication for the Anyconnect client
- Once the primary authentication is successful, Duo Access Gateway sends a request to Duo Security over TCP port 443 to begin two-factor authentication
- The AnyConnect client has presented with "Duo Interactive Prompt" and the user completes Duo two-factor authentication using their preferred method (push or passcode)
- Duo Security receives an authentication response and returns the information to the Duo Access Gateway
- Based on the authentication response, Duo Access Gateway builds a SAML authentication response which contains SAML assertion and responds to the Anyconnect client
- Anyconnect client successfully authenticates for SSL VPN connection with Cisco ASA
- Once the authentication is successful, Cisco ASA sends an authorization request to Cisco ISE
Note: Cisco ISE is configured only for authorization since Duo Access Gateway provides the necessary authentication
- Cisco ISE processes the authorization request and since the client posture status is Unknown, returns Posture redirect with limited access to Anyconnect client via Cisco ASA
- If Anyconnect client doesn't have a compliance module, it is prompted to download it to proceed further with posture assessment
- If Anyconnect client has a compliance module, it establishes a TLS connection with Cisco ASA and posture flow starts
- Depending on the posture conditions configured on ISE, posture checks are done and details are sent from Anyconnect client to Cisco ISE
- If the client posture status changes from Unknown to Compliant, change of authorization (CoA) request is sent from Cisco ISE to Cisco ASA to grant full access to the client and VPN is fully established
Configurations
- Duo Admin Portal Configuration
In this section, configure the ASA application on the Duo Admin Portal.
1. Login to “Duo Admin Portal” and navigate to “Applications > Protect an Application”, and search for “ASA” with protection type of “2FA with Duo Access Gateway, self-hosted”. Click “Protect” on the far right to configure the Cisco ASA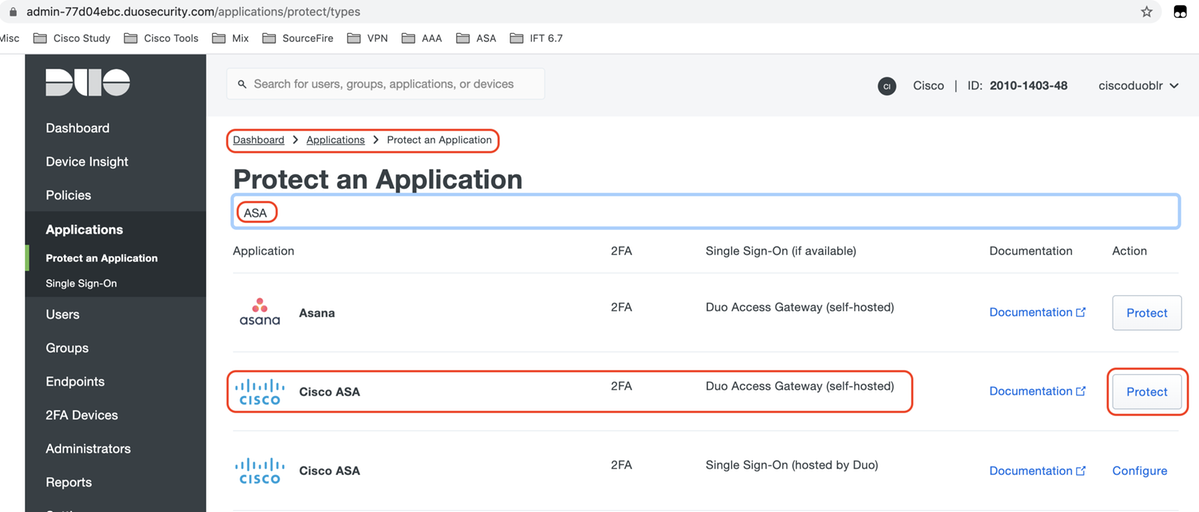
2. Configure the following attributes under "Service Provider" for the protected application, ASA
| Base URL | firebird.cisco.com |
| Tunnel Group | TG_SAML |
| Mail Attribute |
sAMAccountName,mail |
Click on “Save” at the bottom of the page
In this document, the rest of the configuration uses default parameters but they can be set based on customer's requirements.
Additional settings can be adjusted for the new SAML application at this time, like changing the application's name from the default value, enabling self-service, or assigning a group policy.
3. Click the "Download your configuration file" link to obtain the Cisco ASA application settings (as a JSON file). This file is uploaded to Duo Access Gateway in later steps
4. Under “Dashboard > Applications", the newly created ASA application looks like as shown in the image below:
5. Navigate to "Users > Add User" as shown in the image:
Create a user named "duouser" to be used for Anyconnect Remote Access authentication and activate Duo Mobile on the end-user device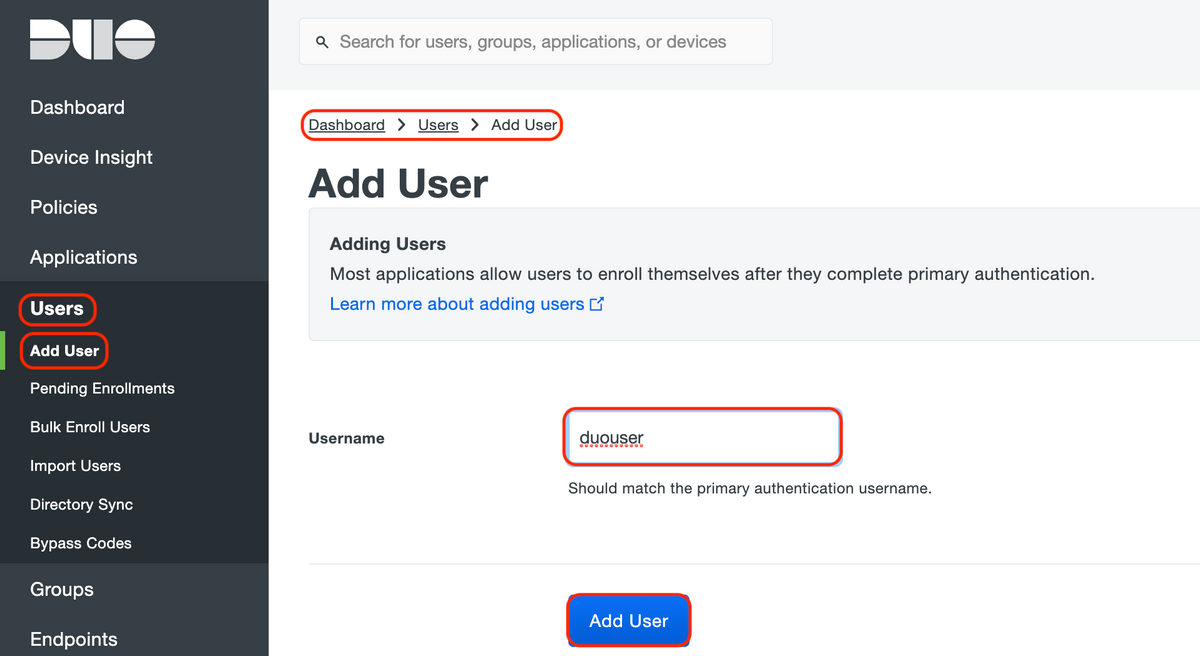
To add the phone number as shown in the image, select the "Add Phone" option.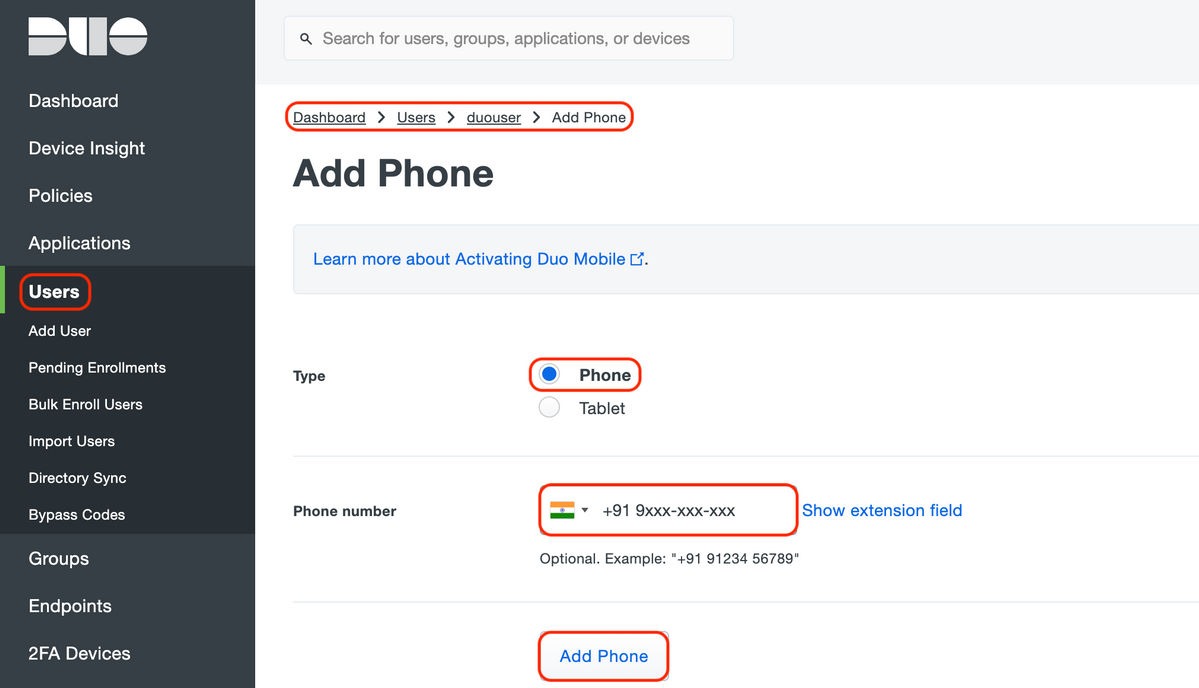
Activate "Duo Mobile" for the particular user
Note: Ensure to have "Duo Mobile" installed on the end-user device.
Manual installation of Duo application for IOS devices
Manual installation of Duo application for android devices
Select "Generate Duo Mobile Activation Code" as shown in the image:
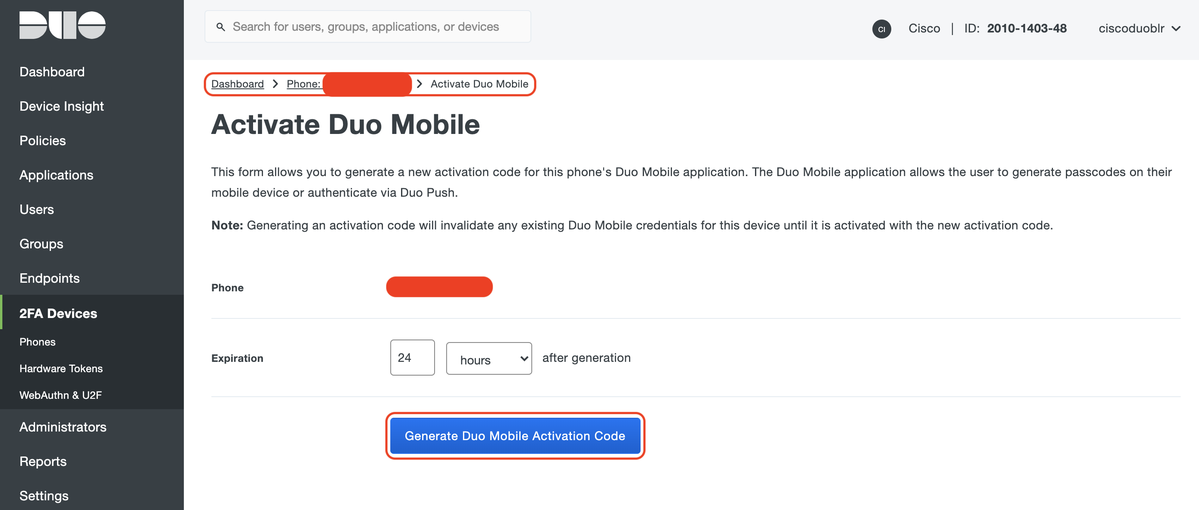
Select "Send Instructions by SMS" as shown in the image:
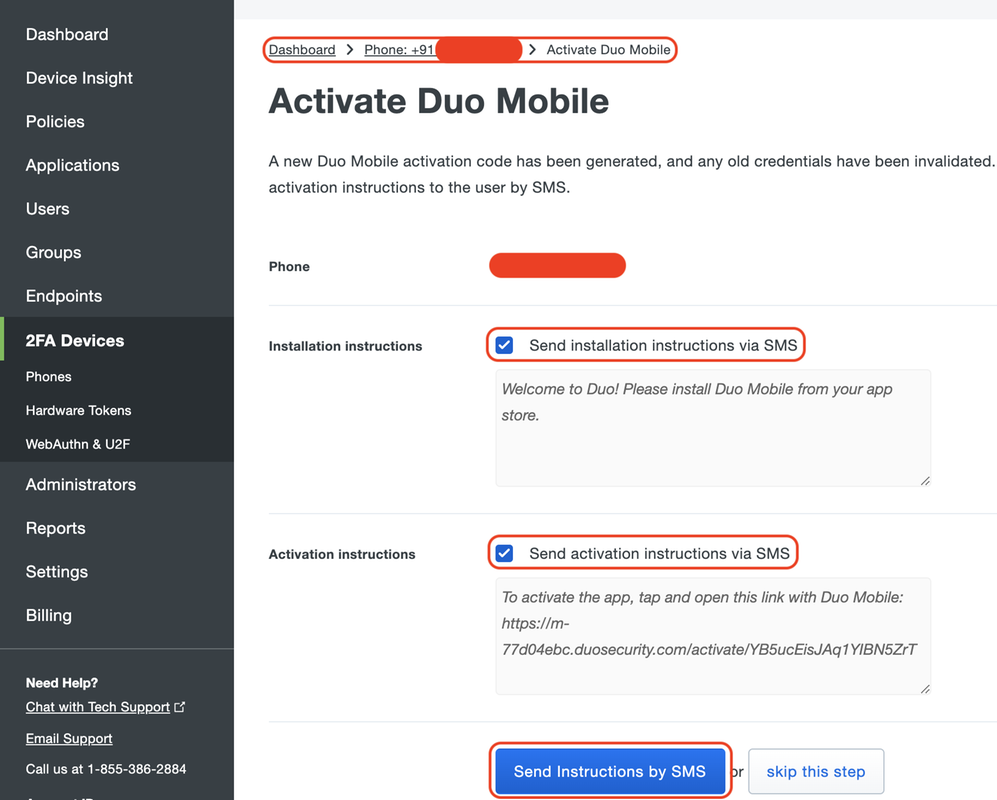
Click the link in the SMS, and Duo app gets linked to the user account in the Device Info section, as shown in the image:

- Duo Access Gateway (DAG) Configuration
- Deploy Duo Access Gateway(DAG) on a server in your network
Note: Follow the below documents for deployment:
Duo Access Gateway for Linux
https://duo.com/docs/dag-linux
Duo Access Gateway for Windows
https://duo.com/docs/dag-windows - On Duo Access Gateway homepage, navigate to "Authentication Source"
- Under "Configure Sources", enter the following attributes for your Active Directory and click "Save Settings"
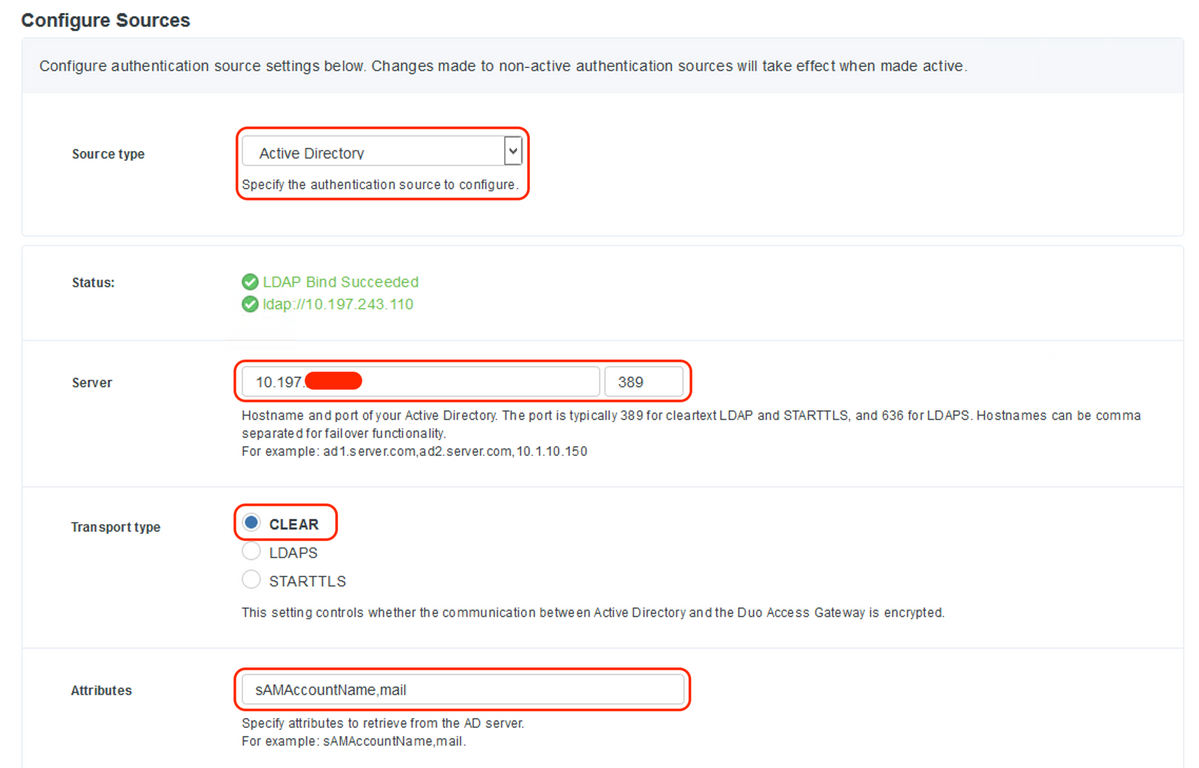
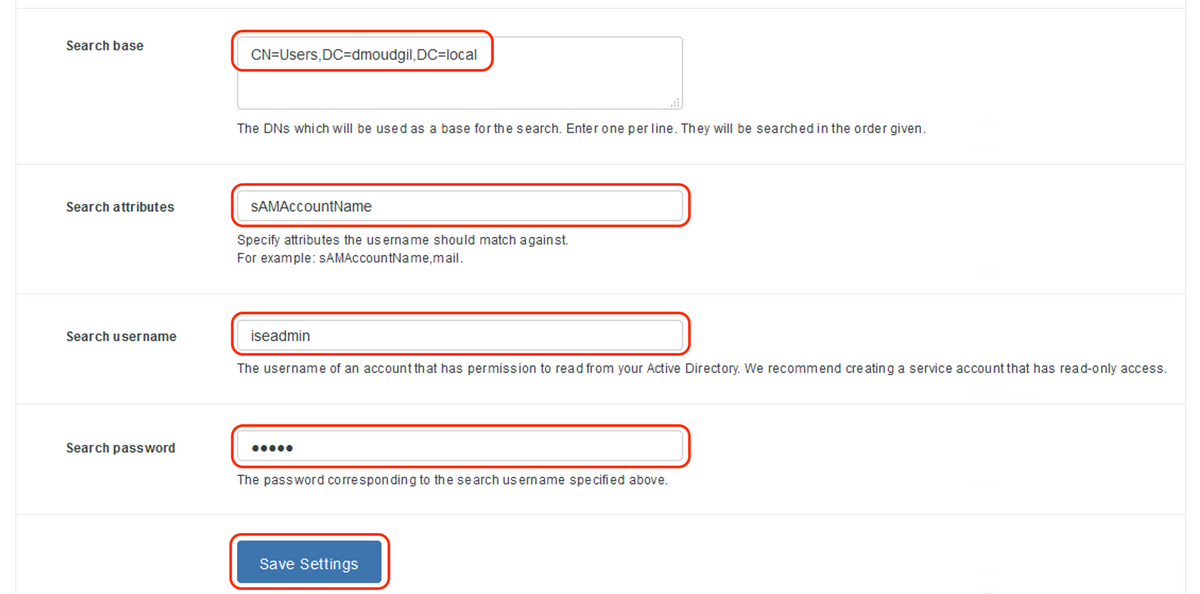
- Under “Set Active Source”, select the source type as “Active Directory" and click "Set Active Source"

- Navigate to “Applications”, under the “Add Application” sub-menu upload the .json file downloaded from Duo Admin Console within the “Configuration file” section. The corresponding .json file was downloaded in Step 3 under Duo Admin Portal Configuration

- Once the application is successfully added, it shows up under “Applications” sub-menu

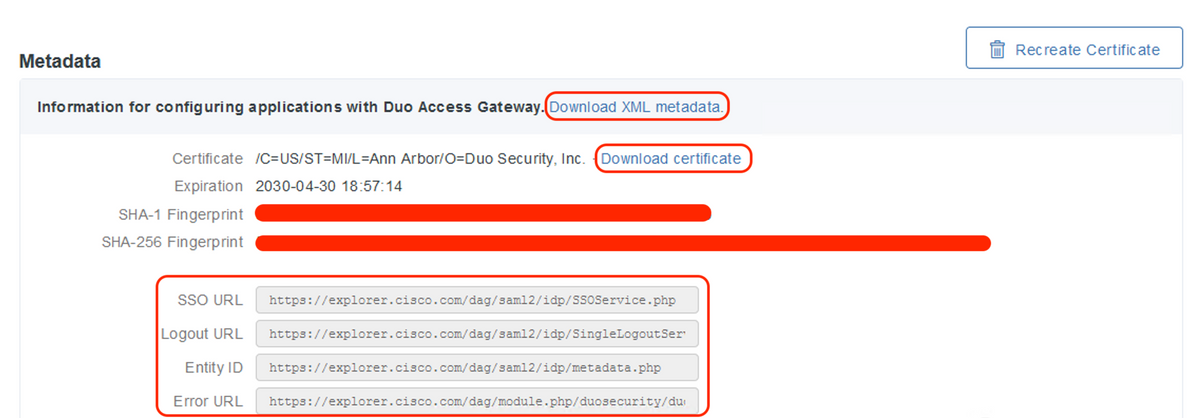
- Under “Metadata” sub-menu, download the XML metadata and IdP certificate and note down the following URLs which is configured on the ASA later
- SSO URL
- Logout URL
- Entity ID
- Error URL
- ASA Configuration
This section provides information to configure ASA for SAML IDP authentication and basic AnyConnect configuration. The document provides ASDM configuration steps and CLI running configuration for the overview.
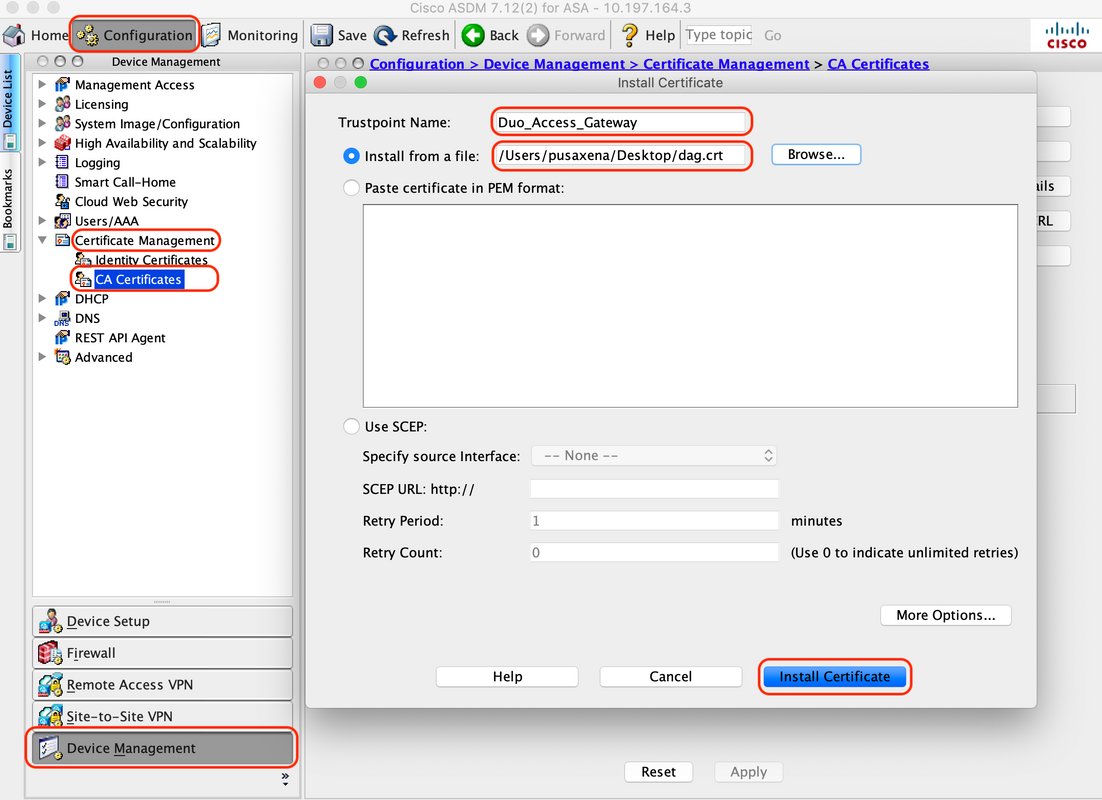
1. Upload Duo Access Gateway Certificate
A. Navigate to "Configuration > Device Management > Certificate Management > CA Certificates", click "Add"
B. On the “Install Certificate Page”, configure the Trustpoint Name: Duo_Access_Gateway
C. Click "Browse" to select the path associated with DAG certificate and once selected, click “Install Certificate”
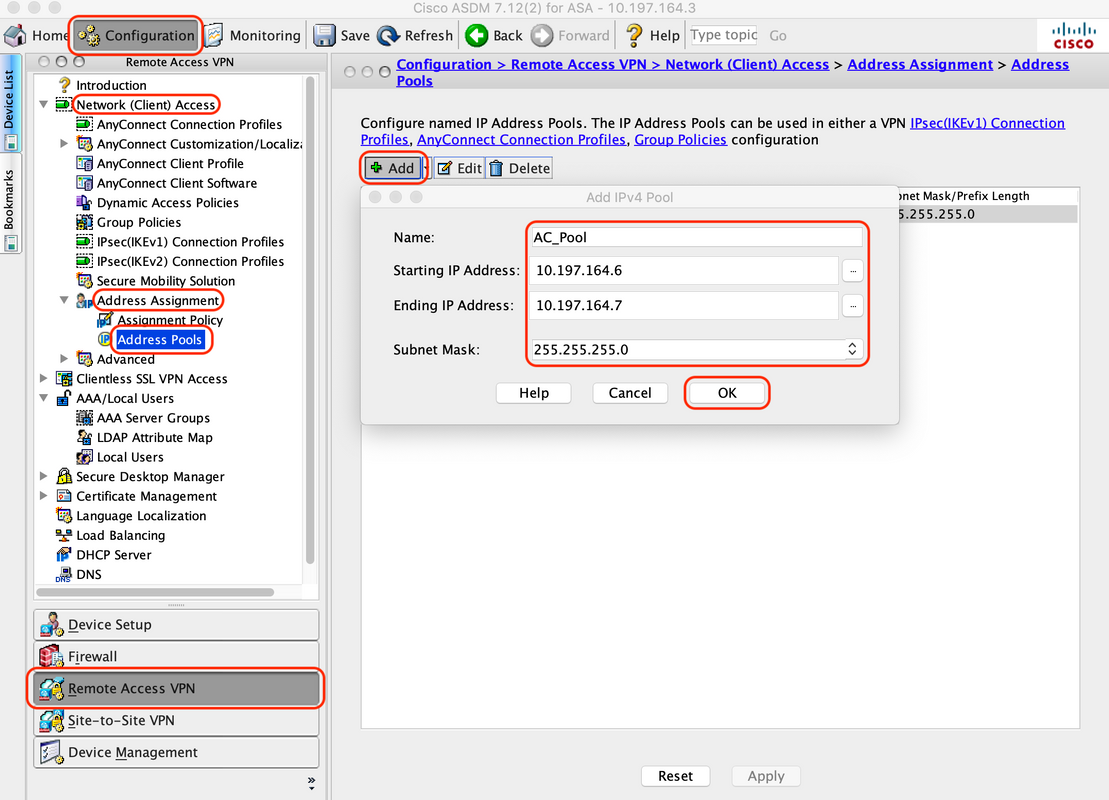
2. Create IP Local Pool for AnyConnect users
Navigate to "Configuration > Remote Access VPN > Network (Client) Access > Address Assignment > Address Pools", click "Add"
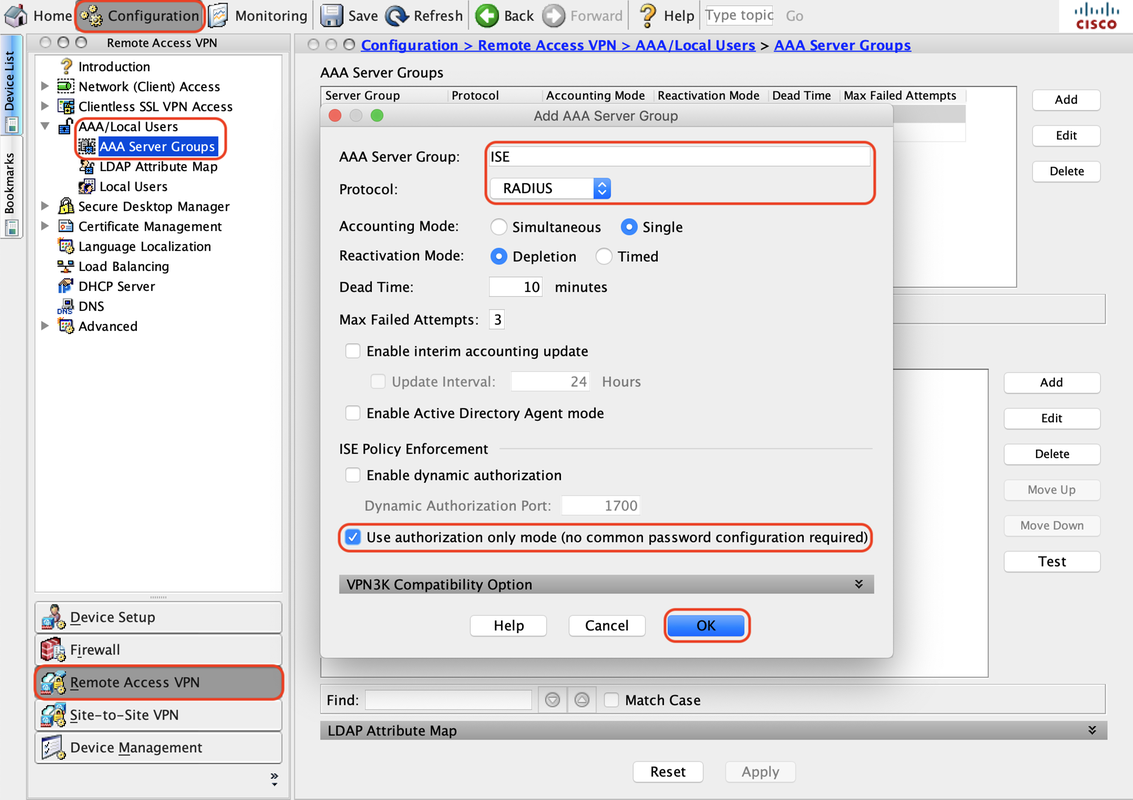
3. Configure AAA Server Group
A. In this section, configure the AAA Server Group and provide details of the specific AAA server which performs authorization
B. Navigate to "Configuration > Remote Access VPN > AAA/Local Users > AAA Server Groups", click "Add"
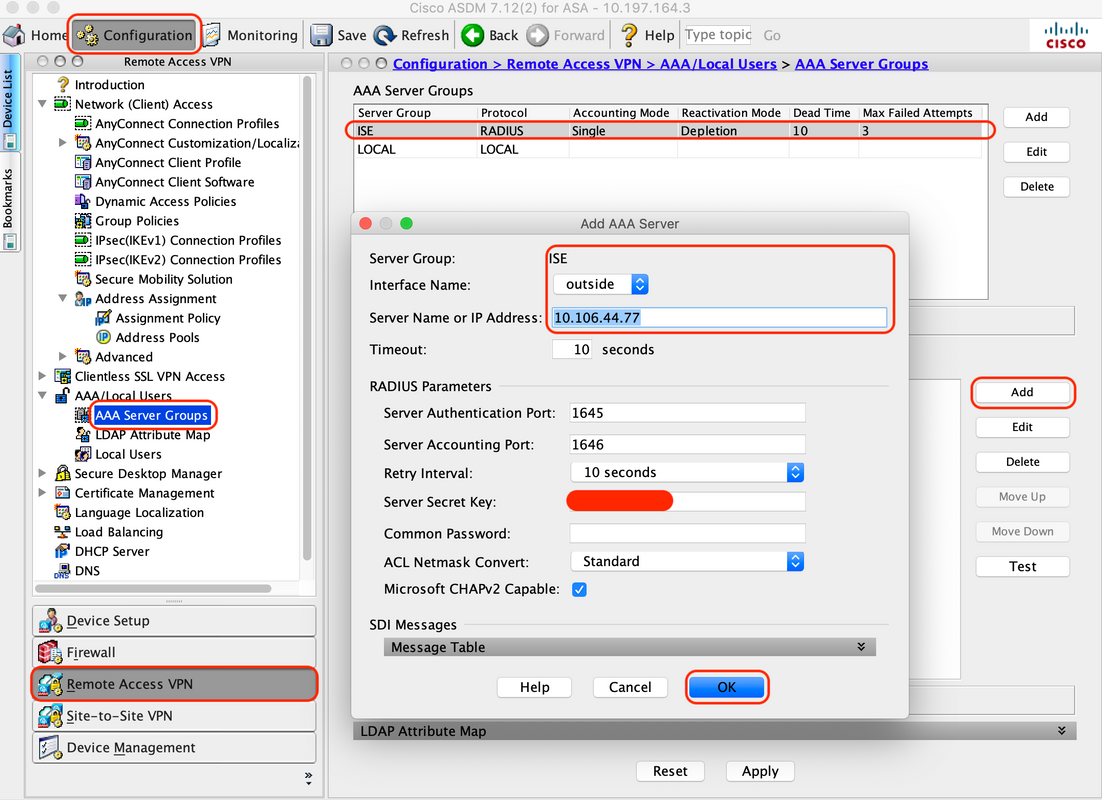
C. On the same page, under the section “Servers in the Selected group”, click "Add" and provide IP address details of the AAA server
4. Map AnyConnect Client Software
A. Map the AnyConnect client software webdeploy image 4.8.03052 for windows to be used for WebVPN
B. Navigate to "Configuration > Remote Access VPN > Network (Client) Access > AnyConnect Client Software", click "Add"
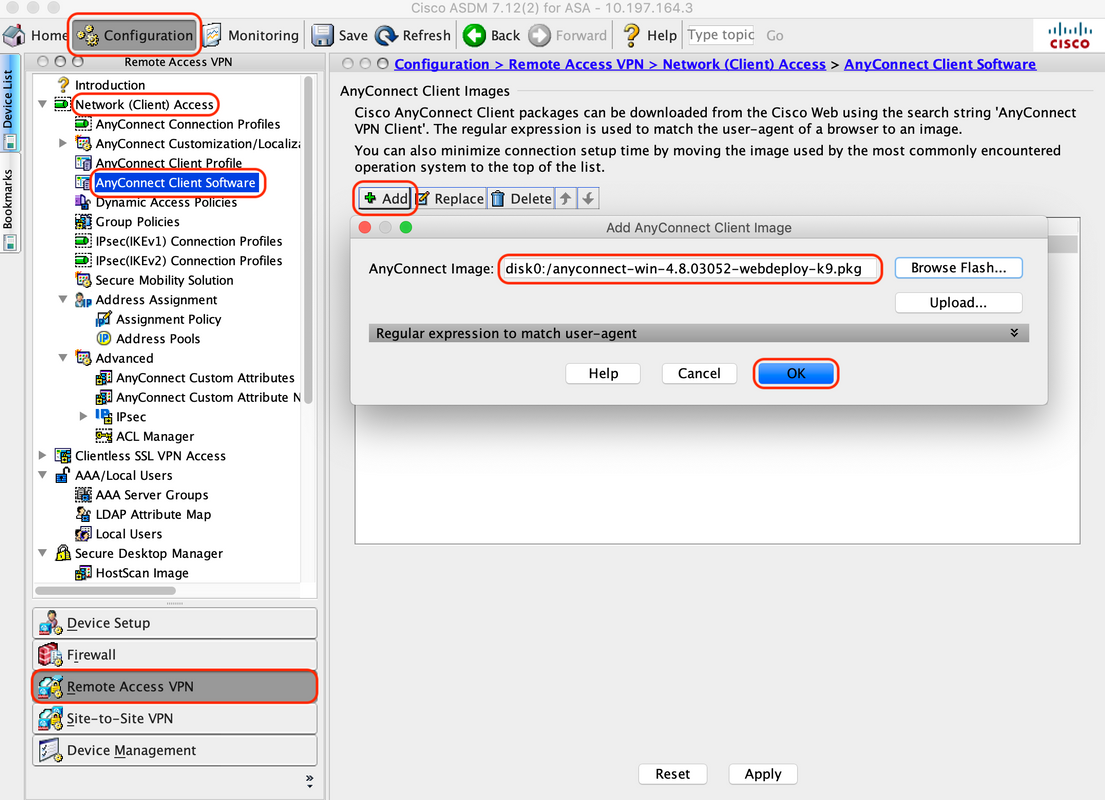
5. Configure the redirect ACL which is pushed as a result from ISE
A. Navigate to "Configuration > Firewall > Advanced > ACL Manager”, click Add to add the redirect ACL. The entries, once configured, looks as shown below: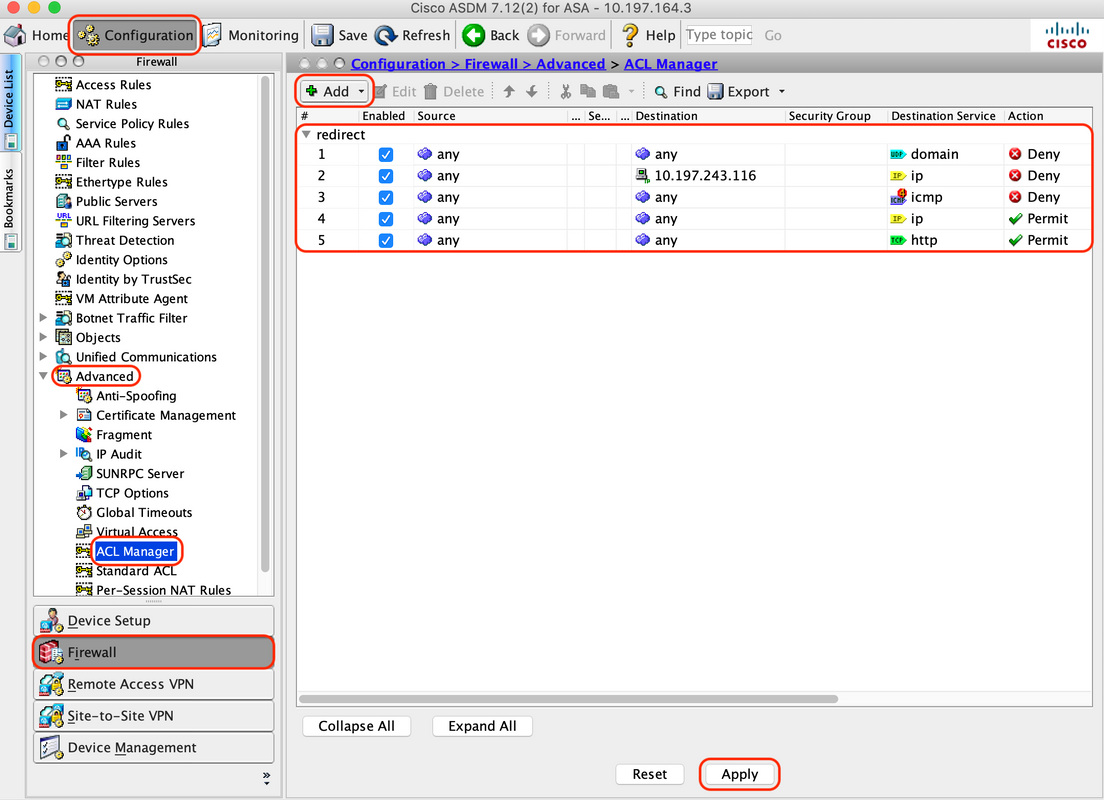
6. Validate existing Group Policy
A. This setup uses the default group-policy and that can be viewed at: "Configuration > Remote Access VPN > Network (Client) Access > Group Policies"
7. Configure Connection Profile
A. Create a new connection profile to which AnyConnect users connect
B. Navigate to "Configuration > Remote Access VPN > Network (Client) Access > Anyconnect Connection Profiles", click "Add"
C. Configure the below details associated with connection profile:
| Name | TG_SAML |
| Aliases | SAML_Users |
| Method | SAML |
| AAA Server Group | Local |
| Client Address Pools | AC_Pool |
| Group Policy | DfltGrpPolicy |
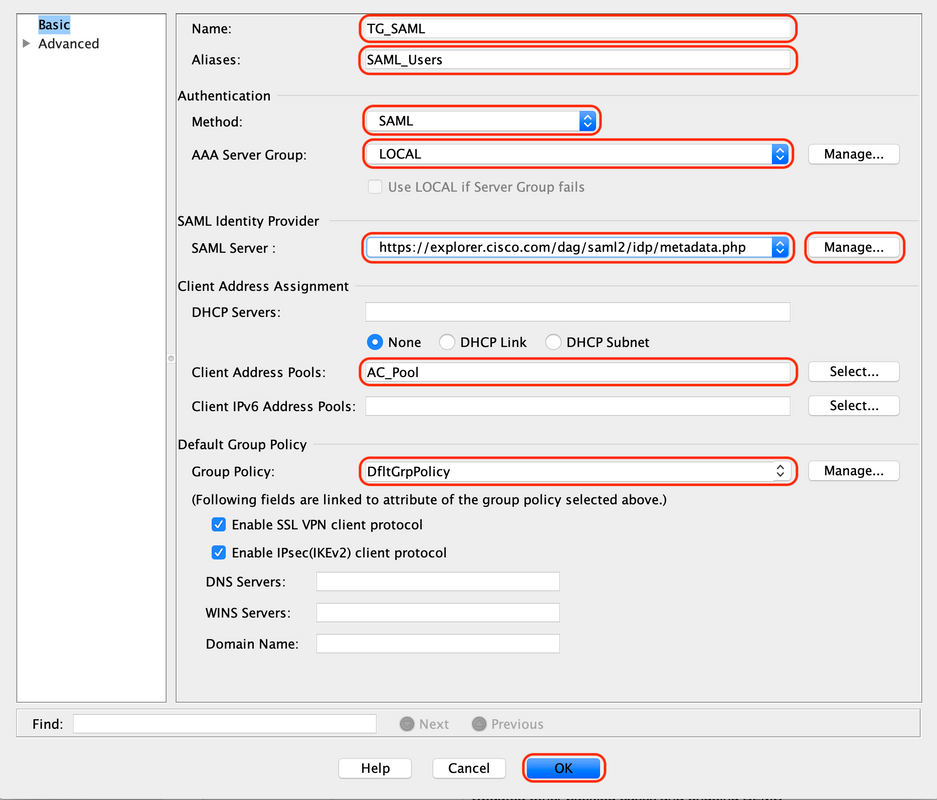
D. On the same page, configure SAML Identity provider details which look as shown below:
E. Click on "Manage > Add"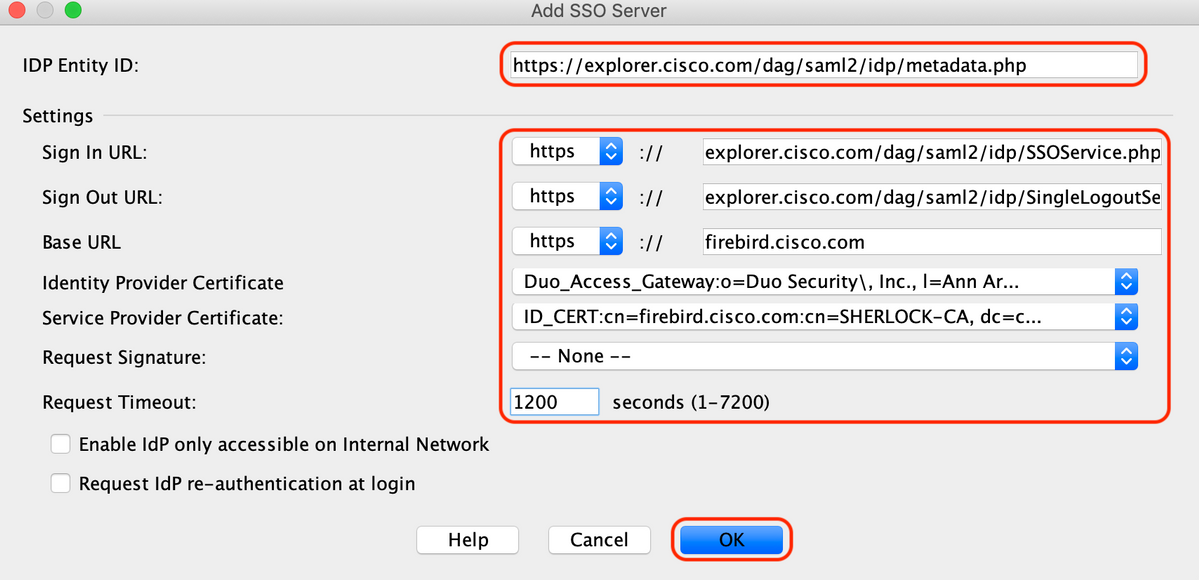
F. Under the Advanced Section for the connection profile, define the AAA server for authorization
Navigate to "Advanced > Authorization" and click "Add"

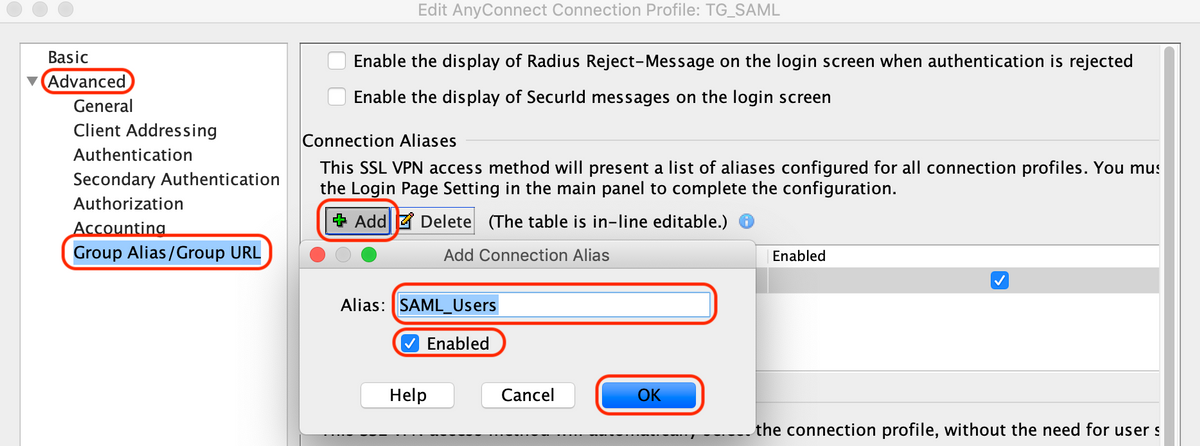
G. Under Group Alias, define the connection alias
Navigate to "Advanced > Group Alias/Group URL" and click "Add"
H. This completes the ASA configuration, the same looks like below on the command-line interface (CLI)
!
hostname firebird
domain-name cisco.com
!
!
name 10.197.164.7 explorer.cisco.com
name 10.197.164.3 firebird.cisco.com
!
!--------------------Client pool configuration--------------------
!
ip local pool AC_Pool 10.197.164.6-explorer.cisco.com mask 255.255.255.0
!
!--------------------Redirect Access-list-------------------------
!
access-list redirect extended deny udp any any eq domain
access-list redirect extended deny ip any host 10.197.243.116
access-list redirect extended deny icmp any any
access-list redirect extended permit ip any any
access-list redirect extended permit tcp any any eq www
!
!--------------------AAA server configuration---------------------
!
aaa-server ISE protocol radius
 authorize-only
 interim-accounting-update periodic 1
 dynamic-authorization
aaa-server ISE (outside) host 10.106.44.77
 key *****
!
!-----Configure Trustpoint for Duo Access Gateway Certificate-----
!
crypto ca trustpoint Duo_Access_Gateway
 enrollment terminal
 crl configure
!
!-------Configure Trustpoint for ASA Identity Certificate---------
!
crypto ca trustpoint ID_CERT
 enrollment terminal
 fqdn firebird.cisco.com
 subject-name CN=firebird.cisco.com
 ip-address 10.197.164.3
 keypair ID_RSA_KEYS
 no ca-check
 crl configure
!
!------Enable AnyConnect and configuring SAML authentication------
!
webvpn
 enable outside
 hsts
  enable
  max-age 31536000
  include-sub-domains
  no preload
 anyconnect image disk0:/anyconnect-win-4.8.03052-webdeploy-k9.pkg 1
 anyconnect enable
 saml idp https://explorer.cisco.com/dag/saml2/idp/metadata.php
  url sign-in https://explorer.cisco.com/dag/saml2/idp/SSOService.php
  url sign-out https://explorer.cisco.com/dag/saml2/idp/SingleLogoutService.php?ReturnTo=https://explorer.cisco.com/dag/module.php/duosecurity/logout.php
  base-url https://firebird.cisco.com
  trustpoint idp Duo_Access_Gateway
  trustpoint sp ID_CERT
  no signature
  no force re-authentication
  timeout assertion 1200
 tunnel-group-list enable
 cache
  disable
 error-recovery disable
!
!--------------------Group Policy configuration--------------------
!
group-policy DfltGrpPolicy attributes
 vpn-tunnel-protocol ikev1 ikev2 l2tp-ipsec ssl-client ssl-clientless
!
!----------Tunnel-Group (Connection Profile) Configuraiton----------
!
tunnel-group TG_SAML type remote-access
tunnel-group TG_SAML general-attributes
 address-pool AC_Pool
 authorization-server-group ISE
 accounting-server-group ISE
tunnel-group TG_SAML webvpn-attributes
 authentication saml
 group-alias SAML_Users enable
 saml identity-provider https://explorer.cisco.com/dag/saml2/idp/metadata.php
!
- ISE Configuration
1. Add Cisco ASA as Network Device
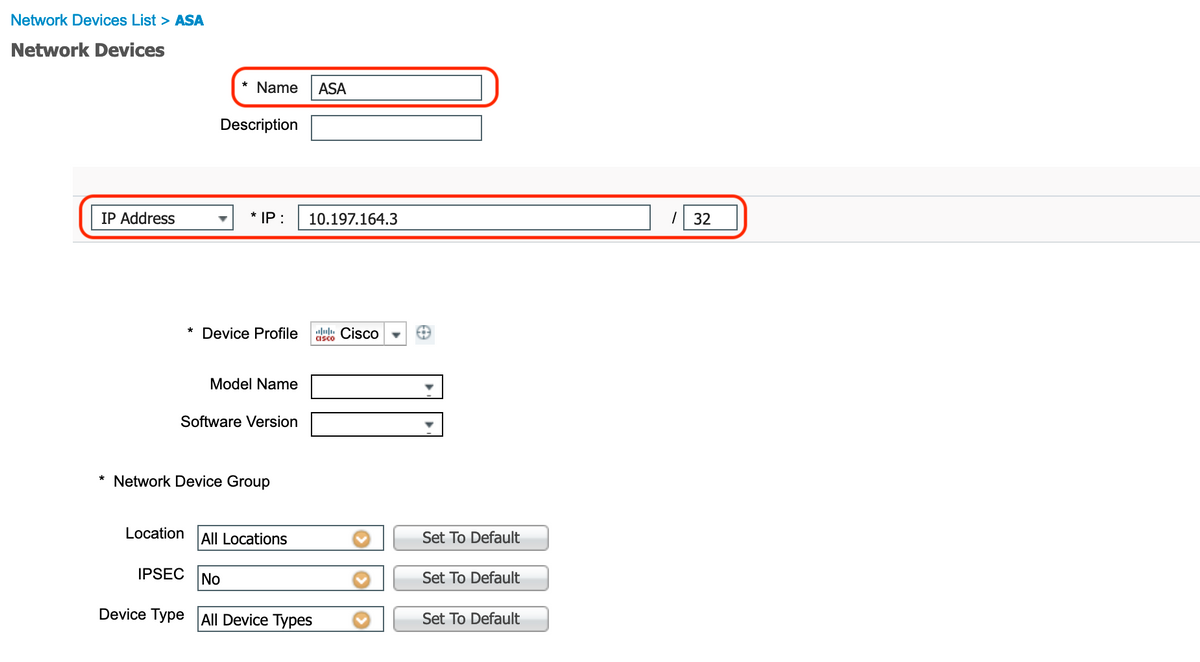
Under "Administration > Network Resources > Network Devices", click "Add".
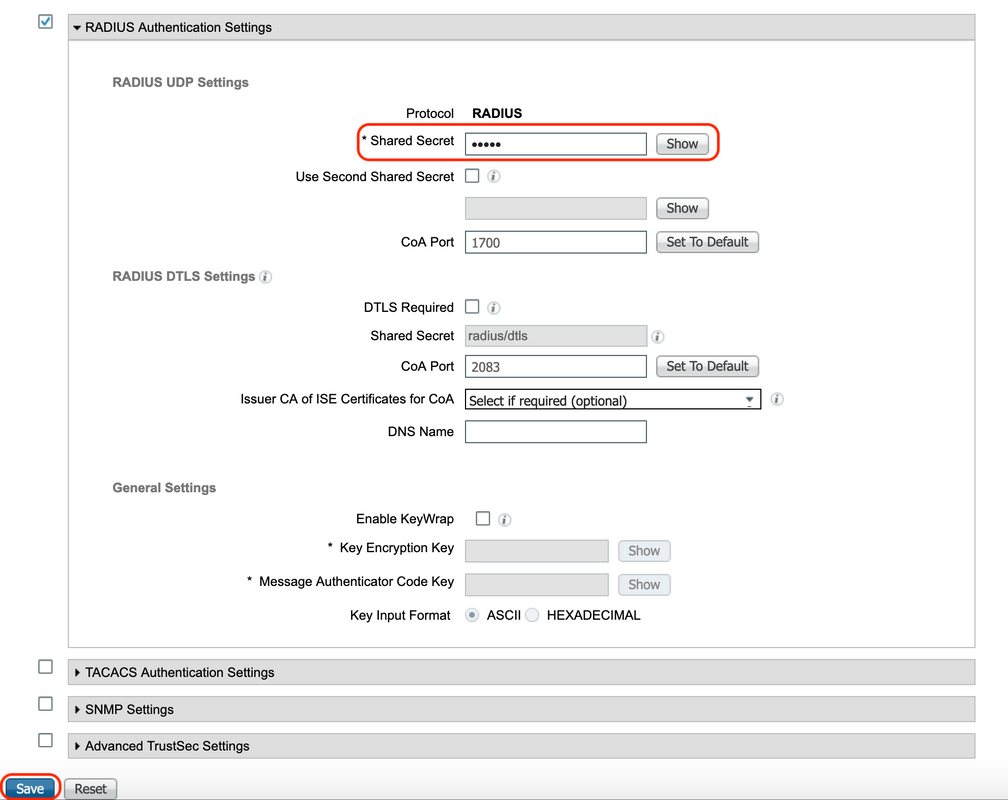
Configure the name of the Network device, associated IP address and under "Radius Authentication Settings", configure the "Shared Secret" and click "Save"
2. Install the latest posture updates
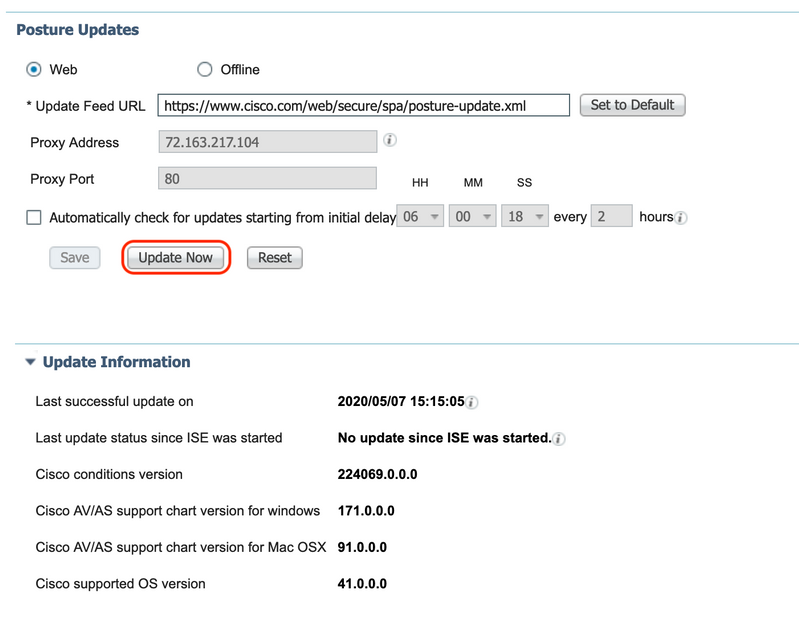
Navigate to "Administration > System > Settings > Posture > Updates" and click "Update Now"
 3. Upload the Compliance Module and AnyConnect Headend Deployment Package on ISE
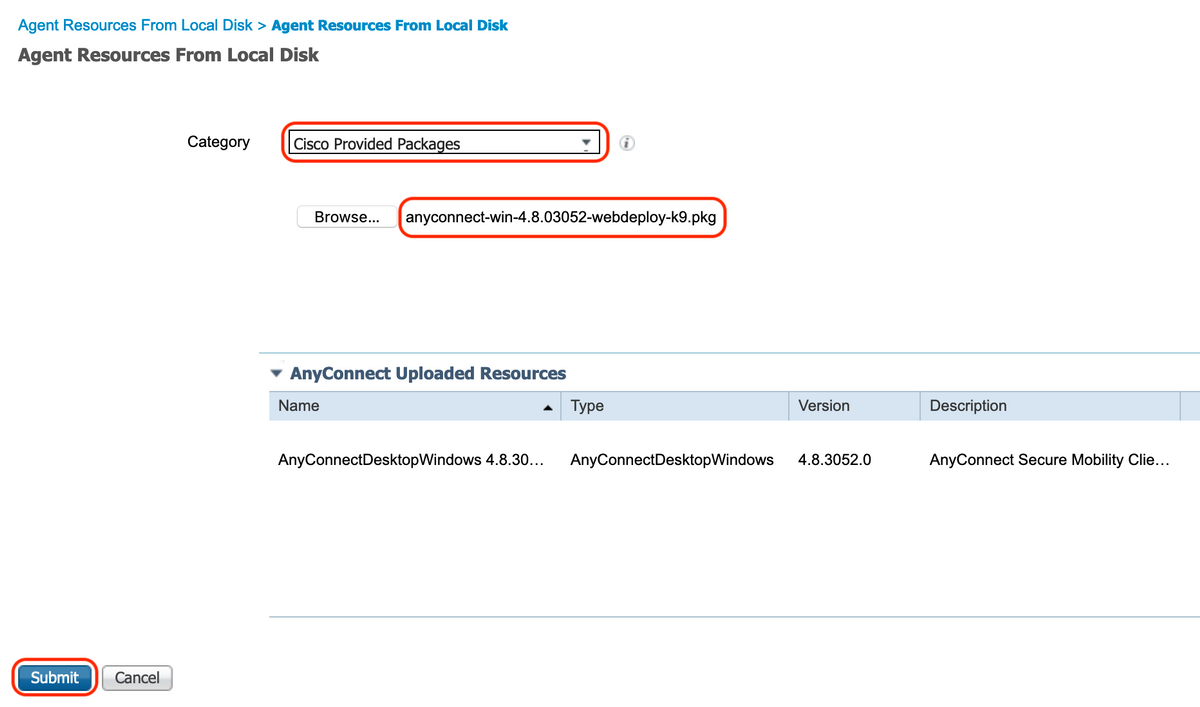
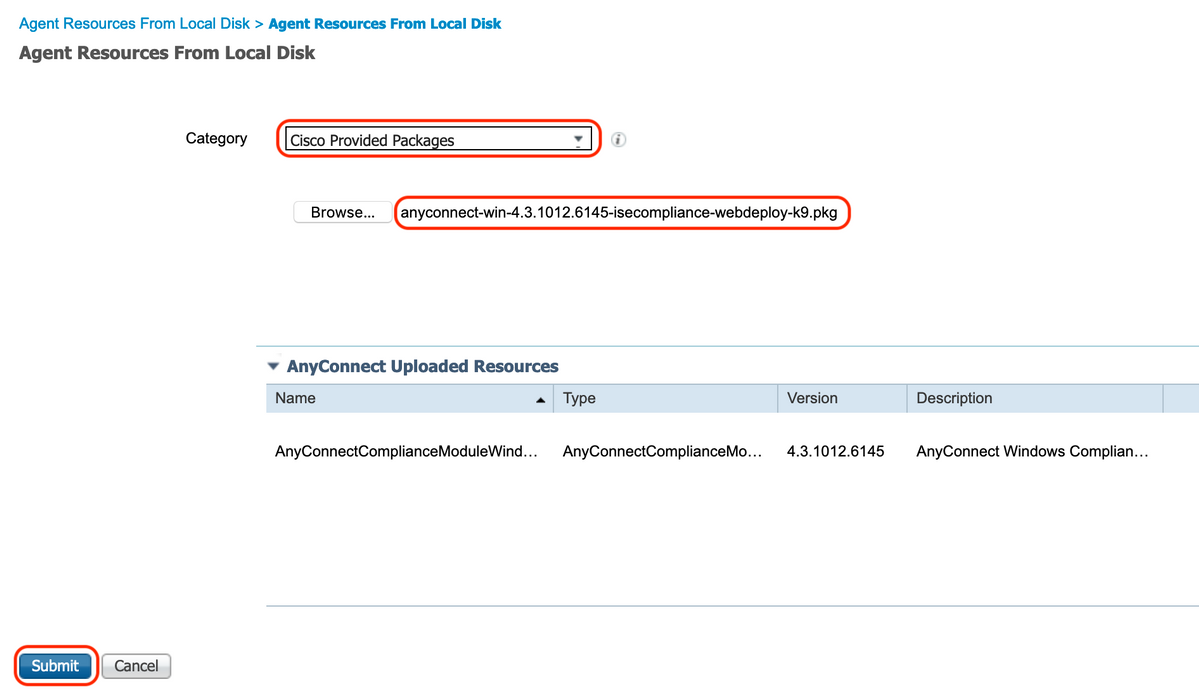
Navigate to "Policy > Policy Elements > Results > Client Provisioning > Resources". Click "Add" and select "Agent resources from local disk" or "Agent resources from Cisco site" based on whether the files are to be fetched from the local workstation or Cisco site.
In this case, to upload files from local workstation under Category, select "Cisco Provided Packages", and click "Browse" and select the required packages and click "Submit".
This document uses "anyconnect-win-4.3.1012.6145-isecompliance-webdeploy-k9.pkg" as compliance module and "anyconnect-win-4.8.03052-webdeploy-k9.pkg" as AnyConnect Headend Deployment Package.
4. Create an AnyConnect Posture Profile
A. Navigate to "Policy > Policy Elements > Results > Client Provisioning > Resources". Click "Add" and select "AnyConnect Posture Profile"
B. Enter the name for Anyconnect Posture Profile and configure server name as "*" under Server name rules and click "Save"


5. Create Anyconnect Configuration
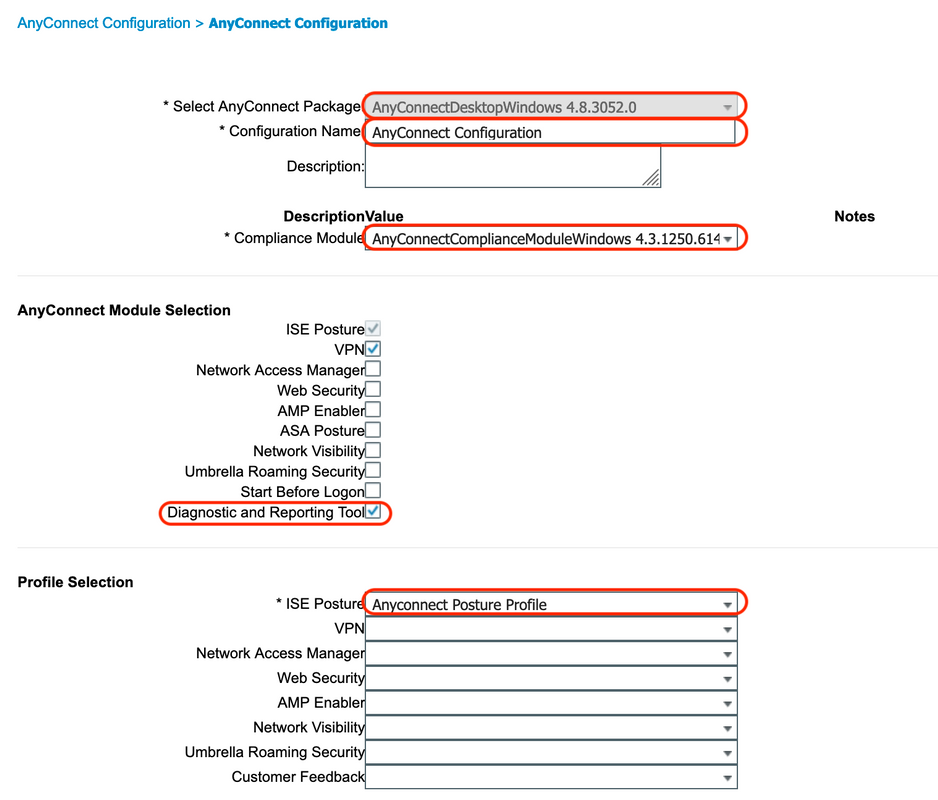
A. Navigate to "Policy > Policy Elements > Results > Client Provisioning > Resources". Click "Add" and select "AnyConnect Configuration"
B. Select AnyConnect Package, enter Configuration Name, select the required Compliance Module
C. Under "AnyConnect Module Selection", check 'Diagnostic and Reporting Tool"
D. Under "Profile Selection", select Posture Profile and click "Save"
6. Create Client Provisioning Policy
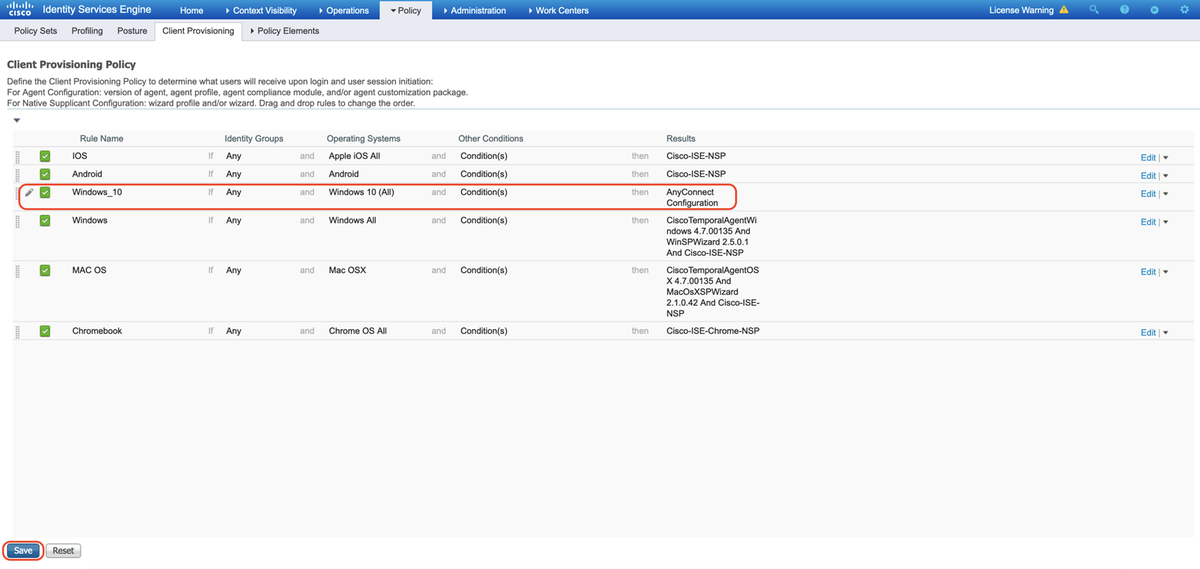
A. Navigate to "Policy > Client Provisioning"
B. Click "Edit" then select "Insert Rule Above"
C. Enter the Rule Name, select the required Operating System, and under Results (within "Agent" > "Agent Configuration" ), select "AnyConnect Configuration" that was created in Step 5 and click "Save"
7. Create a Posture Condition
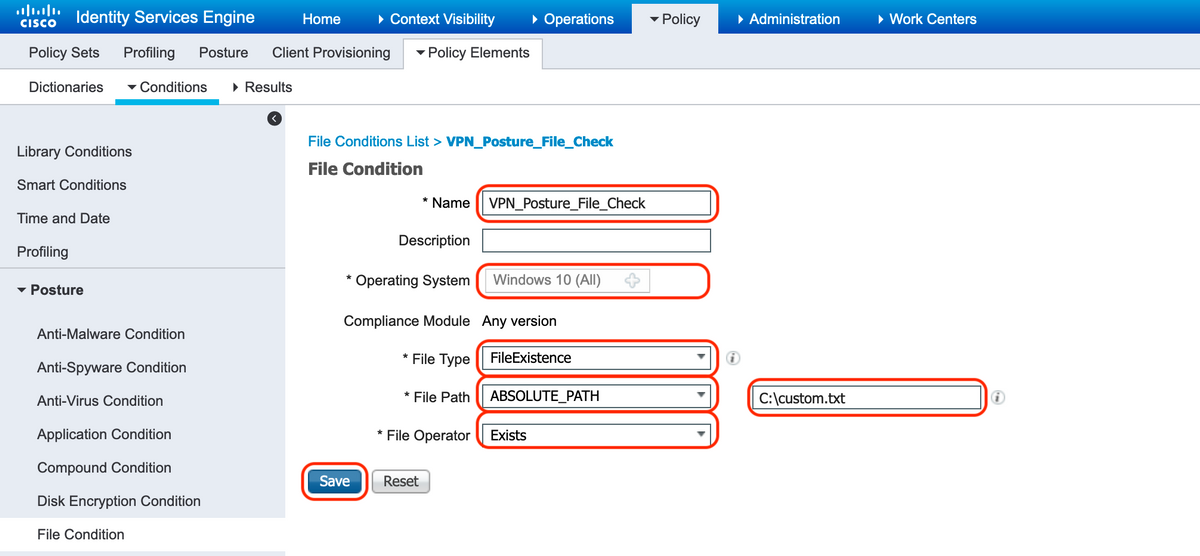
A. Navigate to "Policy > Policy Elements > Conditions > Posture > File Condition"
B. Click "Add" and configure the Condition Name "VPN_Posture_File_Check", required Operating System as "Windows 10(All)", File Type as "FileExistence", File Path as "ABSOLUTE_PATH", and full path and file name as "C:\custom.txt", select File Operator as "Exists"
C. This example uses the presence of a file named "custom.txt" under C: drive as the file condition
8. Create Posture Remediation Action
Navigate to "Policy > Policy Elements > Results > Posture > Remediation Actions" to create corresponding File Remediation Action. This document uses "Message Text Only" as Remediations Actions which is configured in the next step.
9. Create Posture Requirement rule
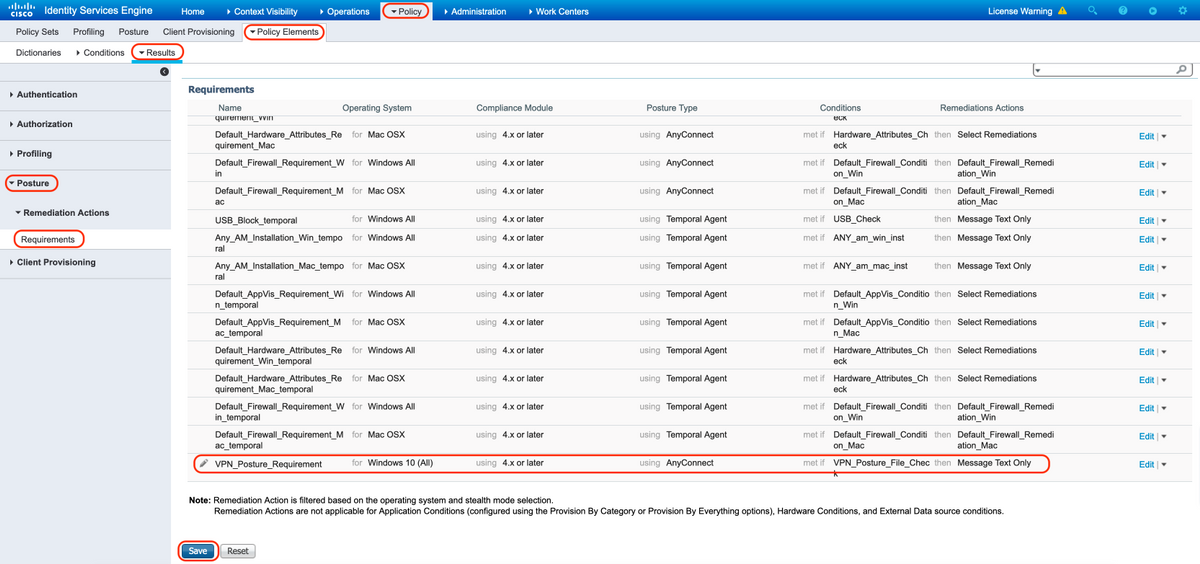
A. Navigate to "Policy > Policy Elements > Results > Posture > Requirements"
B. Click "Edit" then select "Insert new Requirement"
C. Configure the Condition Name "VPN_Posture_Requirement", required Operating System as "Windows 10(All)", Compliance Module as "4.x or later", Posture Type as "Anyconnect"
D. Conditions as "VPN_Posture_File_Check" (created in Step 7) and under Remediations Actions, select Action as "Message Text Only" and enter the custom message for Agent User
10. Create a Posture Policy
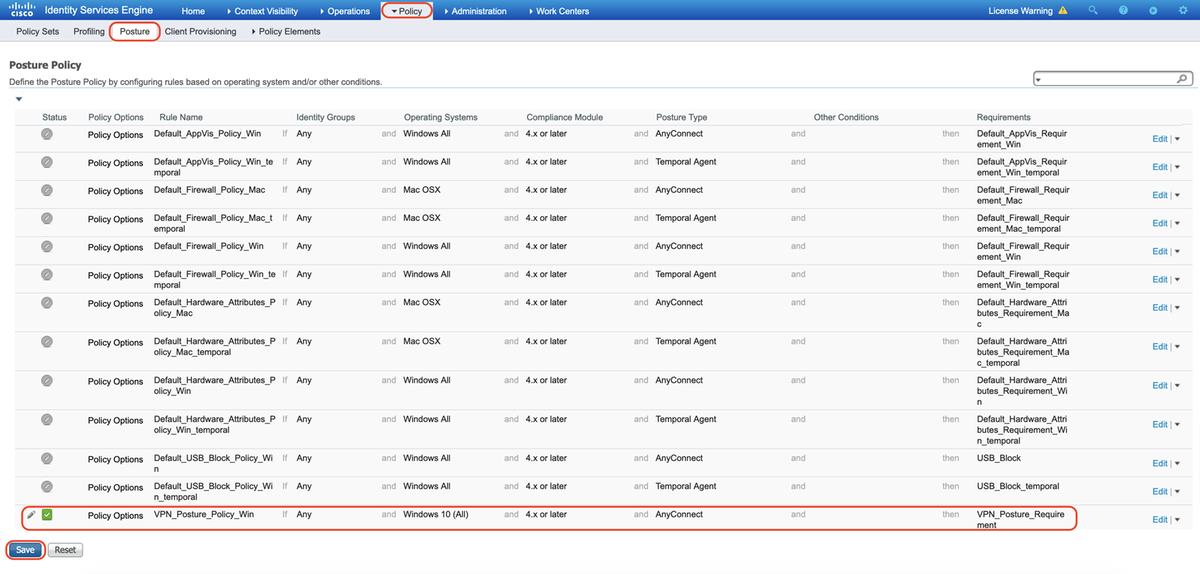
A. Navigate to "Policies > Posture"
B. Configure Rule Name as "VPN_Posture_Policy_Win", required Operating System as "Windows 10(All)", Compliance Module as "4.x or later", Posture Type as "Anyconnect" and Requirements as "VPN_Posture_Requirement" as configured in Step 9
11. Create Dynamic ACLs (DACLs)
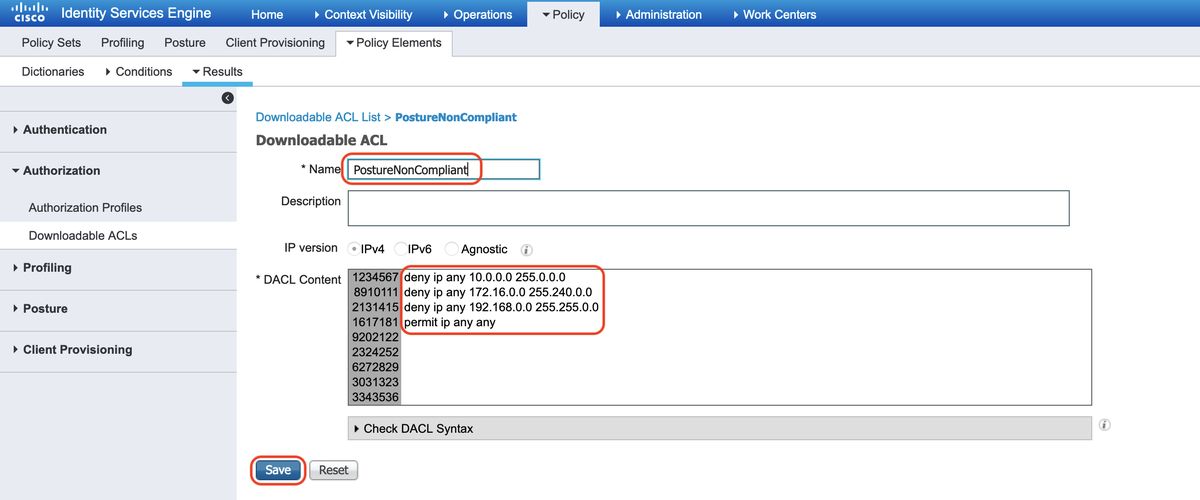
Navigate to "Policy > Policy Elements > Results > Authorization > Downlodable ACLS" and create the DACLs for different posture statuses.
This document uses the following DACLs.
A. Posture Unknown: Allows traffic to DNS, PSN, and HTTP, and HTTPS traffic
B. Posture NonCompliant: Denies access to Private Subnets and allow only internet traffic
C. Posture Compliant: Allows all traffic for Posture Compliant end users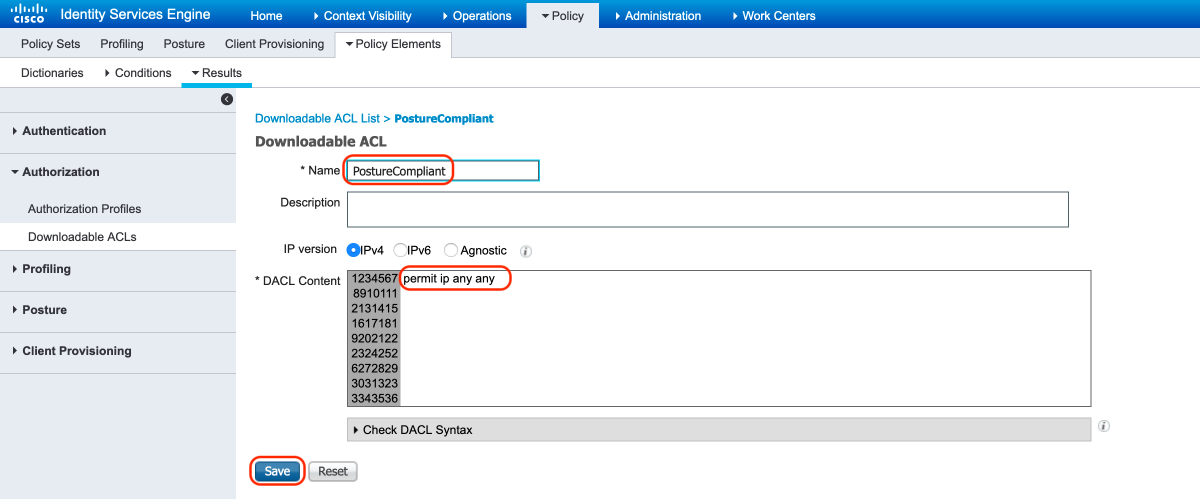
12. Create Authorization Profiles
Navigate to "Policy > Policy Elements > Results > Authorization > Authorization Profiles".
A. Authorization Profile for Unknown Posture
Select DACL "PostureUnknown", check Web Redirection, select Client Provisioning(Posture), configure Redirect ACL name "redirect"(to be configured on the ASA), and select the Client Provisioning portal (default)


B. Authorization Profile for Posture Non-Compliant
Select DACL "PostureNonCompliant" to limit access to the network


C. Authorization Profile for Posture Compliant
Select DACL "PostureCompliant" to allow full access to the network


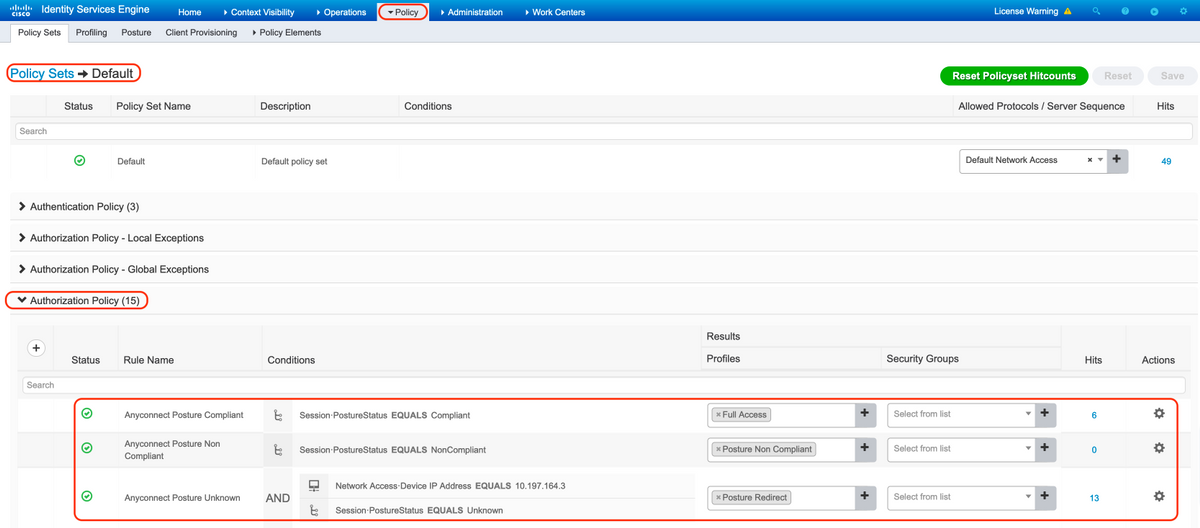
12. Configure Authorization Policies
Use the authorization profiles configured in the previous step to configure 3 authorization policies for Posture Compliant, Posture Non-Compliant, and Posture Unknown.
Common condition "Session: Posture Status" is used to determine the results for each policy
Verify
Use this section in order to confirm that your configuration works properly.
To verify if the user is successfully authenticated, run the following command on the ASA.
firebird(config)# show vpn-sess detail anyconnect

Session Type: AnyConnect Detailed

Username     : _585b5291f01484dfd16f394be7031d456d314e3e62
Index        : 125
Assigned IP  : explorer.cisco.com     Public IP    : 10.197.243.143
Protocol     : AnyConnect-Parent SSL-Tunnel DTLS-Tunnel
License      : AnyConnect Premium
Encryption   : AnyConnect-Parent: (1)none  SSL-Tunnel: (1)AES-GCM-256  DTLS-Tunnel: (1)AES-GCM-256
Hashing      : AnyConnect-Parent: (1)none  SSL-Tunnel: (1)SHA384  DTLS-Tunnel: (1)SHA384
Bytes Tx     : 16404                  Bytes Rx     : 381
Pkts Tx      : 16                     Pkts Rx      : 6
Pkts Tx Drop : 0                      Pkts Rx Drop : 0
Group Policy : DfltGrpPolicy                Tunnel Group : TG_SAML
Login Time   : 07:05:45 UTC Sun Jun 14 2020
Duration     : 0h:00m:16s
Inactivity   : 0h:00m:00s
VLAN Mapping : N/A                    VLAN         : none
Audt Sess ID : 0ac5a4030007d0005ee5cc49
Security Grp : none

AnyConnect-Parent Tunnels: 1
SSL-Tunnel Tunnels: 1
DTLS-Tunnel Tunnels: 1

AnyConnect-Parent:
  Tunnel ID    : 125.1
  Public IP    : 10.197.243.143
  Encryption   : none                   Hashing      : none
  TCP Src Port : 57244                  TCP Dst Port : 443
  Auth Mode    : SAML
  Idle Time Out: 30 Minutes             Idle TO Left : 29 Minutes
  Client OS    : win
  Client OS Ver: 10.0.15063
  Client Type  : AnyConnect
  Client Ver   : Cisco AnyConnect VPN Agent for Windows 4.8.03052
  Bytes Tx     : 7973                   Bytes Rx     : 0
  Pkts Tx      : 6                      Pkts Rx      : 0
  Pkts Tx Drop : 0                      Pkts Rx Drop : 0

SSL-Tunnel:
  Tunnel ID    : 125.2
  Assigned IP  : explorer.cisco.com     Public IP    : 10.197.243.143
  Encryption   : AES-GCM-256            Hashing      : SHA384
  Ciphersuite  : ECDHE-RSA-AES256-GCM-SHA384
  Encapsulation: TLSv1.2                TCP Src Port : 57248
  TCP Dst Port : 443                    Auth Mode    : SAML
  Idle Time Out: 30 Minutes             Idle TO Left : 29 Minutes
  Client OS    : Windows
  Client Type  : SSL VPN Client
  Client Ver   : Cisco AnyConnect VPN Agent for Windows 4.8.03052
  Bytes Tx     : 7973                   Bytes Rx     : 0
  Pkts Tx      : 6                      Pkts Rx      : 0
  Pkts Tx Drop : 0                      Pkts Rx Drop : 0
  Filter Name  : #ACSACL#-IP-PostureUnknown-5ee45b05

DTLS-Tunnel:
  Tunnel ID    : 125.3
  Assigned IP  : explorer.cisco.com     Public IP    : 10.197.243.143
  Encryption   : AES-GCM-256            Hashing      : SHA384
  Ciphersuite  : ECDHE-ECDSA-AES256-GCM-SHA384
  Encapsulation: DTLSv1.2               UDP Src Port : 49175
  UDP Dst Port : 443                    Auth Mode    : SAML
  Idle Time Out: 30 Minutes             Idle TO Left : 29 Minutes
  Client OS    : Windows
  Client Type  : DTLS VPN Client
  Client Ver   : Cisco AnyConnect VPN Agent for Windows 4.8.03052
  Bytes Tx     : 458                    Bytes Rx     : 381
  Pkts Tx      : 4                      Pkts Rx      : 6
  Pkts Tx Drop : 0                      Pkts Rx Drop : 0
  Filter Name  : #ACSACL#-IP-PostureUnknown-5ee45b05

ISE Posture:
  Redirect URL : https://ise261.pusaxena.local:8443/portal/gateway?sessionId=0ac5a4030007d0005ee5cc49&portal=27b1bc30-2...
  Redirect ACL : redirect
Once the posture assessment is complete, the user access is changed to full access as observed in the DACL pushed in the field "Filter Name"
firebird(config)# show vpn-sess detail anyconnect

Session Type: AnyConnect Detailed

Username     : _585b5291f01484dfd16f394be7031d456d314e3e62
Index        : 125
Assigned IP  : explorer.cisco.com     Public IP    : 10.197.243.143
Protocol     : AnyConnect-Parent SSL-Tunnel DTLS-Tunnel
License      : AnyConnect Premium
Encryption   : AnyConnect-Parent: (1)none  SSL-Tunnel: (1)AES-GCM-256  DTLS-Tunnel: (1)AES-GCM-256
Hashing      : AnyConnect-Parent: (1)none  SSL-Tunnel: (1)SHA384  DTLS-Tunnel: (1)SHA384
Bytes Tx     : 16404                  Bytes Rx     : 381
Pkts Tx      : 16                     Pkts Rx      : 6
Pkts Tx Drop : 0                      Pkts Rx Drop : 0
Group Policy : DfltGrpPolicy                Tunnel Group : TG_SAML
Login Time   : 07:05:45 UTC Sun Jun 14 2020
Duration     : 0h:00m:36s
Inactivity   : 0h:00m:00s
VLAN Mapping : N/A                    VLAN         : none
Audt Sess ID : 0ac5a4030007d0005ee5cc49
Security Grp : none

AnyConnect-Parent Tunnels: 1
SSL-Tunnel Tunnels: 1
DTLS-Tunnel Tunnels: 1

AnyConnect-Parent:
  Tunnel ID    : 125.1
  Public IP    : 10.197.243.143
  Encryption   : none                   Hashing      : none
  TCP Src Port : 57244                  TCP Dst Port : 443
  Auth Mode    : SAML
  Idle Time Out: 30 Minutes             Idle TO Left : 29 Minutes
  Client OS    : win
  Client OS Ver: 10.0.15063
  Client Type  : AnyConnect
  Client Ver   : Cisco AnyConnect VPN Agent for Windows 4.8.03052
  Bytes Tx     : 7973                   Bytes Rx     : 0
  Pkts Tx      : 6                      Pkts Rx      : 0
  Pkts Tx Drop : 0                      Pkts Rx Drop : 0

SSL-Tunnel:
  Tunnel ID    : 125.2
  Assigned IP  : explorer.cisco.com     Public IP    : 10.197.243.143
  Encryption   : AES-GCM-256            Hashing      : SHA384
  Ciphersuite  : ECDHE-RSA-AES256-GCM-SHA384
  Encapsulation: TLSv1.2                TCP Src Port : 57248
  TCP Dst Port : 443                    Auth Mode    : SAML
  Idle Time Out: 30 Minutes             Idle TO Left : 29 Minutes
  Client OS    : Windows
  Client Type  : SSL VPN Client
  Client Ver   : Cisco AnyConnect VPN Agent for Windows 4.8.03052
  Bytes Tx     : 7973                   Bytes Rx     : 0
  Pkts Tx      : 6                      Pkts Rx      : 0
  Pkts Tx Drop : 0                      Pkts Rx Drop : 0
  Filter Name  : #ACSACL#-IP-PERMIT_ALL_IPV4_TRAFFIC-57f6b0d3

DTLS-Tunnel:
  Tunnel ID    : 125.3
  Assigned IP  : explorer.cisco.com     Public IP    : 10.197.243.143
  Encryption   : AES-GCM-256            Hashing      : SHA384
  Ciphersuite  : ECDHE-ECDSA-AES256-GCM-SHA384
  Encapsulation: DTLSv1.2               UDP Src Port : 49175
  UDP Dst Port : 443                    Auth Mode    : SAML
  Idle Time Out: 30 Minutes             Idle TO Left : 29 Minutes
  Client OS    : Windows
  Client Type  : DTLS VPN Client
  Client Ver   : Cisco AnyConnect VPN Agent for Windows 4.8.03052
  Bytes Tx     : 458                    Bytes Rx     : 381
  Pkts Tx      : 4                      Pkts Rx      : 6
  Pkts Tx Drop : 0                      Pkts Rx Drop : 0
  Filter Name  : #ACSACL#-IP-PERMIT_ALL_IPV4_TRAFFIC-57f6b0d3
To verify if authorization was successfully performed on ISE, navigate to "Operations > RADIUS > Live Logs"
This section exhibits the relevant information associated to the authorized user i.e. identity, authorization profile, authorization policy, and posture status.
Note: For additional posture validation on ISE, please refer to the following documentation:
https://www.cisco.com/c/en/us/support/docs/security/identity-services-engine/215236-ise-posture-over-anyconnect-remote-acces.html#anc7
To verify the authentication status on Duo Admin Portal, click on the "Reports" on the left side of the Admin Panel that shows the Authentication Log.
More details: https://duo.com/docs/administration#reports
To view debug logging for Duo Access Gateway, use the following link:
https://help.duo.com/s/article/1623?language=en_US
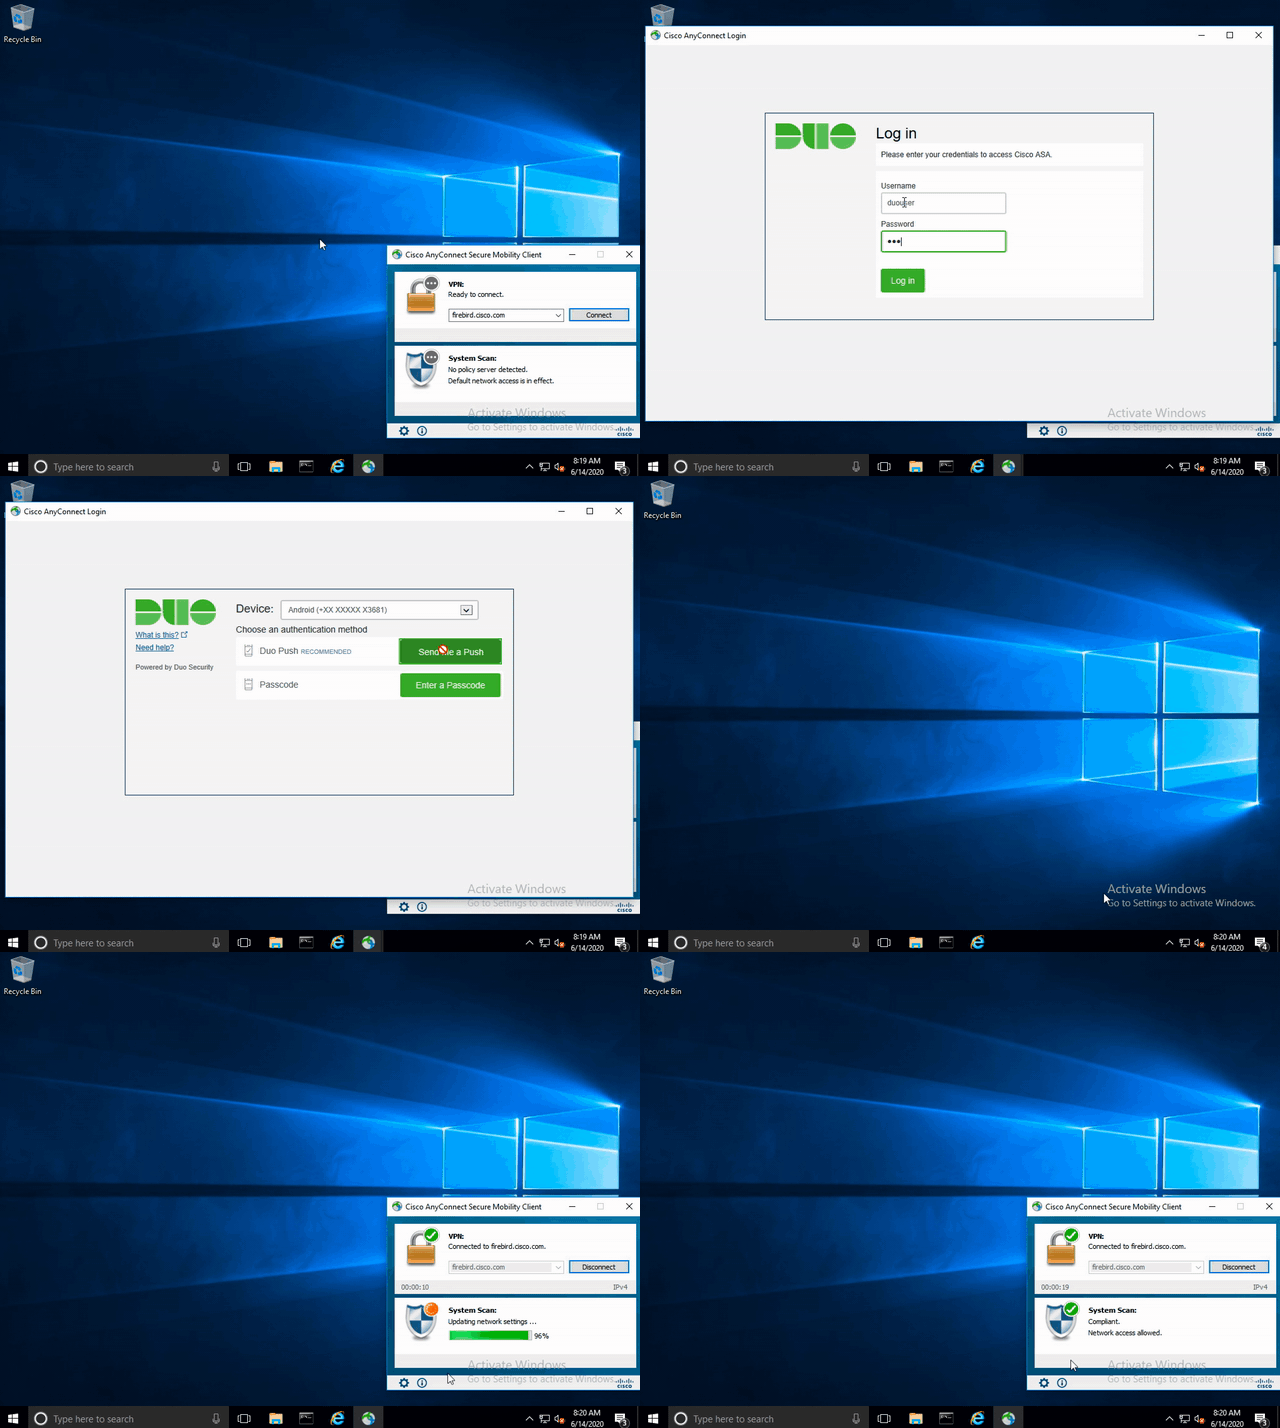
User Experience
Troubleshoot
This section provides the information you can use in order to troubleshoot your configuration.
Note: Refer to Important Information on Debug Commands before you use debug commands.
Caution: On the ASA, you can set various debug levels; by default, level 1 is used. If you change the debug level, the verbosity of the debugs might increase. Do this with caution, especially in production environments.
Most SAML troubleshooting will involve a misconfiguration that can be found through checking the SAML configuration or running debugs.
"debug webvpn saml 255" can be used to troubleshoot most issues, however in scenarios where this debug does not provide useful information, additional debugs can be run:
debug webvpn 255
debug webvpn anyconnect 255
debug webvpn session 255
debug webvpn request 255
To troubleshoot authentication and authorization issues on ASA, use the following debug commands:
debug radius all
debug aaa authentication
debug aaa authorization To troubleshoot Posture related issues on ISE, set the following attributes to debug level:
posture (ise-psc.log)
portal (guest.log)
provisioning (ise-psc.log)
runtime-AAA (prrt-server.log)
nsf (ise-psc.log)
nsf-session (ise-psc.log)
swiss (ise-psc.log)
Note: For detailed posture flow and troubleshooting AnyConnect and ISE, refer to the following link:
ISE Posture Style Comparison for Pre and Post 2.2
To interpret and troubleshoot Duo Access Gateway debug logs
https://help.duo.com/s/article/5016?language=en_US
Related Information
https://www.youtube.com/watch?v=W6bE2GTU0Is&
https://duo.com/docs/cisco#asa-ssl-vpn-using-saml
https://www.cisco.com/c/en/us/support/docs/security/identity-services-engine/215236-ise-posture-over-anyconnect-remote-acces.html#anc0
Contributed by Cisco Engineers
- Created by Dinesh MoudgilHTTS Engineer
- Created by Pulkit SaxenaHTTS Engineer
- Edited by Cesar Ivan Monterrubio RamirezTechnical Consulting Engineer
Contact Cisco
- Open a Support Case

- (Requires a Cisco Service Contract)

 Feedback