Configuration of AnyConnect NVM and Splunk for CESA
Available Languages
Download Options
Bias-Free Language
The documentation set for this product strives to use bias-free language. For the purposes of this documentation set, bias-free is defined as language that does not imply discrimination based on age, disability, gender, racial identity, ethnic identity, sexual orientation, socioeconomic status, and intersectionality. Exceptions may be present in the documentation due to language that is hardcoded in the user interfaces of the product software, language used based on RFP documentation, or language that is used by a referenced third-party product. Learn more about how Cisco is using Inclusive Language.
Contents
Introduction
This document describes how to install and configure the Cisco AnyConnect Network Visibility Module (NVM) on an end-user system that runs AnyConnect 4.7.x or later, and how to install and configure the associated Splunk Enterprise components and NVM Collector.
Prerequisites
Requirements
Cisco recommends that you have knowledge of these topics:
- AnyConnect 4.7.x or later with NVM
- AnyConnect licensing
- Adaptive Security Device Manager (ASDM) 7.5.1 or later
- Familiarity with Splunk Enterprise and how to install Splunk apps and add-ons
Components Used
The information in this document is based on these software and hardware versions:
-
Cisco AnyConnect Security Mobility Client 4.7.x or later
-
Cisco AnyConnect Profile Editor
-
Cisco Adaptive Security Appliance (ASA), version 9.5.2
-
Cisco Adaptive Security Device Manager (ASDM), version 7.5.1
-
Splunk Enterprise 7.x or later (installed as all-in-one on any supported Linux platform; CentOS preferred)
-
Any supported Linux install as a collector device
Note: A collector can run on the same server. Refer to Cisco Endpoint Security Analytics (CESA) Built on Splunk Quickstart POV Kit & Deployment Guide for more information.
The information in this document was created from the devices in a specific lab environment. All of the devices used in this document started with a cleared (default) configuration. If your network is live, ensure that you understand the potential impact of any command.
Background Information
The Cisco AnyConnect NVM provides a continuous feed of high-value endpoint telemetry that enables organizations to see endpoint and user behavior on their network. NVM collects flows from endpoints both on- and off-premise, along with valuable contexts like users, applications, devices, locations, and destinations. Splunk Enterprise consumes the telemetry data and provides the analytics capabilities and reports.
This technote is a configuration example for AnyConnect NVM with Splunk Enterprise as part of the new Cisco Endpoint Security Analytics (CESA) solution.
- For a complete overview proof-of-value (POV) of CESA with Splunk, refer to Cisco Endpoint Security Analytics (CESA) Built on Splunk Quickstart POV Kit & Deployment Guide.
- For a guide to the CESA NVM Dashboard on Splunk, refer to Cisco Endpoint Security Analytics (CESA) Dashboard Overview and FAQ.
- For more information about the solution, refer to Cisco Endpoint Security Analytics Built on Splunk.
These components make up the solution:
- Cisco AnyConnect Secure Mobility Client with Network Visibility Module (NVM) enabled
- Cisco Endpoint Security Analytics (CESA) App for Splunk
- Cisco Endpoint Security Analytics (CESA) Add-On for Splunk
- NVM Collector (bundled in a zip file with the NVM TA Add-on)
Cisco AnyConnect Secure Mobility Client - More than VPN
Cisco AnyConnect is a unified agent that delivers multiple security services to protect the enterprise. AnyConnect is most commonly used as an enterprise VPN client, but it also supports additional modules that cater to different aspects of enterprise security. The additional modules enable security features like posture assessment, web security, malware protection, network visibility, and more.
This technote is about NVM, which integrates with Cisco AnyConnect to provide administrators the ability to monitor endpoint application usage. For more information about Cisco AnyConnect, refer to Cisco AnyConnect Secure Mobility Client Administrator Guide, Release 4.7.
Internet Protocol Flow Information Export (IPFIX)
IPFIX is an IETF protocol that defines a standard for the export of IP flow information for various purposes such as accounting, auditing, and security. IPFIX is based on Cisco NetFlow protocol v9, although they are not directly compatible. Cisco nvzFlow is a protocol specification that is based on the IPFIX protocol. By design, IPFIX is an extensible protocol that allows you to define new parameters to convey information. Cisco nvzFlow protocol extends the IPFIX standard and defines new Information Elements. The protocol also defines a standard set of IPFIX templates that are conveyed as part of the telemetry used by AnyConnect NVM.
For more information on IPFIX, refer to these RFCs:
IPFIX NVM Collector
A collector is a server that receives and stores IPFIX data. It can then feed this data to Splunk.
Cisco provides a collector that is specifically designed for the nvzFlow protocol and is bundled with the CESA TA Add-On for Splunk. The collector can be installed on the same box (all-in-one) with the Splunk server, on the heavy forwarder, or on a standalone Linux box.
For more detailed information about the collector, refer to Cisco Network Visibility (NVM) Collector.
Splunk Enterprise
Splunk Enterprise is a powerful tool that collects and analyses diagnostic data to give useful information about the IT infrastructure. It provides a one-stop location for administrators to collect data that helps them understand the health of the network.
Splunk is a Cisco partner and the CESA solution was created in collaboration with them. For more information, refer to Cisco Endpoint Security Analytics Built on Splunk.
Deployment Overview
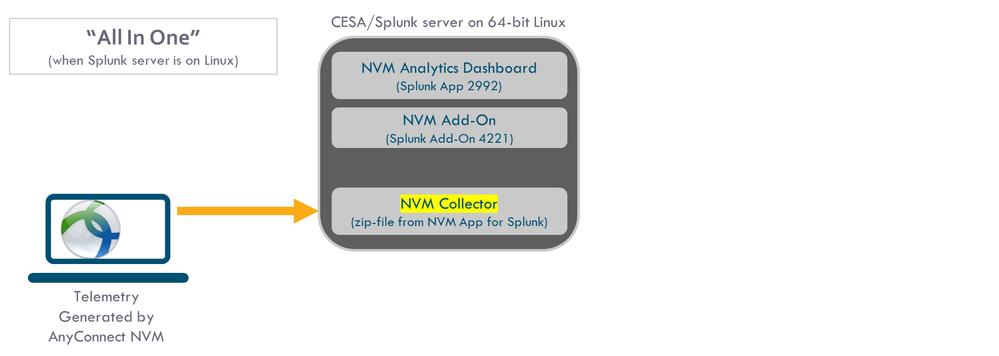
This document provides a high-level overview of deployment in its simplest form. This is an all-in-one configuration that runs on 64-bit Linux.
This diagram shows the configuration that is used for most demonstrations. This configuration is also useful in a small production deployment.
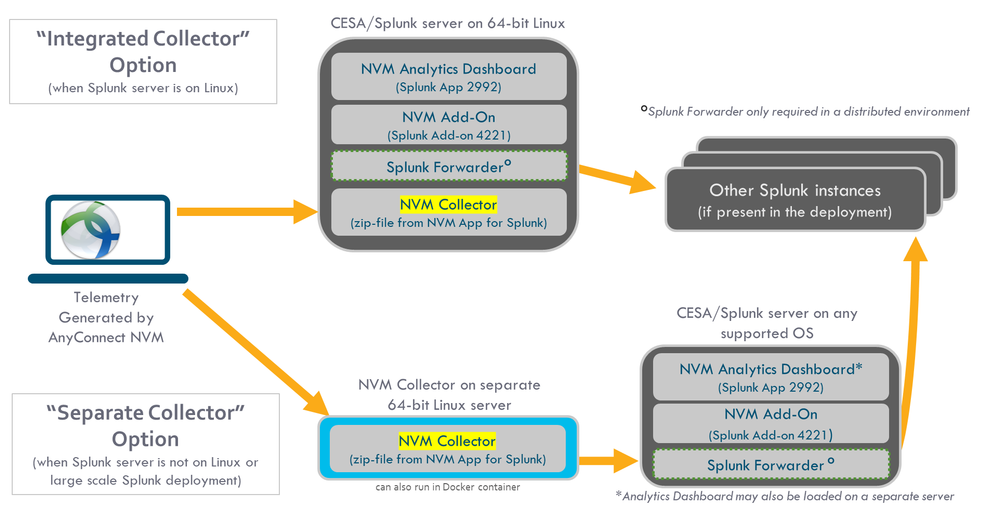
This diagram shows a more comprehensive set of options that are available for deployment. Typically, a production setup is distributed and has several Splunk Enterprise nodes.
Topology
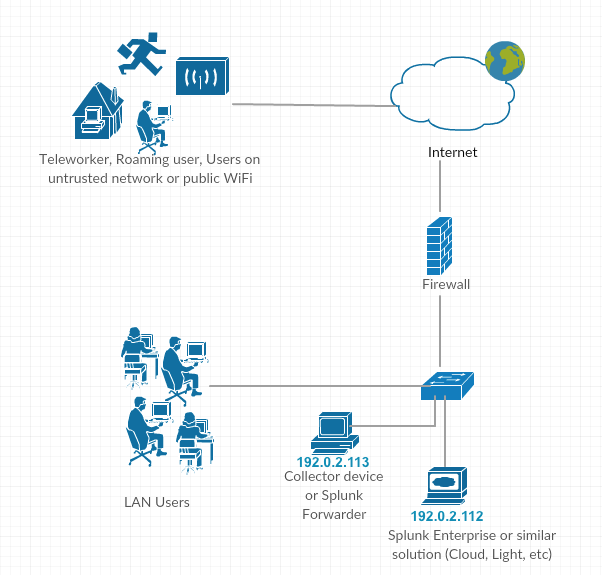
IP address conventions in this technote:
- Collector IP address: 192.0.2.123
- Splunk IP address: 192.0.2.113
Configure
This section covers the configuration of Cisco NVM components. For an overview of AnyConnect NVM deployment and the configuration profile, also refer to How to Implement the AnyConnect Network Visibility Module.
Configure NVM for DTLS Support
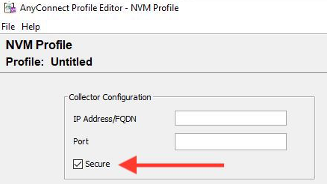
NVM can now be configured to send data securely to the collector over DTLS. This mode is configurable in the NVM Profile Editor. When the 'Secure' check box is checked, NVM uses DTLS as transport. For the DTLS connection to go through, the DTLS server (collector) certificate must be trusted by the endpoint. Untrusted certificates are rejected silently. DTLS 1.2 is the minimum supported version. The collector as part of CESA Splunk App v3.1.2 or later is required for DTLS support. The collector only works in one mode: either secure or unsecure.
Certificate Requirements
- The collector certificate must be trusted by the client. (Ensure that the certificate chain is trusted because there is no configuration on AnyConnect.)
- The certificate must be in PEM format.
- Does not support a certificate key password. Note: Cisco Identity Services Engine (ISE) internal Certificate Authority (CA) requires one.
- Any certificate can be used on the collector as long as the AnyConnect client machine trusts it (internal Public Key Infrastructure (PKI), well known, and so on).
- After the configuration file is updated, the AnyConnect NVM service must restart (for single-client tests). For profiles that are pushed from ISE or Adaptive Security Appliance (ASA), the client machine must disconnect from the network and then reconnect.
-
The AnyConnect NVM Profile collector configuration should be set to either IP or FQDN. This choice depends on what value is used in the Common Name (CN) of the certificate. The Fully Qualified Domain Name (FQDN) is always preferred in case of IP address changes.
- If you use an IP address, then the collector certificate CN or Subject Alternative Name (SAN) should have that IP.
- If you have the FQDN as the CN in the certificate, then the NVM profile should have the same FQDN as a collector.
AnyConnect Configuration (4.9.3043 and later)
For NVM profile, there is a new checkbox called "Secure" under collector IP/port.
Standalone AnyConnect NVM Module
The standalone module requires AnyConnect 4.8.01090 or later. Refer to Cisco AnyConnect Secure Mobility Client Administrator Guide, Release 4.9. Also refer to this standalone guide: How to Implement the AnyConnect Network Visibility Module.
If you do not have an AnyConnect deployment or if you use another VPN solution, you can install the NVM standalone package for your NVM needs. This package works independently, but provides the same level of flow collection from an endpoint as the current AnyConnect NVM solution. If you install the standalone NVM, the active processes (such as the Activity Monitor on the Macintosh operating system (macOS)) indicate the use.
Standalone NVM is configured with the NVM Profile Editor, and Trusted Network Detection (TND) configuration is mandatory. NVM uses the TND configuration to determine if the endpoint is on the corporate network, and then applies the appropriate policies.
Troubleshooting and logging are still done by AnyConnect Diagnostic and Reporting Tools (DART), which can be installed from the AnyConnect package.
Before the availability of the standalone option, the Core VPN module had to be installed in order to take advantage of TND. The core VPN tile was visible in the user interface (UI), which could confuse the end users, especially if they use a VPN solution from another vendor.
When you use the standalone option, you do not use the core VPN profile to configure TND. The NVM profile can now be configured directly for TND.
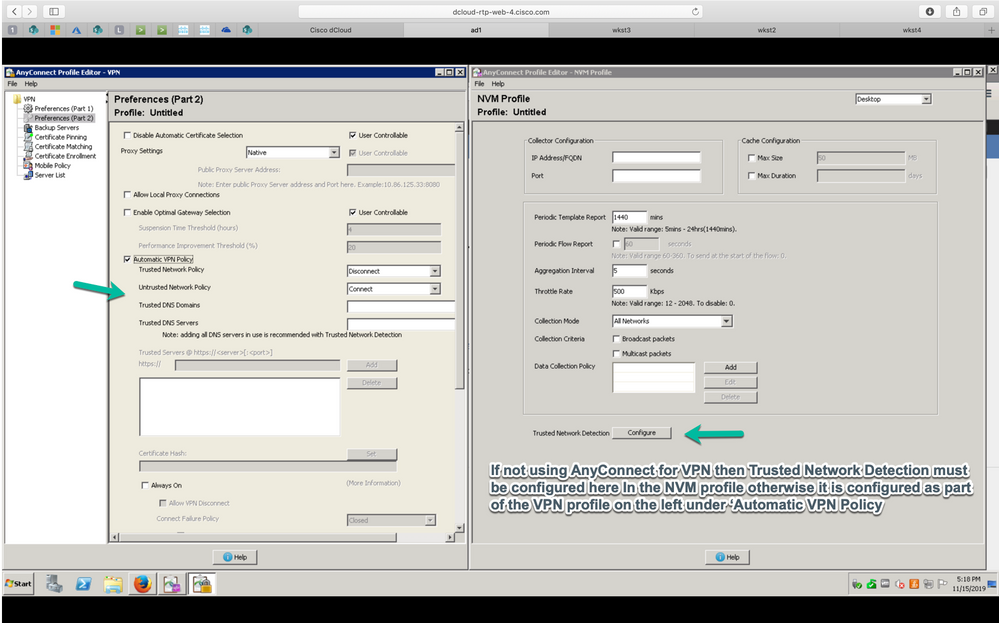
AnyConnect NVM Client Profile
AnyConnect NVM configuration is saved in an XML file that contains information about the collector IP address and port number, along with other information. The collector IP address and a port number must be correctly configured on the NVM client profile.
For correct operation of the NVM module, the XML file must be placed in this directory:
- For Windows 7 and later: %ALLUSERSPROFILE%\Cisco\Cisco AnyConnect Secure Mobility Client\NVM
- For Mac OSX: /opt/cisco/anyconnect/nvm
If the profile is present on Cisco ASA/ISE, then it is auto-deployed along with AnyConnect NVM deployment.
XML profile example:
<?xml version="1.0" encoding="UTF-8"?>
-<NVMProfile xmlns:xsi="http://www.w3.org/2001/XMLSchema-instance" xsi:noNamespaceSchemaLocation="NVMProfile.xsd">
-<CollectorConfiguration>
<CollectorIP>192.0.2.123</CollectorIP>
<Port>2055</Port>
</CollectorConfiguration>
<Anonymize>false</Anonymize>
<CollectionMode>all</CollectionMode>
</NVMProfile>
An NVM profile can be created with these tools:
- Cisco ASDM
- AnyConnect Profile Editor
- ISE
Configure NVM Client Profile via ASDM
This method is preferred if AnyConnect NVM is deployed via Cisco ASA:
-
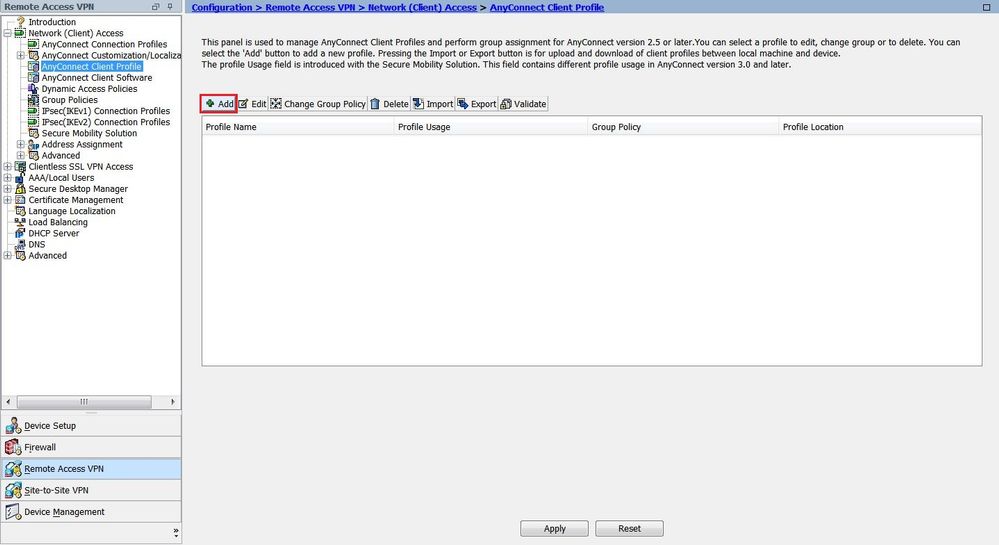
Navigate to Configuration > Remove Access VPN > Network (Client) Access > AnyConnect Client Profile.
-
Click Add, as shown in the image.
-
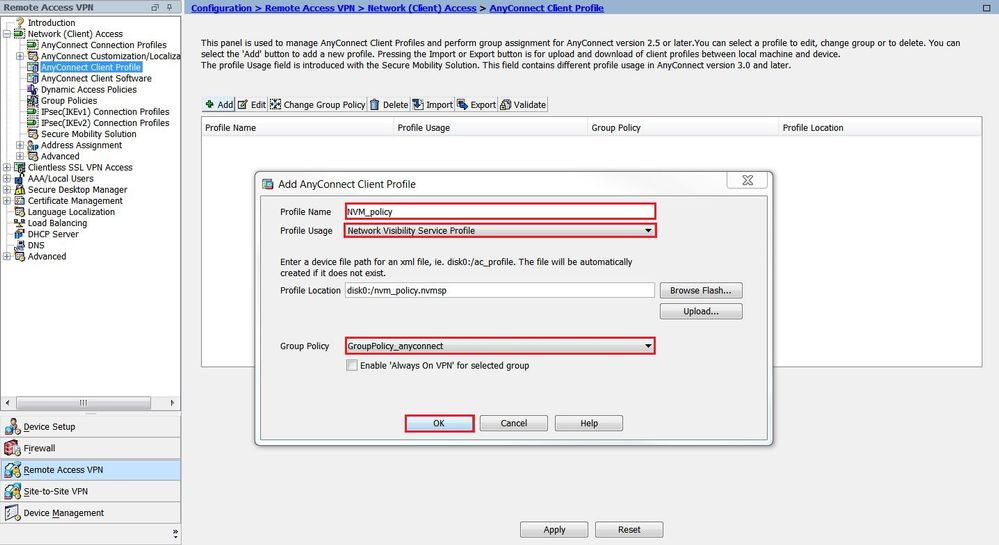
Give the profile a name. In Profile Usage, select Network Visibility Service Profile.
-
Assign the profile to the group-policy that is currently used by AnyConnect users and click OK, as shown in the image.
-
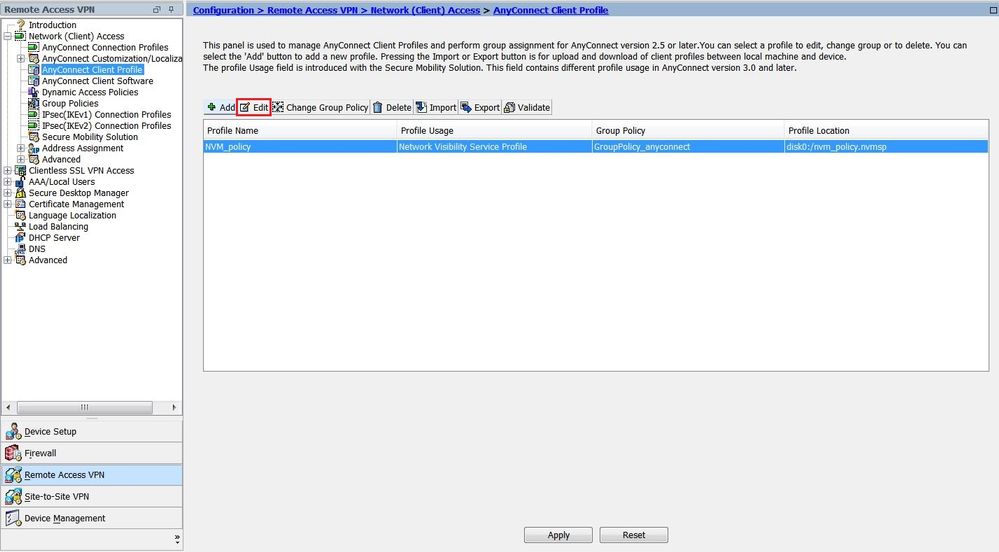
After the new policy is created, click Edit, as shown in the image.
-
Enter the information about the Collector IP address and port number; then click OK.
-
Click Apply, as shown in the image.
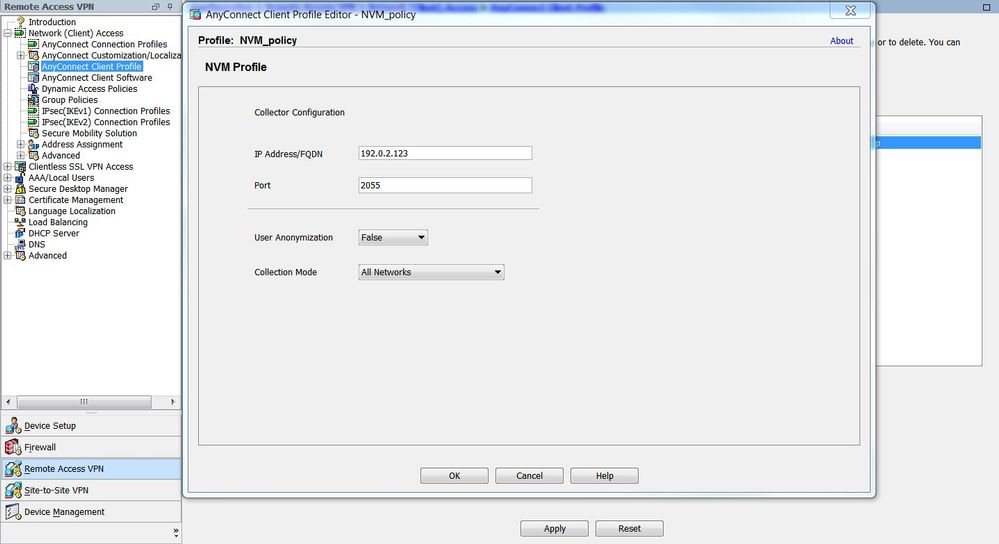
Configure NVM Client Profile via AnyConnect Profile Editor
This tool is a standalone tool that is available on Cisco.com. This method is preferred if AnyConnect NVM is deployed via Cisco ISE. The NVM profile that is created via this tool can be uploaded to Cisco ISE, or copied directly to endpoints.
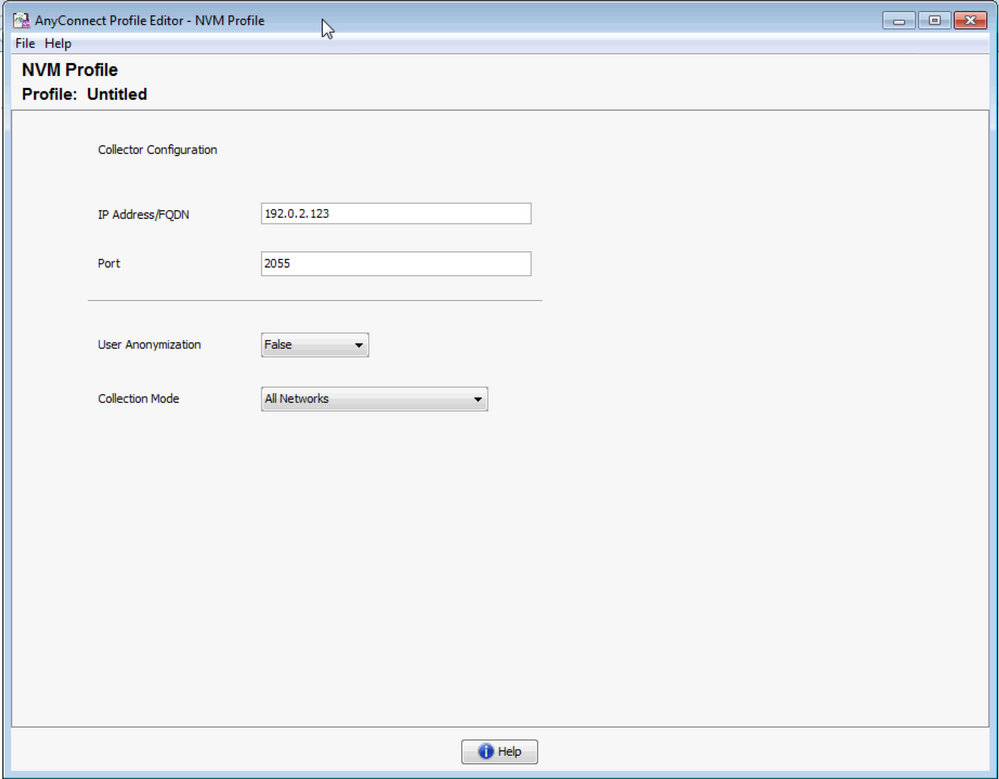
For detailed information on the AnyConnect Profile Editor, refer to AnyConnect Profile Editor.
Configure Web-Deployment on Cisco ASA
This technote assumes that AnyConnect is already configured on the ASA, and that you need to add only the NVM module configuration. For detailed information on ASA AnyConnect configuration, refer to ASDM Book 3: Cisco ASA Series VPN ASDM Configuration Guide, 7.16.
In order to enable AnyConnect NVM module on Cisco ASA, perform these steps:
-
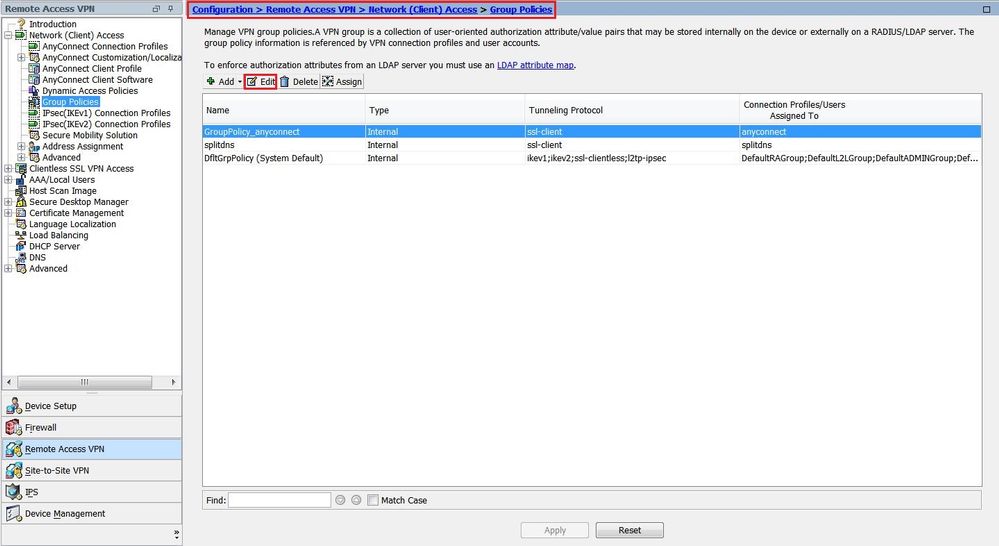
Navigate to Configuration > Remote Access VPN > Network (Client) Access > Group Policies.
-
Select the relevant group-policy and click Edit, as shown in the image.
-
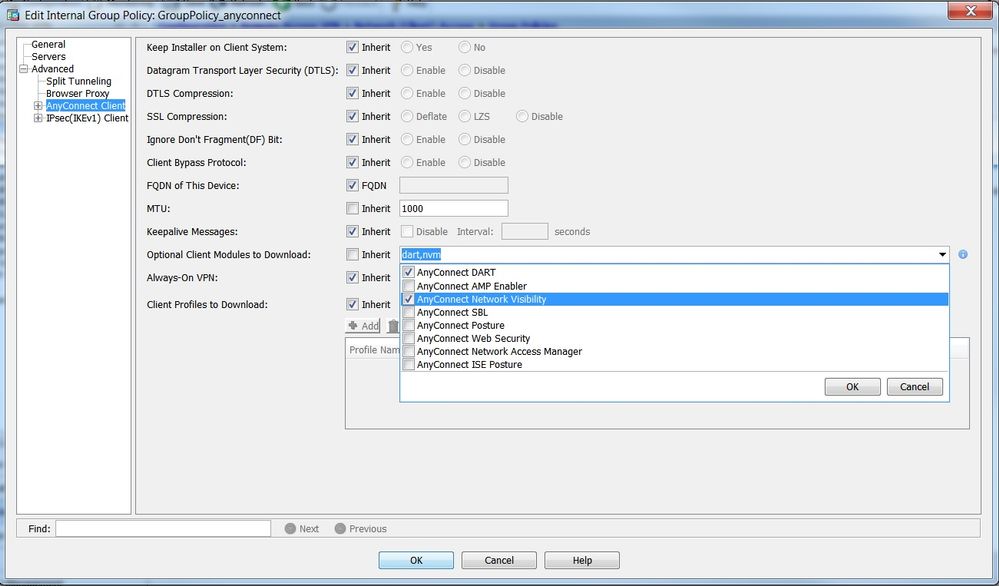
Within the group-policy pop-up, navigate to Advanced > AnyConnect Client.
-
Expand Optional Client Modules to Download and select AnyConnect Network Visibility.
-
Click OK and apply changes.
Configure Web-Deployment on Cisco ISE
In this section, we enable AnyConnect Client modules, profiles, customization/language packages, and the Opswat packages.
In order to configure the Cisco ISE for AnyConnect Web-Deployment, perform these steps:
-
In the Cisco ISE GUI, navigate to Policy > Policy Elements > Results.
-
Expand Client Provisioning to show Resources; then select Resources.
-
Add the AnyConnect Image:
-
Select Add > Agent Resources and upload the AnyConnect package file.
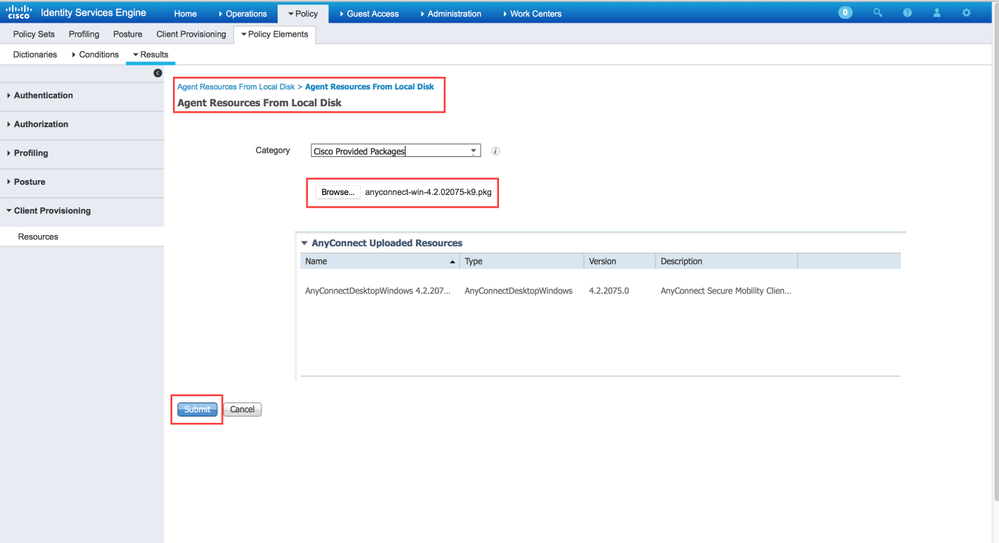
-
Confirm the package's hash in the pop-up.
The file-hash can be verified against the Cisco.com download page or via a third-party tool.
This step can be repeated to add multiple AnyConnect images (for example, for Mac OSX and Linux OS).

-
-
Add the AnyConnect NVM profile:
-
Select Add > Agent Resources and upload the NVM client profile.
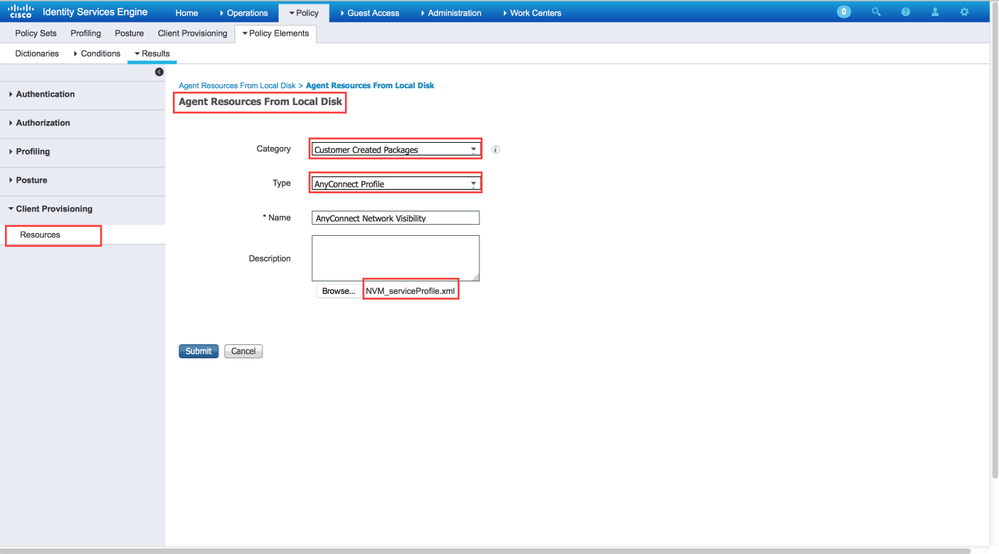
-
-
Add the AnyConnect configuration file:
-
Click Add and choose AnyConnect Configuration.
Select the package that you uploaded in the previous step.
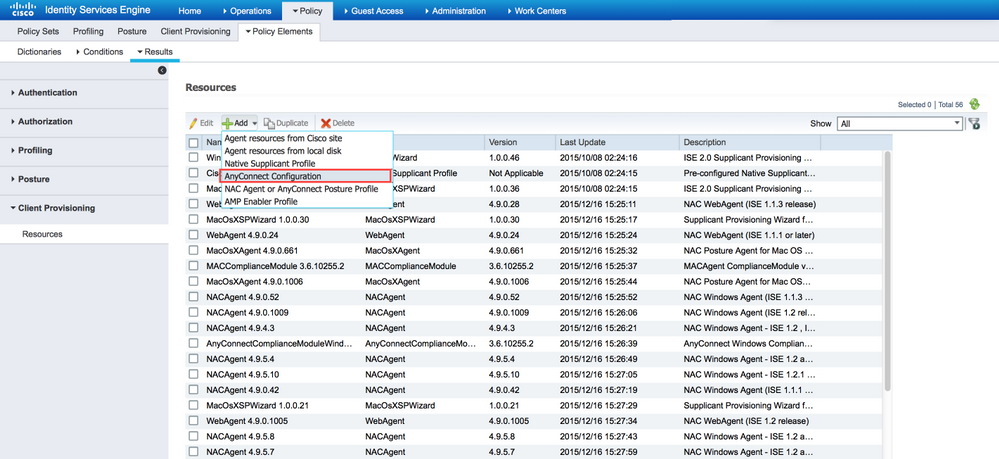
-
Enable NVM in the AnyConnect Module Selection, along with the policy required.
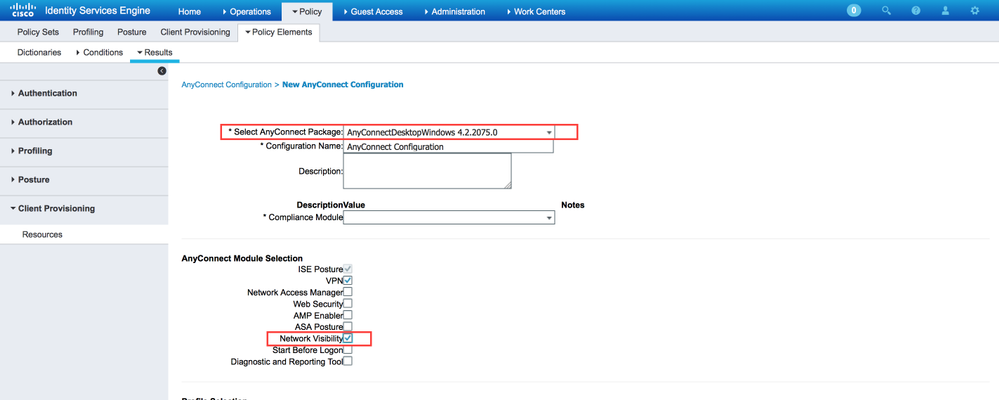
-
For detailed information about web-deployment configuration on Cisco ISE, refer to Web Deploying AnyConnect.
Trusted Network Detection
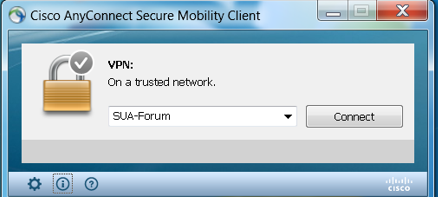
AnyConnect NVM sends flow information only when it is on a Trusted Network. It uses the TND feature of the AnyConnect client to learn if the endpoint is in a trusted network or not.
Trusted Network Detection (TND) is configured in the AnyConnect Client Profile (XML)that is used for VPN, regardless of whether the VPN component is currently used in the environment or not. TND is enabled via configuration of the Automatic VPN Policy section in the profile. At a minimum, a single Trusted DNS Domain or Trusted DNS Server must be populated. The actions taken by AnyConnect when the client has determined that it is on a Trusted Network can be set to DoNothing mode via the pull-down for the Trusted and Untrusted Network Policy.

For additional details on TND configuration, refer to About Trusted Network Detection.
Deploy
Deployment of AnyConnect NVM solution requires these steps:
-
Configure AnyConnect NVM on Cisco ASA/ISE.
-
Set up the IPFIX Collector component (NVM Collector on Linux - Packaged in the TA Add-On).
-
Set up Splunk with the CESA app and the TA Add-On.
Step 1. Configure AnyConnect NVM on Cisco ASA/ISE
This step is covered in detail in the Configure section of this document.
After NVM is configured on Cisco ISE/ASA, it can be auto-deployed to client endpoints.
Step 2. Set up the IPFIX Collector Component (AnyConnect NVM Collector)
The Collector Component is responsible for the collection and translation of all IPFIX data from the endpoints, and for forwarding the data to the Cisco Endpoint Security Analytics (CESA) Add-On for Splunk. The NVM collector runs on 64-bit Linux. CentOS, Ubuntu and Docker configuration scripts are included. The CentOS install scripts and configuration files can also be used in Fedora and Redhat distributions.
In a typical distributed Splunk Enterprise deployment, the collector should be run on either a standalone 64-bit Linux system or a Splunk Forwarder node that runs on 64-bit Linux. The collector can also be installed on a standalone server with no Splunk components.
Note: The solution can also be run on a single 64-bit Linux system that includes the NVM collector and Splunk Enterprise components for use in a small deployment or for demonstration purposes. The all-in-one is easiest for up to 10,000 endpoints. Refer to Real Client POV for POV sizing information.
How to Install the Collector
-
Copy the acnvmcollector.zip file, located in the /opt/splunk/etc/apps/TA-Cisco-NVM/appserver/addon/ directory (included with the TA Add-On), to the system where you want to install it.
-
Unzip the acnvmcollector.zip file to extract the files.
It is recommended to read the $PLATFORM$_README file in the .zip bundle before it executes the install.sh script. The $PLATFORM$_README file provides information on the relevant configuration settings that need to be verified and modified (if necessary) before the install.sh script is executed. At a minimum, you need to configure the address of the Splunk instance that you forward data to. Failure to properly configure the system can cause the collector to operate incorrectly.
Note: Ensure that your network and host firewalls are configured to allow the UDP traffic for the source and destination addresses and ports. The firewalls must allow the incoming IPFIX (CFLOW) traffic from the AnyConnect clients to the collector, and the outgoing UDP data to Splunk.
A single NVM collector instance can handle a minimum of 5000 flows per second on a properly sized system, or up to 35,000 to 40,000 endpoints. The collector must be configured and running before the Splunk NVM and TA-Add on App can be used.
By default, the collector receives flows from AnyConnect NVM endpoints on UDP port 2055.
Additionally, the collector produces three data feeds for Splunk:
- Per Flow Data on UDP port 20519
- Endpoint Identity Data on UDP port 20520
- Endpoint Interface Dataon UDP port 20521
The receive and data feed ports can be changed. To do so, change the acnvm.conf file and restart the collector instance. Make sure that any host/network firewalls between endpoints and the collector or between the collector and the Splunk system(s) are open for the configured UDP ports and addresses. Also, ensure that your AnyConnect NVM configuration matches your collector configuration.
After all components are installed and running, refer to the Help files section from within the Splunk application for detailed information about the pre-configured reports, data model, and information elements that are created by the solution.
You can restart one of your AnyConnect endpoints and validate that traffic is being sent to the solution. For example, you can use youtube.com to run a steady stream of data.
This information must be configured in the acnvm.conf configuration file:
- syslog_server_ip (forwarder or Splunk instance): Can point to 127.0.0.1 (do not use LOCALHOST) if it is on the same box.
- Listening port for the collector (incoming IPFIX data): The default value is okay.
Note: netflow_collector_ip is omitted from the configuration file. It uses the default public interface and should be changed only in order to override the default value with a specific local IP.
The Per Flow Data Port, Endpoint Identity Data Port, Endpoint Interface Data, and Collector Port are pre-configured to default settings in the configuration file. You must change these values if you use non-default ports.
This information is added in the configuration file: /opt/acnvm/conf/acnvm.conf
DTLS Support
Note: See Configure NVM for DTLS Support in this document for more details.
Perform these steps on the box that hosts the collector:
-
Make this directory: /opt/acnvm/certs.
-
In order to apply the certificate to the collector, save the certificate and the key in the /opt/acnvm/certs directory.
-
Change the owner and group of the folder to acnvm:acnvm with this command:
sudo chown -R acnvm:acnvm certs/: -
This section for acnvm.conf must be configured with the certificate and key.
-
After the configuration and certificate are placed, restart the collector:
sudo systemctl restart acnvm.service -
Check the collector status:
sudo systemctl status acnvm.service{ "security" :{ "dtls_enabled": true, "server_certificate":"/opt/acnvm/certs/public.cer", "server_pkey":"/opt/acnvm/certs/private.key" },Here is the rest of the configuration:
"syslog_server_ip" : "192.0.2.113",
"syslog_flowdata_server_port" : 20519,
"syslog_sysdata_server_port" : 20520,
"syslog_intdata_server_port" : 20521,
"netflow_collector_port" : 2055
}
-
Execute the install.sh script with superuser privileges (
sudo ./install.sh).Note: The account needs sudo permissions or root to run the install.sh script, and permissions for the acnvm service account.
For more information, refer to Cisco Endpoint Security Analytics (CESA) App for Splunk (details).
Step 3. Set up Splunk with CESA Dashboard and TA Add-On
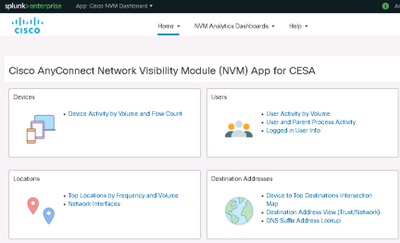
Cisco AnyConnect NVM App for Splunk is available on Splunkbase. This app provides pre-defined reports and dashboards that present IPFIX (nvzFlow) data from endpoints in usable reports that help correlate user and endpoint behavior.
Note: For cloud deployments, both apps are installed in the cloud instance. Only the TA is installed on-premise (with the forwarder). The collector is installed on-premise with the forwarder or on a separate Linux/Docker box.
For an on-premise installation, you can install all components and apps on one box or on separate boxes. (See the diagrams in the Deployment Overview section of this document.)
Download these files:
- Cisco Endpoint Security Analytics (CESA) App for Splunk
- Cisco Endpoint Security Analytics (CESA) Add-On for Splunk
Install
-
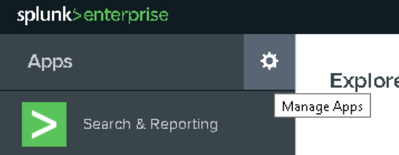
Navigate to Splunk > Apps. Click the gear and install the tar.gz file that was downloaded from the Splunkbase, or search within the Apps section.
-
Install the Add-On with the same process.
-
View the Splunk Apps page in order to confirm that both the Cisco NVM Dashboard and the Cisco NVM Add-On for Splunk are installed.

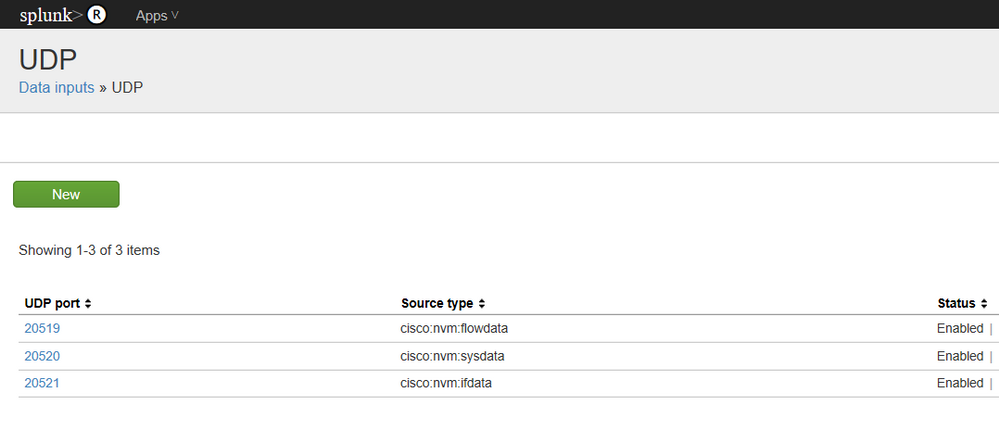
The default configuration receives three data feeds for Splunk (see Enable UDP Inputs via the Splunk Management UI in this document).
- Per Data Flow on UDP port 20519
- Endpoint Identity Data on UDP port 20520
- Endpoint Interface Data on UDP port 20521
The Add-On then maps these data feeds to Splunk sourcetypes cisco:nvm:flowdata, cisco:nvm:sysdata, and cisco:nvm:ifdata, respectively.
Enable UDP Inputs via the Splunk Management UI
Note: You can also enable UDP inputs via an input.conf file. This method is explained in the Cisco NVM Dashboard app GUI (under Help).
You do not need to restart the Splunk software.
-
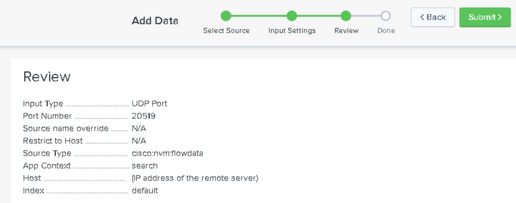
Navigate to Splunk > Settings > Data Input > UDP.
-
Click New Local UDP > Enter port # missing > Click Next > Select the corresponding Source Type > Click Review > Click Submit.
-
Repeat for the other two ports. (You can use a clone.)
Verify
Validate the AnyConnect NVM Installation
After successful installation, the Network Visibility Module should be listed in Installed Modules, within the Information section of AnyConnect Secure Mobility Client.
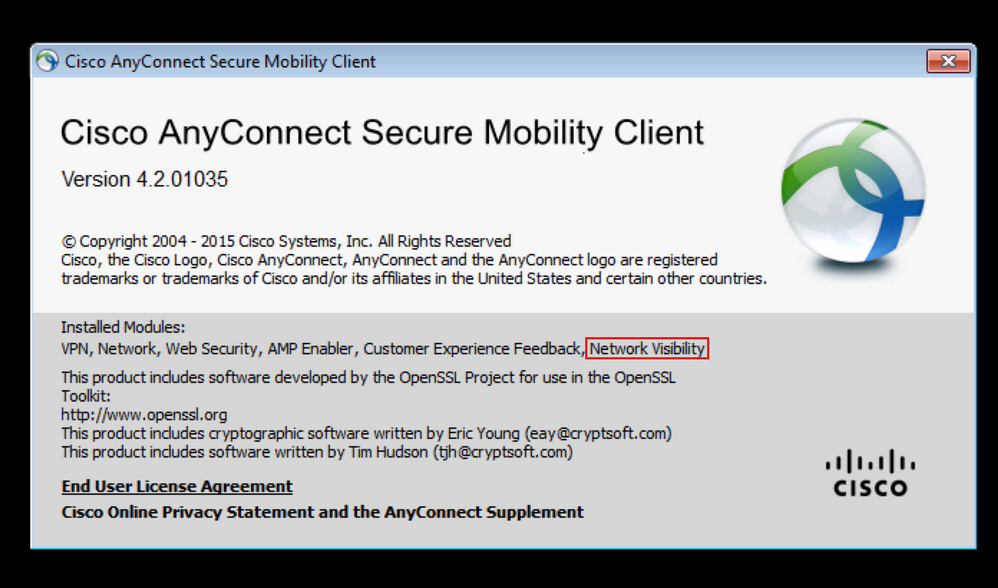
Also, verify that the nvm service is running on the endpoint and that the profile is present in the required directory.
Validate the Collector Status
Confirm that the collector status is "active (running)." This status ensures that the collector is receiving IPFIX/cflow from the endpoints at all times. If the collector status is not active, then ensure that the acnvm account permissions for the file allow it to execute:
-
/opt/acnvm/bin/acnvmcollector
root@ubuntu-splunkcollector:~$ /etc/init.d/acnvmcollectord status
 * acnvmcollector is running
root@ubuntu-splunkcollector:~$
-
/opt/splunk/etc/apps/TA-Cisco-NVM/appserver/addon/

Validate Splunk - CESA Dashboard
Ensure that Splunk and its relevant services are running. For documentation on how to troubleshoot Splunk issues, refer to the Splunk website.
The dashboards for CESA are not updated until five minutes after the initial data is received, due to an automation script. However, you can run a manual search immediately in order to validate that data is being received:
-
From the main Splunk dashboard, click Search & Reporting.
-
In the next screen, set the correct range in order to populate the desired data.
-
In the search field, enter:
sourcetype="cisco:nvm:flowdata"
After the initial five minutes, verify that the CESA dashboard is receiving data:
- From the main Splunk dashboard, click Cisco Endpoint Security Analytics Dashboard.
-
Click Device Activity by Volume and Flow Count if you want to keep the current settings.
- Click Submit. The dashboard displays data and graphics.
Packet Flow
-
IPFIX packets are generated on client endpoints by AnyConnect NVM module.
-
The client endpoints forward IPFIX packets to the Collector IP address.
-
The collector collects the information and forwards it to Splunk.
-
The collector sends traffic to Splunk on three different streams: Per Flow Data, Endpoint Data, and Interface Data.
All traffic is UDP-based, so there is no acknowledgment in the packet flow that the data was received.
Default ports for traffic:
- IPFIX data 2055
- Per Flow Data 20519
- Endpoint Data 20520
- Interface Data 20521
The NVM module caches IPFIX data and sends it to a collector when it is in aTrusted Network. This behavior occurs when the laptop is connected to the corporate network (on-prem) or when it is connected via VPN.
You can validate that the collector is receiving packets from the NVM module. To do so, run a packet capture on specific UDP ports, as per your configuration, to check if the packets are being received. This validation would be done via the Splunk system Linux OS.
Flow Templates
IPFIX flow templates are sent to the collector at the start of the IPFIX communication. These templates help the collector make sense of the IPFIX data.
The collector also preloads templates to ensure that the data can be parsed, even if the client has not sent the templates. If a newer version of the client is released with protocol changes, the collector uses the new templates that are sent by the client.
A template is sent out under these conditions:
- There is a change in the NVM client profile.
- There is a network change event.
- The nvmagent service is restarted.
- The endpoint is rebooted/restarted.
- Periodically (default=24 hours), as configured in the NVM Profile.
In rare circumstances, the collector cannot find a template. If this situation occurs, you will see one of these symptoms:
- Either no template found in a packet capture on the endpoint
- Or no templates for flowset in the collector logs
In order to fix this problem, restart one of the endpoints.
Troubleshoot
These are the basic steps to troubleshoot:
- Ensure network connectivity between the client endpoint and the collector.
- Ensure network connectivity between the collector and Splunk.
- Ensure that NVM is installed correctly on the client endpoint.
- Apply captures on the endpoint to see if IPFIX traffic is being generated.
- Apply captures on a collector to see if it receives IPFIX traffic and if it forwards traffic to Splunk.
- Apply captures on Splunk to see if it receives traffic.
- For DTLS:
- Confirm that AnyConnect clients trust the collector certificate.
- Confirm that the NVM profile has the "secure" option enabled.
- Confirm that the collector is configured for certificates.
IPFIX traffic as seen in Wireshark:
Note: If you run DTLS between the client and the collector, you must filter on DTLS traffic.

AnyConnect Client (NVM Module)
Data Is Not Reported to the Collector and Data Packets Are Not Sent from the Endpoint
Does the size of the NVM database file (NVM.db) continue to increase in the C:\%ProgramData%\Cisco\Cisco AnyConnect Secure Mobility Client\NVM directory? That behavior indicates that the AnyConnect NVM client is not sending data packets to the collector.
Note: For information about cache processes and the available cache controls, refer to the Cisco AnyConnect Secure Mobility Client Administrator Guide, Release 4.9.

Trusted Network Detection (TND)
Launch the AnyConnect UI and make sure that it is on a trusted network. NVM relies on TND to detect when the endpoint is within a trusted network. An incorrect TND configuration causes issues with NVM. NVM has its own TND configuration, which works on the TLS certificate fingerprint of the configured server. The NVM TND can be configured in the NVM Profile Editor.
If NVM TND is not configured, NVM relies on the VPN module's TND configuration. The VPN module's TND works based on information that is received via DHCP: domain-name and Domain Name System (DNS) server. If the DNS server and/or domain-name match the configured values, then the network is deemed to be trusted. VPN also supports TLS certificate-based TND detection.
-
Ensure that the TND configuration is correct. NVM exports only when it is on a trusted network.
Note: If the TND configuration is incorrect, NVM will not export the data. For example, if you have three DNS servers configured on the client, but all three DNS servers are not set in the TND configuration, then NVM will not export the data.
-
Remove the trusted domain from the TND VPN configuration.
-
Network issues:
-
For split tunneling, always include the collector's IP address in the "split include" configuration for the VPN. If the collector's IP address is not part of the split tunnel trusted configuration, the data will be sent out the public interface.
-
-
Ensure that the CollectionMode is configured to collect on the current network (trusted/untrusted).
-
Ensure that the VPN.xml and NVM_ServiceProfile.xml files are in the correct folders; then restart.
-
Start-stop all AnyConnect services.
-
Bounce the network connected to the inside that has a connection to DNS server.
Packet capture:

AnyConnect Diagnostic and Reporting Tools (DART)
In order to troubleshoot AnyConnect actions, run DART on the NVM components. Refer to Troubleshoot AnyConnect.
-
All logs that are needed for NVM are handled by DART. DART collects log files, configuration, and so on.
-
Windows logs: Events are not located in a single place. There is a separate leaf in the event viewer for NVM under AnyConnect.
-
macOS/Linux: Filter logs by nvmagent.
Collector (On Linux/Docker machine: all-in-one or standalone)
acnvmcollector Fails to Install
While installing the collector and running the install script (Sudo ./install_ubuntu.sh ),
this error occurs in the /var/log/syslog: "Acnvm.conf error: line number 17 : expected key string"
This problem can be caused by an extra comma or by a comma in an invalid position.
acnvmcollector Fails to Start
This problem was an issue on Ubuntu (but possibly for all Linux). The code failed to execute on the acnvmcollector file: /opt/acnvm/bin/acnvmcollector.
The acvnm user and group did not have eXecute for the acnvmcollector.

Collector Logs - Where Can I Set the Debug?
You can set the logging level in the ACMNVMLOG.conf file. The logging level is part of the configuration that is sent to the collector on startup. After a change, restart the collector.
log4cplus.rootLogger=DEBUG, STDOUT, NvmFileAppender
Jan 20 12:48:54 csaxena-ubuntu-splunkcollector NVMCollector: no templates
for flowset 258 for 10.150.176.167 yet
Jan 20 12:48:55 csaxena-ubuntu-splunkcollector NVMCollector:
HandleReceivedIPFIX: exporter=10.150.176.167 bytes_recvd=234 totlength=234
Jan 20 12:48:55 csaxena-ubuntu-splunkcollector NVMCollector:
=================> flowsetid=258 flowsetlen=218
Jan 20 12:48:55 csaxena-ubuntu-splunkcollector NVMCollector: no templates
for flowset 258 for 10.150.176.167 yet
How Can I Find the Version Number of the Collector?
In order to find the collector version, run the acnvmcollector command with the -v flag:
Example 1:
./opt/acnvm/bin/acnvmcollector -v
Example 2:
/opt/acnvm/bin
[root@splunk-virtual-machine bin]# ./acnvmcollector -v
Output:
Cisco AnyConnect Network Visibility Module Collector (version 4.10.02086 release)
Copyright (C) 2004-2021 All Rights Reserved.
DTLS issues
- The message "DTLS not configured" means that DTLS is not configured in the acnvm.conf file.
- The message "server key is invalid" displays when a password key combination is not supported.
Splunk Console (CESA Dashboard) Does Not Show Data
AnyConnect Client
- Use youtube.com to generate data. You can also browse to a few websites.
- Can the AnyConnect client send information via UDP 2055 to the collector server? (In other words, are there any firewalls between the AnyConnect client and the collector server?)
- Try to telnet from the client machine to the collector machine.
- Run wireshark to confirm that the client is sending traffic (2055 CFLOW) data to the collector.
Collector Box
-
Validate that the collector box is receiving AnyConnect NVM traffic:
-
Do a tcpdump and confirm that you see packets from the client to the server on 25001 to 2055. For example, this command shows the first 100 packets coming from the client host IP address:
Sudo tcpdump -I any -c100 -nn host 10.1.110.7Note: For more information, refer to How can I capture all the UDP packets using tcpdump?
-
Ensure that the AnyConnect NVM collector is running (see DTLS Support in this document).
-
Check the acnvm.conf file for format errors, missing quotes, commas, and so on.
-
Splunk UI - TA - Are the UDP data inputs and sourcetypes set up on the Splunk GUI or via input.conf?
-
Restart Splunk under the UI > settings > server controls.
-
Common Questions (FAQs)
How can you send data from AnyConnect NVM to multiple destinations?
This scenario is used for high availability situations or for sending to multiple platforms (for example, Splunk and Stealthwatch).
For more information, refer to Cisco Endpoint Security Analytics (CESA) Built on Splunk Quickstart POV Kit & Deployment Guide.
Where do you store the certificate for AnyConnect NVM DTLS?
This situation can occur in lab tests where you do not have a well known certificate installed on the collector.
-
Windows: Install the collector certificate into the Windows Trusted Certificates.
-
Mac OSX: Use the standard process to install the root certificate via the keychain. You can use the keychain tool to import the certificate and add it as a trusted certificate.
-
Linux RHEL: Follow these RHEL Root CA import steps:
-
Copy the ca cert to /etc/pki/ca-trust/source/anchors.
-
sudo update-ca-trust enable -
sudo update-ca-trust extract
-
-
Linux Ubuntu: Follow these Ubuntu Root CA import steps:
-
Convert .cer file to .crt file with this command:
openssl x509 -inform PEM -in RootCA.cer -out rootCa.crt -
Copy the .crt file to the /usr/local/share/ca-certificates directory.
-
Run the command:
sudo update-ca-certificates
-
XML File Names
When you use the local profile editor, the core VPN module XML profile name does not matter. However, you must save the service profile as NVM_ServiceProfile.xml. If you use a different name for the service profile, NVM fails to collect and send data.
Collector (AnyConnect NVM)
Cisco Endpoint Security Analytics (CESA) App for Splunk (details)
-
Can a vendor directory be created under root and then the ownership be provided to another account?
You can create /opt/acnvm first as long as the install script has permission to copy files into it.
-
File permissions: The install.sh file needs permission to execute as root.
-
Service accounts:
-
The
useradd -rcommand and the-s /bin/falsecommand are required because a service account is a non-interactive account that does not have a home directory. -
It is not a requirement for non-interactive account to have a home directory, and it is standard practice for the service account to not have a home directory to keep clean.
-
All users have uid/guid, whether or not they have a home directory.
-
-
Collector OS: The collector runs on CentOS or Ubuntu; it can also run on RedHat because RedHat uses the CentOS script.
-
You can modify the install script, if needed:
-
The install script must be run as root or with SUDO rights because it creates a new user called acnvm and places everything into the /opt/acnvm directory.
Note: Alternatively, you can create a custom script to perform the appropriate actions based on your requirements. This script can use a different user that already exists on the system, but this user must have SUDO rights to run the install.
-
To find the collector version, run this command with the
-vflag:./opt/acnvm/bin/acnvmcollector -v
Recommended Release
We always recommend that you use the latest available software version of AnyConnect. For more information, refer to Release Notes for Cisco AnyConnect Secure Mobility Client v4.x.
Related Information
- Cisco Endpoint Security Analytics (CESA) Built on Splunk Quickstart POV Kit & Deployment Guide
- Cisco Endpoint Security Analytics (CESA) Dashboard Overview and FAQ
- Cisco Endpoint Security Analytics (CESA) App for Splunk
- Cisco Endpoint Security Analytics (CESA) App for Splunk (documentation)
- Client Administrator Guides for Cisco AnyConnect Secure Mobility Client v4.x
- Release Notes for Cisco AnyConnect Secure Mobility Client v4.x
- Technical Support & Documentation - Cisco Systems
-
Revision History
| Revision | Publish Date | Comments |
|---|---|---|
3.0 |
22-Oct-2021 |
Updated the path for the configuration file. |
2.0 |
20-Oct-2021 |
Edited for clarity. Consolidated "Background Information" into one section. Updated links and nomenclature. |
1.0 |
27-Aug-2021 |
Initial Release |
Contributed by
- Chirag SaxenaCisco Engineering
- Jason KunstCisco Engineering
Contact Cisco
- Open a Support Case

- (Requires a Cisco Service Contract)
 Feedback