Introduction
This document describes new functionality in Cisco Identity Services Engine (ISE) Version 1.3 that allows you to configure several AnyConnect Secure Mobility Client modules and provision them automatically to the endpoint. This document presents how to configure VPN, Network Access Manager (NAM), and Posture modules on ISE and push them to the corporate user.
Prerequisites
Requirements
Cisco recommends that you have knowledge of these topics:
- ISE deployments, authentication, and authorization
- Configuration of Wireless LAN Controllers (WLCs)
- Basic VPN and 802.1x knowledge
- Configuration of VPN and NAM profiles with AnyConnect profile editors
Components Used
The information in this document is based on these software and hardware versions:
- Microsoft Windows 7
- Cisco WLC Version 7.6 and Later
- Cisco ISE Software, Versions 1.3 and Later
The information in this document was created from the devices in a specific lab environment. All of the devices used in this document started with a cleared (default) configuration. If your network is live, make sure that you understand the potential impact of any command.
Topology and Flow
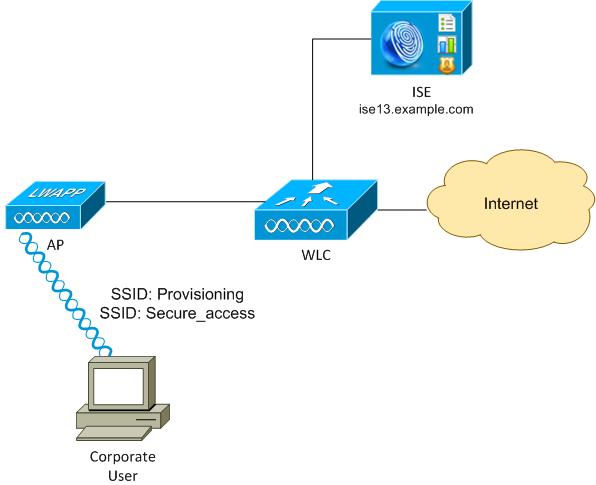
Here is the flow:
Step 1. Corporate user acceses Service Set Identifier (SSID): Provisioning. Performs 802.1x authentication with Extensible Authentication Protocol-Protected EAP (EAP-PEAP). The Provisioning authorization rule is encountered on ISE and the user is redirected for AnyConnect Provisioning (via the Client Provisioning Protal). If AnyConnect is not detected on the machine, all configured modules are installed (VPN, NAM, Posture). Along with that profile, the configuration for each module is pushed.
Step 2. Once AnyConnect is installed, the user must reboot the PC. After the reboot, AnyConnect runs and the correct SSID is automatically used as per the configured NAM profile (Secure_access). EAP-PEAP is used (as an example, Extensible Authentication Protocol-Transport Layer Security (EAP-TLS) could be also used). At the same time, the Posture module checks if the station is compliant (checks for the existence of c:\test.txt file).
Step 3. If the station posture status is unknown (no report from Posture module), it is still redirected for provisioning, because the Unknown Authz rule is encountered on ISE. Once the station is compliant, ISE sends a Change of Authorization (CoA) to the Wireless LAN Controller, which triggers re-authentication. A second authentication occurs, and the Compliant rule is hit on ISE, which will provide the user with full access to the network.
As a result, the user has been provisioned with AnyConnect VPN, NAM, and Posture modules that allow for unified access to the network. Similar functionality can be used on the Adaptive Security Appliance (ASA) for VPN access. Currently, ISE can do the same for any type of access with a very granular approach.
This funcionality is not limited to corporate users, but it is possibly most common to deploy it for that group of users.
Configure
WLC
The WLC is configured with two SSIDs:
- Provisioning - [WPA + WPA2][Auth(802.1X)]. This SSID is used for AnyConnect provisioning.
- Secure_access - [WPA + WPA2][Auth(802.1X)]. This SSID is used for secure access after the endpoint has been provisioned with the NAM module that is configured for that SSID.
ISE
Step 1. Add the WLC
Add the WLC to the Network Devices on ISE.
Step 2. Configure the VPN Profile
Configure the VPN profile with the AnyConnect Profile Editor for VPN.
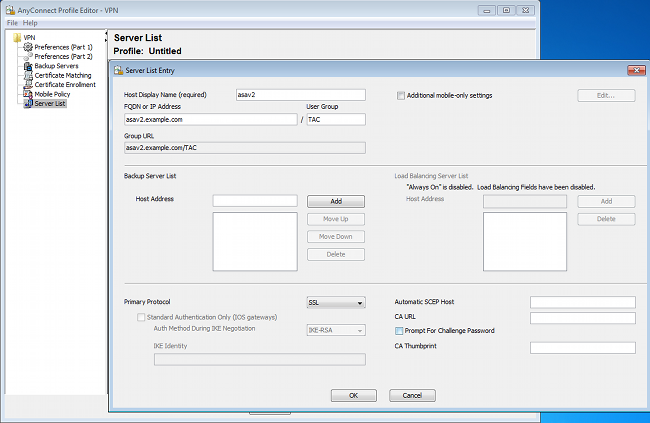
Only one entry has been added for VPN access. Save that XML file to VPN.xml.
Step 3. Configure the NAM Profile
Configure the NAM profile with the AnyConnect Profile Editor for NAM.
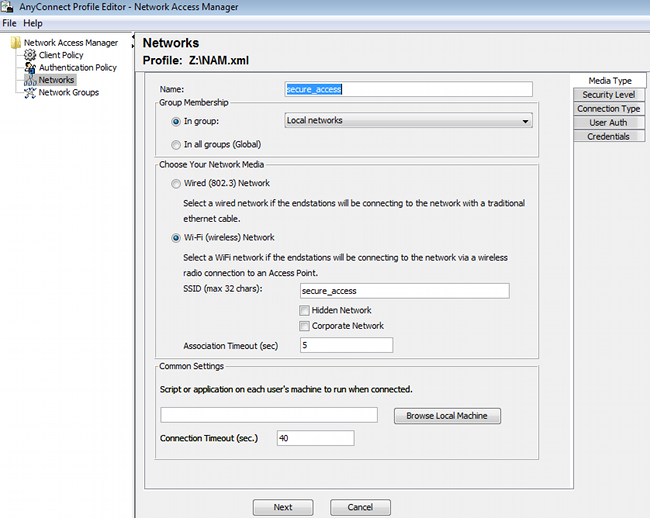
Only one SSID has been configured: secure_access. Save that XML file to NAM.xml.
Step 4. Install the Application
- Download the application manually from Cisco.com.
- anyconnect-win-4.0.00048-k9.pkg
- anyconnect-win-compliance-3.6.9492.2.pkg
- On ISE, navigate to Policy > Results > Client Provisioning > Resources, and add Agent Resources From Local Disk.
- Choose Cisco Provided Packages and select the anyconnect-win-4.0.00048-k9.pkg:
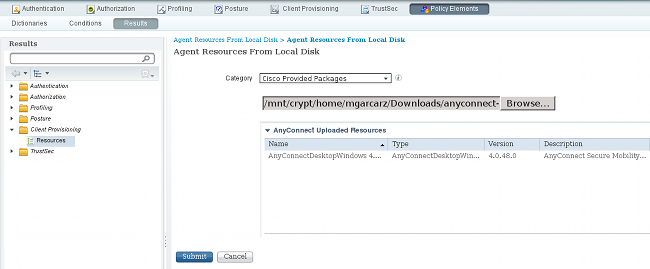
- Repeat Step 4 for the compliance module.
Step 5. Install the VPN/NAM Profile
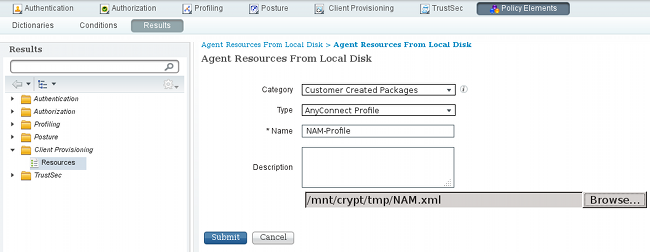
- Navigate to Policy > Results > Client Provisioning > Resources, and add Agent Resources From Local Disk.
- Choose Customer Created Packages and type AnyConnect Profile. Select the previously created NAM profile (XML file):
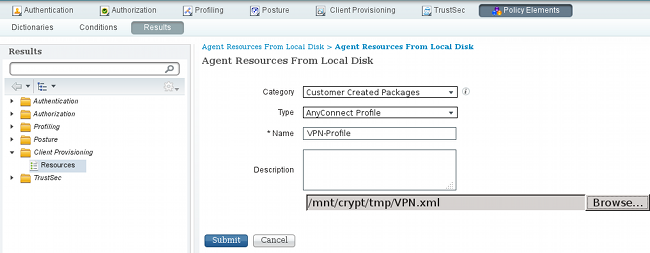
- Repeat similar steps for the VPN profile:
Step 6. Configure the Posture
NAM and VPN profiles have to be configured externally with the AnyConnect profile editor and imported into ISE. But the Posture is fully configured on ISE.
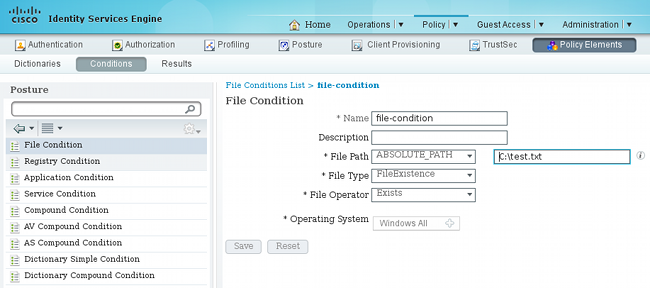
Navigate to Policy > Conditions > Posture > File Condition.You can see that a simple condition for file existence has been created. You must have that file in order to be compliant with the policy verified by the Posture module:
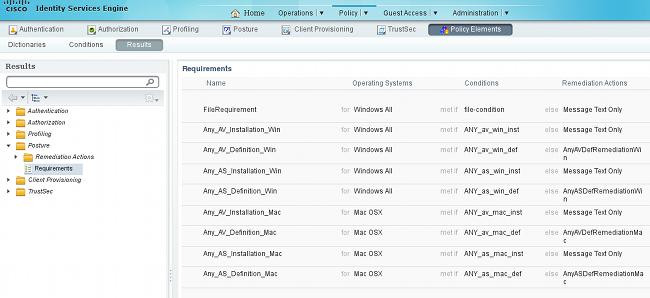
This condition is used for a requirement:
And the requirement is used in the Posture policy for Microsoft Windows systems:

For more information about Posture configuration, refer to Posture Services on the Cisco ISE Configuration Guide.
Once the Posture policy is ready, it is time to add the Posture agent configuration.
- Navigate to Policy > Results > Client Provisioning > Resources and add Network Admission Control (NAC) Agent or AnyConnect Agent Posture Profile.
- Select AnyConnect (a new Posture module from ISE Version 1.3 has been used instead of the old NAC Agent):
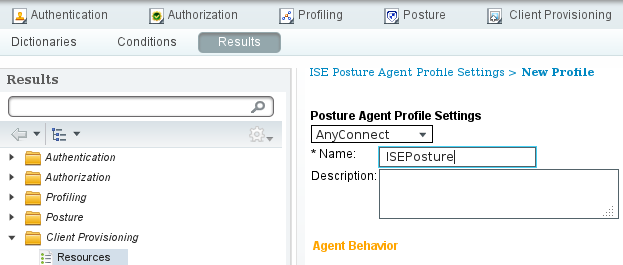
- From the Posture Protocol section, do not forget to add * in order to allow the Agent to connect to all servers.

- If the Server name rules field is left empty, ISE does not save settings and reports this error:
Server name rules: valid value is required
Step 7. Configure AnyConnect
At this stage, all of the applications (AnyConnect) and the profile configuration for all modules (VPN, NAM, and Posture) have been configured. It is time to bind it together.
- Navigate to Policy > Results > Client Provisioning > Resources, and add AnyConnect Configuration.
- Configure the name and select the compliance module and all required AnyConnect modules (VPN, NAM, and Posture).
- In Profile Selection, choose the profile configured earlier for each module.
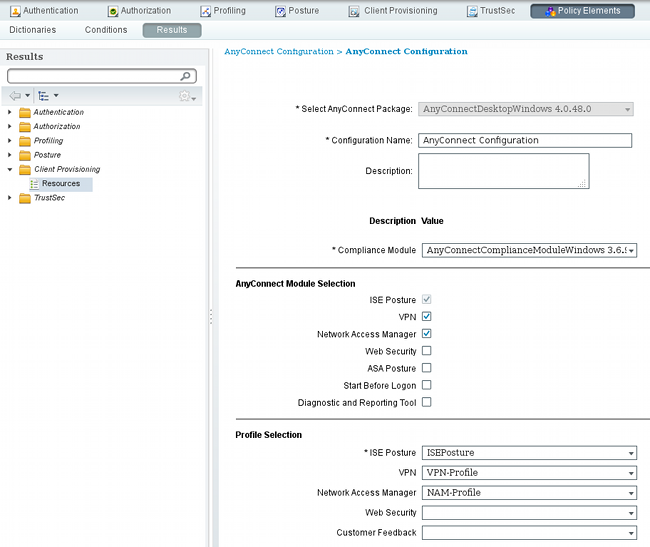
- The VPN module is mandatory for all other modules to function corrrectly. Even if the VPN module is not selected for installation, it will be pushed and installed on the client. If you do not want to use VPN, there is a possibility to configure a special profile for VPN that hides the user interface for the VPN module. These lines should be added to the VPN.xml file:
 <ClientInitialization>
    <ServiceDisable>true</ServiceDisable>
  </ClientInitialization>
- This kind of profile is also installed when you use Setup.exe from iso package (anyconnect-win-3.1.06073-pre-deploy-k9.iso). Then, the VPNDisable_ServiceProfile.xml profile for VPN is installed along with the configuration, which disables the user interface for the VPN module.
Step 8. Client Provisioning Rules
The AnyConnect configuration created in Step 7 should be referenced in the Client Provisioning rules:
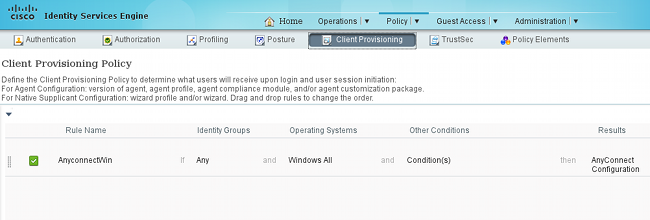
Client Provisioning Rules decide which application will be pushed to the client. Only one rule is needed here with the result that points to the configuration created in Step 7. This way, all Microsoft Windows endpoints that are redirected for Client Provisioning will use the AnyConnect configuration with all of the modules and profiles.
Step 9. Authorization Profiles
The Authorization profile for client provisioning needs to be created. The default Client Provisioning Portal is used:
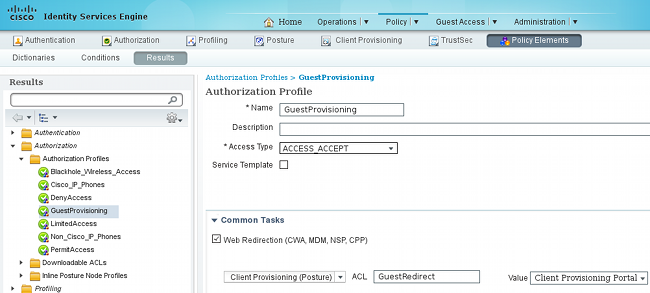
This profile forces the users to be redirected for provisioning to the default Client Provisioning Portal. This Portal evaluates the Client Provisiong Policy (rules created in Step 8). Authorization profiles are the results of Authorization Rules configured in Step 10.
GuestRedirect Access Control List (ACL) is the name of the ACL defined on the WLC. This ACL decides which traffic should be redirected to ISE. For more information, refer to Central Web Authentication with a Switch and Identity Services Engine Configuration Example.
There is also another Authorization profile that provides the limited network access (DACL) for non-compliant users (called LimitedAccess).
Step 10. Authorization Rules
All those are combined into four Authorization rules:
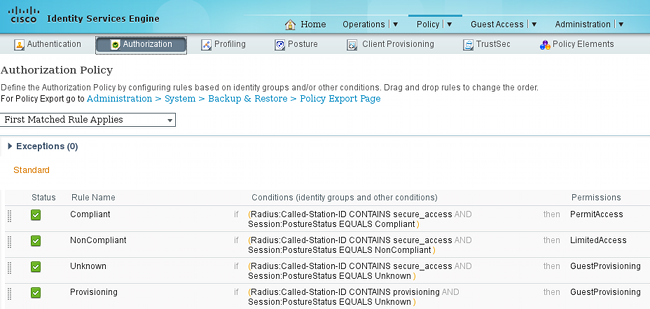
First you connect to the Provisioning SSID and are redirected for provisioning to a default Client Provisioning Portal (rule named Provisioning). Once you connect to the Secure_access SSID, it still redirects for provisioning if no report from the Posture module is received by ISE (rule named Unknown). Once the endpoint is fully compliant, the full access is granted (rule name Compliant). If the endpoint is reported as non-compliant, it has limited network access (rule named NonCompliant).
Verify
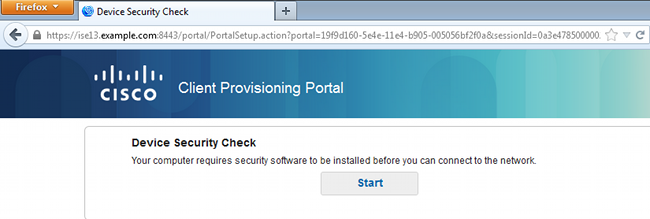
You associate with the Provisioning SSID, try to access any web page, and are redirected to Client Provisioning Portal:
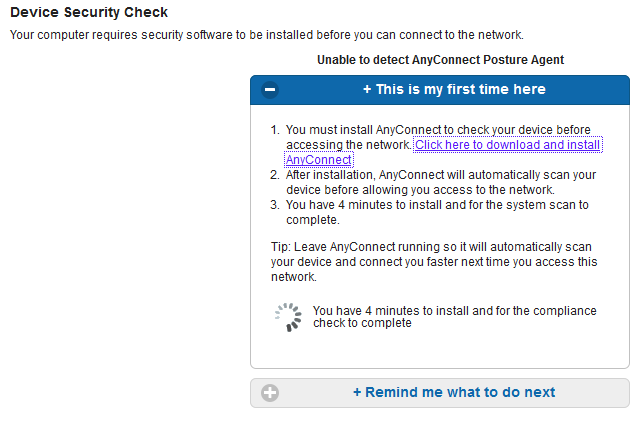
Since AnyConnect is not detected, you are asked to install it:
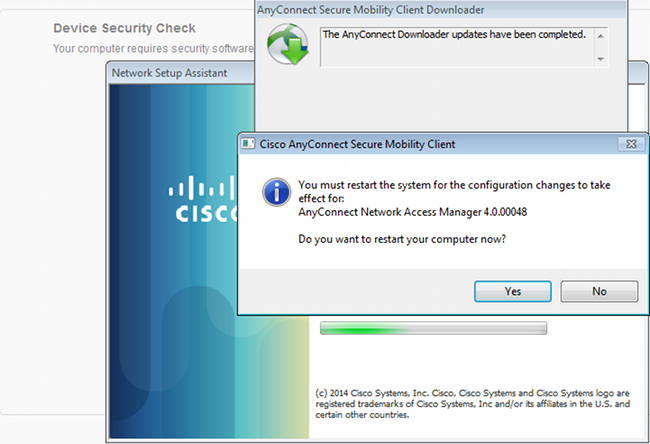
A small application called Network Setup Assistant, which is responsible for the whole installation process, is downloaded. Notice that it is different than the Network Setup Assistant in Version 1.2.
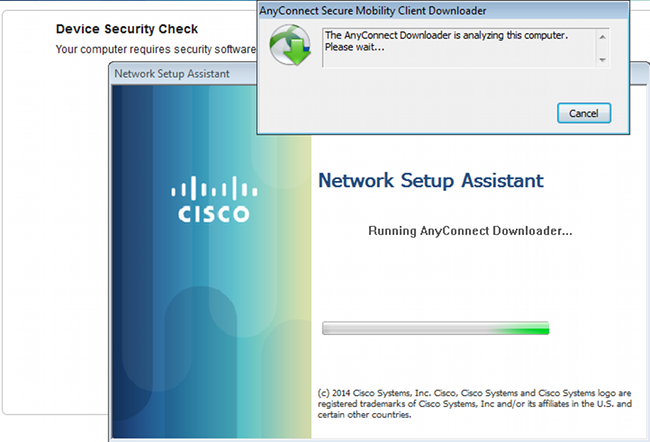
All modules (VPN, NAM, and Posture) are installed and configured. You must reboot your PC:
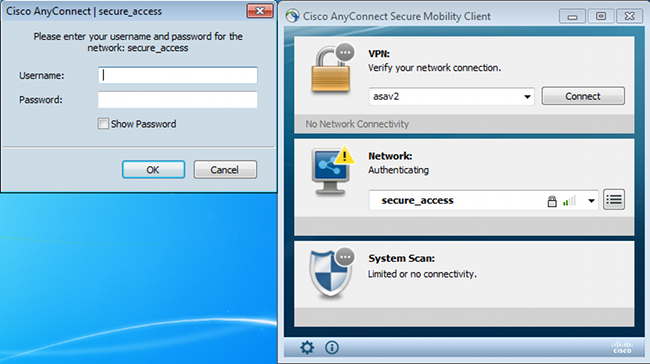
After the reboot, AnyConnect is automatically executed and NAM tries to associate with secure_access SSID (as per the configured profile). Notice that the VPN profile is correctly installed (asav2 entry for VPN):
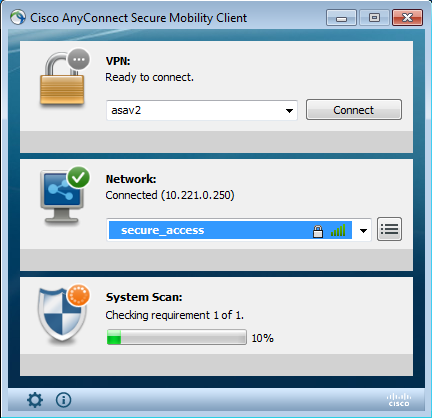
After authentication, AnyConnect downloads updates and also Posture rules for which verification is performed:
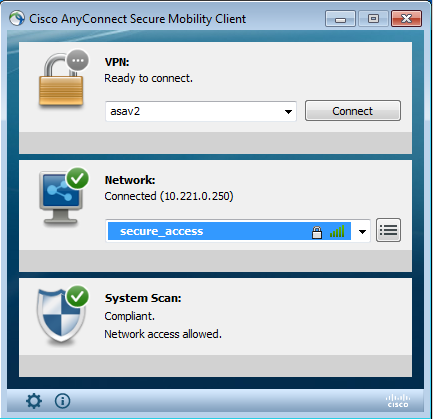
At this stage, there might still be limited access (you encounter the Unknown Authorization rule on ISE). Once the station is compliant, that is reported by the Posture module:
The details can be also verified (the FileRequirement is satisfied):
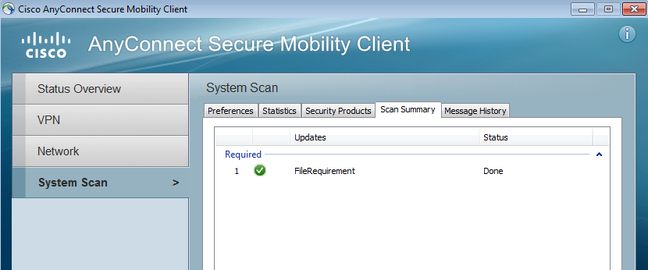
The Message History shows detailed steps:
9:18:38 AM The AnyConnect Downloader is performing update checks...
9:18:38 AM Checking for profile updates...
9:18:38 AM Checking for product updates...
9:18:38 AM Checking for customization updates...
9:18:38 AM Performing any required updates...
9:18:38 AM The AnyConnect Downloader updates have been completed.
9:18:38 AM Update complete.
9:18:38 AM Scanning system ...
9:18:40 AM Checking requirement 1 of 1.
9:18:40 AM Updating network settings ...
9:18:48 AM Compliant.
The successful report is sent to ISE, which triggers the Change of Authorization. The second authentication encounters the Compliant rule and full network access is granted. If the Posture report is sent while still associated to the Provisioning SSID, these logs are seen on ISE:

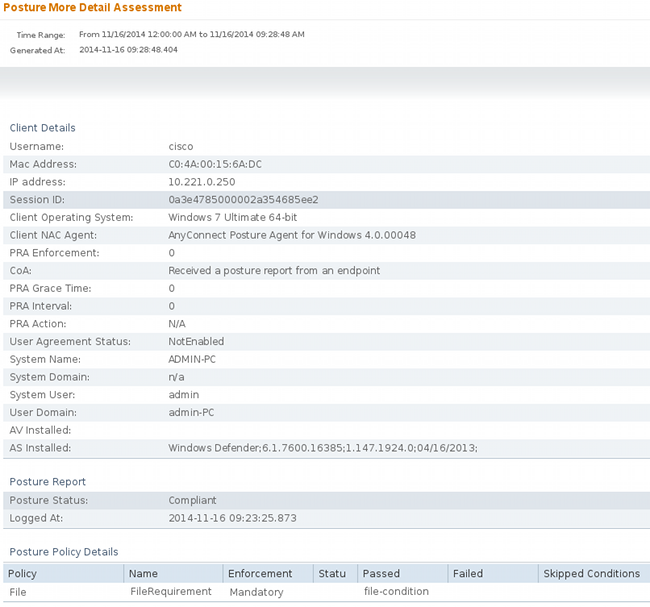
The Posture report indicates:
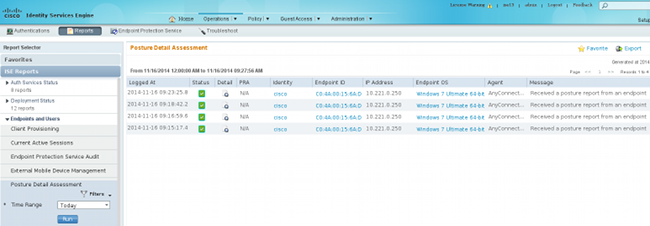
Detailed reports show the FileRequirement that is satisfied:
Troubleshoot
There is currently no specific troubleshooting information available for this configuration.
Related Information


 Feedback