Introduction
This document describes the process to Integrate Cisco Threat Response (CTR) with Email Security Appliance (ESA) and how to verify this in order to perform some CTR investigations.
Prerequisites
Requirements
Cisco recommends that you have knowledge of these topics:
- Cisco Threat Response
- Email Security Appliance
Components Used
The information in this document is based on these software and hardware versions:
- CTR Account
- Cisco Security Services Exchange
- ESA C100V on software version 13.0.0-392
The information in this document was created from the devices in a specific lab environment. All of the devices used in this document started with a cleared (default) configuration. If your network is live, ensure that you understand the potential impact of any command.
Configure
In order to configure the Integration CTR and ESA, log in to your Email Security Virtual Appliance and follow these quick steps:
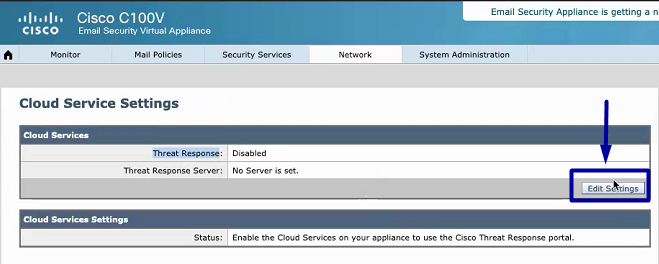
Step 1. Navigate to Network > Cloud Service Settings
Once in the ESA, navigate to the context menu Network > Cloud Service Settings, in order to see the currently Threat Response Status (Disabled / Enabled) as shown in the image.

Step 2. Click on Edit Settings
Until now Threat Response feature in the ESA is disabled, in order to enable the feature, click on Edit Settings as shown in the image:

Step 3. Select the checkbox Enable and the Threat Response Server
Select the checkbox Enable, then choose the Threat Response Server, please see the image below:

Note: The default selection for Threat Response Server URL is AMERICAS (api-sse.cisco.com). For EUROPE businesses, click the drop-down menu and choose EUROPE (api.eu.sse.itd.cisco.com)
Step 4. Submit and Commit changes
It is required to submit and commit the changes, in order to save and apply any change. Now if the ESA interface is refreshed a Registration token is requested in order to register the Integration, as shown in the image below.
Note: You can see a Success message: Your changes have been committed.


Step 5. Log into the CTR portal and generate the Registration Token requested in the ESA
1.- Once in the CTR portal, navigate to Modules > Devices > Manage Devices, please see the next image.

2.- Manage Devices link redirects you to the Security Services Exchange (SSE), once there, click on the icon Add Devices and Generate Tokens as shown in the image.

3.- Click on Continue in order to generate the Token, once the Token is generated, click on Copy to Clipboard, as shown in the image.
Tip: You can select the number of devices to add (from 1 and up to 100) and also select the Token expiration time (1hr, 2hrs, 4hrs, 6hrs, 8hrs, 12hrs, 01 days, 02 days, 03 days, 04 days and 05 days).

Step 6. Paste the Registration Token (generated from CTR portal) in the ESA
Once the Registration Token is generated, paste it in the Cloud Services Settings section in the ESA, as the image below.
Note: You can see a Success message: A request to register your appliance with the Cisco Threat Response portal is initiated. Navigate back to this page after some time to check the appliance status.


Step 7. Verify that your ESA device is in the SSE portal
You can navigate to the SSE portal (CTR > Modules > Devices > Manage Devices), and in the Search Tab look at your ESA device, as shown in the image.

Step 8. Navigate to the CTR portal and add a new ESA module
1.- Once you are in the CTR portal, navigate to Modules > Add New Module, as shown in the image.

2.- Choose the module type, in this case, the module is an Email Security Appliance module as the image below.

3.- Enter the fields: Module Name, Registered Device (select the one previously registered) and Request Timeframe (days), and Save, as shown in the image.

Verify
In order to verify the CTR and ESA Integration, you can send a test email, which you can also see it from your ESA, navigate to Monitor > Message Tracking, and find the test email. In this case, I filtered by Email Subject as the image below.

Now, from the CTR portal, you can perform an Investigation, navigate to Investigate, and use some email observables, as shown in the image.

Tip: You can use the same syntax for other email observables as follows in the image.

Troubleshoot
If you are a CES customer or if you manage your ESA devices via an SMA, you can only connect to Threat Response via your SMA. Please ensure your SMA runs AsyncOS 12.5 or higher. If you do not manage your ESA with an SMA and you integrate the ESA directly, ensure it is at AsyncOS version 13.0 or higher.
ESA device is not shown in the CTR portal
If your ESA device is not shown in the drop-down Registered Device while the ESA module is added in the CTR portal, please ensure to have enabled CTR in SSE, in CTR navigate to Modules > Devices > Manage Devices, then in SSE portal navigate to Cloud Services and enable CTR, as the image below:

CTR investigation is not showing data from the ESA
Please ensure that:
- The syntax of the investigation is correct, the email observables are shown above in the Verify Section.
- You have selected the proper Threat Response Server or Cloud (Americas/Europe).
ESA is not requesting the Registration token
Please ensure to commit the changes, when Threat Response has been enabled, otherwise, the changes won't be applied to the Threat Response section in the ESA.
Registration failed because of an invalid or expired token
Please ensure that the token is generated from the correct Cloud:
If you use Europe (EU) Cloud for ESA, generate the token from: https://admin.eu.sse.itd.cisco.com/
If you use Americas (NAM) Cloud for ESA, generate the token from: https://admin.sse.itd.cisco.com/
Also, remember that the Registration token has an expiration time (select the most convenient time to complete the Integration in time).
Related Information
