Install and Renew Certificate on FTD Managed by FDM
Available Languages
Download Options
Bias-Free Language
The documentation set for this product strives to use bias-free language. For the purposes of this documentation set, bias-free is defined as language that does not imply discrimination based on age, disability, gender, racial identity, ethnic identity, sexual orientation, socioeconomic status, and intersectionality. Exceptions may be present in the documentation due to language that is hardcoded in the user interfaces of the product software, language used based on RFP documentation, or language that is used by a referenced third-party product. Learn more about how Cisco is using Inclusive Language.
Contents
Introduction
This document describes how to install, trust, and renew self-signed certificates and certificates signed by a third party CA or internal CA on FTD.
Prerequisites
Requirements
Cisco recommends that you have knowledge of these topics:
- Manual certificate enrollment requires access to a trusted third party Certificate Authority (CA). Examples of third party CA vendors include, but are not limited to, Entrust, Geotrust, GoDaddy, Thawte, and VeriSign.
- Verify that the Firepower Threat Defense (FTD) has the correct clock time, date, and time zone. With certificate authentication, it is recommended to use a Network Time Protocol (NTP) server to synchronize the time on the FTD.
Components Used
The information in this document is based on these software and hardware versions:
- FTDv that runs 6.5.
- For Keypair and Certificate Signing Request (CSR) creation, OpenSSL is used.
The information in this document was created from the devices in a specific lab environment. All of the devices used in this document started with a cleared (default) configuration. If your network is live, ensure that you understand the potential impact of any command.
Configure
Certificate Installation
Self-Signed Enrollment
Self-Signed certificates are an easy way to get a certificate with the appropriate fields added to the FTD device. Although they cannot be trusted in most places, they can still provide similar encryption benefits as a third party signed certificate. Still, it is recommended to have a trusted CA-signed certificate so that users and other devices are able to trust the certificate presented by the FTD.

Note: Firepower Device Management (FDM) does have a default self-signed certificate named DefaultInternalCertificate that can be used for similar purposes.
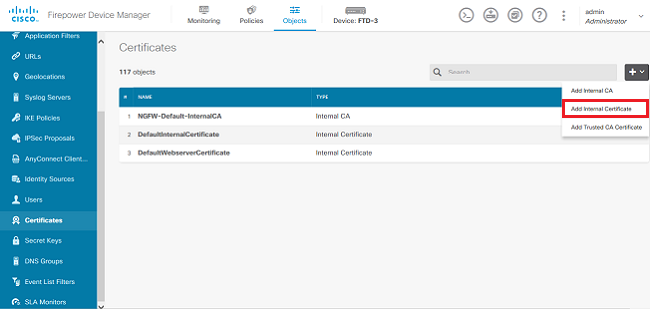
1. Navigate to Objects > Certificates. Click the + symbol and then choose Add Internal Certificate as shown in the image.
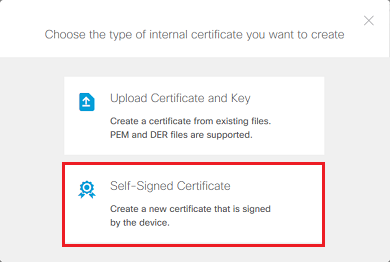
2. Choose Self-Signed Certificate in the popup window as shown in the image.
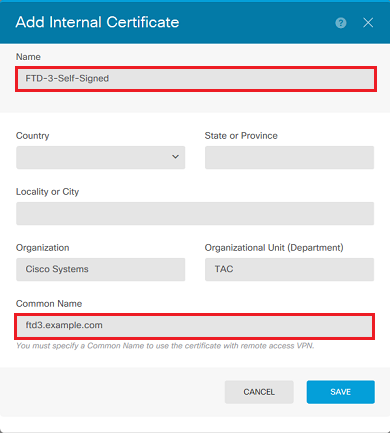
3. Specify a Name for the trustpoint, then fill out the subject distinguished name fields. At a minimum, the Common Name field can be added. This can match the Fully Qualified Domain Name (FQDN) or IP address of the service for which the certificate is used. Click Save when done as shown in the image.
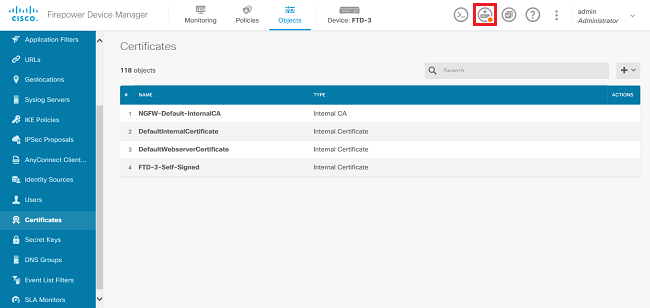
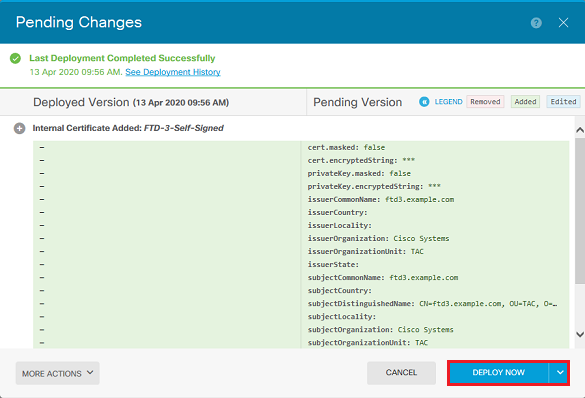
4. Click the Pending Changes button from the top right of the screen as shown in the image.
5. Click the Deploy Now button.

Note: When the deploy is done, the certificate is not available to be seen in the CLI until there is a service that uses it such as AnyConnect as shown in the image.
Manual Enrollment
Manual Enrollment can be used to install a certificate issued by a trusted CA. OpenSSL or a similar tool can be used to generate the private key and CSR required to receive a CA-signed certificate. These steps cover common OpenSSL commands in order to generate the private key and CSR as well as the steps to install the certificate and private key once obtained.
1. With OpenSSL or a similar application, generate a private key and Certificate Signing Request (CSR). This example shows a 2048 bit RSA key named private.key and a CSR named ftd3.csr that is created in OpenSSL.
openssl req -new -newkey rsa:2048 -nodes -keyout private.key -out ftd3.csr
Generating a 2048 bit RSA private key
..........................................+++
..................................................................................+++
writing new private key to 'private.key'
-----
You are about to be asked to enter information that is incorporated
into your certificate request.
What you are about to enter is what is called a Distinguished Name or a DN.
There are quite a few fields but you can leave some blank
For some fields there is be a default value,
If you enter '.', the field is left blank.
-----
Country Name (2 letter code) [AU]:.
State or Province Name (full name) [Some-State]:.
Locality Name (eg, city) []:.
Organization Name (eg, company) [Internet Widgits Pty Ltd]:Cisco Systems
Organizational Unit Name (eg, section) []:TAC
Common Name (e.g. server FQDN or YOUR name) []:ftd3.example.com
Email Address []:.

Please enter the following 'extra' attributes
to be sent with your certificate request
A challenge password []:
An optional company name []:
2. Copy the generated CSR and send it to a CA. Once the CSR has been signed, an identity certificate is provided.
3. Navigate to Objects > Certificates. Click the + symbol, then choose Add Internal Certificate as shown in the image.
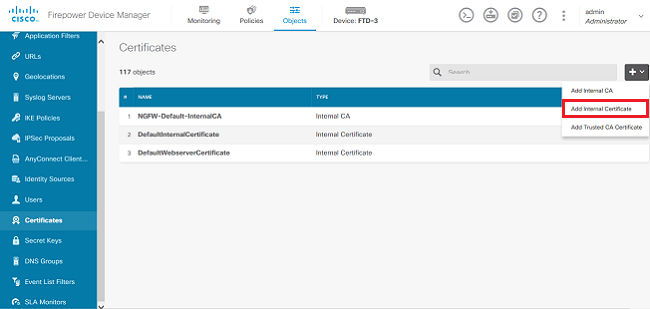
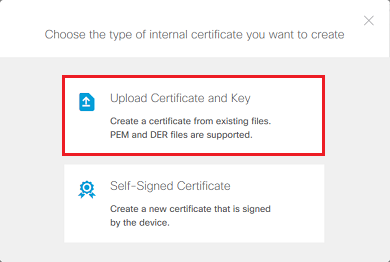
4. Choose Upload Certificate and Key in the popup window as shown in the image.
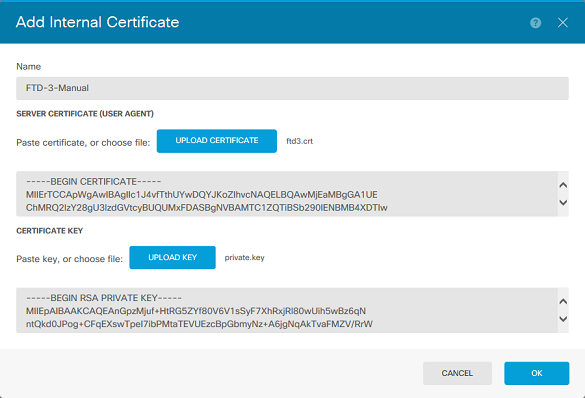
5. Specify a Name for the trustpoint, then either upload, or copy and paste the identity certificate and private key in Privacy Enhanced Mail (PEM) format. If the CA provided the certificate and key together in a single PKCS12, navigate to the section titled Extracting Identity certificate and private key from PKCS12 file later in this document in order to separate them.

Note: The file names cannot have any spaces or FDM does not accept them. Additionally, the private key must not be encrypted.
Click OK when done as shown in the image.
6. Click the Pending Changes button from the top right of the screen as shown in the image.
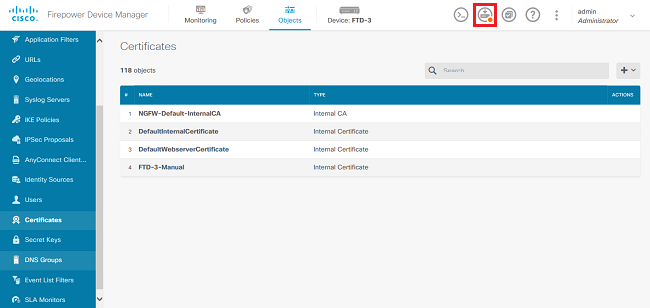
7. Click the Deploy Now button.

Note: When the deploy is done, the certificate is not available to be seen in the CLI until there is a service that uses it such as AnyConnect as shown in the image.
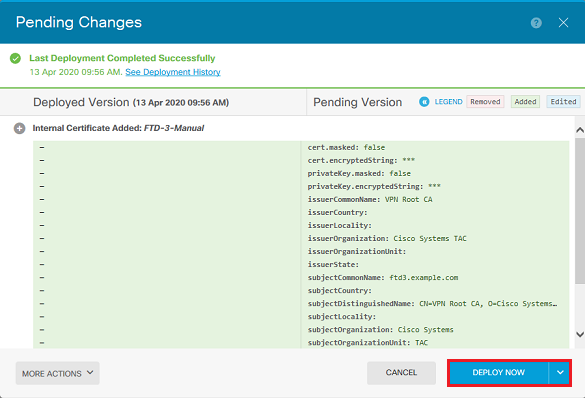
Trusted CA Certificate Installation
When you install a trusted CA certificate, it is necessary, in order to successfully authenticate users or devices which present identity certificates to the FTD. Common examples of this include AnyConnect certificate authentication and S2S VPN certificate authentication. These steps cover how to trust a CA certificate so that certificates issued by that CA are also trusted.
1. Navigate to Objects > Certificates. Click the + symbol, then choose Add Trusted CA Certificate as shown in the image.
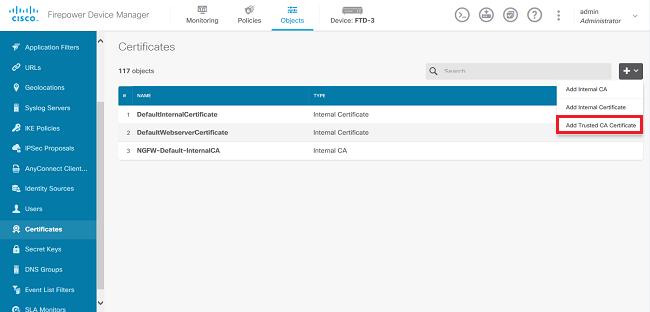
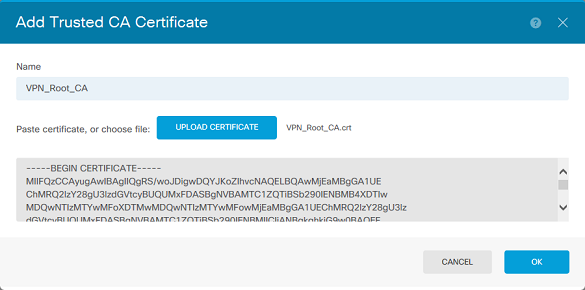
2. Specify a Name for the trustpoint. Then either upload, or copy and paste the CA certificate in PEM format. Click OK when done as shown in the image.
3. Click the Pending Changes button from the top right of the screen as shown in the image.
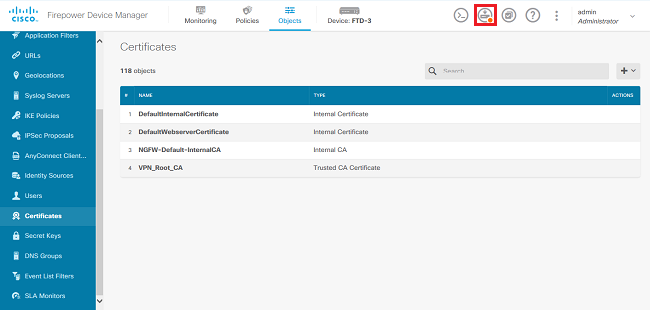
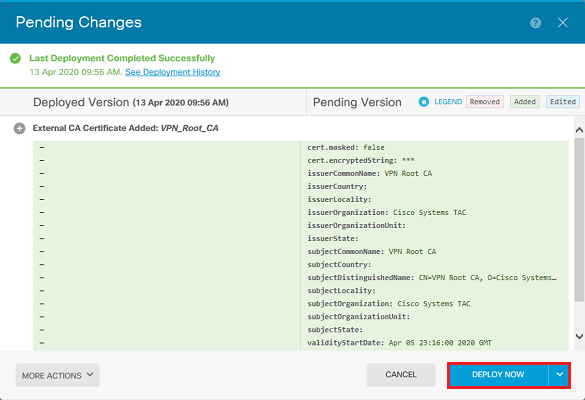
4. Click the Deploy Now button as shown in the image.
Certificate Renewal
Certificate renewal on an FTD managed by FDM involves the replacement of the previous certificate and potentially the private key. If you do not have the original CSR and private key used to create the original certificate, then a new CSR and private key needs to be created.
1. If you have the original CSR and private key, this step can be ignored. Otherwise, a new private key and CSR need to be created. Use OpenSSL, or a similar application, to generate a private key and CSR. This example shows a 2048 bit RSA key named private.key and a CSR named ftd3.csr that is created in OpenSSL.
openssl req -new -newkey rsa:2048 -nodes -keyout private.key -out ftd3.csr
Generating a 2048 bit RSA private key
..........................................+++
..................................................................................+++
writing new private key to 'private.key'
-----
You are about to be asked to enter information that is incorporated
into your certificate request.
What you are about to enter is what is called a Distinguished Name or a DN.
There are quite a few fields but you can leave some blank
For some fields there is a default value,
If you enter '.', the field is left blank.
-----
Country Name (2 letter code) [AU]:.
State or Province Name (full name) [Some-State]:.
Locality Name (eg, city) []:.
Organization Name (eg, company) [Internet Widgits Pty Ltd]:Cisco Systems
Organizational Unit Name (eg, section) []:TAC
Common Name (e.g. server FQDN or YOUR name) []:ftd3.example.com
Email Address []:.

Please enter the following 'extra' attributes
to be sent with your certificate request
A challenge password []:
An optional company name []:
2. Send the generated CSR or the original CSR to a Certificate Authority. Once the CSR has been signed, a renewed identity certificate is provided.
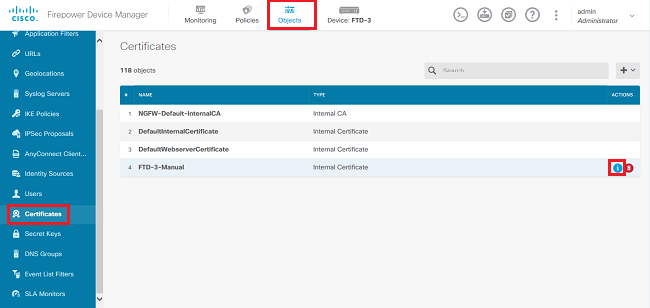
3. Navigate to Objects > Certificates. Hover over the certificate you want to renew, and click the View button as shown in the image.
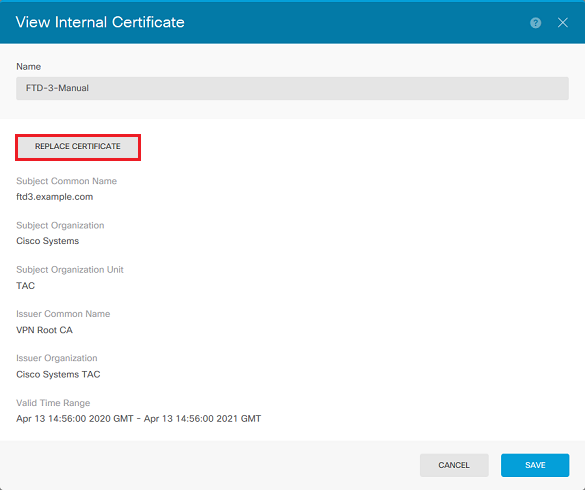
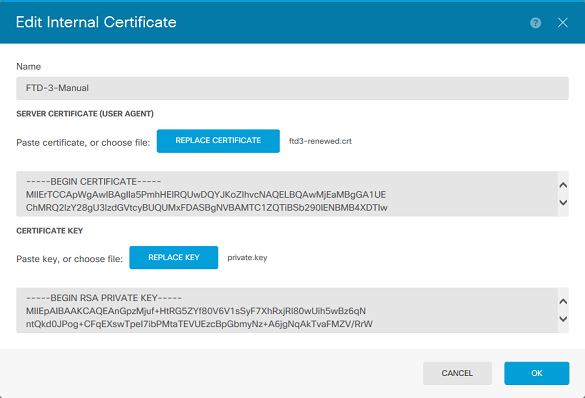
4. In the pop-up window, click Replace Certificate as shown in the image.
5. Either upload, or copy and paste the identity certificate and private key in PEM format. Click OK when done as shown in the image.
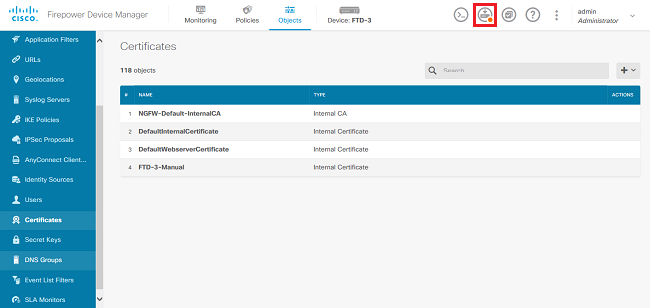
6. Click the Pending Changes button from the top right of the screen as shown in the image.
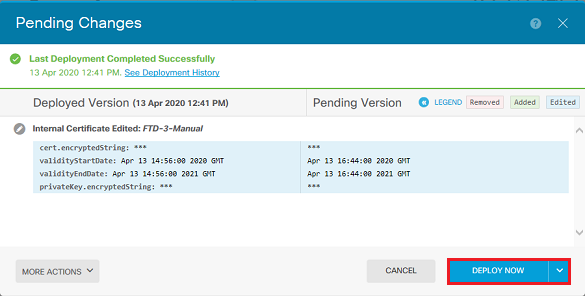
7. Click the Deploy Now button as shown in the image.
Common OpenSSL Operations
Extract Identity Certificate and Private Key from PKCS12 File
An administrator can receive a PKCS12 file that needs to be imported on to the FTD. FDM does not currently support the import of PKCS12 files. In order to import the certificates and private key contained within the PKCS12 file, the individual files must be extracted from the PKCS12 with the use of a tool like OpenSSL. You need the passcode used to encrypt the PKCS12.
openssl pkcs12 -info -in pkcs12file.pfx
Enter Import Password: [PKCS12-passcode]
MAC Iteration 1
MAC verified OK
PKCS7 Encrypted data: pbeWithSHA1And40BitRC2-CBC, Iteration 2048
Certificate bag
Bag Attributes
    localKeyID: 28 20 C1 B4 08 1E 65 2E 4D 1D F9 F3 25 07 62 F7 D9 96 A7 F4
    friendlyName: ftd3.example.com
subject=/O=Cisco Systems/OU=TAC/CN=ftd3.example.com
issuer=/O=Cisco Systems TAC/CN=VPN Root CA
-----BEGIN CERTIFICATE-----
MIIErTCCApWgAwIBAgIIa5PmhHEIRQUwDQYJKoZIhvcNAQELBQAwMjEaMBgGA1UE
ChMRQ2lzY28gU3lzdGVtcyBUQUMxFDASBgNVBAMTC1ZQTiBSb290IENBMB4XDTIw
MDQxMzE2NDQwMFoXDTIxMDQxMzE2NDQwMFowQTEWMBQGA1UEChMNQ2lzY28gU3lz
dGVtczEMMAoGA1UECxMDVEFDMRkwFwYDVQQDExBmdGQzLmV4YW1wbGUuY29tMIIB
IjANBgkqhkiG9w0BAQEFAAOCAQ8AMIIBCgKCAQEAnGpzMjuf+HtRG5ZYf80V6V1s
SyF7XhRxjRl80wUih5wBz6qNntQkd0JPog+CFqEXswTpeI7ibPMtaTEVUEzcBpGb
myNz+A6jgNqAkTvaFMZV/RrWqCNkt08ULEbIX+f67TMMBhtfZ2dpapEP2wQ2DVqN
Bqotoz3/8CrZOIcpzVqL6hOziJFBgdiWJEYBoFuE1jmmsjI3qd39ib9+t6LhkS50
QpQDTgvIiD1bYpPiWKpS0g1PZDnX8b740s0pVKVXTsujQqSqH1va9BB6hK1JCoZa
HrP9Y0xO9+MpVMH33R9vRl3SOEF6kpZ6VEdGI4s6/IRvaM1zlBcK10N/N2+mjwID
AQABo4G3MIG0MAkGA1UdEwQCMAAwHQYDVR0OBBYEFMcvjL0XiSTzNADJ/ptNb/cd
zB8wMB8GA1UdIwQYMBaAFHekzDnhi4O727mjLXuwCRVFgyguMAsGA1UdDwQEAwIF
oDAdBgNVHSUEFjAUBggrBgEFBQcDAQYIKwYBBQUHAwIwGwYDVR0RBBQwEoIQZnRk
My5leGFtcGxlLmNvbTAeBglghkgBhvhCAQ0EERYPeGNhIGNlcnRpZmljYXRlMA0G
CSqGSIb3DQEBCwUAA4ICAQCjjrMjruGH5fpcFND8qfuVU0hkszCwq201oMqMrvXn
gENKcXxxT27z6AHnQXeX3vhDcY3zs+FzFSoP5tRRPmy/413HAN+QEP2L9MQVD9PH
f5OrQ/Ke5c16hMOJ08daR7wNzvFkcbicKCLRH0EvEoI0SPKsLyGSSxGmh6QXfZcM
GX3jG9Krglugp2UEqOug9HPTpgsbuNcHw8xXgFp6IAlOLrytwrLeMIh5V+Vh5pll
yTl9wo5VADoYKgN4O8D21TeJIj6KB7YnYFB5wMgPGR5h5wx1qNq/MFixwfMXM4Tl
Rk3EOdSTENqzq2ZwnqJ4HCoqar7ASlQ5Zub5NY4+QfEpt8UHfYszp/e1BA+TviUC
DXGBUlbadlnEfi5Jl8G+/vZl6ykcmXe9hokKYxY8cg/U7170n/FbAmdYwRYgMAE4
RWfBp0voNzn97cG+qzogo7j/0kTfYu3O9DzdU3uy+R8JJkBrerktrZR7w7OfP61O
IAs86N5Zb18U14Gfc9m0eXHbN+/OB31JNhvWeyZfAbtgU1qstzvb2bc2GBoJJ1XC
YRQ1ft1FxHpn4zMkjI2Px0yam/bROn0FoMCesHvvtcgcGjFJgZduZyBJ9u1EZ2H5
uwNEJFOiV0GV+UBRigpjXEaUfJj4yMwaMYerZcZQVJfZ75+8SS5rfGfpMwTiT47I
ng==
-----END CERTIFICATE-----
Certificate bag
Bag Attributes: <No Attributes>
subject=/O=Cisco Systems TAC/CN=VPN Root CA
issuer=/O=Cisco Systems TAC/CN=VPN Root CA
-----BEGIN CERTIFICATE-----
MIIFQzCCAyugAwIBAgIIQgRS/woJDigwDQYJKoZIhvcNAQELBQAwMjEaMBgGA1UE
ChMRQ2lzY28gU3lzdGVtcyBUQUMxFDASBgNVBAMTC1ZQTiBSb290IENBMB4XDTIw
MDQwNTIzMTYwMFoXDTMwMDQwNTIzMTYwMFowMjEaMBgGA1UEChMRQ2lzY28gU3lz
dGVtcyBUQUMxFDASBgNVBAMTC1ZQTiBSb290IENBMIICIjANBgkqhkiG9w0BAQEF
AAOCAg8AMIICCgKCAgEAxhTBKiB1xzLg2Jr48h/2u84RcWahOTmPYCNGYZg0PvSf
JOpKvAu5tz4z625Yx1nBtjSsEgzF+qETpSplEhjW2NxIclxuNirfrmSJQfIw51yT
PaFv7u+VhgyYbYsSxGAB/m6RWWpiNbg8SDoUACU7R/bvp1Rb8W6tXk/rsTljc7L2
c/G5MeDLNmc/i/M1zuMjhj0tCphsJPhvNII7lcNj6K0pvg2yB/Md7PXOZnLaz9pf
GgpjpH0zzKhdIMW/KII64IRpo8KVhpE5X2sFohjzot4u8/t2oP846z/CXmlHQcgp
g5BgZMGqro0l5rcq0PjtK9Tqg7q013Vf0kMlsofMp+Bu1CiFDpawF/j8uSPuswEs
rzvJ+8GbOY1WEHtohgNGjPO0q8wnKQu0C47Ft1UMpdSwUsMMze0X43dyp/WoZtLW
4v/Pn/NibE3aoPOaMhIo4CdwSBHZOgVag4INqVsuFX1uPKD25Whrl09LQ93P/sN3
FhoAh98HKOcuQ64Ua3AaShdzornD+G2J2pd1Nf1DahlzlskIMtlURSWdLjsHLKft
JqSOoLIs2stU8HutUZ4h6Lv2+da554zVjpRTQiYh/lyNexDsd1m6PH7mQj+iL8/9
c2qDhuich3cxl1jIN0LdB+/jQqkfzmx9ziB1PXnIshNRbflLLrNfdDO9agqQsvsC
AwEAAaNdMFswDAYDVR0TBAUwAwEB/zAdBgNVHQ4EFgQUd6TMOeGLg7vbuaMte7AJ
FUWDKC4wHwYDVR0jBBgwFoAUd6TMOeGLg7vbuaMte7AJFUWDKC4wCwYDVR0PBAQD
AgEGMA0GCSqGSIb3DQEBCwUAA4ICAQC6B+Y3obatEZqv0RQz1MS6oOumCgNWGi8d
kcRDxkY2F+zw3pBFa54Sin1OfRPJvZvLNJV5OdXmvH5luh6KJDMVrLMWNiSgI7Tn
0ipqKraokS2Oo0STwQ7Q9Wk1xCrwxMfTuDJFMe80qabFAU557O5PDXPtFEutn0xz
Ou8VMLBRy+gDc+0WARsjFj+0gU0c2Wj3gQ81GlyoPYgufWRnztN5rQxWzFLSsCNN
jnIesjQv0vF3nY7SH5QasPN25AydsGE0DFgp7rZLN2BH7G9rhi5hEn3Bv9ALZCQ6
p702FZly5lxuzuA/wPnR89HiIkSF13OMTpnOIl3d6d07s3bwyNja8JikYTCflle5
2CSsz4Cn/BlwfWyAcLN3HxUjG4Ev2818fWWpkYmuxujpKDFFzF0skpKAK53tNKPf
pn4+w5FyLo18o0AydtPoKjYkDqbvG/SRPbt92mdTIF7E6J+o8J6OV3YL+IyrZ+u0
MYqPd450i4cgHdMFICAndN3PYScrrGYHawfVxp+R+G4dTJWdMvthh3ftS0mkiKJ8
m1NH7WYST1kYcTbcokZiOIcZa+VVv5UOLIt/hD0VG7xqZ0lpMQKkYUBzg5LbGINm
8ypfhQ1faI5fQRxpxTIsmDv9rQzxBjuCyKn+23FkkUhFJt0D989UUyp08H9vDoJr
yzm9J0pMrg==
-----END CERTIFICATE-----
PKCS7 Data
Shrouded Keybag: pbeWithSHA1And3-KeyTripleDES-CBC, Iteration 2048
Bag Attributes
    localKeyID: 28 20 C1 B4 08 1E 65 2E 4D 1D F9 F3 25 07 62 F7 D9 96 A7 F4
    friendlyName: ftd3.example.com
Key Attributes: <No Attributes>
Enter PEM pass phrase: [private-key-passcode]
Verifying - Enter PEM pass phrase: [private-key-passcode]
-----BEGIN ENCRYPTED PRIVATE KEY-----
MIIFDjBABgkqhkiG9w0BBQ0wMzAbBgkqhkiG9w0BBQwwDgQIScA8TOogup4CAggA
MBQGCCqGSIb3DQMHBAgKqoTuZzoXsASCBMgOTEb24ENJl4/qh3GpsE2C20CnJeid
ptDDIFdyOV4A+su3OJWzlnHrCuIhjR8+/p/N0WlA73x47R4T6+u4w4/ctHkvEbQj
gZJZzFWTed9HqidhcKxxOoM/w6/uDv/opc6/rlIZiaKp6FO9hOibqlGI9kjxkWQC
EQR8cM1U2yi0vagL8pOYdeujCrzBtorRp9BMJelCP1Mw9t0EbAC4mmuedzs+86r1
xadK7qHBuWUJcO3SLXLCmX5yLSGteWcoaPZnIKO9UhLxpUSJTkWLHr2VtE1ACMRc
RlPBXMLb70nMtPTqctl58+Q/axtQCWUs8caHs3LvVf0nRG+War49/F8Ii8mqnNnb
M6ZTwTOZ1sn0f4ohVePrW/kkdlQavJbPa+0dzjZvs88ClEXAJ/XIegfSWifJAXqP
3d37VonXX7YRocJ4kzhkuE/SUDsu1sMC0hbM81uZcWiBbDAT2jjlKgfoxubtnuFq
un4EJD73K9RWeA+7IVmEceRTBMyfD+ZwZHOBuFls+wZEmzYqw+cuc+I8XEFVOMl8
P3ah28Nno0jXMk4MpfFJlYMCmMq66xj5gZtcVZxOGCOswOCKU0JiFFQTEmmVf9/C
65a96np7YCI8s6UnUWi5Zp/NrbN31HkP0wt7+1DFGFit1pTTGvOFchtLYWeB3Kj0
h/C/R7ciq6ZNCzwBrbztGV8jG1l5NSslwKbTGiiwCYw0N8c09TXQb04rMomFDAv8
aef1aBsjMqEUkzOZK0U2ZgTxMline8pqNs/BhWBCYGSNmnWDJ7UmdkdqCpKIubp0
qtmFX/DtSu9J2yevfV+3/YCwnSRkr02oTGs1jJkEM2wzTaAeEQfShQMCHQPHtc4O
w94fQH/DJ/lKsmSVwBLQLEKRl/nIDz36kmA27+1nVtX42PbEaIaFgucU4xHKx3zN
mgSdbz7ikgiggNm+Dxq9GmYs+FuogaiiNdtvqNIHGq+LaQDwIPBBXmajXPhHVaq8
fNl7vEB+aret+PmqCiQYlHqe5TXcv6j7+VF4RTVpt5au9iX74sZ1qUROTuBHQhRK
3XpHfGXpe/O0GdW3LeifNLvrrQwyICoV9h7MNSpykbn/5wEpX671SqfZgrH6wNbP
VI9A+cSAAT1bWkuywx2uEo+9g1w/IFzdOcJ3aGCeAl84XuPRfQhHe/Aj7q6l6uqB
W3Kt+kMJ9j8AIyQD58SvfpC7bGb26jE/+Mm1Peh+HmyjIF/zv/FQPwPf+TRpcM8/
QCyhIRk3mx+8a1YLqK+hOMjWWBDEHX2mvbdKickK/jhwRdR/WmFOALq51phgtZlz
Zedl5UbPqWahJsjo09N5pp7Uq5iV0/xq4Ml+/xQIYo2GIrqyat4AdB2B6K8K3xQd
Pip/Q2/ttdKLyEDP3U/6rsu74zo3b/iXe2MZWTTfzH5zgneUwLwnuBAbGT3oMSQ/
OKXnhcmUGu8XvLEfU/PITvGzKr06o12/hHJtzXQ8eNPDJbvcD/okRRKZpmjH+ijp
FPD/WgQ/vmO9HdCWW3flhqceqfHff8ClCJYFLxsgZp4M3G+WyQTky4J8+6uTn/mj
yyZ5JCZdlt42haSNqU/ynioCjh5XY4m8WMZsOJBNPjKZiUX/vqVcc+/nodl7VRZy
ELk=
-----END ENCRYPTED PRIVATE KEY-----
pkcs12file.pfx is aPKCS12 file that needs to be unpackaged.
In this example, three separate files are created:
One for the Identity Certificate. You can tell this is the identity certificate due to the subject=/O=Cisco Systems/OU=TAC/CN=ftd3.example.com.
subject=/O=Cisco Systems/OU=TAC/CN=ftd3.example.com
issuer=/O=Cisco Systems TAC/CN=VPN Root CA
-----BEGIN CERTIFICATE-----
MIIErTCCApWgAwIBAgIIa5PmhHEIRQUwDQYJKoZIhvcNAQELBQAwMjEaMBgGA1UE
ChMRQ2lzY28gU3lzdGVtcyBUQUMxFDASBgNVBAMTC1ZQTiBSb290IENBMB4XDTIw
MDQxMzE2NDQwMFoXDTIxMDQxMzE2NDQwMFowQTEWMBQGA1UEChMNQ2lzY28gU3lz
dGVtczEMMAoGA1UECxMDVEFDMRkwFwYDVQQDExBmdGQzLmV4YW1wbGUuY29tMIIB
IjANBgkqhkiG9w0BAQEFAAOCAQ8AMIIBCgKCAQEAnGpzMjuf+HtRG5ZYf80V6V1s
SyF7XhRxjRl80wUih5wBz6qNntQkd0JPog+CFqEXswTpeI7ibPMtaTEVUEzcBpGb
myNz+A6jgNqAkTvaFMZV/RrWqCNkt08ULEbIX+f67TMMBhtfZ2dpapEP2wQ2DVqN
Bqotoz3/8CrZOIcpzVqL6hOziJFBgdiWJEYBoFuE1jmmsjI3qd39ib9+t6LhkS50
QpQDTgvIiD1bYpPiWKpS0g1PZDnX8b740s0pVKVXTsujQqSqH1va9BB6hK1JCoZa
HrP9Y0xO9+MpVMH33R9vRl3SOEF6kpZ6VEdGI4s6/IRvaM1zlBcK10N/N2+mjwID
AQABo4G3MIG0MAkGA1UdEwQCMAAwHQYDVR0OBBYEFMcvjL0XiSTzNADJ/ptNb/cd
zB8wMB8GA1UdIwQYMBaAFHekzDnhi4O727mjLXuwCRVFgyguMAsGA1UdDwQEAwIF
oDAdBgNVHSUEFjAUBggrBgEFBQcDAQYIKwYBBQUHAwIwGwYDVR0RBBQwEoIQZnRk
My5leGFtcGxlLmNvbTAeBglghkgBhvhCAQ0EERYPeGNhIGNlcnRpZmljYXRlMA0G
CSqGSIb3DQEBCwUAA4ICAQCjjrMjruGH5fpcFND8qfuVU0hkszCwq201oMqMrvXn
gENKcXxxT27z6AHnQXeX3vhDcY3zs+FzFSoP5tRRPmy/413HAN+QEP2L9MQVD9PH
f5OrQ/Ke5c16hMOJ08daR7wNzvFkcbicKCLRH0EvEoI0SPKsLyGSSxGmh6QXfZcM
GX3jG9Krglugp2UEqOug9HPTpgsbuNcHw8xXgFp6IAlOLrytwrLeMIh5V+Vh5pll
yTl9wo5VADoYKgN4O8D21TeJIj6KB7YnYFB5wMgPGR5h5wx1qNq/MFixwfMXM4Tl
Rk3EOdSTENqzq2ZwnqJ4HCoqar7ASlQ5Zub5NY4+QfEpt8UHfYszp/e1BA+TviUC
DXGBUlbadlnEfi5Jl8G+/vZl6ykcmXe9hokKYxY8cg/U7170n/FbAmdYwRYgMAE4
RWfBp0voNzn97cG+qzogo7j/0kTfYu3O9DzdU3uy+R8JJkBrerktrZR7w7OfP61O
IAs86N5Zb18U14Gfc9m0eXHbN+/OB31JNhvWeyZfAbtgU1qstzvb2bc2GBoJJ1XC
YRQ1ft1FxHpn4zMkjI2Px0yam/bROn0FoMCesHvvtcgcGjFJgZduZyBJ9u1EZ2H5
uwNEJFOiV0GV+UBRigpjXEaUfJj4yMwaMYerZcZQVJfZ75+8SS5rfGfpMwTiT47I
ng==
-----END CERTIFICATE-----
One for the Issuing CA Certificate. You can tell this is the identity certificate due to the subject=/O=Cisco Systems TAC/CN=VPN Root CA. This is the same value as the issuer in the Identity Certificate that is seen previously:
subject=/O=Cisco Systems TAC/CN=VPN Root CA
issuer=/O=Cisco Systems TAC/CN=VPN Root CA
-----BEGIN CERTIFICATE-----
MIIFQzCCAyugAwIBAgIIQgRS/woJDigwDQYJKoZIhvcNAQELBQAwMjEaMBgGA1UE
ChMRQ2lzY28gU3lzdGVtcyBUQUMxFDASBgNVBAMTC1ZQTiBSb290IENBMB4XDTIw
MDQwNTIzMTYwMFoXDTMwMDQwNTIzMTYwMFowMjEaMBgGA1UEChMRQ2lzY28gU3lz
dGVtcyBUQUMxFDASBgNVBAMTC1ZQTiBSb290IENBMIICIjANBgkqhkiG9w0BAQEF
AAOCAg8AMIICCgKCAgEAxhTBKiB1xzLg2Jr48h/2u84RcWahOTmPYCNGYZg0PvSf
JOpKvAu5tz4z625Yx1nBtjSsEgzF+qETpSplEhjW2NxIclxuNirfrmSJQfIw51yT
PaFv7u+VhgyYbYsSxGAB/m6RWWpiNbg8SDoUACU7R/bvp1Rb8W6tXk/rsTljc7L2
c/G5MeDLNmc/i/M1zuMjhj0tCphsJPhvNII7lcNj6K0pvg2yB/Md7PXOZnLaz9pf
GgpjpH0zzKhdIMW/KII64IRpo8KVhpE5X2sFohjzot4u8/t2oP846z/CXmlHQcgp
g5BgZMGqro0l5rcq0PjtK9Tqg7q013Vf0kMlsofMp+Bu1CiFDpawF/j8uSPuswEs
rzvJ+8GbOY1WEHtohgNGjPO0q8wnKQu0C47Ft1UMpdSwUsMMze0X43dyp/WoZtLW
4v/Pn/NibE3aoPOaMhIo4CdwSBHZOgVag4INqVsuFX1uPKD25Whrl09LQ93P/sN3
FhoAh98HKOcuQ64Ua3AaShdzornD+G2J2pd1Nf1DahlzlskIMtlURSWdLjsHLKft
JqSOoLIs2stU8HutUZ4h6Lv2+da554zVjpRTQiYh/lyNexDsd1m6PH7mQj+iL8/9
c2qDhuich3cxl1jIN0LdB+/jQqkfzmx9ziB1PXnIshNRbflLLrNfdDO9agqQsvsC
AwEAAaNdMFswDAYDVR0TBAUwAwEB/zAdBgNVHQ4EFgQUd6TMOeGLg7vbuaMte7AJ
FUWDKC4wHwYDVR0jBBgwFoAUd6TMOeGLg7vbuaMte7AJFUWDKC4wCwYDVR0PBAQD
AgEGMA0GCSqGSIb3DQEBCwUAA4ICAQC6B+Y3obatEZqv0RQz1MS6oOumCgNWGi8d
kcRDxkY2F+zw3pBFa54Sin1OfRPJvZvLNJV5OdXmvH5luh6KJDMVrLMWNiSgI7Tn
0ipqKraokS2Oo0STwQ7Q9Wk1xCrwxMfTuDJFMe80qabFAU557O5PDXPtFEutn0xz
Ou8VMLBRy+gDc+0WARsjFj+0gU0c2Wj3gQ81GlyoPYgufWRnztN5rQxWzFLSsCNN
jnIesjQv0vF3nY7SH5QasPN25AydsGE0DFgp7rZLN2BH7G9rhi5hEn3Bv9ALZCQ6
p702FZly5lxuzuA/wPnR89HiIkSF13OMTpnOIl3d6d07s3bwyNja8JikYTCflle5
2CSsz4Cn/BlwfWyAcLN3HxUjG4Ev2818fWWpkYmuxujpKDFFzF0skpKAK53tNKPf
pn4+w5FyLo18o0AydtPoKjYkDqbvG/SRPbt92mdTIF7E6J+o8J6OV3YL+IyrZ+u0
MYqPd450i4cgHdMFICAndN3PYScrrGYHawfVxp+R+G4dTJWdMvthh3ftS0mkiKJ8
m1NH7WYST1kYcTbcokZiOIcZa+VVv5UOLIt/hD0VG7xqZ0lpMQKkYUBzg5LbGINm
8ypfhQ1faI5fQRxpxTIsmDv9rQzxBjuCyKn+23FkkUhFJt0D989UUyp08H9vDoJr
yzm9J0pMrg==
-----END CERTIFICATE-----
And one for the private key:
-----BEGIN ENCRYPTED PRIVATE KEY-----
MIIFDjBABgkqhkiG9w0BBQ0wMzAbBgkqhkiG9w0BBQwwDgQIScA8TOogup4CAggA
MBQGCCqGSIb3DQMHBAgKqoTuZzoXsASCBMgOTEb24ENJl4/qh3GpsE2C20CnJeid
ptDDIFdyOV4A+su3OJWzlnHrCuIhjR8+/p/N0WlA73x47R4T6+u4w4/ctHkvEbQj
gZJZzFWTed9HqidhcKxxOoM/w6/uDv/opc6/rlIZiaKp6FO9hOibqlGI9kjxkWQC
EQR8cM1U2yi0vagL8pOYdeujCrzBtorRp9BMJelCP1Mw9t0EbAC4mmuedzs+86r1
xadK7qHBuWUJcO3SLXLCmX5yLSGteWcoaPZnIKO9UhLxpUSJTkWLHr2VtE1ACMRc
RlPBXMLb70nMtPTqctl58+Q/axtQCWUs8caHs3LvVf0nRG+War49/F8Ii8mqnNnb
M6ZTwTOZ1sn0f4ohVePrW/kkdlQavJbPa+0dzjZvs88ClEXAJ/XIegfSWifJAXqP
3d37VonXX7YRocJ4kzhkuE/SUDsu1sMC0hbM81uZcWiBbDAT2jjlKgfoxubtnuFq
un4EJD73K9RWeA+7IVmEceRTBMyfD+ZwZHOBuFls+wZEmzYqw+cuc+I8XEFVOMl8
P3ah28Nno0jXMk4MpfFJlYMCmMq66xj5gZtcVZxOGCOswOCKU0JiFFQTEmmVf9/C
65a96np7YCI8s6UnUWi5Zp/NrbN31HkP0wt7+1DFGFit1pTTGvOFchtLYWeB3Kj0
h/C/R7ciq6ZNCzwBrbztGV8jG1l5NSslwKbTGiiwCYw0N8c09TXQb04rMomFDAv8
aef1aBsjMqEUkzOZK0U2ZgTxMline8pqNs/BhWBCYGSNmnWDJ7UmdkdqCpKIubp0
qtmFX/DtSu9J2yevfV+3/YCwnSRkr02oTGs1jJkEM2wzTaAeEQfShQMCHQPHtc4O
w94fQH/DJ/lKsmSVwBLQLEKRl/nIDz36kmA27+1nVtX42PbEaIaFgucU4xHKx3zN
mgSdbz7ikgiggNm+Dxq9GmYs+FuogaiiNdtvqNIHGq+LaQDwIPBBXmajXPhHVaq8
fNl7vEB+aret+PmqCiQYlHqe5TXcv6j7+VF4RTVpt5au9iX74sZ1qUROTuBHQhRK
3XpHfGXpe/O0GdW3LeifNLvrrQwyICoV9h7MNSpykbn/5wEpX671SqfZgrH6wNbP
VI9A+cSAAT1bWkuywx2uEo+9g1w/IFzdOcJ3aGCeAl84XuPRfQhHe/Aj7q6l6uqB
W3Kt+kMJ9j8AIyQD58SvfpC7bGb26jE/+Mm1Peh+HmyjIF/zv/FQPwPf+TRpcM8/
QCyhIRk3mx+8a1YLqK+hOMjWWBDEHX2mvbdKickK/jhwRdR/WmFOALq51phgtZlz
Zedl5UbPqWahJsjo09N5pp7Uq5iV0/xq4Ml+/xQIYo2GIrqyat4AdB2B6K8K3xQd
Pip/Q2/ttdKLyEDP3U/6rsu74zo3b/iXe2MZWTTfzH5zgneUwLwnuBAbGT3oMSQ/
OKXnhcmUGu8XvLEfU/PITvGzKr06o12/hHJtzXQ8eNPDJbvcD/okRRKZpmjH+ijp
FPD/WgQ/vmO9HdCWW3flhqceqfHff8ClCJYFLxsgZp4M3G+WyQTky4J8+6uTn/mj
yyZ5JCZdlt42haSNqU/ynioCjh5XY4m8WMZsOJBNPjKZiUX/vqVcc+/nodl7VRZy
ELk=
-----END ENCRYPTED PRIVATE KEY-----

Note: The private key is encrypted and FDM does not accept encrypted private keys.
In order to unencrypt the private key, copy the encrypted private key into a file then run this openssl command:
openssl rsa -in encrypted.key -out unencrypted.key
Enter pass phrase for encrypted.key: [private-key passphrase]
writing RSA key
- encrypted.key is the name of the file that holds the encrypted private key.
- unencrypted.key is the name of the file that has the unencrypted key.
The unencrypted private key can show -----BEGIN RSA PRIVATE KEY----- rather than -----BEGIN ENCRYPTED PRIVATE KEY----- as seen in this example:
-----BEGIN RSA PRIVATE KEY-----
MIIEpAIBAAKCAQEAnGpzMjuf+HtRG5ZYf80V6V1sSyF7XhRxjRl80wUih5wBz6qN
ntQkd0JPog+CFqEXswTpeI7ibPMtaTEVUEzcBpGbmyNz+A6jgNqAkTvaFMZV/RrW
qCNkt08ULEbIX+f67TMMBhtfZ2dpapEP2wQ2DVqNBqotoz3/8CrZOIcpzVqL6hOz
iJFBgdiWJEYBoFuE1jmmsjI3qd39ib9+t6LhkS50QpQDTgvIiD1bYpPiWKpS0g1P
ZDnX8b740s0pVKVXTsujQqSqH1va9BB6hK1JCoZaHrP9Y0xO9+MpVMH33R9vRl3S
OEF6kpZ6VEdGI4s6/IRvaM1zlBcK10N/N2+mjwIDAQABAoIBAEQzCd1KMBrosdmk
eRvoMPiaemBbze2cXlJWXZ2orICSXhvM0okBGJFDQXN47ZCuVqYAq0ecjU9RzGgE
NbXYfUsD6+P91k+/Gj1RiCNLBHBwdgewzw1quTxP54zSpAVlIXyQ+FolTzjH1yfW
7iHhuSujYsAYLWPy4Yg3NpU2IdzeQoK5ViuSTTNx8LHYBKw1Qf7HVaQTfmsWOAyg
/vjZqjRkukqKM41srgkO/HjPnEBDuUWVTehzMCk1etijENc7ttISzYIEMNPthe60
NpidXAHoJ1lJM6HB9ZraBH5fu7MZJZO0n6YVKQuCdW0WfnKiNQCDsXq7X5EWsaj3
cgyjWlkCgYEAy33k1wxp7WEqg1zEwq0Vq7AtoL6i4V9QCenMThQAHwNAAUGGOSIF
JhpKyApm/BUogSIOMzIPse+NgAA66TRn4qfkbpvTI98CeCUxiUPcbRmqZnYxC0fp
Pzosv5OnBLltoIOprIO2S5a261w6JGNAfD95tCjCYYrB8Cw/HbZOLPUCgYEAxMbZ
KVyosBxaAIFQinHaff3fVSTsEOZFpLCBbLybgLcP8LsLdahBsj6HK/hAffKXOdvM
35CAM7ZL/WCI1Jb+dx4YcD9q8lbVMu4HTvSl2deTZoZrBG2iFX6OSsn2rLKAH+cH
uLSHCNAj9cj9syldZErGLZtBQpJPtpLRd6iy0vMCgYBP/zoLYJH0BBLWeY3QioLO
cABABTG7L+EjRIpQ14QErR5oX/4IT9t+Uy+63HwH9blqqpyye6e359jUzUJbk4KT
lDU1VoT2wSETYmvK7qalLUXT6fr12FtVw+T7m2w5azwxshDuBQmRRbq7ZBJnY61i
KwIJVUy1U/tSE9LsN1McUQKBgQClc4ykeoRbj3sdcZ2GyrQru4pMzP6wNu3Xy5EH
HI6ja0i74ImCJDcY5/o/vjx7qb39qBJa5+TjliPOp5xlI5BSF7v0pV4G5XvdlsYO
XSYWRGxriBnzXzspV3/M4oPGMVAJgve7Fg90GY4i2xx1yBH+geCf+CqnDt53ZHs7
YVz6gQKBgQDG42tZZ1kNAn0x/k1lUlZrEeF8iqdsyVcRf4fAvqsPbY3+kdae+8Or
+cQpVoeWzOQLUkA6eMsiTLmcWYb62qMgdpluyKo0ciPG9+2AGNTvQp/ig34pF2F/
9OGuVYlA1p7mkP8Vb1Mo1ugV0zUqAIjHKiGUzBWVsxOZsGa+SY47uw==
-----END RSA PRIVATE KEY-----
Once the private key has been unencrypted, the identity and private key file can be uploaded, or copied and pasted into FDM with Step 3 in the Manual Enrollment section mentioned previously. The Issuing CA can be installed with the use of the Trusted CA Certificate Installation steps mentioned previously.
Verify
Use this section to confirm that your configuration works properly.
View Installed Certificates in FDM
1. Navigate to Objects > Certificates. Hover over the certificate you want to verify, and click the view button as shown in the image.
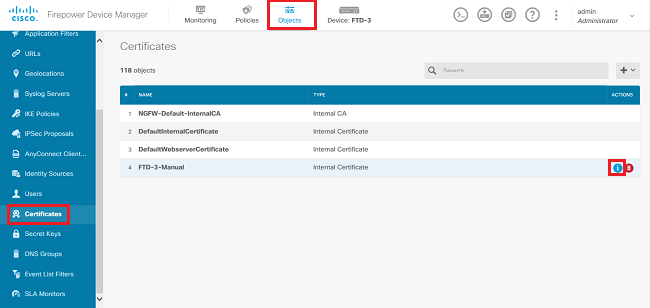
2. The pop-up window provides additional details about the certificate as shown in the image.
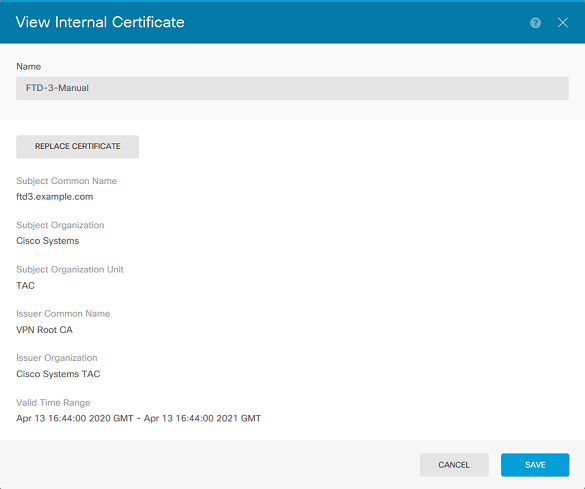
View Installed Certificates in CLI
You can either use the CLI Console in FDM or SSH into the FTD and run the command show crypto ca certificates in order to verify that a certificate is applied to the device as shown in the image.

Example output:
> show crypto ca certificates

Certificate
  Status: Available
  Certificate Serial Number: 6b93e68471084505
  Certificate Usage: General Purpose
  Public Key Type: RSA (2048 bits)
  Signature Algorithm: SHA256 with RSA Encryption
  Issuer Name:
    cn=VPN Root CA
    o=Cisco Systems TAC
  Subject Name:
    cn=ftd3.example.com
    ou=TAC
    o=Cisco Systems
  Validity Date:
    start date: 16:44:00 UTC Apr 13 2020
    end   date: 16:44:00 UTC Apr 13 2021
  Storage: config
  Associated Trustpoints: FTD-3-Manual
Note: Identity Certificates only show in the CLI when they are used with a service such as AnyConnect. Trusted CA certificates appear once they have been deployed.
Troubleshoot
This section provides information you can use to troubleshoot your configuration.
Debug Commands
Debugs can be run from the diagnostic CLI after you connect the FTD via SSH in the case of an SSL Certificate Installation failure: debug crypto ca 14
In older versions of FTD, these debugs are available and recommended for troubleshooting:
debug crypto ca 255
debug crypto ca message 255
debug crypto ca transaction 255
Common Issues
Import ASA Exported PKCS12
When you attempt to extract the identity certificate and private key from an exported ASA PKCS12 in OpenSSL, you can receive an error similar to this:
openssl pkcs12 -info -in asaexportedpkcs12.p12
6870300:error:0D0680A8:asn1 encoding routines:ASN1_CHECK_TLEN:wrong tag:tasn_dec.c:1220:
6870300:error:0D07803A:asn1 encoding routines:ASN1_ITEM_EX_D2I:nested asn1 error:tasn_dec.c:386:Type=PKCS12
In order to work around this, the pkcs12 file must first be converted to DER format:
openssl enc -base64 -d -in asaexportedpkcs12.p12 -out converted.pfx
Once that is done, the steps from the section Extracting Identity certificate and private key from PKCS12 file earlier in this document can be followed in order to import the identity certificate and private key.
Revision History
| Revision | Publish Date | Comments |
|---|---|---|
3.0 |
30-Sep-2024 |
Updated Formatting. |
2.0 |
22-Feb-2023 |
Added Alt Text.
Updated Title, Introduction, Style Requirements, Machine Translation, Gerunds and Formatting. |
1.0 |
23-Jul-2020 |
Initial Release |
Contributed by Cisco Engineers
- Shannon WellingtonTechnical Consulting Engineer
Contact Cisco
- Open a Support Case

- (Requires a Cisco Service Contract)
 Feedback