Introduction
This document describes configuration and verification steps to create SD-WAN On-demand Tunnels.
Prerequisites
Components Used
This document is based on these software, and hardware versions:
- vManage version 20.9.3
- Cisco Edge Routers version 17.9.3
The information in this document was created from the devices in a specific lab environment. All of the devices used in this document started with a cleared (default) configuration. If your network is live, ensure that you understand the potential impact of any command.
Background
Cisco SD-WAN supports dynamic On-demand tunnels between any two Cisco SD-WAN spoke devices. These tunnels are triggered to be set up only when there is traffic between the two devices, optimizing bandwidth usage and device performance.
Advantages
On-demand tunnels come with these advantages:
-
Improved performance, especially for less-powerful platforms operating in a full-mesh network.
-
Improved latency in hub-and-spoke deployments when On-demand tunnels are used between spokes.
-
Reduced bandwidth use in the network because tunnels in Inactive state do not require Bidirectional Forwarding Detection (BFD) probes, so there is less BFD traffic produced in the network.
-
Direct tunnels between spokes, while also optimizing CPU and memory usage.
Configure
Configurations
Here are the steps to configure On-demand Tunnels:
Step 1: Enable traffic engineering only on the Hub site routers under the VPN 0 feature template. It is recommended to have a separate VPN 0 feature template for hub sites and spoke sites.
Navigate to Configuration > Templates > Feature Template. Search for the correct VPN 0 feature template assigned to Hub Routers, click on three dots and select Edit.
1. Under Service section
2. Click New Service
3.Choose TE from the service type.
Click Add and then Update.
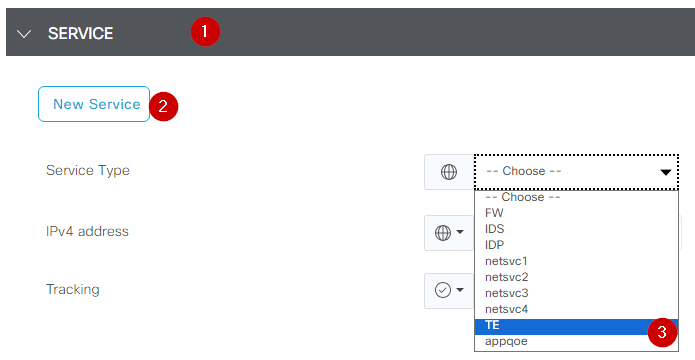 Enable TE
Step 2: To increase the OMP path limit to the recommended value 16 on a Cisco Edge Router.
Navigate to Configuration>Template> Feature Template, search for the OMP feature template, click on the three dots, and select Edit.
Under Basic Configuration, locate Number of Paths Advertised per Prefix, and ECMP Limit, and change the values to 16.
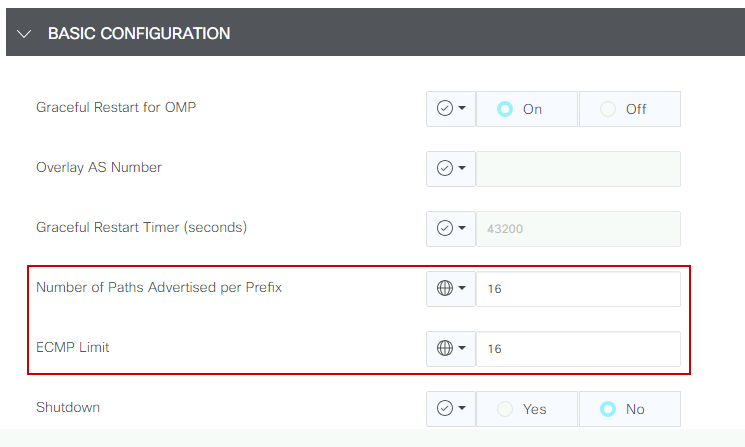 OMP - ECMP Limit

Note: To change the send-path-limit on vSmarts OMP to a value higher than 4, with the recommended value being 16, please refer to the Routing Configuration guides on the Cisco SD-WAN Configuration Guidesfor detailed instructions.
Step 3: Create or clone a System feature template to enable On-demand Tunnel and modify On-demand Tunnel Idle-Timeout timer if desired (default value it is 10 minutes), and apply this system template specifically for the On-demand spoke sites.
Navigate to Configuration > Templates > Feature Templates search for the System feature template, click on three dots, and select Edit.
On Advanced section enable On-demand Tunnel. Optionally, adjust the On-demand Tunnel Idle-Timeout if you wish to bring the tunnel down faster than the default 10 minutes when there is no traffic passing between the sites.
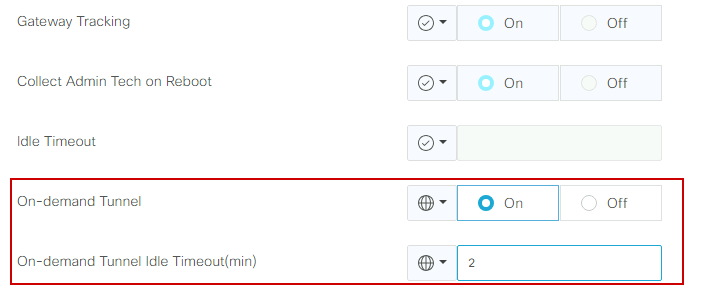 On-demand Tunnel Enable
Step 4: You need to create a custom topology policy using a route sequence on the match tab set site list (matching On-demand spoke sites), and under action tab set the TLOC list (matching the Hub tlocs) to backup.
Create the On-demand spoke list and HUB backup TLOC list.
Navigate to Configuration > Policies > Custom Options from the drop down menu select Centralized Policy > Lists, create the groups of interest:
- Click on Site create a new site list including all site-id for all On-demand sites.
- On TLOC create a TLOC list including all HUB tloc that are going to be used as backup.
Once you have created the groups of interest list, navigate to Custom Options from the drop down menu select Centralized Policy > Topology > Topology > Add Topology > Custom Control (Route & TLOC).
- Provide a name and description for the topology.
- Change Default Action to Accept by clicking the pencil icon, then click Save Match And Action.
- Click Sequence Type and select Route. Click Sequence Rule to add new sequence.
- On Match tab click Site and select the correct site list.
 Sequance creating
- On the Action tab, click Accept, then, for the TLOC Action select Backup, and for TLOC select correct TLOC list. Click Save Match and Actions once you are done.
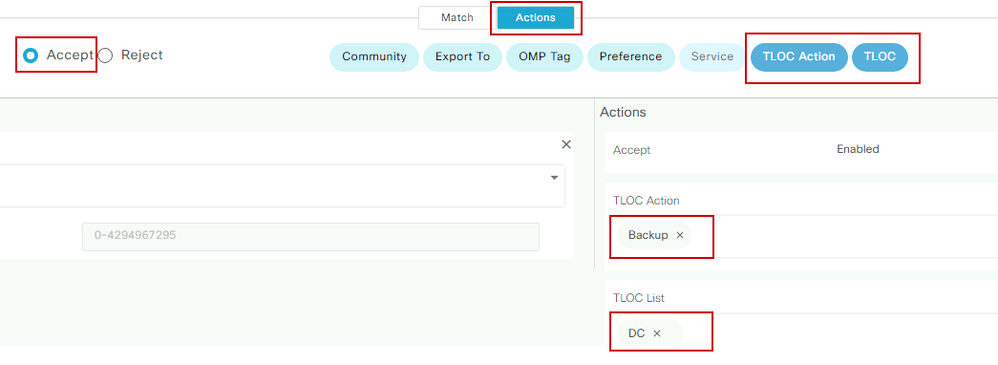 Action Policy set
Attach the control topology policy to the main policy by navigate to Configuration > Policies > Centralized Policy.
Find your active policy, click on the three dots, and select Edit.
Click on
1. Topology
2. Topology
3. Add Topology
4. Import Existing
5. Custom Control (Route and TLOC)
6. Find your policy from the drop-menu, then click Import.
 Import Existing Policy
Click on Policy Application > Topology > New Site/ Region List
In the outbound Site List select correct site list name.
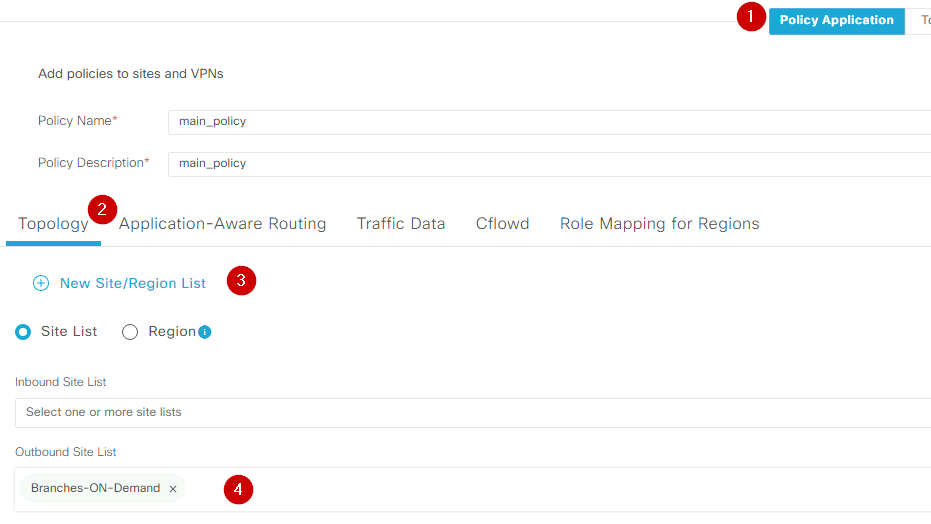 Apply the Poicy Outband
Click Add, and Save Policy Changes. Since this is an active policy, changes are going to be pushed to vSmarts.
Verify
To verify run the command show sdwan system on-demand remote-system. From the output, you can locate On-demand: yes. If the status shows inactive it means the tunnel between sites is down.
Spoke#show sdwan system on-demand remote-system
SITE-ID    SYSTEM-IP     ON-DEMAND       STATUS     IDLE-TIMEOUT-EXPIRY(sec)
---------------------------------------------------------------------------
100      192.168.0.70       no           -                   -
100      192.168.0.71       no           -                   -
1000     192.168.0.72       yes          inactive            -
1000     192.168.0.73       yes          inactive            -
200      192.168.0.80       no           -                   -
After generating some traffic between on-demand sites, you can check the same output. In this case the status shows Active, it is showing the number of seconds left before the tunnel goes down.
Spoke#show sdwan system on-demand remote-system
SITE-ID    SYSTEM-IP     ON-DEMAND       STATUS     IDLE-TIMEOUT-EXPIRY(sec)
---------------------------------------------------------------------------
100      192.168.0.70       no           -                   -
100      192.168.0.71       no           -                   -
1000     192.168.0.72       yes          active              105
1000     192.168.0.73       yes          active              105
200      192.168.0.80       no           -                   -
From this example, you can notice that the BFD with sites 192.168.0.72 and 192.168.0.73 are missing while tunnel is down.
Spoke#show sdwan bfd sessions
                                      SOURCE TLOC      REMOTE TLOC                                      DST PUBLIC                      DST PUBLIC         DETECT      TX
SYSTEM IP        SITE ID     STATE       COLOR            COLOR            SOURCE IP                    IP                              PORT        ENCAP  MULTIPLIER  INTERVAL(msec  UPTIME       TRANSITIONS
---------------------------------------------------------------------------------------------------------------------------------------------------------------------------------------------------------------
192.168.0.70     100         up          public-internet  public-internet  <removed>                   <removed>                       12346       ipsec  5           2000           0:03:22:04      2
192.168.0.71     100         up          public-internet  public-internet  <removed>                   <removed>                       12346       ipsec  5           2000           0:03:22:03      2
192.168.0.80     200         up          public-internet  public-internet  <removed>                   <removed>                       12346       ipsec  5           2000           0:03:22:04      2
192.168.0.70     100         up          mpls             mpls             <removed>                   <removed>                       12346       ipsec  5           2000           0:03:22:03      2
192.168.0.71     100         up          mpls             mpls             <removed>                   <removed>                       12346       ipsec  5           2000           0:03:22:04      2
192.168.0.80     200         up          mpls             mpls             <removed>                   <removed>                       12346       ipsec  5           2000           0:03:22:03      2
When the tunnel between sites is up, you notice that BFD with sites 192.168.0.72 and 192.168.0.73 are up.
Spoke#show sdwan bfd sessions
                                      SOURCE TLOC      REMOTE TLOC                                      DST PUBLIC                      DST PUBLIC         DETECT      TX
SYSTEM IP        SITE ID     STATE       COLOR            COLOR            SOURCE IP                    IP                              PORT                ENCAP  MULTIPLIER  INTERVAL(msec  UPTIME          TRANSITIONS
-------------------------------------------------------------------------------------------------------------------------------------------------------------------------------------------------------------------------
192.168.0.70     100         up          public-internet  public-internet  <removed>                <removed>                                      12346       ipsec  5           2000           0:03:27:27      2
192.168.0.71     100         up          public-internet  public-internet  <removed>                <removed>                                       12346       ipsec  5           2000           0:03:27:26      2
192.168.0.80     200         up          public-internet  public-internet  <removed>                <removed>                                      12346       ipsec  5           2000           0:03:27:27      2
192.168.0.73     1000        up          public-internet  public-internet  <removed>                <removed>                                       5063        ipsec  5           2000           0:00:00:03     3
192.168.0.72     1000        up          public-internet  public-internet  <removed>                <removed>                                       12346       ipsec  5           2000           0:00:00:03      2
192.168.0.70     100         up          mpls             mpls             <removed>                <removed>                                      12346       ipsec  5           2000           0:03:27:26      2
192.168.0.71     100         up          mpls             mpls             <removed>                <removed>                                       12346       ipsec  5           2000           0:03:27:26      2
192.168.0.80     200         up          mpls             mpls             <removed>                <removed>                                       12346       ipsec  5           2000           0:03:27:26      2
192.168.0.73     1000        up          mpls             mpls             <removed>                <removed>                                     12346       ipsec  5           2000           0:00:00:03        3
192.168.0.72     1000        up          mpls             mpls             <removed>                <removed>                                      12346       ipsec  5           2000           0:00:00:03      2
You can obtain the same results from vMange GUI by navigating to Monitor > Device or Monitor > Network (from code 20.6 and early), find your device and navigate WAN > Tunnel, focusing on the Down number.
 Monitoring On-demand Tunnels
On the same menu, scroll down and click on Real Time. On Device Options search On Demand Remote.
This example shows the output when On Demand Tunnels are down.
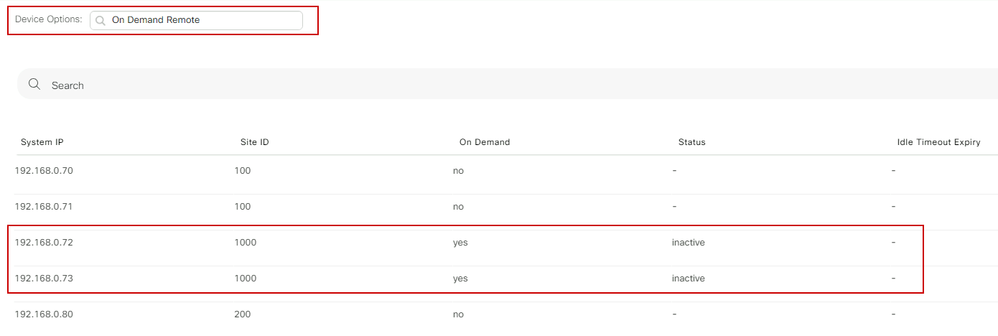 On-demand Tunnels Down
This example shows the output when On-demand Tunnels are up.
 On-demand Tunnels Up
Troubleshoot
Refer to Troubleshoot SD-WAN Dynamic On-Demand Tunnels for more detailed steps.
Related Information


 Feedback