Introduction
This document describes the procedure to deploy and configure a Cisco CSR1000v and Catalyst 8000v (C800v) on Google Cloud Platform (GCP).
Prerequisites
Requirements
Cisco recommends that you have knowledge of these topics:
- Virtualization technologies / Virtual Machines (VMs)
- Cloud Platforms
Components Used
The information in this document is based on these software and hardware versions:
- An active subscription to Google Cloud Platform with a project created
-
GCP console
-
GCP marketplace
- Bash terminal, Putty, or SecureCRT
- Public and private Secure Shell (SSH) Keys
The information in this document was created from the devices in a specific lab environment. All of the devices used in this document started with a cleared (default) configuration. If your network is live, ensure that you understand the potential impact of any command.
Background Information
From 17.4.1 onwards, the CSR1000v becomes C8000v with the same functionality but new features added such as SD-WAN and Cisco DNA licensing. For further reference, please verify the official products datasheet:
Cisco Cloud Services Router 1000v Data Sheet
Cisco Catalyst 8000V Edge Software Data Sheet
Therefore, this guide is applicable for the installation of both CSR1000v and C8000v routers.
Project Setup
Note: At the moment this document is written, new users have 300USD of free credits to fully explore GCP as Free Tier for one year. This is defined by Google and it is not under Cisco control.
Note: This document requires the creation of public and private SSH keys. For additional information, please refer to Generate an Instance SSH Key to Deploy a CSR1000v in Google Cloud Platform
Step 1. Ensure a Valid and Active Project for the Account.
Ensure your account has a valid and active project, these must be associated with a group with permissions for Compute Engine.
For this example deployment, a created project in the GCP is used.
Note: To create a new project, please refer to Create and manage projects.
Step 2. Create a New VPC and Subnet.
Create a new Virtual Private Cloud (VPC) and a subnet that must be associated with the CSR1000v instance.
It is possible to use the default VPC or a previously created VPC and subnet.
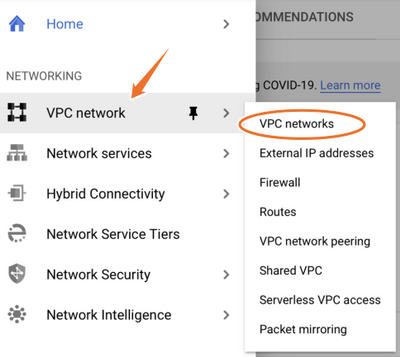
In the console dashboard, select VPC network > VPC networks as shown in the image.
Select Create VPC Network as shown in the image.
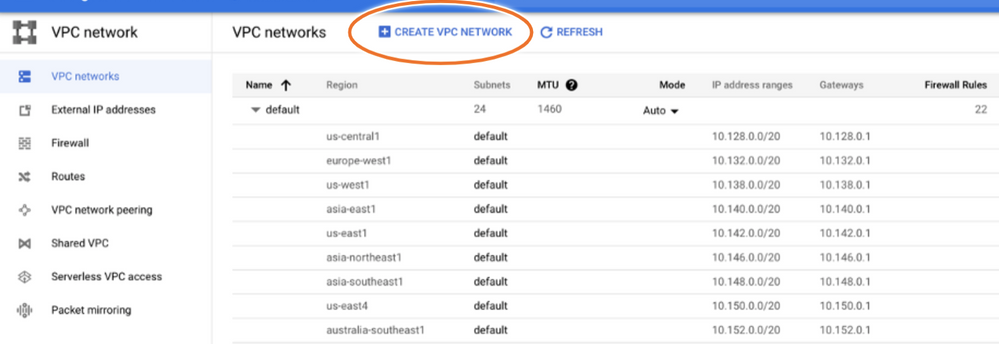
Note: Currently, CSR1000v is only deployed in the us-central region on GCP.
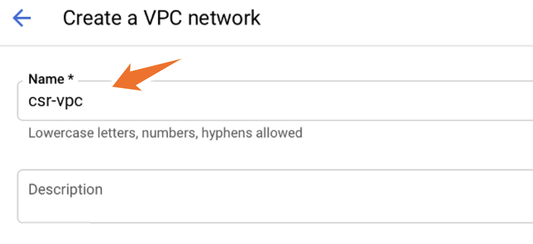
Configure the VPC name as shown in the image.
Configure the subnet name associated with the VPC and select region us-central1.
Assign a valid IP address range within the us-central1 CIDR of 10.128.0.0/20. as shown in the image.
Leave other settings as default and select create button:
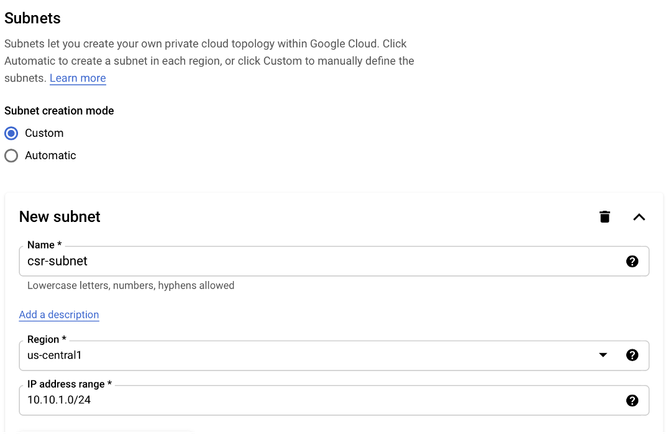
Note: If "automatic" is selected, GCP assigns an automatic valid range within the region CIDR.
Once the creation process finishes, the new VPC appears in the VPC networks section as shown in the image.

Step 3. Virtual Instance Deployment.
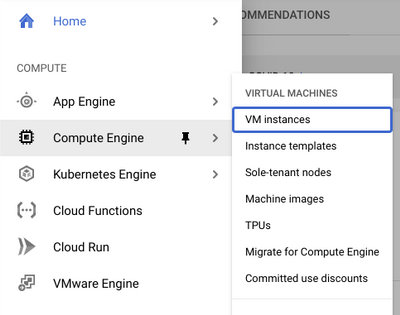
In Compute Engine section, select Compute Engine > VM instances as shown in the image.
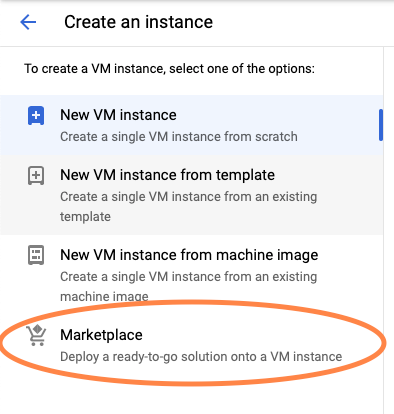
Once in the VM dashboard, select the Create Instance tab as shown in the image.

Use GCP marketplace as shown in the image, in order to display Cisco products.
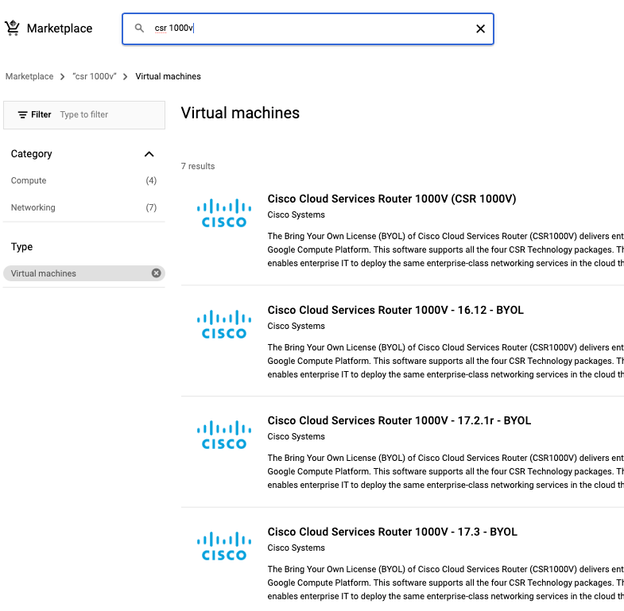
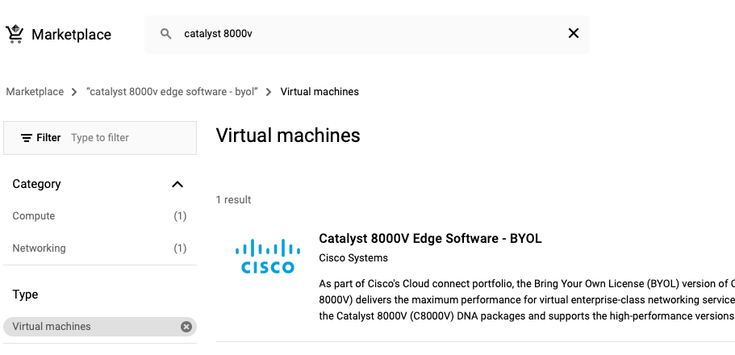
In the search bar, type Cisco CSR or Catalyst C8000v, choose model and version that fits your requirements and select Launch.
For this example deployment, the first option was selected as shown in the image.
Note: BYOL stands for “Bring Your Own License”.
Note: Currently, GCP does not support Pay As You Go (PAYG) model.
GCP requires to enter the configuration values that must be associated with the VM, as shown in the image:
A username and SSH public key is required to deploy a CSR1000v/C8000v in GCP as shown in the image. Please refer to Generate an Instance SSH Key to Deploy a CSR1000v in Google Cloud Platform if the SSH keys have not been created.
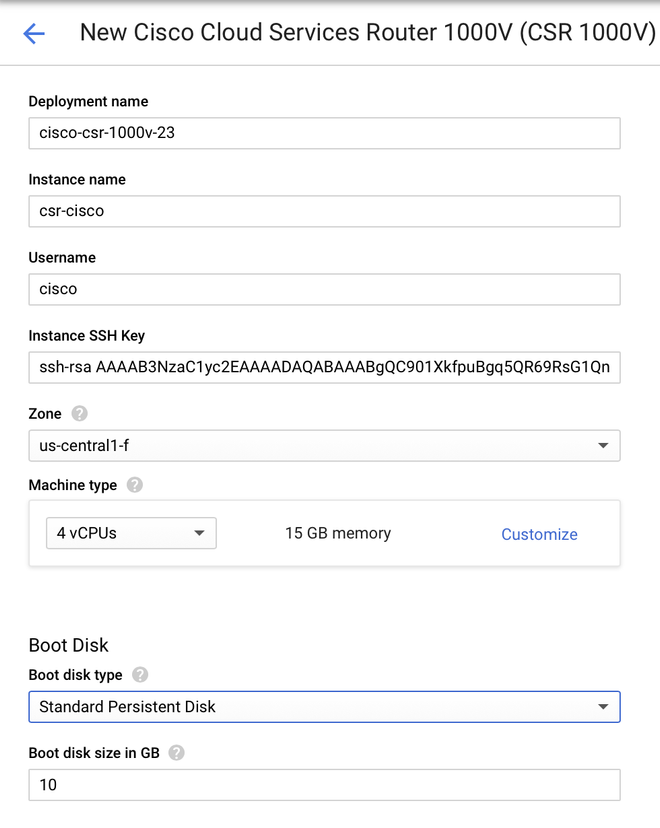
Select the VPC and subnet created before and choose Ephemeral in external IP, in order to have a Public IP associated with the instance as shown in the image.
After this is configured. Select the launch button.
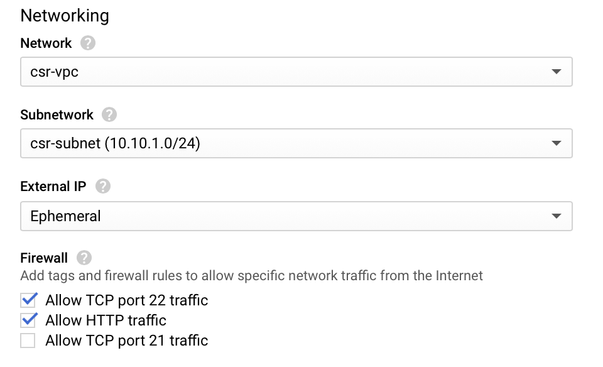
Note: Port 22 is needed to connect to the CSR instance via SSH. The HTTP port is optional.
Once the deployment is completed, select Compute Engine > VM instances in order to verify that the new CSR1000v was deployed successfully as shown in the image.

Verify Deployment
Connect Remotely to the New Instance
The most common methods to log in to a CSR1000v/C8000V in GCP are the command line in a Bash terminal, Putty and SecureCRT. In this section, the configuration needed to connect with the previous methods.
Log in to CSR1000v/C8000v with Bash Terminal
The syntax needed to connect remotely to the new CSR is:
ssh -i private-key-path username@publicIPaddress
Example:
$ ssh -i CSR-sshkey <snip>@X.X.X.X
The authenticity of host 'X.X.X.X (X.X.X.X)' can't be established.
RSA key fingerprint is SHA256:c3JsVDEt68CeUFGhp9lrYz7tU07htbsPhAwanh3feC4.
Are you sure you want to continue connecting (yes/no/[fingerprint])? yes
Warning: Permanently added 'X.X.X.X' (RSA) to the list of known hosts.
If the connection is successful, CSR1000v prompt is displayed
$ ssh -i CSR-sshkey <snip>@X.X.X.X

csr-cisco# show version
Cisco IOS XE Software, Version 16.09.01
Cisco IOS Software [Fuji], Virtual XE Software (X86_64_LINUX_IOSD-UNIVERSALK9-M), Version 16.9.1, RELEASE SOFTWARE (fc2)
Technical Support: http://www.cisco.com/techsupport
Copyright (c) 1986-2018 by Cisco Systems, Inc.
Compiled Tue 17-Jul-18 16:57 by mcpre
Log in to CSR1000v/C8000v with PuTTY
To connect with Putty, use the PuTTYgen application in order to convert the private key from PEM to PPK format.
Please refer to Convert Pem to Ppk File Using PuTTYgen for additional information.
Once the private key is generated in the proper format, you have to specify the path in Putty.
Select the Private key file for authentication section in the auth option of the SSH connection menu.
Browse to the folder where the key is stored and select the created key. In this example, the images show the graphical view of the Putty menu and the desired state:
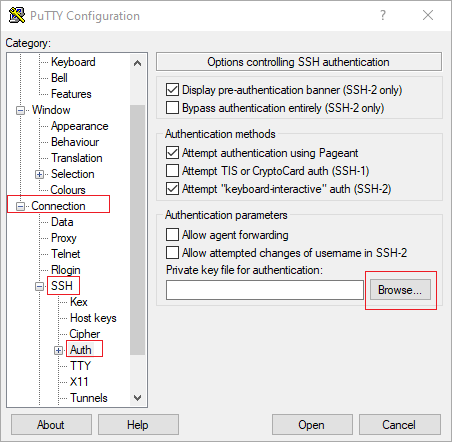
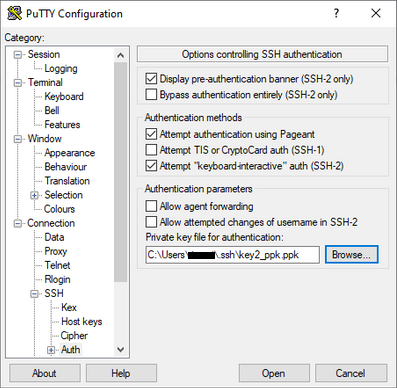
Once the proper key is selected, return to the main menu and use the external IP address of the CSR1000v instance to connect via SSH as shown in the image.
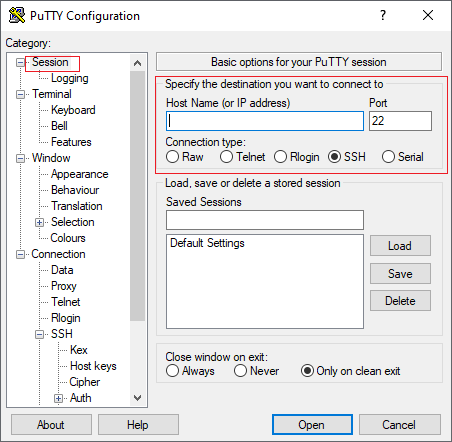
Note: Username/password defined in the SSH keys generated are requested to log in.
log in as: cisco
Authenticating with public key "imported-openssh-key"
Passphrase for key "imported-openssh-key":

csr-cisco#
Log in to CSR1000v/C8000V with SecureCRT
Secure CRT requires the private key in PEM format, which is the default format for the private keys.
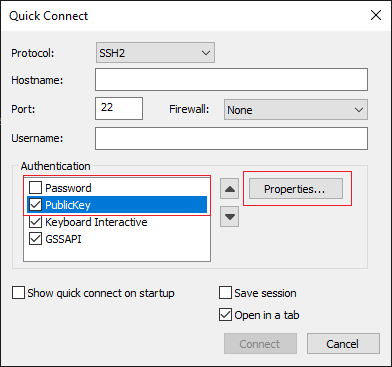
In Secure CRT specify the path to the private key in the menu:
File > Quick Connect > Authentication > Uncheck Password > PublicKey > Properties.
The image shows the expected window.
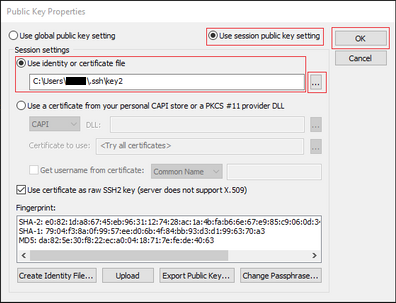
Select Use session public key string > Select Use identity or certificate file > Select ... button > Navigate to the directory and select the desired key > Select OK as shown in the image.
Finally, connect to the external IP of the instance address via SSH as shown in the image.
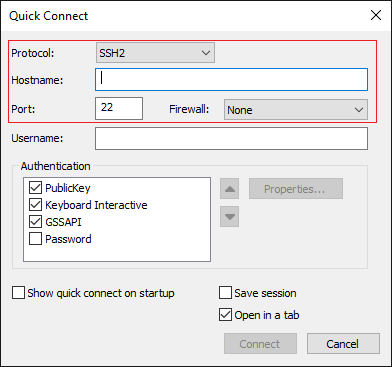
Note: Username/password defined in the SSH keys generated are requested to log in.
csr-cisco# show logging
Syslog logging: enabled (0 messages dropped, 3 messages rate-limited, 0 flushes, 0 overruns, xml disabled, filtering disabled)

No Active Message Discriminator.
<snip>
*Jan 7 23:16:13.315: %SEC_log in-5-log in_SUCCESS: log in Success [user: cisco] [Source: X.X.X.X] [localport: 22] at 23:16:13 UTC Thu Jan 7 2021
csr-cisco#
Additional VM Log in Methods
Note: Please refer to Connect to Linux VMs using advanced methods documentation.
Authorize Additional Users to Log in to CSR1000v/C8000v in GCP
Once logged in to the CSR1000v instance is successful, it is possible to configure additional users with these methods.
Configure a New Username/Password
Use these commands to configure a new user and password.
enable
configure terminal
username <username> privilege <privilege level> secret <password>
end
Example:
csr-cisco# configure terminal
Enter configuration commands, one per line. End with CNTL/Z.
csr-cisco(config)#

csr-cisco(config)# username cisco privilege 15 secret cisco
csr-cisco(config)# end
csr-cisco#
A new user is now able to log in to the CSR1000v/C8000v instance.
Configure a New User with SSH Key
In order to get access to the CSR1000v instance, configure the public key. SSH keys in the instance metadata do not provide access to CSR1000v.
Use these commands to configure a new user with an SSH key.
configure terminal
ip ssh pubkey-chain
username <username>
key-string
<public ssh key>
exit
end
Note: The maximum line length at the Cisco CLI is 254 characters thus the key string can not fit this limitation, it is convenient to wrap the key string to fit a terminal line. The details about how to overcome this limitation are explained in Generate an Instance SSH Key to Deploy a CSR1000v in Google Cloud Platform
$ fold -b -w 72 /mnt/c/Users/ricneri/.ssh/key2.pub
ssh-rsa AAAAB3NzaC1yc2EAAAADAQABAAABAQDldzZ/iJi3VeHs4qDoxOP67jebaGwC6vkC
n29bwSQ4CPJGVRLcVSNPcPPqVydiXVEOG8e9gFszkpk6c2meO+TRsSLiwHigv28lyw5xhn1U
ck/AYpy9E6TyEEu9w6Fz0xTG2Qhe1n9b5Les6K9PFP/mR6WUMbfmaFredV/sADnODPO+OfTK
/OZPg34DNfcFhglja5GzudRb3S4nBBhDzuVrVC9RbA4PHVMXrLbIfqlks3PCVGOtW1HxxTU4
FCkmEAg4NEqMVLSm26nLvrNK6z7lRMcIKZZcST+SL6lQv33gkUKIoGB9qx/+DlRvurVXfCdq
3Cmxm2swHmb6MlrEtqIv cisco
$

csr-cisco# configure terminal
Enter configuration commands, one per line. End with CNTL/Z.
csr-cisco(config)#

csr-cisco(config)# ip ssh pubkey-chain
csr-cisco(conf-ssh-pubkey)# username cisco
csr-cisco(conf-ssh-pubkey-user)# key-string
csr-cisco(conf-ssh-pubkey-data)#ssh-rsa AAAAB3NzaC1yc2EAAAADAQABAAABAQDldzZ/iJi3VeHs4qDoxOP67jebaGwC
csr-cisco(conf-ssh-pubkey-data)#6vkCn29bwSQ4CPJGVRLcVSNPcPPqVydiXVEOG8e9gFszkpk6c2meO+TRsSLiwHigv28l
csr-cisco(conf-ssh-pubkey-data)#yw5xhn1Uck/AYpy9E6TyEEu9w6Fz0xTG2Qhe1n9b5Les6K9PFP/mR6WUMbfmaFredV/s
csr-cisco(conf-ssh-pubkey-data)#ADnODPO+OfTK/OZPg34DNfcFhglja5GzudRb3S4nBBhDzuVrVC9RbA4PHVMXrLbIfqlk
csr-cisco(conf-ssh-pubkey-data)#s3PCVGOtW1HxxTU4FCkmEAg4NEqMVLSm26nLvrNK6z7lRMcIKZZcST+SL6lQv33gkUKI
csr-cisco(conf-ssh-pubkey-data)#oGB9qx/+DlRvurVXfCdq3Cmxm2swHmb6MlrEtqIv cisco
csr-cisco(conf-ssh-pubkey-data)# exit
csr-cisco(conf-ssh-pubkey-user)# end
csr-cisco#
Verify Configured Users on Log in to CSR1000v/C8000v
In order to confirm the configuration was properly set, please log in with the credentials created or with the private key pair for the public key with the additional credentials.
From the router side, see the success log-in log with the terminal IP address.
csr-cisco# show clock
*00:21:56.975 UTC Fri Jan 8 2021
csr-cisco#

csr-cisco# show logging
Syslog logging: enabled (0 messages dropped, 3 messages rate-limited, 0 flushes, 0 overruns, xml disabled, filtering disabled)

<snip>
*Jan 8 00:22:24.907: %SEC_log in-5-log in_SUCCESS: log in Success [user: <snip>] [Source: <snip>] [localport: 22] at 00:22:24 UTC Fri Jan 8 2021
csr-cisco#
Troubleshoot
If the "Operation Timed Out" Error Message is Displayed.
$ ssh -i CSR-sshkey <snip>@X.X.X.X
ssh: connect to host <snip> port 22: Operation timed out
Possible causes
- The instance has not finished its deployment.
- The Public address is not the one assigned to nic0 in the VM.
Solution
Wait for the VM deployment to complete. Usually, a CSR1000v deployment takes up to 5 minutes to complete.
If a Password is Required
If a password is required:
$ ssh -i CSR-sshkey <snip>@X.X.X.X
Password:
Password:
Possible cause
- The username or private key is incorrect.
- On newer versions of Operative Systems like MacOS or Linux, the OpenSSH utiliy does not have RSA enabled by default.
Solution
- Ensure the username is the same that was specified when CSR1000v/C8000v was deployed.
- Ensure the private key is the same you included at the deployment time.
- Specify the type of accepted key in the ssh command.
ssh -o PubkeyAcceptedKeyTypes=ssh-rsa -i <private_key> <user>@<host_ip>
Related Information


 Feedback