Introduction
The document describes basic information about the Chassis Management Module (CMM) for deployments that include a Cisco blade switch within the same chassis.
Note: Cisco recommends that you reference the IBM website for any setup, configuration, and troubleshooting information in regards to the CMM module.
Prerequisites
Requirements
Cisco recommends that you have knowledge of these topics:
- IBM blade chassis
- Cisco blade switches
Components Used
The information in this document is based on these software and hardware versions:
- Cisco B22 Series Fabric Extender (FEX)
- IBM CMM
The information in this document was created from the devices in a specific lab environment. All of the devices used in this document started with a cleared (default) configuration. If your network is live, make sure that you understand the potential impact of any command.
CMM Overview
The CMM is a hot-swap module that configures and manages all of the installed chassis components. Since the IBM chassis is used in order to host Cisco blade switches, it is good practice to understand the CMM features and functions, and how you can configure it.
Note: This is an IBM product, and IBM owns and manages it.
The CMM provides these features and functions:
- Single-chassis management
- Power control and fan management
- Chassis and compute node initialization
- Chassis management network
- Diagnostics
- Service data collection and call home services
- Resource discovery and inventory management
- Resource alerts and monitoring management
- Chassis and compute node power management
- Network management
CMM Layout
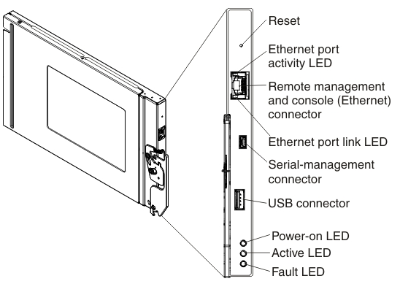
This image illustrates the physical component layout of the CMM:

Useful CMM Screens
This section describes some of the more useful CMM screens.
Note: The images in this section are taken from a web browser, while logged into the CMM module. For this example, the CMM IP address is 10.122.166.119.
Login Screen
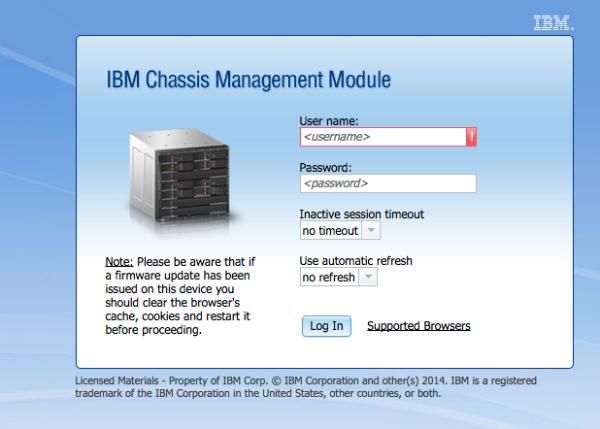
This image shows the CMM Login screen:

System Information Screen
The System Information screen provides a visual representation of the modules within the blade chassis:

Event Log Screen
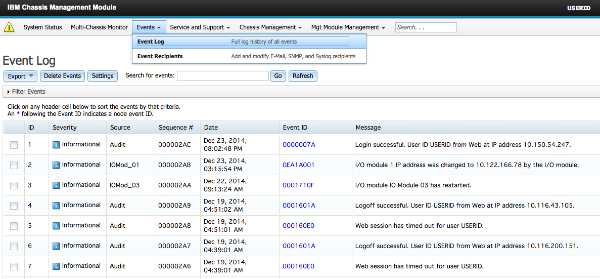
In order to check for event logs, click the Events tab and choose Event Log:

Chassis Hardware Topology Screen
In order to view the chassis hardware topology, click the Chassis Management tab and choose Hardware Topology:

As shown in these images, the CMM GUI can be easy to navigate, dependent upon the information that you desire to view in the blade chassis.
CMM Firmware Upgrades
Note: Always refer to the instructions that are provided on the IBM website about how to upgrade the CMM module. The information in this section was developed in a lab environment.
In order to upgrade the firmware of the CMM, you must download the image from the IBM website. You can run a Google search for cmm images in order to locate the correct information.
Note: You are required to use login information in order to download the firmware upgrade files, which is free through the IBM website.
Once you download the folder, unzip it and locate the xxx.uxp file. Use this file for the firmware upgrade, which takes approximately ten minutes to complete.

CMM Recovery
Complete these steps in order to reset and reconfigure the CMM from the CMM web interface:
- With a straightened paper clip or similar tool, press the Reset button for 15 seconds in order to reset the CMM to the manufacturer default settings.
Tip: For more information about the Reset button and its location, refer to the CMM controls and indicators section of the IBM Flex System information page.
- Connect an Ethernet cable from a laptop or a workstation directly to the CMM.
Note: This is necessary in order to avoid connection to a different CMM on the same subnet with the default IP address.
- Open a browser from the laptop or workstation and navigate to the CMM default IP address at https://192.168.70.100.
Note: You might be required to reconfigure your local host in order to reach the subnet.
- Log into the CMM with the default user name USERID and the default passcode PASSW0RD. You are required to change the password immediately.
- Configure the CMM with the same settings that were used before the reset.
- Optionally, you can create a second administrative user account for use in future lock-out situations.