Introduction
This document describes how to enable Quality of Service (QoS) tagging on Windows client machines.
Prerequisites
Requirements
This document assumes you have basic understanding and familiarity with QoS concepts.
Components used
This article is based on Windows 10 and 11.
Background Information
You sometimes need to configure your windows machine to override or tag the traffic they send. By default, Windows OS sets DSCP tag to '0' unless you have applications configured to mark traffic such as Webex for example.
Configure window 10 Machines to tag traffic
Add "Do not use NLA” parameter and configure the value to 1
Step 1. From the start menu open “register Editor”.
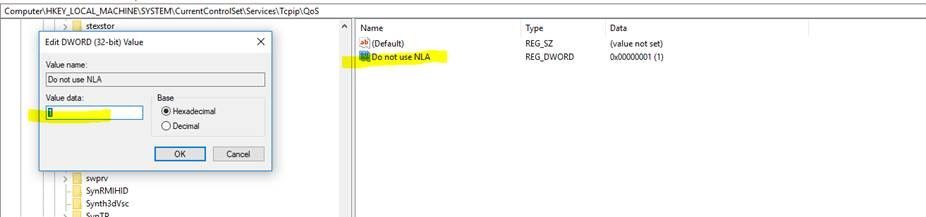
Step 2. Go to Computer\HKEY_LOCAL_MACHINE\SYSTEM\CurrentControlSet\Services\Tcpip\QoS
Step 3. If "QoS" folder does not exist , Create it as demonstrated
- Right click on Tcpip folder.
- Choose New > key.
- Name it as QoS.
Step 4. Under QoS folder add a DWORD parameter named "Do not use NLA" and assign the value to "1" .
Step 5. Reboot the PC.
Configure local group policy for all or specific application and add the DSCP value
Step 1. From start menu open “local group policy Editor”.
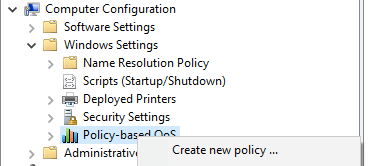
Step 2. In the Group Policy Management Editor, expand ‘Computer Configuration’, followed by ‘Windows Settings’, right-click ‘Policy-based QoS’, and then click ‘Create new policy’:
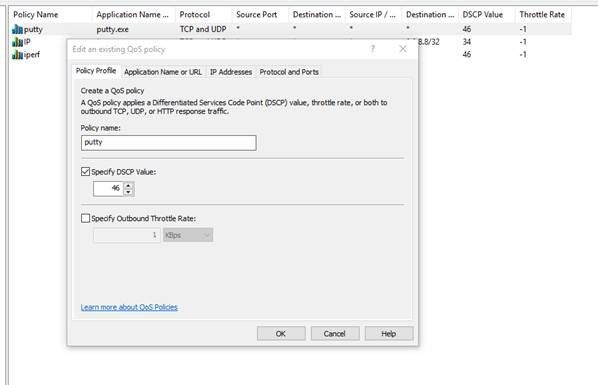
Step 3. In ‘Policy-based QoS’, type a name for the new policy. Select Specify DSCP Value and set the value to 46 or any value you want.
Step 4. Select the application that you want to use this policy or leave it for all applications.
Step 5. On the third page, configure the source and destination IPs if needed.
Step 6. On page four, choose ‘TCP and UDP’ in ‘Select the protocol this QoS policy applies to’.
Step 7. In ‘Specify the source port number’, make sure that both ‘Any source port’ and ‘Any destination port’ are selected and then click ‘Finish’.
For example Putty can be used as application to tag traffic as 46 :

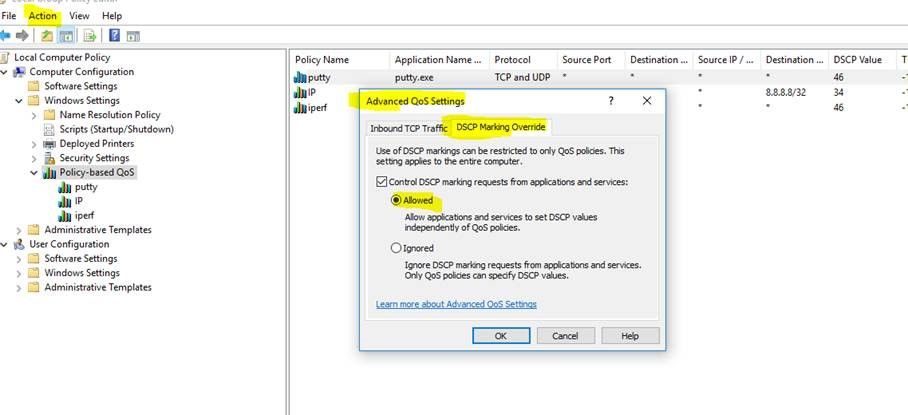
Note: In case you want to use the tag from the application , not the configured DSCP value under the group policy , make sure to configure DSCP marking Override to be Allowed.
1. From Action tab > Advanced Qos Settings > DSCP marking Override > Allowed.
Each time you do changes under the group policy make sure to do a Group Policy refreshment:
1. Run CMD as administrator
2. Run this command :C:\Windows\system32> gpupdate.exe /force.
Note : if your PC is part of group domain , make sure you are connected to that domain before doing the refresh .
Verifications
Step 1. Run CMD as administrator.
Step 2. Generate Html file : C:\Windows\system32> gpresult /H "%USERPROFILE%\Desktop\gp.html"
Step 3. Or generate .txt file :C:\Windows\system32> regedit /e "%USERPROFILE%\Desktop\gp.txt" HKEY_LOCAL_MACHINE\Software\Policies\Microsoft\Windows\QoS
For example for the putty test, you can generate the .txt file which shows the DSCP value as 46 :
[HKEY_LOCAL_MACHINE\Software\Policies\Microsoft\Windows\QoS\putty]
"Version"="1.0"
"Application Name"="putty.exe"
"Protocol"="*"
"Local Port"="*"
"Local IP"="*"
"Local IP Prefix Length"="*"
"Remote Port"="*"
"Remote IP"="*"
"Remote IP Prefix Length"="*"
"DSCP Value"="46"
"Throttle Rate"="-1".


Note: The changes depicted affects both adapters the wired and the Wireless , in case you see the DSCP tag on wired adapter but not in wireless Adapter this indicates a wireless adapter limitation.
References
Implementing QoS on Windows Environments
How To Enable Group Policy Editor (gpedit.msc) In Windows 10 Home Edition
 Feedback