ONS 15454 Release 2.2.x to 2.2.2 and 3.0 Software Upgrades
Available Languages
Contents
Introduction
With the Optical Network System (ONS) 15454 running release 2.2.x software, it is now possible for users to perform their own software upgrades to either release 2.2.2 or 3.0. This top issue documents a lab setup,which walks the reader through all of the necessary steps to complete these software upgrades.
The upgrade prerequites, pre-upgrade and post-upgrade sections of this top issue are common to both release 2.2.2 and 3.0 software upgrades. The upgrade section covers the procedures for both release 2.2.2 and 3.0 upgrades.
 Caution: Cisco recommends release 3.0.0 for new system installations, or what is commonly termed Greenfield applications only. When you upgrade from ONS 15454 release 2.2.x to 3.0.0, a condition may arise that can cause a reset of the node at the point after the upgrade process after a provisioning change is performed on the node. During testing, this condition was experienced in less than two-percent of the systems upgraded. If the node falls into this condition, traffic may be affected on provisioned circuits. If you choose to upgrade nodes to release 3.0.0, perform the upgrade within a maintenance window and follow the procedure described in the Caution note after Step 9 of the Activating the New Software Level section.
Upgrade Prerequisites
The following sections detail the hardware and software configuration prerequisites which are necessary for the upgrade. Work through each of the sections, ensuring that you meet all criteria.
Use the flowchart below to assist you with the upgrade prerequisite procedures.
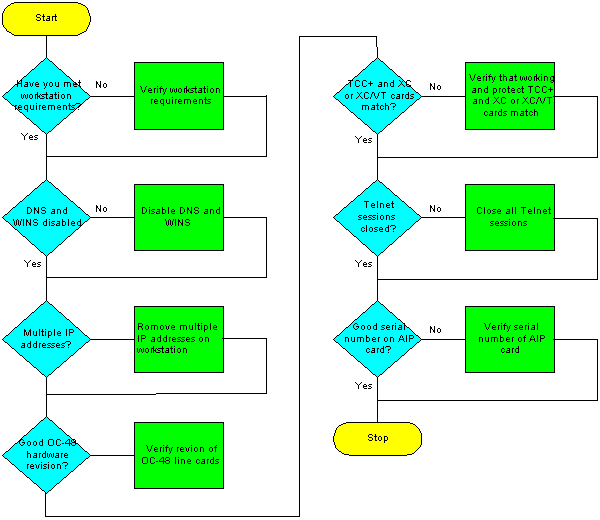
Cisco Transport Controller Workstation Requirements
The following minimum hardware and software components are necessary for the software upgrade:
-
Windows workstation using an IBM-compatible PC with a 486 or higher processor.
-
CD ROM drive, and 128 MB Random Access Memory (RAM) running Windows 95, Windows 98, Windows 2000, or Windows NT
-
Direct connection to the ONS 15454 using 10baseT Ethernet Network Interface Card (NIC) and Ethernet cable (use the CAT 5 10baseT patch cable to connect to the TCC+). For detailed instructions on directly connecting a PC to the 15454 refer, to the Troubleshooting Direct PC Connections to the Cisco ONS 15454 TCC Card top issue.
-
Browser software using either Netscape Navigator 4.08 or higher, Netscape Communicator 4.61 or higher, Internet Explorer 4.0 Service Pack 2 or higher. Note that Netscape Navigator is included on the ONS 15454 software CD shipped with the node.
-
Java ™ Policy File and Java Runtime Environment (JRE) file (included on the ONS 15454 software CD). If you do not have the CD, you can download the JRE software from the Java ™ website. Note that for release 3.0 Java Runtime Environment (JRE) file, release 1.2.2_005 or later is required.
DNS and WINS Settings
When setting up Transmission Control Protocol/Internet Protocol (TCP/IP) network properties for a workstation that will run CTC release 2.2.x, ensure that Domain Name Services (DNS) and Windoes Internet Naming Service (WINS) resolutions are disabled. WINS resolution is rarely used, but DNS is commonly used in corporate networks. When DNS is enabled, it causes the CTC to hang and requires a Timing Communicationa dn Control (TCC+) side switch at every network node to correct the lockup.
For detailed instructions on how to disable the DNS and WINS settings, refer to step 4 of the Connecting PCs to the ONS 15454 section of the ONS 15454 User Documentation.
IP Addresses
Disable all other Ethernet devices (such as a dial-up adapter) on the workstation that runs CTC. If you have multiple IP addresses on your workstation, you must remove them; you cannot install CTC release 2.2.2 if multiple IP addresses are running.
If you have multiple ONS 15454 nodes configured in the same IP subnet, only one can be connected to a router. Otherwise, the remaining nodes might be unreachable. For IP connection suggestions refer to the Common IP Addressing Scenarios for the 15454 section of the Common Issues With IP Addressing and Static Routes on the 15454 top issue.
Direct PC Connection
The front-panel Ethernet interface is changed in release 2.2.x. The permanent wire-wrap LAN connection on the backplane will communicate with the node if either TCC (A or B) is active or if the front-panel TCC connection is used. When using release 2.2.0 or greater, you can connect through either of the TCC+ RJ-45 ports regardless of which one is active.
For detailed instructions on directly connecting a PC to the 15454, refer to the Troubleshooting Direct PC Connections to the Cisco ONS 15454 TCC Card top issue.
Hardware Verification
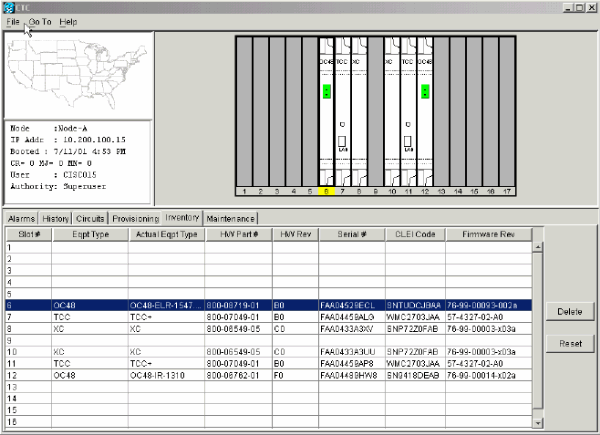
Certain hardware revisions of the Optical Carrier-48 (OC-48) Long Reach (LR) 1550 card do not support release 2.x.x software. If you have an OC-48 ring, you must verify the hardware revision on the OC-48 line cards before continuing, as shown in the steps below:
-
From the CTC node view, click the Inventory tab.
-
Click the appropriate slot containing the hardware information, as shown below:
-
If you have OC-48 LR line cards (OC48 LR 1550) with a 008C hardware revision, you will need to replace them before continuing with the software upgrade.
TCC+ Verification
You must now use CTC to check for duplex common modules, as shown in the steps below:
-
Log into the node.
-
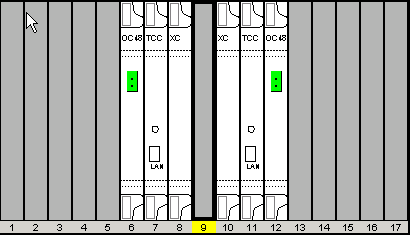
Ensure that slots 7, 8, 10, and 11 have duplicate TCC+ and Cross Connect (XC) or Cross Connect Virtual Tributary (XC-VT) cards installed. Release 2.2.x does not support simplex operation.
-
Repeat Steps 1 and 2 at every node in the network.
Telnet Sessions
Make sure all active Telnet sessions to any node in the network are closed.
Additional Superuser
A new superuser, CISCO15, was added to release 2.2.0. You can currently use the cerent454 superuser name, but this username will be phased out in a future release.
AIP Verification
-
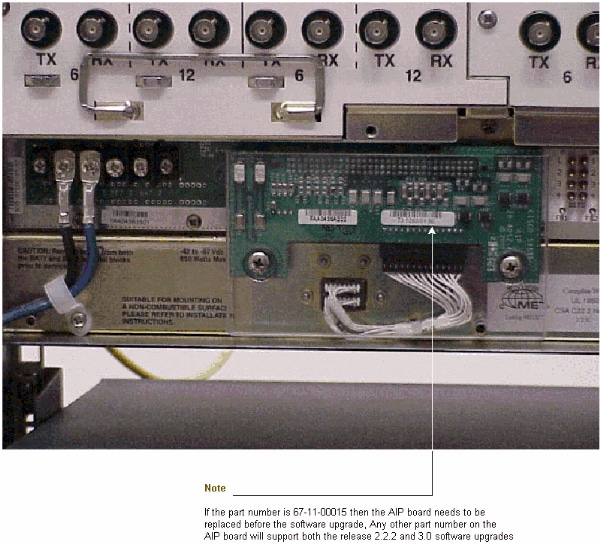
Look at the back of your ONS 15454 node and locate the green board with ATM Interface Processor (AIP) stamped into the right hand side (the writing will be sideways as you face the board).
-
Locate the sticker with the part number. The number should be preceded by P/N on the sticker.
Note: If there is no sticker with a part number, the number may be stamped into the board itself.
-
If the part number is 67-11-00015, the AIP board should be replaced. Otherwise, the AIP board will support the software upgrade.
-
Repeat steps 1-3 for all nodes in the network.
Conventions
Refer to Cisco Technical Tips Conventions for more information on document conventions.
Pre-Upgrade Procedures
The following sections detail the hardware and software configuration prerequisites which are necessary for the upgrade. Work through each of the sections, ensuring that you meet all criteria.
Use the flowchart below to assist you with the pre-upgrade procedures.
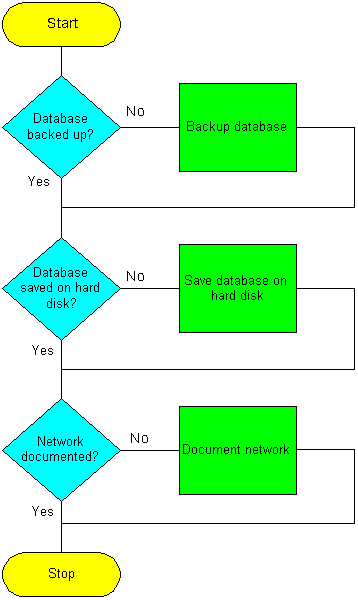
Back Up the Database
Before upgrading from release 2.2.x to release 2.2.2 or 3.0 software, it is necessary to back up the current database for each node in the network.
-
Log into CTC.
-
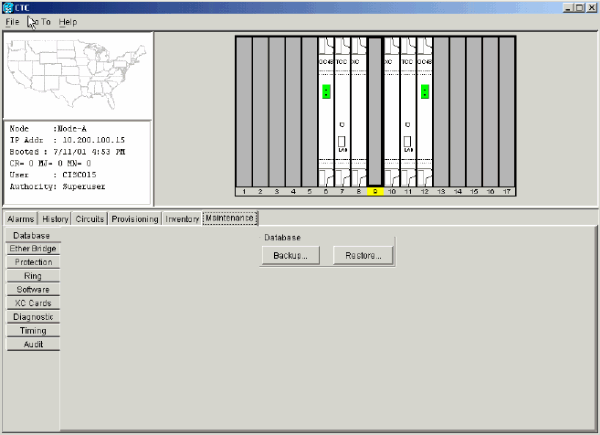
From the Node view, click the Maintenance > Database tabs, as shown below:
-
Click Backup.
-
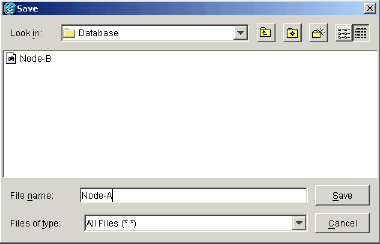
Save the database on the workstation's hard drive or on network storage. Use an appropriate file name with the file extension .db (for example, myDatabase.db).
-
Click Save. The File Received dialog box appears, as shown below:

-
Click OK.
Document the Network
Cisco recommends that you manually log critical information for each node in the network by either writing it down or printing screens where applicable. This step is optional after you have backed up the database. Use the following table to determine the information you should log. Complete the table (or your own version) for every node in the network.
| Item | Record data here (if applicable) |
|---|---|
| IP address of the node | |
| Node name | |
| Timing settings | |
| Data Communications Channel (DCC) connections; list all optical ports that have DCCs activated | |
| User IDs (List all, including at least one super user) | |
| Inventory; do a print screen from the inventory window | |
| Active TCC+ | Slot 7 or Slot 11 (circle one) |
| Active XC | Slot 8 or Slot 10 (circle one) |
| Network information; record all the information from the Provisioning tab in the network view | |
| Current configuration: BLSR, linear, etc | |
| List all protection groups in the system; do a print screen from the protection group window | |
| List alarms; do a print screen from the alarm window | |
| List circuits; do a print screen from the circuit window |
After backing up the database for each node and logging the required information for each node, you are ready to start the software upgrade.
 Caution: Temporary traffic interruption is possible during the upgrade. A traffic interruption of less than 60 ms on each circuit is possible during the activation of the new software level. For Ethernet, traffic disruption possibly lasting up to several minutes on each circuit is possible due to Spanning-Tree Protocol (STP) recalculation.
 Caution: Do not perform maintenance or provisioning activities during the upgrade.
Note: Starting with the node most directly connected to your workstation will achieve the best download performance. However, in most networks it is usually safer to begin activation at the farthest node and proceed toward the one you are most directly connected to. This ensures that no node will be at risk of being stranded if unforeseen circumstances cause the upgrade to fail. This issue is a matter of network administration policy.
Upgrade Procedures
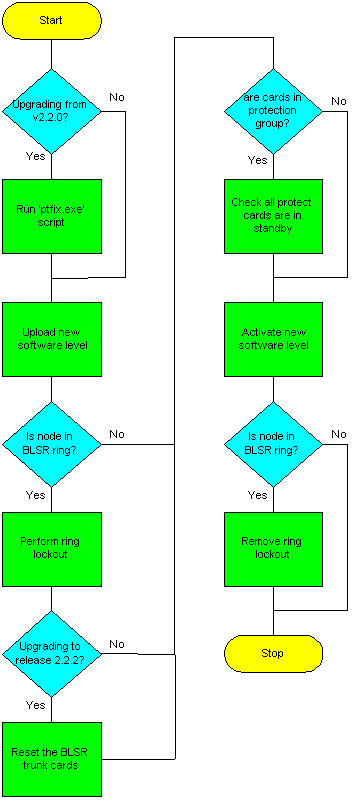
If you are upgrading from release 2.2.0, you must first run the ptfix.exe script (PC). If you are upgrading from release 2.2.1, go directly to the Uploading the New Software Level section of this document.
The TCC+ card has two flash Random Access Memories (RAMs). An upgrade uploads the software to the backup RAM on both the backup and active TCC+ cards. This does not affect traffic, as the active software continues to run at the primary RAM location. Therefore, you can upload the software at any time.
When testing the upgrade procedure for software release level 2.2.2, it was found that in a very small percentage of cases, the Bidirectional Line Switched Rings (BLSR) trunk card could hang. The workaround is to reset the BLSR trunk card. Therefore, it is recommended that if upgrading to software release level 2.2.2, it is necessary to reset the BLSR trunk cards on each node before activating the new software level.
Use the flowchart below to assist you with the upgrade procedures.
Running the ptfix.exe Script
The script ptfix.exe is required to be run the first time that you upgrade to a software level above release 2.2.0. The script performs a partition of memory on the new TCC+ card for release 2.2.1 standby/protect software and above. It changes the cluster size from 16384 to 65536 bytes. If you are upgrading from release 2.2.1, you can skip this procedure and continue with the Upload section of this document.
 Caution: Do not run the script on more than one node and one workstation at the same time.
Running the script takes approximately two to three minutes. If neceessary, you can specify the -u operand before the IP address to undo the memory partitioning.
-
Using CTC release 2.2.0, log into the farthest node from the node connected to the workstation.
-
Check the ONS 15454 for existing alarms. Resolve any outstanding alarms before proceeding.
-
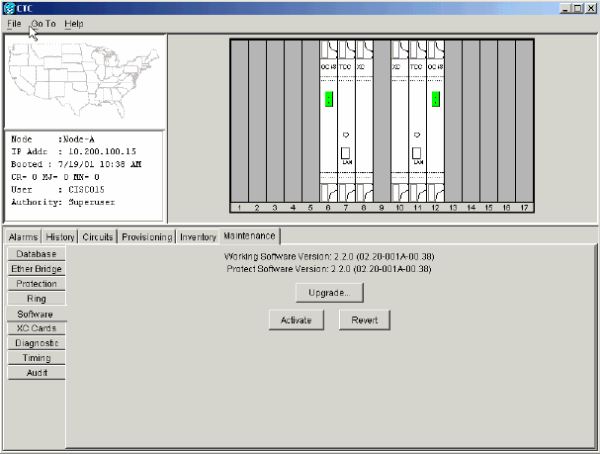
From the node view, click the Maintenance > Software tabs, as shown below:
-
Verify that the active load is 2.2.0 (02.20-001A-00.38). Note that the script will only work for the release 2.2.0 (02.20-001A-00.38) load.
-
Close all active Telnet connections to the ONS 15454.
-
In a command window, from the CD software Cisco15454 directory, run ptfix.exe using the IP address of the node you are running the script on, as shown below:
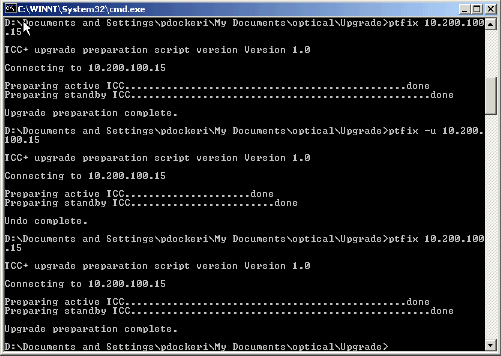
This step takes approximately two to three minutes. When the script has completed successfully, an Upgrade Preparation Complete message appears.
-
Close the CTC connection, and reconnect to the same node you were previously connected to (farthest from the node you ran the script on).
-
From the Network view, log into the node you ran the script on.
-
Click the Maintenance > Software tabs.
-
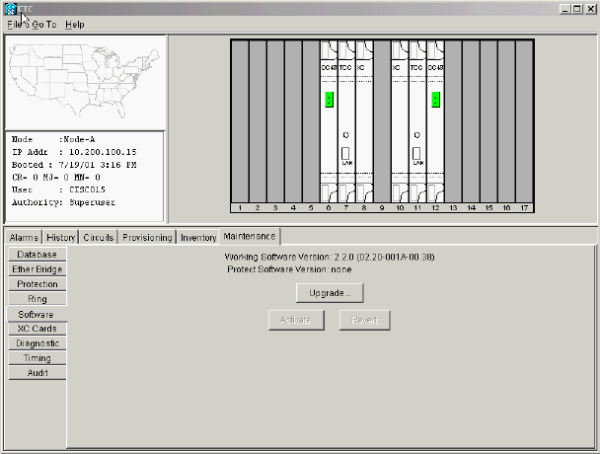
Verify that the protect software is now none, as shown below:
Note: Rerun the script if at any time the active/standby TCC+ reboots before the Release 2.2.2 load is activated.
Uploading the New Software Level
Complete these steps:
-
Check all nodes in the ring for existing alarms. Resolve any outstanding alarms or abnormal conditions before proceeding.
-
Ensure that no outstanding alarms are being declared against any synchronization facility. Clear any minor, major, or critical alarms on synchronization facilities before proceeding.
Note: Information alarms are blue in color; you can disregard these.
-
After checking and resolving alarms on all nodes, upload the new software level only to the node you started with. For release 2.2.0 upgrades, this will be the node for which you most recently ran the script.
Note: During the software upgrade process, alarms indicate that the software upgrade is taking place for the working and protect TCC+ cards. This is normal, and the alarms white out when the upgrades are complete, as shown below:

-
Return to the node you are upgrading. From the Node view, click the Maintenance > Software tabs, as shown below:

-
Click Upgrade. The Software Upgrade dialog box opens.
-
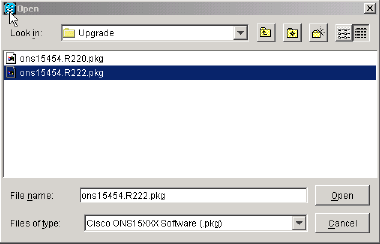
Browse the CD-ROM drive containing the new software level, and open the Cisco15454 folder, or go to the directory where you have downloaded the new software to. In the screenshot below, we are uploading from a directory called /Upgrade:
-
Select the file with the .pkg extension, and click Open. CTC displays a status window so you can monitor the upgrade process, as shown below:

After the new software level has been copied to both the active and standby TCC+ cards, a message indicating that your files transferred successfully will appear, as shown below:

Note: The upgrade process can take 30 minutes or more.
Performing the BLSR Ring Lockout
If the node is in a BLSR configuration, it is necessary to perform a ring lockout before activating the new software level. The ring lockout keeps the ring from switching (routing traffic on protect Synchronous Transport Signals (STSs)) due to bit errors caused by cards in the shelf booting during the upgrade. You must perform the ring lockout for all nodes in the BLSR ring. Complete the steps below for the ring lockout.
Note: During the lockout, BLSR spans will not be protected. Be sure to remove the lockout after activating all nodes in the ring.
Note: To prevent ring or span switching, perform the lockout on both the East and West spans of each node.
-
Perform a ring lockout to prevent switches from occuring during the upgrade by following the steps below:
-
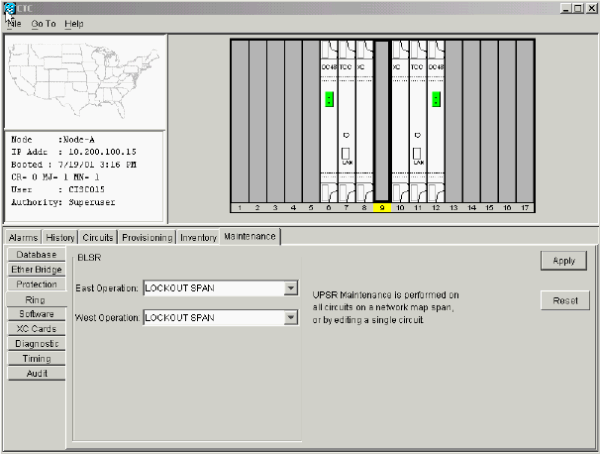
Click the Maintenance > Ring tabs.
-
Choose Lockout Span from the pull-down menus for both West and East side operation, as shown below:
-
Click Apply to activate the command. Reply Yes to the prompt. Leave the node in this state until the new software level is loaded.

Note: The lockout request alarms shown below appear when you lock out the West and East spans. In the screenshot below, Node-A is using the OC-48 card in slot 6 as its primary timing reference. Because of this, when the lockout span is applied, we see additional alarms indicating that the lockout span has caused the primary timing reference to be lost.
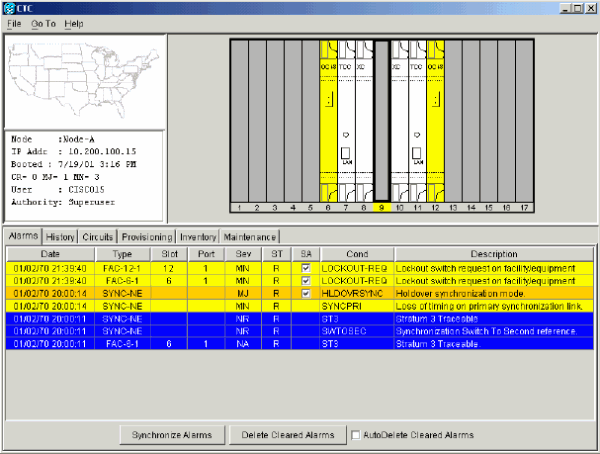
Default K alarms or alarms on the protect STS timeslots can occur during this lockout period. Ignore these alarms if they do occur.

-
-
Repeat Step 1 at every node in the BLSR.
-
When upgrading to software release level 2.2.2, it is necessary to reset the BLSR trunk cards. Note that this step is not necessary if upgrading to software release level 3.0. From the node view, individually right click on all of the BLSR trunk cards in the 15454 chassis and reset them. This is necessary to prevent the risk of the BLSR cards locking up during the loading of the new software level.
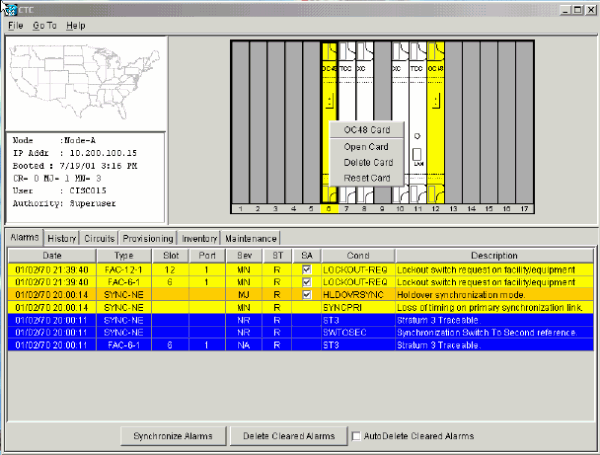
Answer Yes to the prompt, as shown below:

Note: If a BLSR card does not reset correctly, resolve the problem with BLSR card befoe continuing with the load of the new software version. Physically reseat the card if necessary. If you need to reseat the card, make sure you first release all lockouts on protection switches. Once the card is rebooted and active, issue the lockouts again.
-
Repeat Step 3 at every node in the BLSR ring.
Protection Groups
Make sure all cards that are part of a protection group (1:1 and 1:N) are active on the working card of that protection group and that no protection switches are occurring. In other words, make sure protect cards are in standby before proceeding.
Activating the New Software Level
Log in and activate each node, beginning with the farthest node in the network and ending with your workstation node.
Note: Upon activating release 3.0 software level, you may receive a series of Java exception errors. Disregard these messages, as they are due to changes instituted in the Java code base for release 3.0 that 2.2.x is unable to interpret. The Java exceptions have no adverse effect.
-
Log into the node you ran the script on.
-
Record the IP address of that node.
-
Verify that the node has no active alarms.
-
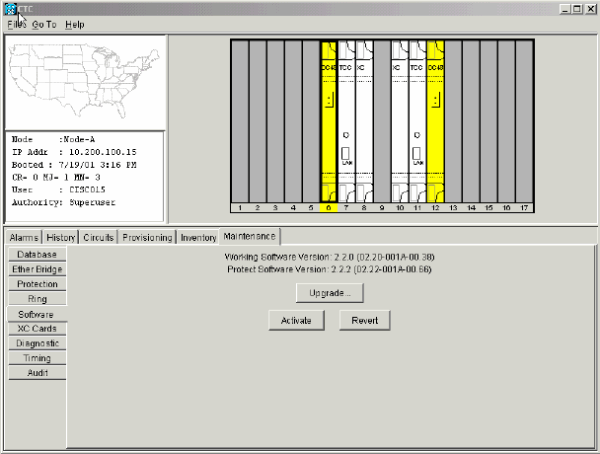
From the node view, click the Maintenance > Software tabs.
-
Verify that the protect software displays release 2.2.2 or 3.0, depending on the software level chosen for your upgrade, as shown below:
-
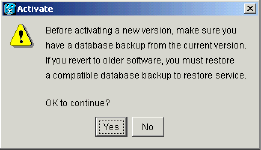
Click Activate. The Activate dialog box appears with a warning message, as shown below:
-
Click Yes to proceed with the activation. The first portion of the activation completes in two to three minutes, and issues the message shown below:

This is followed by a message confirming that activation is complete and the node will now reboot, as shown below:

-
Click OK.
-
Wait until the software upgrade finishes at that node before continuing.
Activation proceeds from the node through each card installed, beginning with the standby TCC+. Once the standby TCC+ is fully activated and fully rebooted, it becomes the active TCC+ and the other TCC+ reboots. Then, the XC or XCVT and Alarm Interface Card (AIC) reboot; next, the line cards boot from left to right one by one. The whole process takes approximately 30 minutes. This process is traffic affecting, so Cisco recommends that you activate the new load during a maintenance window. Time Division Muliplexing (TDM) traffic will endure a 50 ms or greater hit, and Ethernet traffic will take about a three to four minute hit, due to STP recalculation. After all cards have booted, the active XCVT boots again to ensure that all circuits are updated correctly. Once the active XCVT finishes this final reboot and all alarms clear, you can safely proceed to the next step.
 Caution: When you upgrade from ONS 15454 release 2.2.x to 3.0, a condition may arise during activation that can cause a reset of the node at the point after the upgrade process when a provisioning change is performed on the node. If a card fails to load the new software successfully, you may see a communication failure (CONTBUS) condition that persists after the activation is completed, indicating the node has entered this state. Once the node is in this state, provisioning changes can cause the node to go into a system-wide reset, wherein all cards (except for the card that failed to reset originally) will perform a soft reboot and reload the new software image. If the node falls into this condition, traffic may be affected on provisioned circuits.
If you see a CONTBUS alarm that does not clear after the upgrade is complete, manually reseat the card that generated the alarm.
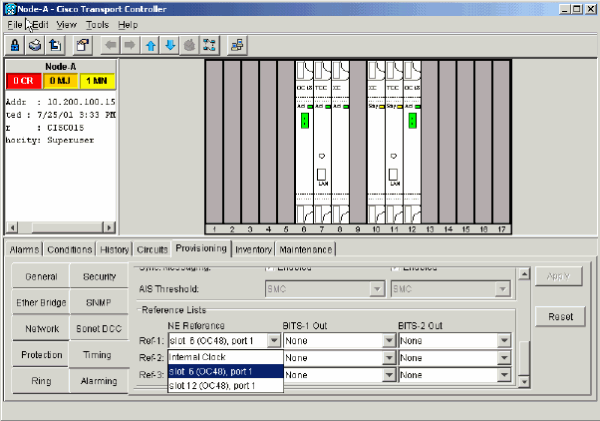
To ensure that your upgrade activation has succeeded, Cisco recommends that you execute a provisioning change to the node, as shown in the steps below:
-
In the Node view, click the Provisioning > Timing tabs, as shown below:
-
In the Reference Lists pane, change one of the NE References and click Apply.
-
Wait one minute, then change the same NE Reference back again, and click Apply.
If the problem exists, a 30 minute timer will be set in motion allowing the node reset to occur during the maintenance window, or while personnel are onsite. Look for a SYSBOOT alarm in the alarms panel for the node. If the node does not reset 30 minutes after the provisioning change and there is no SYSBOOT alarm present in the CTC alarms panel for the node, the software activation was successful.
-
-
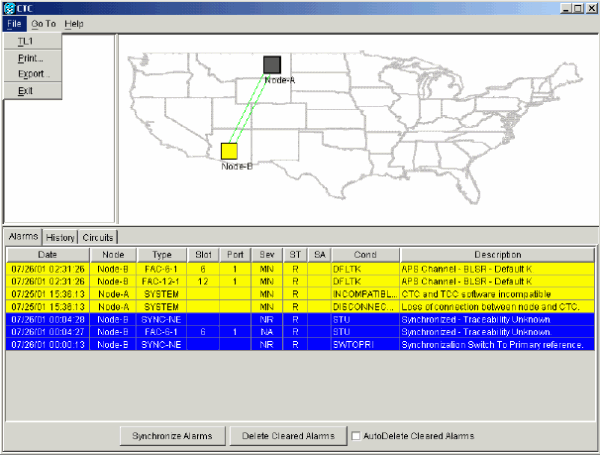
For release 2.2.2 upgrades, shut down and restart your Netscape or Internet Explorer browser. For release 3.0 upgrades from within CTC, select File > Exit, as shown in the screenshot below:
-
Reconnect to CTC using the IP address from Step 2 (if the IP address is still in the browser location bar, you can simply hold down the Shift key and click the browser Reload/Refresh button).
The release 3.0 TCC software should now download the new CTC software level for 3.0, as shown below:

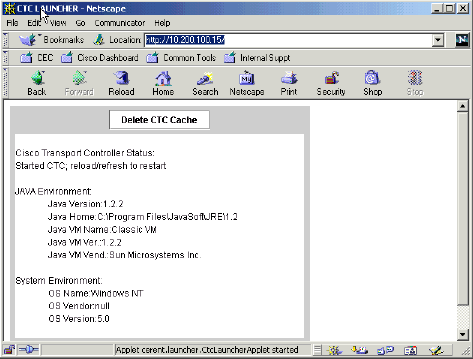
The Delete CTC Cache screen shown below should now appear. Click the Delete CTC Cache button to continue.
The new CTC applet now uploads, as shown below:
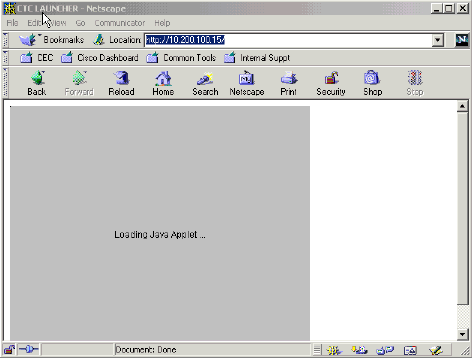
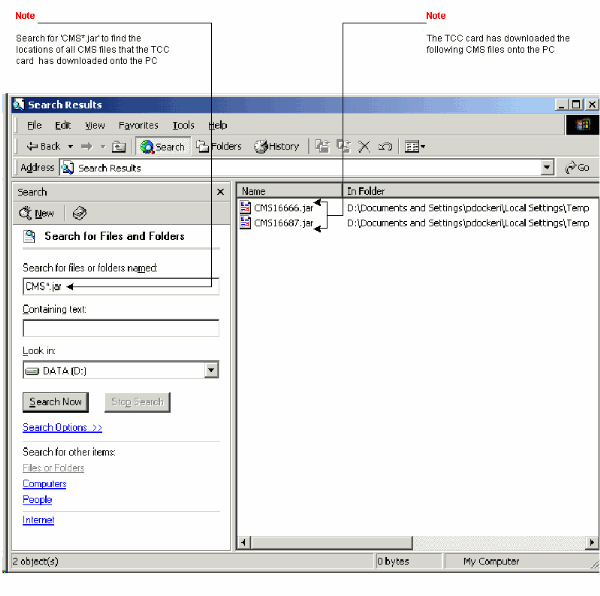
If your browser hangs when trying to reconnect to the new release 3.0 software level, try deleting the cms*.jar files from your personal computer and, try to reconnect again.
Because the new CTC applet is backwardly compatible with CTC release 2.2.x, it affords you network visibility while you are upgrading.
-
Individually log into each of the remaining nodes to be upgraded and repeat the procedures below. Each of these procedures must be performed for every node that has TCC+ cards and is running software release 2.2.x. After each node is finished, you must log out of your CTC session in Netscape to download the new Java plug-ins from the ONS 15454 node. Allow each node to finish (all alarms cleared for 10 minutes) before upgrading the next node. Refer to the sections below for more information:
-
After activating the last node (the node connected to your workstation), wait for the system to reboot.
Note: Be patient. The system might take several minutes to reboot.
Releasing the BLSR Ring Lockout
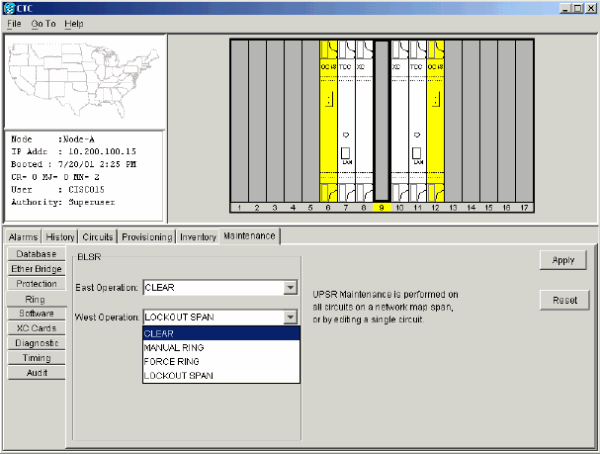
Release the span lockouts on all BLSR nodes after the new software load is activated on all nodes.
-
In CTC node view, click the Maintenance > Ring tabs.
-
Individually select the West and East directions where the lockout is active.
-
Select Clear, as shown below:
-
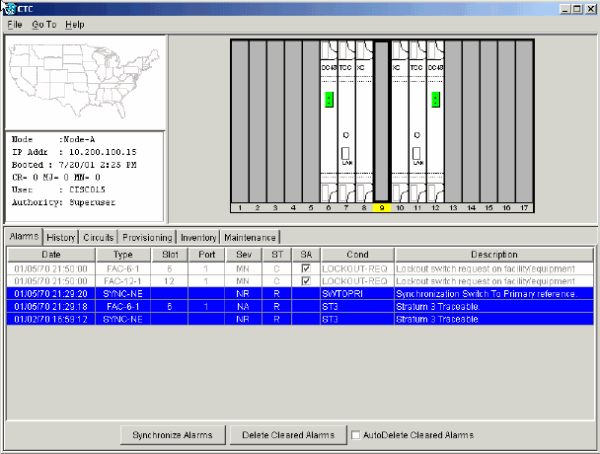
Click Apply to activate the command. Note that the ring lockout alarms now white out, as shown below:
-
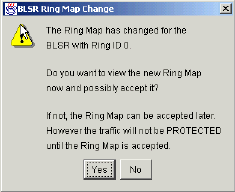
You may see the panel below asking you to invoke the ring map table and accept it to clear Default K byte or Node ID mismatch alarms:
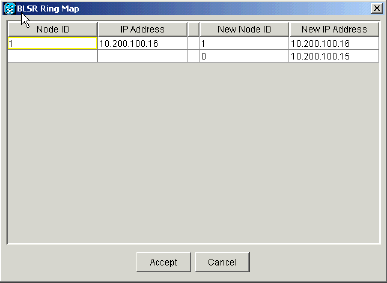
Alternatively, it may be necessary to go to the Provisioning > Ring tabs, and click the Ring Map button. Accept the ring map when prompted to do so, as shown below:
Post-Upgrade Procedures
The following are optional procedures that may be necessary if there has been a problem with the software upgrade. In the current versions of software, in order to verify that the upgrade is complete, it is necessary to recheck the circuits and provisioning information that was logged before the upgrade. Do a comparison with your notes to make sure that all provisioning is the same and the network is up carrying all of the traffic. Verify that there are no alarms being reported, or that at least the same reported alarms that were present before the upgrade are still present.
Use the flowchart below to assist you with the post upgrade procedures.
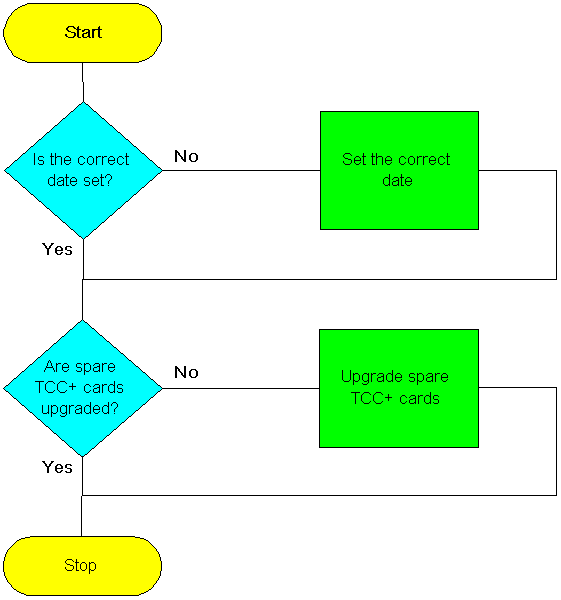
Checking That the Correct Date Is Set
The upgrade procedure can cause the date setting to change.
-
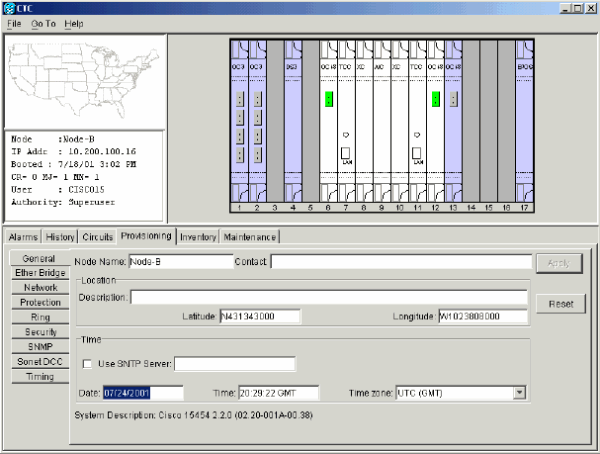
In CTC node view, click the Provisioning > General tabs.
-
Set the correct date and click Apply, as shown below:
-
Repeat Steps 1 and 2 for each remaining node.
Upgrade Spare TCC+ Units
All spare TCC+ units should be upgraded to the new software release level.
To upgrade a spare TCC+, place it in the standby slot of a node running the upgraded release level. The card will upgrade automatically from the active TCC+.
Upgrade Recovery Procedures
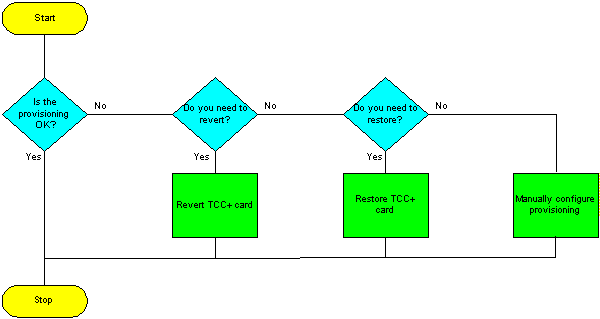
If the software upgrade has completed successfully, the procedures below are not necessary. However, in the event of a problem occuring with the software upgrade, it may be necessary to revert or manually restore the database. Use the procedures below if this becomes necessary.
Use the flowchart below to assist you with the upgrade recovery procedures.
Revert to Previous Load (TCC+ ONLY)
In certain circumstances, it may be necessary to revert to the backup database. Before upgrading from release 2.2.x to release 2.2.2 or 3.0 software, you must back up the current database at all nodes in the network (upgrade the software). Cisco highly recommends that you record or export all critical information to your hard drive. If you need to revert to the backup database, use the following procedure.
If you have a BLSR provisioned, before beginning the revert, you must perform a span lockout at each node. Follow the BLSR ring lockout procedure to perform a span lockout on a BLSR ring.
Note: To perform a supported (non service-affecting) revert from release 3.0, the release you wish to revert to must have been working at the time you activated to release 3.0 on that node. Also, a supported revert automatically restores the node configuration to its state at the time of the previous activation. Thus, any configuration changes made after activation will be lost when you revert the software.
Note: In the following procedure, the database is restored automatically as a part of the revert, only for releases 2.2.1 and later. If you were running release 2.2.0 before activation, you will need to manually restore the database after performing the steps to revert. A manual database restoration is traffic affecting, and should be performed during a service window.
-
Record the IP address of the node.
-
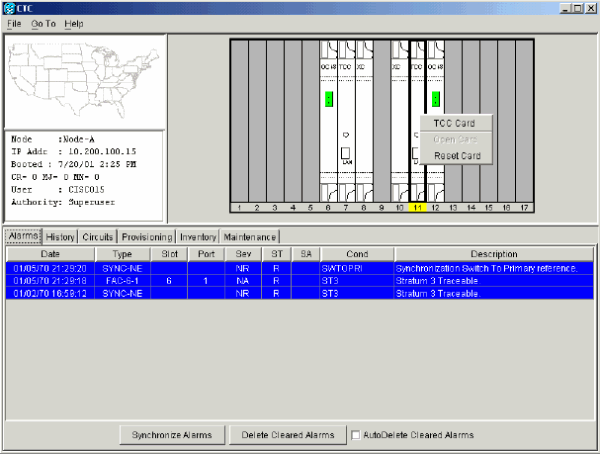
From the Node view, right-click the standby TCC+ and choose the Reset Card option, as shown below:
-
Reply Yes to the Are You Sure? dialog box asking you to confirm the choice, as shown below:

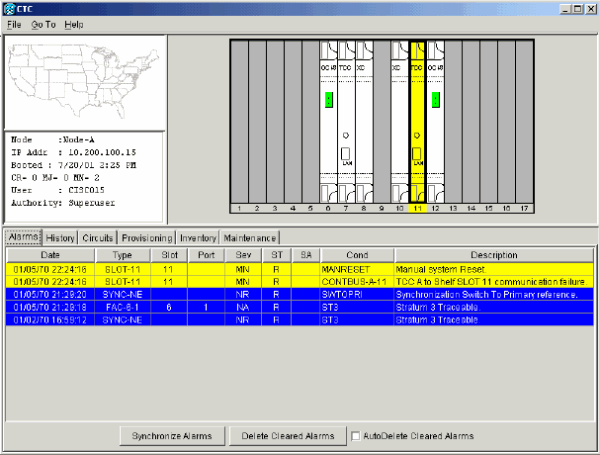
Note that resetting the card causes the system reset and TCC+ communications failure alarms, as shown below:
-
Wait for the TCC+ to finish rebooting (this will take approximately four minutes). After the TCC+ has completed rebooting, the above system reset and TCC+ communications failure alarms will white out.
-
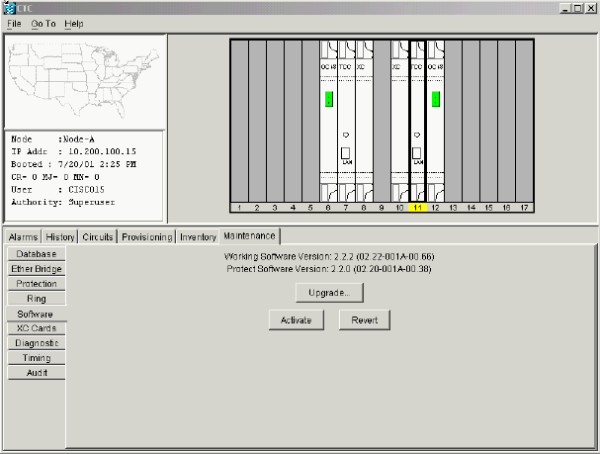
From the node view, click the Maintenance > Software tabs.
-
Verify that the protect software displays 2.2.x (the release you were upgrading from), as shown below:
-
Click Revert. Revert activates the protect software and restores the database from the previous load. A dialog box asks you to confirm the choice, as shown below:

-
Click OK. This drops the connection to the node and begins the revert. During the revert the panel below is displayed:

-
After reverting the node, the revert successful panel shown below is displayed, indicating that the node will reboot.

Select Yes, and wait until the system reboot finishes at the node before continuing. The panel below is displayed, indicating that the CTC connection to the node is lost during the reboot:

Note: Be patient. The system reboot might take up to 30 minutes to complete.
Performing the system reboot causes the system reboot alarm and multiple other alarms on the node as the individual cards are rebooted, as shown below:
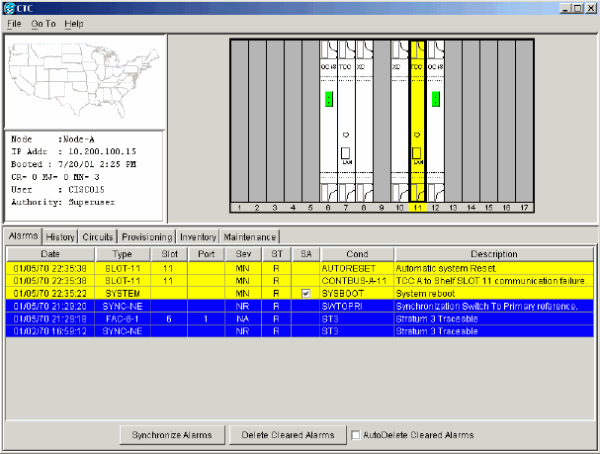
After the reboot is complete, all alarms should white out.
-
Shut down your Netscape or Internet Explorer browser.
-
Wait one minute before restoring another node.
-
After reverting all of the nodes in the network, restart the browser and log back into the last node that was reverted with the IP address that you recorded in Step 1. This uploads the appropriate CTC applet for release 2.2.x to your workstation.
If you have a BLSR provisioned and performed a ring lockout before the revert procedure, you must release the ring lockout at each node. Follow the BLSR ring lockout release procedure to release the ring lockout on a BLSR ring.
Note: If you upgraded to JRE 1.3.0, you cannot log into an ONS 15454 running release 2.2.1 or prior (or an ONS 15327 running Release 1.0.0). If you are reverting to a release that required a previous version of JRE, you will need to reinistall Java and delete the jar files from your workstation's system temp directory after reverting all of the nodes in the network. If you are reverting to a release that also uses JRE 1.3, or if you retained your older version of JRE during the upgrade, this will not be an issue.
Manually Restore the Database
If you were upgrading from release 2.2.0, or in certain other cases, it might be necessary to restore the pre-upgrade database manually.
 Caution: Do not perform these steps unless you are restoring release 2.2.0 or you attempted a software revert for a later release failed.
 Caution: This process is traffic affecting and should be performed during a service window.
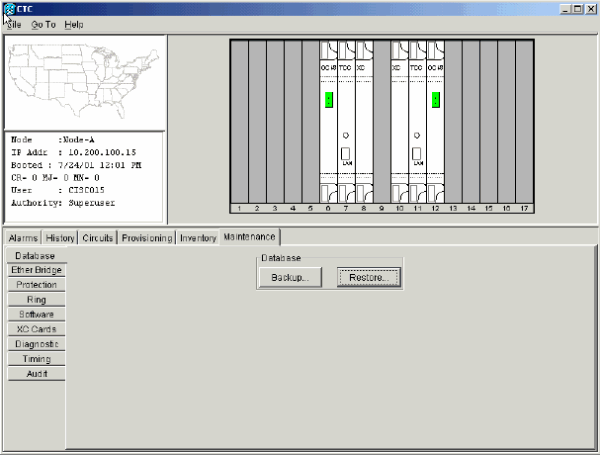
-
From the CTC node view, click the Maintenance > Database tabs, as shown below:
-
Click Restore. The Open dialog box appears.
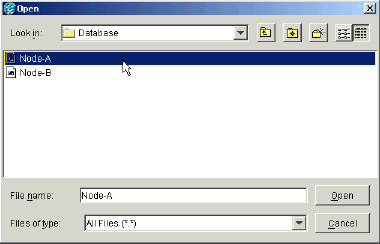
-
Select the previously-saved file and choose Open, as shown below:
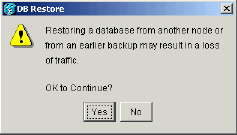
The warning panel below appears, telling you that the restore may cause a loss of traffic is displayed. Click on Yes to continue, as shown below:
The database will be restored and the TCC+s will reboot. At the end of the restore, the panel below is displayed. Click on OK to continue, as shown below:

Note that rebooting the system causes the CTC connection to the node to be lost, as displayed by the panel below:

-
Once the TCC+s have rebooted, log back into CTC and verify that the database is restored by physically checking the circuits configurations match the previous database version. Wait one minute before restoring the next node.
Related Information
Contact Cisco
- Open a Support Case

- (Requires a Cisco Service Contract)


 Feedback