Introduction
This document describes the high availability of using External Border Routing Protocol (eBGP) for connection with Cloud Service Provider (CSP).
Prerequisites
Requirements
Cisco recommends that you have knowledge of this topic:
Configure
You have two eBGP peers on the firewall for high availability to the Cloud Service Provider. Since CSPs are limited to BGP manipulation, the election of primary and secondary peers is not possible from the CSP side.
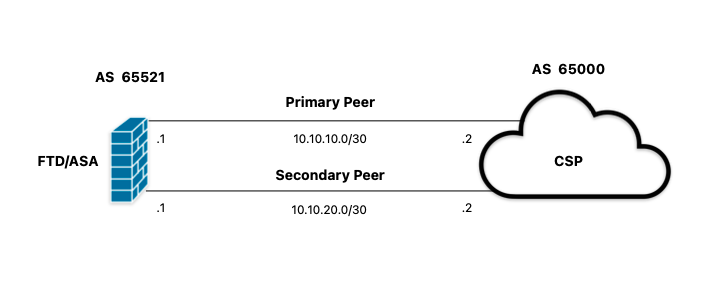 Image 1. Diagram
Procedure
Step 1. Before starting with the firewall configuration, definewhich peer use as the primary one.
Step 2. Use a local preference of 150 (the default local preference is 100) for the incoming traffic in the primary peer.
Step 3. Use AS path prepend for the outgoing traffic in the secondary peer.
Configuration on ASA
Local preference for the incoming traffic in primary peer:
route-map primary_peer_in permit 10
set local-preference 150

router bgp 65521
address-family ipv4 unicast
neighbor 10.10.10.2 route-map primary_peer_in in
AS path prepend for the outgoing traffic in secondary peer:
route-map secondary_peer_out permit 10
set as-path prepend 65521 65521

router bgp 65521
address-family ipv4 unicast
neighbor 10.10.20.2 route-map secondary_peer_out out
Configuration on SFMC
Local preference for the incoming traffic in primary peer:
Step 1. Click Objects, then click Route Map.
Step 2. Select the route map you have assigned to the BGP peer where to apply the local preference or add a new route map by clicking Add Route Map.
Step 3. Configure the name of the route map, then click Add under the Entries section.
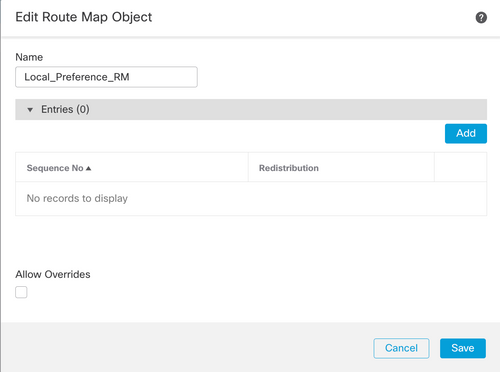 Image 2. Add route map on SFMC
Step 4. Configure at least the next basic settings:
- Sequence No. Select the number of the sequence.
- Redistribution. Select Allow.
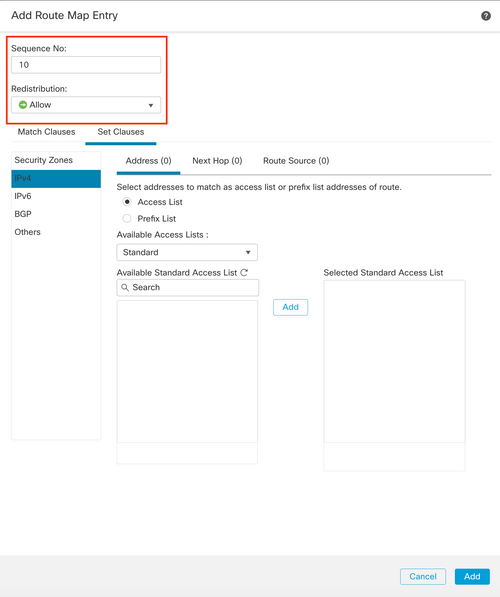 Image 3. Basic route map configuration on SFMC
Step 5. Click Set Clauses, then BGP Clauses, then Others. Set the local preference of 150 in the Local Preference section.
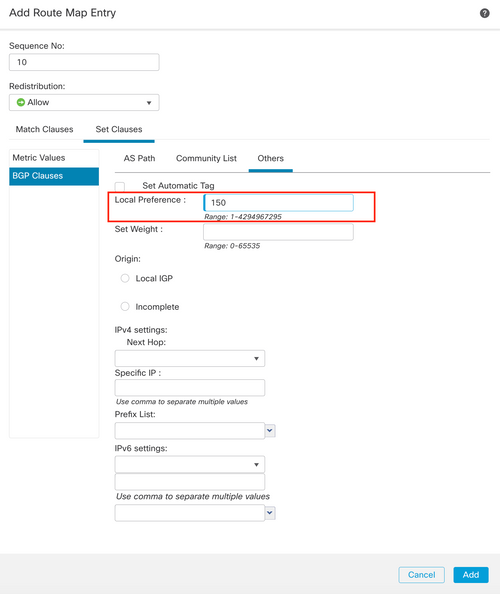 Image 4. Local preference configuration on SFMC
Step 6. Click Add, then Save.
Step 7. Click Device, then Device Management, and select the device you want to apply the local preference.
Step 8. Click Routing, then IPv4 in the BGP section, then Neighbor.
Step 9. Click the edit icon for the primary neighbor, then on the Filtering Routes section, select the route map from the dropdown menu in the Incoming traffic in the Route Map section.
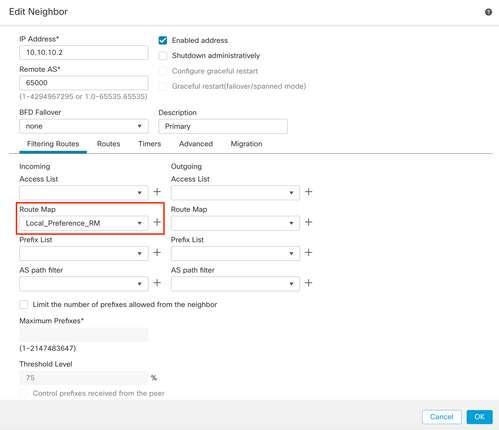 Image 5. Configure local preference on primary peer
Step 11. Click OK, then Save.
AS path prepend for the outgoing traffic in secondary peer:
Step 1. Click Objects, then click Route Map.
Step 2. Select the route map you have assigned to the BGP peer to apply the AS path prepend or add a new route map by clicking Add Route Map.
Step 3. Configure the name of the route map, then click Add under the Entries section.
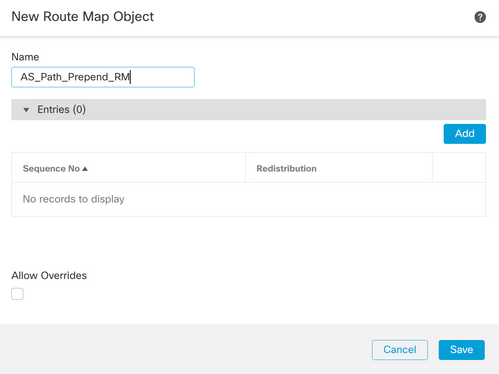 Image 6. Add route map on SFMC
Step 4. Configure at least the next basic settings:
- Sequence No. Select the number of the sequence
- Redistribution. Select Allow
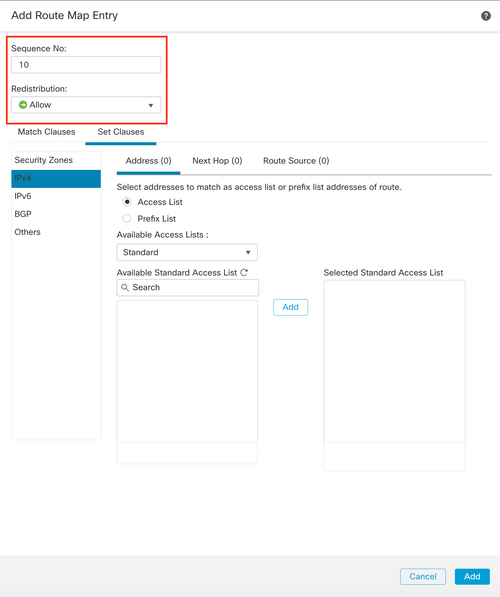 Image 7. Basic route map configuration on SFMC
Step 5. Click Set Clauses, then BGP Clauses, then AS Path. Configure the prepend option based on this:
- Prepend AS Path. Add the AS you want to add to the path separated by commas.
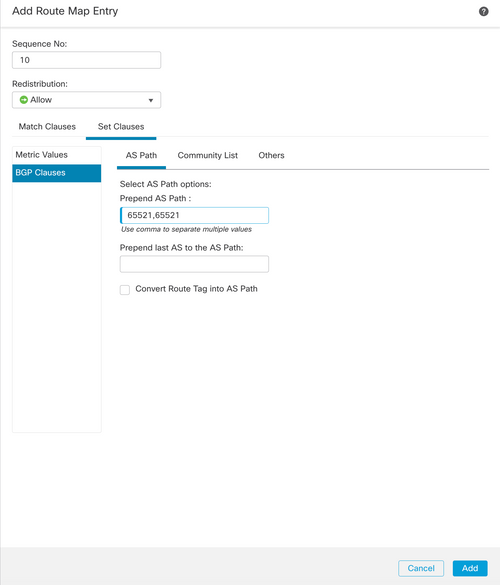 Image 8. AS path prepending configuration on SFMC
Step 6. Click Add, then Save.
Step 7. Click Device, then Device Management, and select the device you want to apply the AS path prepend.
Step 8. Click Routing, then IPv4 in the BGP section, then Neighbor.
Step 9. Click the edit icon for the secondary neighbor, then on the Filtering Routes section, select the route map from the dropdown menu in the Outgoing traffic in the Route Map section.
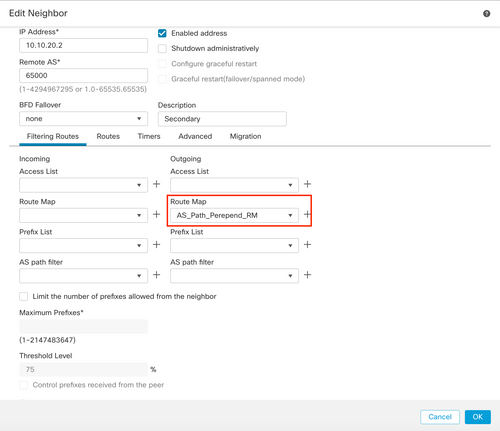 Image 9. Configure AS path prepend on secondary peer
Step 4. Click OK, then Save.
Configuration on FDM
AS path prepend for the outgoing traffic in secondary peer:
Step 1. Click Device, then click View Configuration in the Advanced Configuration section.
Step 2. Click Objects in the Smart CLI section, then click the (+) button.
Step 3. Configure the CLI object as follows:
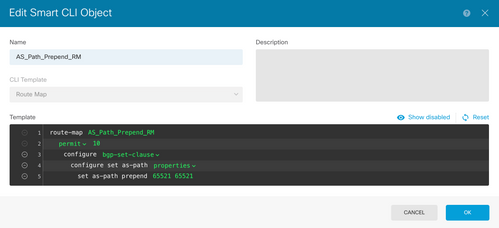 Image 10. Configure AS path prepending object on FDM
Step 10. Click OK.
Local preference for the incoming traffic in primary peer:
Step 1. Click Device, then click View Configuration in the Advanced Configuration section.
Step 2. Click Objects in the Smart CLI section, then click the (+) button.
Step 3. Configure the CLI object as follows:
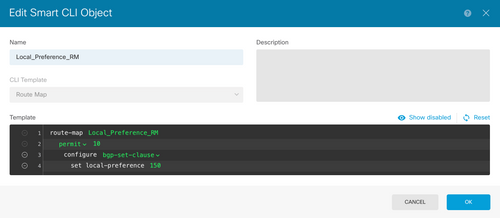 Image 11. Configure local preference object on FDM
Step 4. Click OK.
Configure the route maps into the BGP configuration:
Step 1. Click Device, then click View Configuration in the Routing section.
Step 2. Click BGP, then click the (+) button for a new BGP peer or click the edit button for the existing BGP peer.
Step 3. Configure the BGP object as shown:
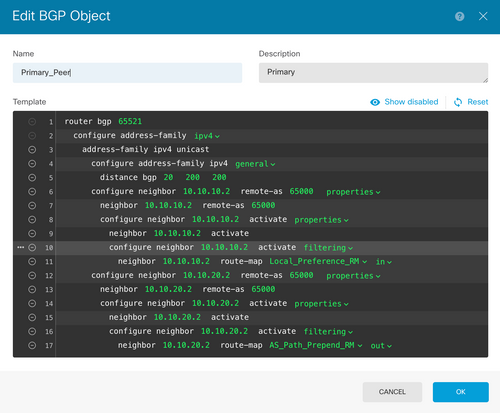 Image 12. Configure BGP peers on FDM
Step 4. Click OK.
Validation
Validate the AS path prepend and local preference are configured and assigned to the peers:
> system support diagnostic-cli
Attaching to Diagnostic CLI ... Press 'Ctrl+a then d' to detach.
Type help or '?' for a list of available commands.
firepower> enable
Password:
firepower#
firepower# show route-map Local_Preference_RM
route-map Local_Preference_RM, permit, sequence 10
  Match clauses:

  Set clauses:
    local-preference 150


firepower# show route-map AS_Path_Perepend_RM
route-map AS_Path_Perepend_RM, permit, sequence 10
  Match clauses:

  Set clauses:
    as-path prepend 65521 65521


firepower# show running-config router bgp
router bgp 65521
bgp log-neighbor-changes
bgp router-id 10.10.10.10
bgp router-id vrf auto-assign
address-family ipv4 unicast
 neighbor 10.10.10.2 remote-as 65000
 neighbor 10.10.10.2 description Primary
 neighbor 10.10.10.2 transport path-mtu-discovery disable
 neighbor 10.10.10.2 activate
 neighbor 10.10.10.2 route-map Local_Preference_RM in
 neighbor 10.10.20.2 remote-as 65000
 neighbor 10.10.20.2 description Secondary
 neighbor 10.10.20.2 transport path-mtu-discovery disable
 neighbor 10.10.20.2 activate
 neighbor 10.10.20.2 route-map AS_Path_Perepend_RM out
 redistribute connected
 no auto-summary
 no synchronization
exit-address-family
Before validating the routing table, clear the BGP peers:
clear bgp 10.10.10.2 soft in
clear bgp 10.10.20.2 soft out
Note: Use the command soft to avoid resetting the entire peer, instead, resend the routing updates only.
Validate the outgoing traffic on the primary peer using the local preference you set previously:
firepower# show bgp
BGP table version is 76, local router ID is10.10.10.10
Status codes: s suppressed, d damped, h history, * valid, > best, i - internal,
              r RIB-failure, S Stale, m multipath
Origin codes: i - IGP, e - EGP, ? - incomplete

   Network          Next Hop        Metric LocPrf Weight  Path
*  10.0.4.0/22      10.10.20.2           0             0  65000 ?
*>                  10.10.10.2           0    150      0  65000 ?
*  10.2.4.0/24      10.10.20.2           0             0  65000 ?
*>                  10.10.10.2           0    150      0  65000 ?
Validate the BGP prefixes installed on your routing table are coming from the primary peer:
firepower# show route
Codes: L - local, C - connected, S - static, R - RIP, M - mobile, B - BGP
D - EIGRP, EX - EIGRP external, O - OSPF, IA - OSPF inter area
N1 - OSPF NSSA external type 1, N2 - OSPF NSSA external type 2
E1 - OSPF external type 1, E2 - OSPF external type 2, V - VPN
i - IS-IS, su - IS-IS summary, L1 - IS-IS level-1, L2 - IS-IS level-2
ia - IS-IS inter area, * - candidate default, U - per-user static route
o - ODR, P - periodic downloaded static route, + - replicated route
SI - Static InterVRF
Gateway of last resort is not set

B        10.0.4.0 255.255.252.0 [20/0] via 10.10.10.2, 01:04:17
B        10.2.4.0 255.255.255.0 [20/0] via 10.10.10.2, 01:04:17
Related Information


 Feedback