Introduction
This document describes a checklist of things to look for if the HyperFlex (HX) servers integrated with Cisco Unified Computing System Management (UCSM) are failing to discover.
Before you Begin
Tip: Make sure the server Cisco Integrated Management Controller (CIMC) is set to factory default settings to integrate with Cisco UCS Manager.
Scenario 1 (Adapter Slot Population)
For HyperFlex servers (example shows a C240M5) make sure that the modular LAN on Motherboard (MLOM) slot is cabled to the Fabric Interconnects (FIs) so discovery can occur.
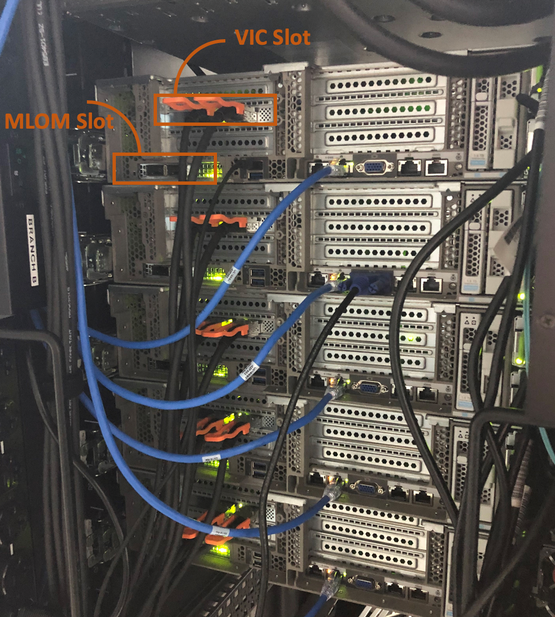
In this scenario, the server will not discover because the Virtual Interface Card (VIC) slot is being plugged into the FIs.
MLOM slot should be plugged into the FIs for discovery to complete. (MLOM is mandatory for discovery of HyperFlex servers)
Reference: SingleConnect Integration with Cisco UCS Manager
Scenario 2 (Discovery and Management Connection Policy)
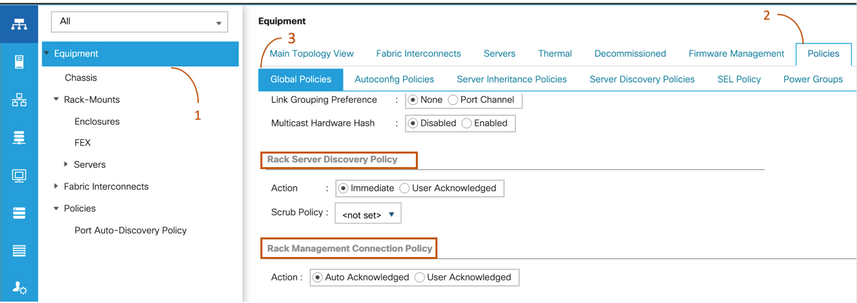
Make sure the Rack server Discovery Policy and the Rack Management Connection Policy have not be altered
-
Auto Acknowledged: This is the recommended and default connection mode for theC-Series Rack-Mount Server. If the connection mode is auto-acknowledged, immediately after establishing the physical connection,Cisco UCS Managerdiscovers the rack server and starts managing the server based on the specified management policy.
-
User Acknowledged: If the connection mode is user-acknowledged, after establishing the physical connection, you must manually acknowledge the connection and specify the connection mode in theCisco UCS Manager GUIorCisco UCS Manager Command Line Interface (CLI)to begin the discovery.Cisco UCS Managerdoes not begin theC-Series Rack-Mount Serverdiscovery until you specify the connection mode.
Scenario 3 (Connecting VIC 1400s to FIs)
When plugging in the VIC 1400's to the FIs be mindful of the criterias below.
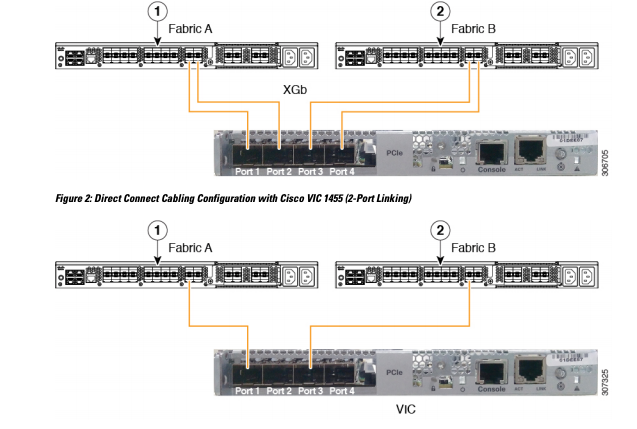
The following images show a sample of direct connect mode physical connectivity for C-Series Rack-Mount
Server with Cisco UCS VIC 1455. The port connections remain the same for Cisco UCS VIC 1457.
Warning: Use of 25GE passive copper cables is not recommended. For more information, see CSCvq50343 and CSCvq38756
Note The following restrictions apply:
Ports 1 and 2 must connect to same Fabric Interconnect, i.e. Fabric-A.
Ports 3 and 4 must connect to same Fabric Interconnect, i.e. Fabric-B.
This is due to the internal port-channeling architecture inside the card.
Ports 1 and 3 are used because the connections between ports 1 and 2 (also 3 and 4) form an internal port-channel.
Caution: Do not connect port 1 to Fabric Interconnect A, and port 2 to Fabric Interconnect B.
Use ports 1 and 3 only. Using ports 1 and 2 results in discovery and configuration failures.
Scenario 4 (Link Training)
Cisco 40Gbps VIC/MLOM (1300/1400) cards have options for speed/training.
These options are (depending on model/firmware/CIMC):
| Admin Speed |
Link Training |
| 40Gbps |
OFF |
| 40Gbps |
On |
| 4x10Gbps |
OFF |
| Auto |
OFF |
| Auto |
ON |
If the wrong speed/training is chosen, then the links may not come up and will not get "link light."
Often this is mistaken for a "bad card" as isolation troubleshooting leads to the "bad card" being the common factor of non-working state.
To resolve for a UCSM Integrated server
- Connect keyboard/monitor
- [F8] to configure CIMC and enter Internet Protocl (IP) address (Configure CIMC)
- Connect the management port to network/laptop
- Access newly configured CIMC IP to access CIMC Web Graphical User Interface (GUI) and make the following changes
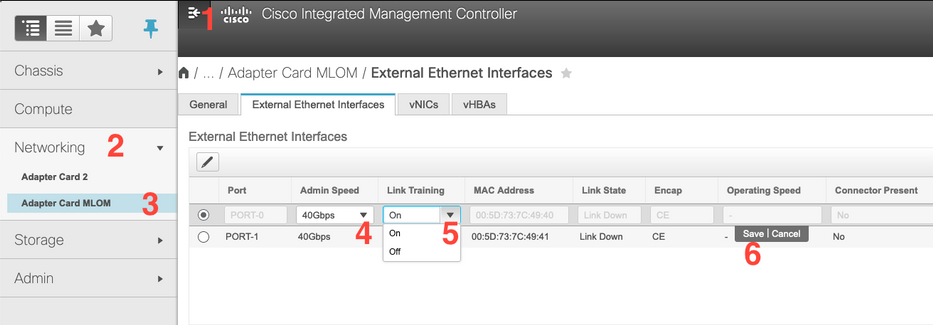
View VIC configuration via CIMC web GUI
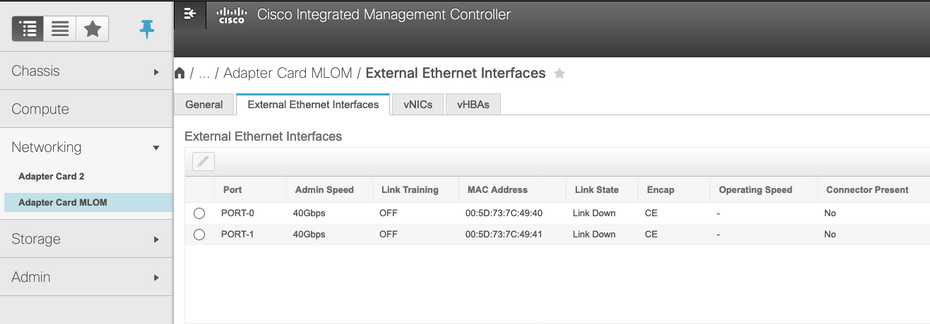
Change Admin Speed

Change Link Training
Reset to Factory Default
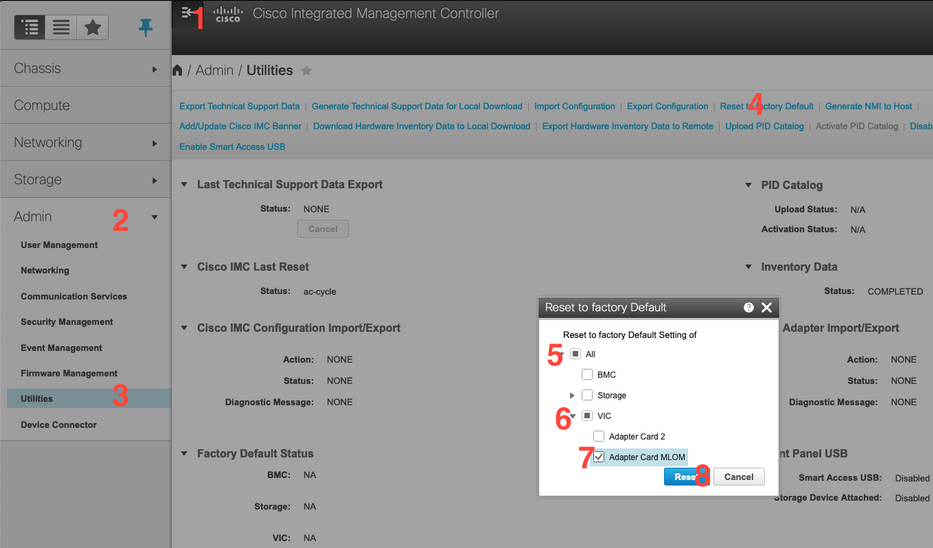
Doing a "reset to factory" from the BIOS/[F8] menu may not reset the VIC configuration.
Resetting via the CIMC web GUI does give the option to reset the VIC configuration to factory default.
5. Reboot Server and perform CIMC Reset to Factory Defaults. (Press the “F8” key to enter the “CIMC Config”, Under Factory Defaults select "CIMC Factory Default. Hit F10 to Save)
6. Pull Power cables for 30 seconds.
7. Reconnect 10G cables.
8. Reconnect power cables and power on.
This will start the re-discovery process.
Note: This behavior is tracked as a part of defect CSCvq21079
Scenario 5 (Software Version Mismatch)
If the Hyperlfex server came in with a CIMC version lower than what is required to enable it to discover in UCSM, the server will not discover
For instance, if we are integrating a HX240c M5 server with 6400 series FIs, then the minimum version of CIMC for a HX240c M5 is 4.0(1a)
|
Servers
|
Minimum Software Version
UCS 6200 Series FI
|
Minimum Software Version
UCS 6332, 6332-16UP
|
Minimum Software Version
UCS 6454
|
Recommended Software Version
UCS 6200 Series FI
UCS 6332, 6332-16UP FI
UCS 6454
|
|
C240 M5
|
3.2(1d)
|
3.2(1d)
|
4.0(1a) |
4.0(4f)
|
Reference: Minimum Host Firmware Versions for Rack Servers to Integrate with UCSM
The only way of making sure that this was the case is to convert the server into a standalone server (Configure CIMC) and upgrade the firmware with the Host Upgrade Utility (HUU). (Upgrading Firmware with HUU)
After you have upgraded the server to the appropriate level of CIMC:
1. Reboot Server and perform CIMC Reset to Factory Defaults. (Press the “F8” key to enter the “CIMC Config”, Under Factory Defaults select "CIMC Factory Default. Hit F10 to Save)
2. Pull Power cables for 30 seconds.
3. Reconnect 10G cables.
4. Reconnect power cables and power on.
This will start the re-discovery process.
Scenario 6 (Check Services of FI)
If the HX server is in line with the recommended version to be intergrated with UCSM and still fails to discover with 6400 FIs on any 4.0 UCSM firmware:
Check the "show pmon state" on the FIs and see if only two pmon services show running.
UCS-A(local-mgmt)# show pmon state
svc_sam_samcproxy running 0(4) 0 0 no
svc_sam_samcstatsproxy running 0(4) 0 0 no
Note: This is being tracked as a part of defect CSCvo64592  .
.
